AI-Assisted Development
Development Phase Frontend
Creating a UI
In this guide, we'll build a simple user interface that lets users upload an image for optimization. The interface allows users to select an image, adjust the quality slider, and submit the file for processing to an API endpoint. This tutorial uses React for the front-end development.
Initializing the React Application
Begin by setting up your React application. The code below imports the required modules and renders the root component:
import { StrictMode } from 'react';
import { createRoot } from 'react-dom/client';
import App from './App.jsx';
createRoot(document.getElementById('root')).render(
<StrictMode>
<App />
</StrictMode>
);
After launching the development server, you should observe output similar to the following in your console:
VITE v5.4.11 ready in 105 ms
Local: http://localhost:5173/
Network: use --host to expose
press h to show help
Setting Up Global Styles
Your application’s base styles are defined in the index.css
file. These styles provide a foundational design for fonts, links, and backgrounds:
/* index.css */
:root {
font-family: Inter, system-ui, Avenir, Helvetica, Arial, sans-serif;
line-height: 1.5;
font-weight: 400;
color: scheme(light dark);
background-color: rgba(255, 255, 255, 0.87);
}
a {
font-synthesis: none;
color: #646cff;
text-decoration: inherit;
}
a:hover {
color: #353bfa;
}
body {
}
The development server output might update as seen here:
VITE v5.4.11 ready in 185 ms
Local: http://localhost:5173/
Network: use --host to expose
press h enter to show help
At this point, the basic HTML structure is visible, featuring a heading for the image optimizer and a file input element. The next step is to implement the upload functionality in App.jsx
.
Building the Image Optimizer Component
Start by creating a basic component in App.jsx
that displays a heading and a file input field:
import React, { useState } from 'react';
import reactLogo from '/assets/react.svg';
import './App.css';
function App() {
const [count, setCount] = useState(0);
return (
<>
<h1>Image Optimizer</h1>
<input type="file" />
</>
);
}
export default App;
After saving your file, you should see a console message similar to:
1:41:38 PM [vite] hmr update /src/App.jsx
This confirms that App.jsx
is correctly integrated into your project.
Handling Image Uploads and Form Submission
Next, enhance the component by adding image upload handling and form submission. This version introduces state management for the selected image and builds a form that submits the image to your API endpoint. A callout alerts users if no image is selected:
import React, { useState } from 'react';
import reactLogo from './assets/react.svg';
import './App.css';
function App() {
const [selectedImage, setSelectedImage] = useState(null);
const handleSubmit = async (e) => {
e.preventDefault();
if (!selectedImage) {
alert('Please select an image first');
return;
}
const formData = new FormData();
formData.append('image', selectedImage);
try {
const response = await fetch('YOUR_API_ENDPOINT', {
method: 'POST',
body: formData,
});
if (response.ok) {
const data = await response.json();
console.log('Upload successful:', data);
} else {
console.error('Upload failed');
}
} catch (error) {
console.error('Error uploading image:', error);
}
};
return (
<div>
<h1>Image Optimizer</h1>
<form onSubmit={handleSubmit} className="upload-form">
<input
type="file"
accept="image/*"
onChange={(e) => setSelectedImage(e.target.files[0])}
/>
<button type="submit">Upload</button>
</form>
</div>
);
}
export default App;
Note
Make sure to replace 'YOUR_API_ENDPOINT'
with your actual endpoint before deploying the application.
Adding a Quality Slider
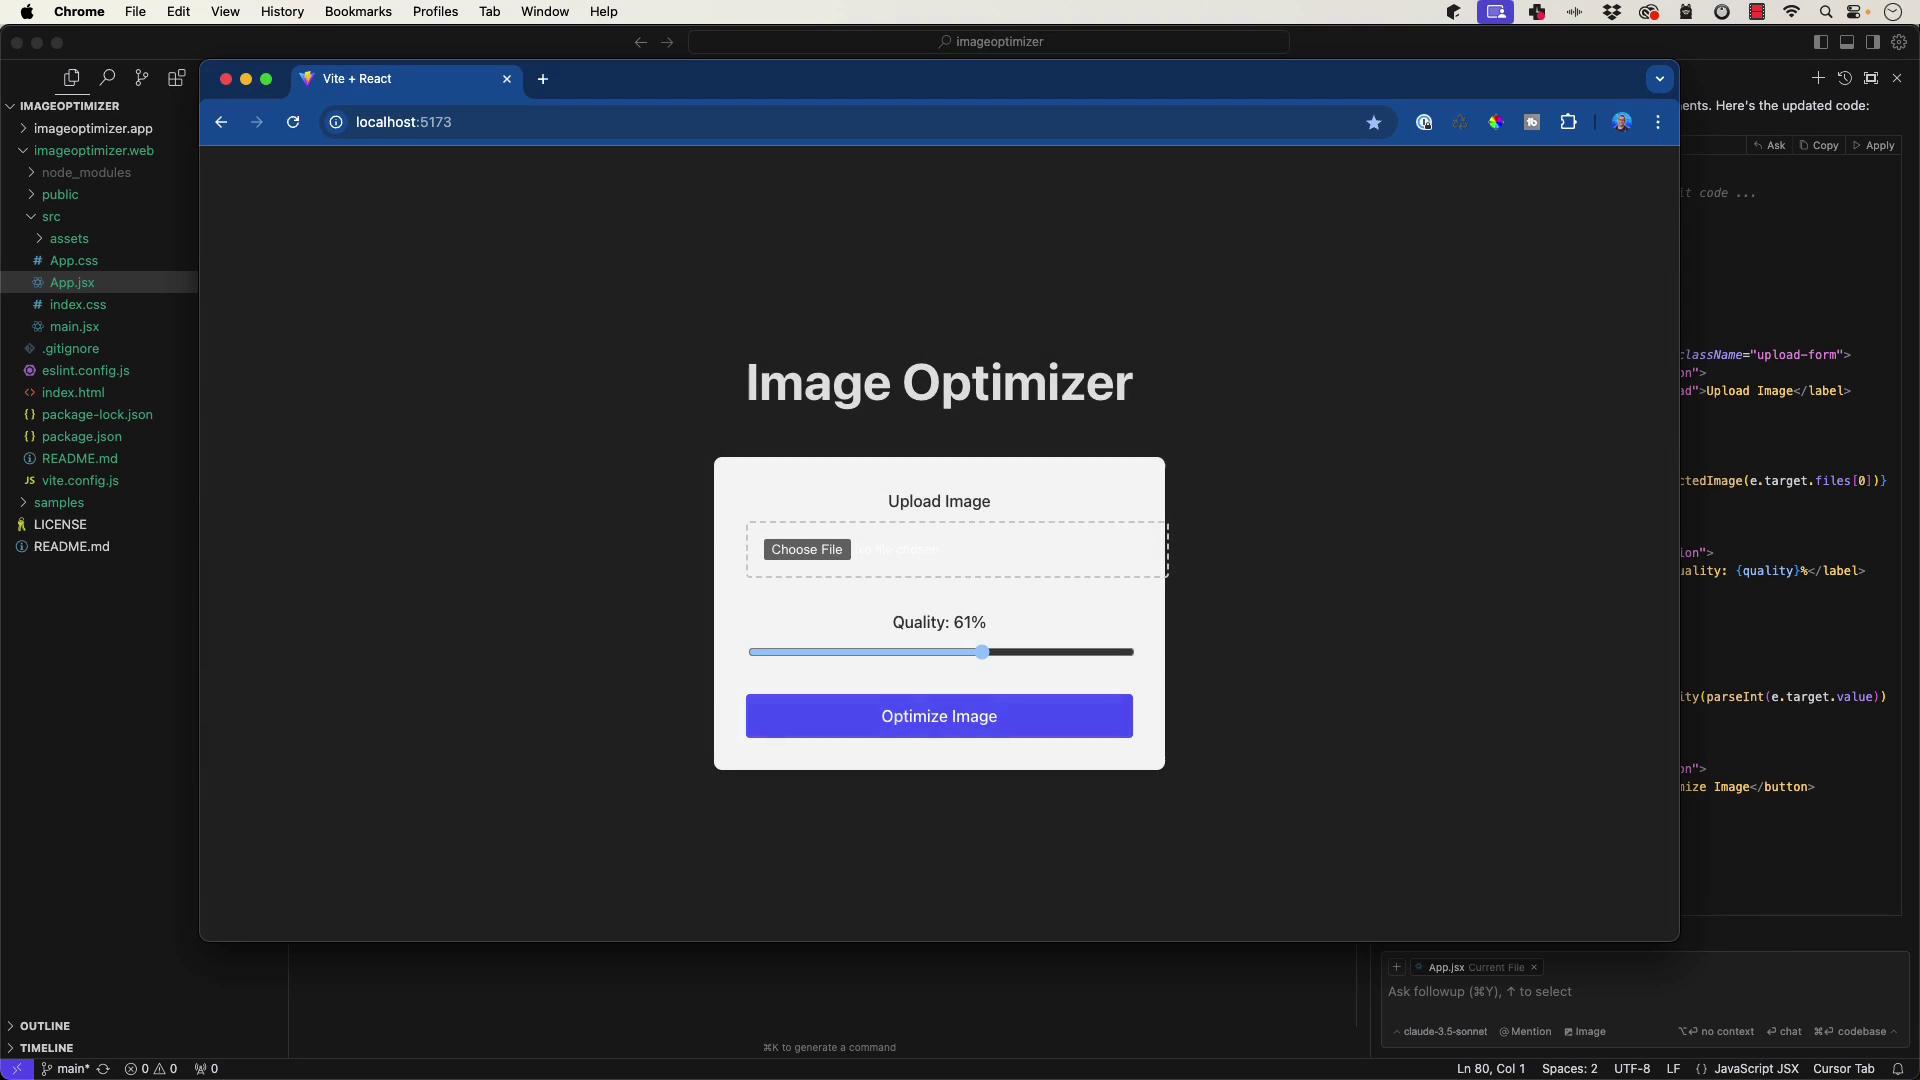
To further enhance the user experience, add a slider to control the quality parameter for image compression. The slider ranges from 0 to 100. The following code updates the form to include the quality slider and passes the slider value to the API:
import React, { useState } from 'react';
import reactLogo from './assets/react.svg';
import './App.css';
function App() {
const [selectedImage, setSelectedImage] = useState(null);
const [quality, setQuality] = useState(80); // Default quality value
const handleSubmit = async (e) => {
e.preventDefault();
if (!selectedImage) {
alert('Please select an image first');
return;
}
const formData = new FormData();
formData.append('image', selectedImage);
formData.append('quality', quality);
try {
const response = await fetch('YOUR_API_ENDPOINT', {
method: 'POST',
body: formData,
});
if (response.ok) {
const data = await response.json();
console.log('Upload successful:', data);
} else {
console.error('Upload failed');
}
} catch (error) {
console.error('Error uploading image:', error);
}
};
return (
<div>
<h1>Image Optimizer</h1>
<form onSubmit={handleSubmit} className="upload-form">
<input
type="file"
accept="image/*"
onChange={(e) => setSelectedImage(e.target.files[0])}
/>
<div className="quality-control">
<label htmlFor="quality">Quality:</label>
<input
type="range"
id="quality"
min="0"
max="100"
value={quality}
onChange={(e) => setQuality(parseInt(e.target.value))}
/>
</div>
<button type="submit">Optimize Image</button>
</form>
</div>
);
}
export default App;
This update introduces the quality slider just above the submit button and ensures that if no image is selected, a prompt will alert the user accordingly.
Improving Layout with a Grid System
A clean, responsive layout enhances usability. Use a grid layout to neatly arrange your components. First, update your component structure in App.jsx
:
import React, { useState } from 'react';
import reactLogo from './assets/react.svg';
import './App.css';
function App() {
const [selectedImage, setSelectedImage] = useState(null);
const [quality, setQuality] = useState(80); // Default quality value
const handleSubmit = async (e) => {
e.preventDefault();
if (!selectedImage) {
alert('Please select an image first');
return;
}
const formData = new FormData();
formData.append('image', selectedImage);
formData.append('quality', quality);
try {
const response = await fetch('YOUR_API_ENDPOINT', {
method: 'POST',
body: formData,
});
if (response.ok) {
const data = await response.json();
console.log('Upload successful:', data);
} else {
console.error('Upload failed');
}
} catch (error) {
console.error('Error uploading image:', error);
}
};
return (
<div className="container">
<header className="header">
<h1>Image Optimizer</h1>
</header>
<main className="main-content">
<form onSubmit={handleSubmit} className="upload-form">
<div className="upload-section">
<label htmlFor="image-upload">Upload Image:</label>
<input
id="image-upload"
type="file"
accept="image/*"
onChange={(e) => setSelectedImage(e.target.files[0])}
/>
</div>
<div className="quality-section">
<label htmlFor="quality">Quality: {quality}%</label>
<input
type="range"
id="quality"
min="0"
max="100"
value={quality}
onChange={(e) => setQuality(parseInt(e.target.value))}
/>
</div>
<div className="button-section">
<button type="submit">Optimize Image</button>
</div>
</form>
</main>
</div>
);
}
export default App;
Then, update your CSS (in App.css
) to implement the grid layout:
.container {
max-width: 1200px;
margin: 0 auto;
padding: 2rem;
}
.header {
text-align: center;
margin-bottom: 3rem;
}
.main-content {
display: grid;
place-items: center;
}
.upload-form {
display: grid;
gap: 2rem;
max-width: 600px;
padding: 2rem;
background: #f5f5f5;
border-radius: 8px;
box-shadow: 0 2px 4px rgba(0, 0, 0, 0.1);
}
.upload-section,
.quality-section,
.button-section {
display: grid;
gap: 0.5rem;
width: 100%;
}
.upload-section input[type="file"] {
box-sizing: border-box;
padding: 0.5rem;
border: 2px dashed #ccc;
border-radius: 4px;
width: 100%;
cursor: pointer;
}
.quality-section input[type="range"] {
width: 100%;
}
button {
background: #646cff;
color: white;
padding: 0.8rem 1.5rem;
border: none;
border-radius: 4px;
}
/* Optional: Ensure a consistent box-sizing across elements */
*, *::before, *::after {
box-sizing: border-box;
}
@media (prefers-reduced-motion: no-preference) {
.card {
padding: 2em;
}
.read-the-docs {
color: #888;
}
}
The CSS above creates a responsive grid layout where the upload section, quality control, and button are evenly spaced and centered.
Notice that the dashed border around the file input has been adjusted using padding and box-sizing properties. The button styling was also refined for better consistency.
Refining the Page Background
To further improve the overall look, set a background color for the page. The CSS below ensures that both the body and the root container have a clean and consistent background:
body {
background-color: #ffffff; /* Adjust this color as needed */
}
#root {
background-color: #ffffff;
max-width: 1280px;
margin: 0 auto;
padding: 2rem;
text-align: center;
}
After applying these changes, your final design will feature a responsive layout with a clean background and centered form elements, ensuring a user-friendly experience.
At this stage, the interface includes all required features: selecting a file, adjusting the quality parameter via a slider, and optimizing the image using a neatly arranged grid layout.
Next Steps
In the next article, we will cover how to integrate the backend and process the image through the API endpoint.
For more information on related topics, check out these resources:
Watch Video
Watch video content