> ## Documentation Index
> Fetch the complete documentation index at: https://notes.kodekloud.com/llms.txt
> Use this file to discover all available pages before exploring further.
# Amazon EC2
> Concise walkthrough for launching, configuring, connecting to, and terminating Amazon EC2 instances, covering AMI choice, instance types, key pairs, security groups, and basic lifecycle operations
This article is a concise, step-by-step walkthrough for launching, inspecting, connecting to, and terminating an Amazon EC2 instance. It covers the EC2 launch wizard, choosing an AMI and instance type, creating or selecting a key pair for SSH, configuring networking and security groups, and basic instance lifecycle actions.
Access the EC2 console and launch an instance
* In the AWS Console search bar type "EC2" and open the EC2 service.
* Verify you're in the intended AWS Region (this guide uses us-east-1). The UI and steps are the same across regions.
* Click Launch instance (or go to Instances → Launch instances) to open the EC2 launch wizard.
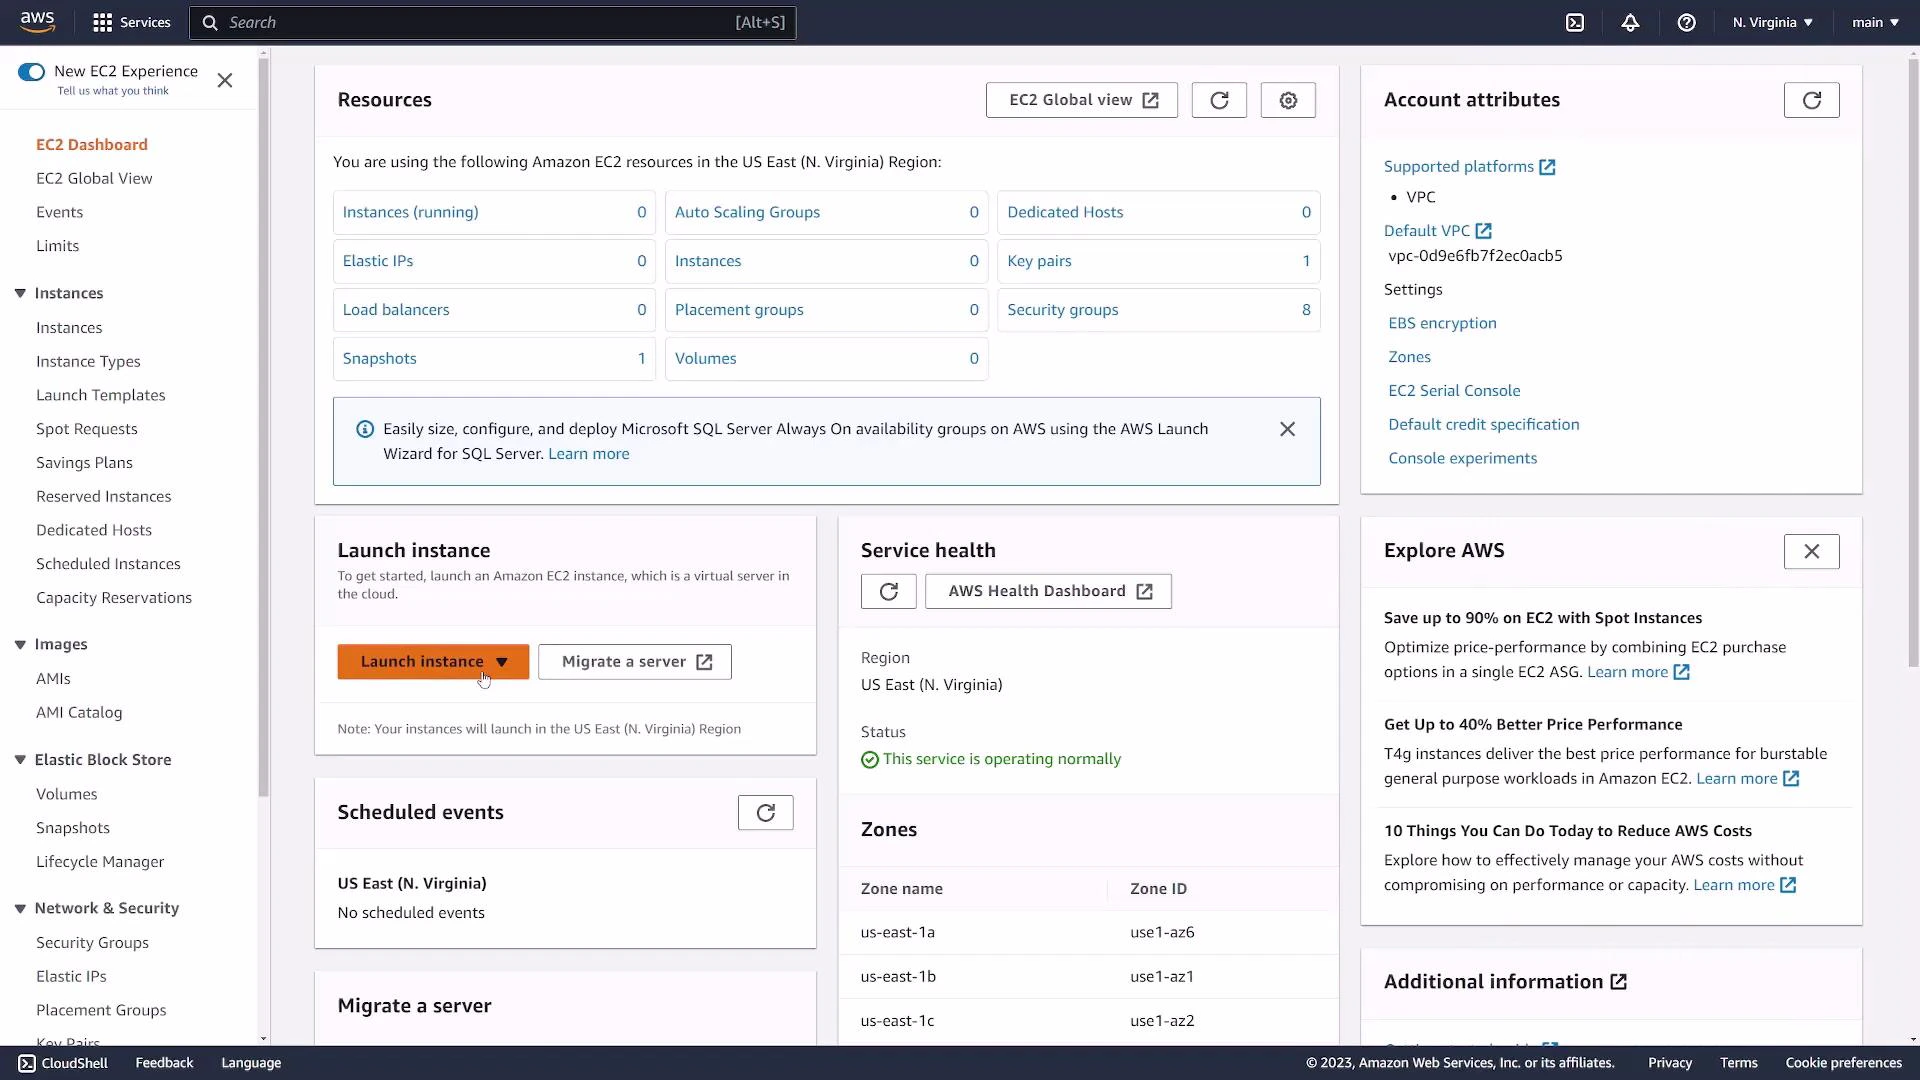 The EC2 launch wizard guides you through the required configuration choices. Below is a streamlined explanation of each step, with practical advice.
Launch wizard steps at a glance
| Step | What to select | Notes |
| ------------------ | ---------------------------------------------------- | -------------------------------------------------------------------------- |
| Name & AMI | Give the instance a name and pick an AMI | AMIs define the OS and preinstalled software. AMI IDs are region-specific. |
| Instance type | Choose instance family and size | t2.micro is commonly used for free-tier demos (1 vCPU, 1 GiB RAM). |
| Key pair | Create or select a key pair for SSH | Download the PEM file once — AWS will not re-provide it. |
| Network & Security | Select VPC/subnet and configure security groups | Restrict SSH access to your IP; avoid 0.0.0.0/0 in production. |
| Storage & advanced | Configure root volume and optional advanced settings | 8 GiB is sufficient for a basic Ubuntu instance. |
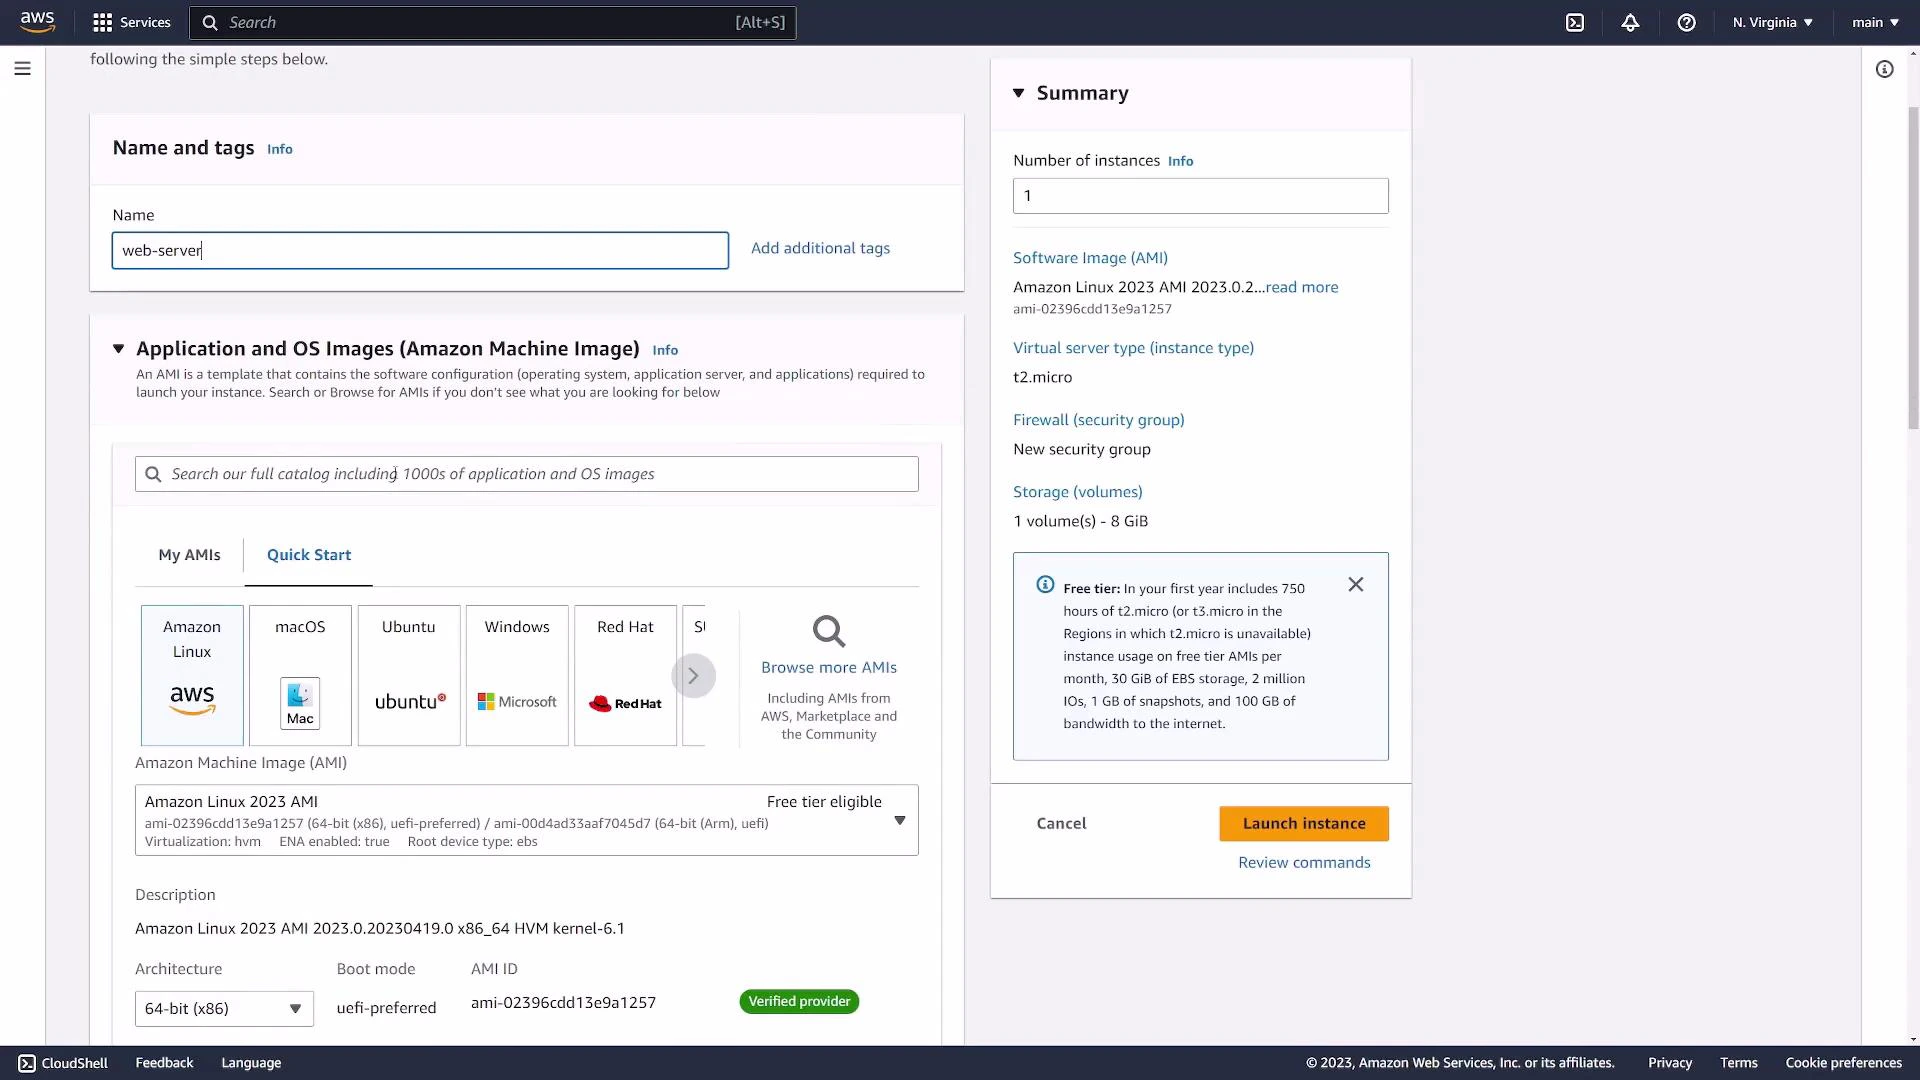
1. Name and AMI
* Assign a descriptive Name tag (example: web-server).
* Choose an AMI (Amazon Machine Image). Common options include Amazon Linux, Ubuntu, and Windows. Marketplace images (Nginx, etc.) are also available.
* For this demo we select Ubuntu 22.04 (64-bit x86). AMI IDs differ by region, so you may see alternate IDs.
The EC2 launch wizard guides you through the required configuration choices. Below is a streamlined explanation of each step, with practical advice.
Launch wizard steps at a glance
| Step | What to select | Notes |
| ------------------ | ---------------------------------------------------- | -------------------------------------------------------------------------- |
| Name & AMI | Give the instance a name and pick an AMI | AMIs define the OS and preinstalled software. AMI IDs are region-specific. |
| Instance type | Choose instance family and size | t2.micro is commonly used for free-tier demos (1 vCPU, 1 GiB RAM). |
| Key pair | Create or select a key pair for SSH | Download the PEM file once — AWS will not re-provide it. |
| Network & Security | Select VPC/subnet and configure security groups | Restrict SSH access to your IP; avoid 0.0.0.0/0 in production. |
| Storage & advanced | Configure root volume and optional advanced settings | 8 GiB is sufficient for a basic Ubuntu instance. |
1. Name and AMI
* Assign a descriptive Name tag (example: web-server).
* Choose an AMI (Amazon Machine Image). Common options include Amazon Linux, Ubuntu, and Windows. Marketplace images (Nginx, etc.) are also available.
* For this demo we select Ubuntu 22.04 (64-bit x86). AMI IDs differ by region, so you may see alternate IDs.
 2. Instance type
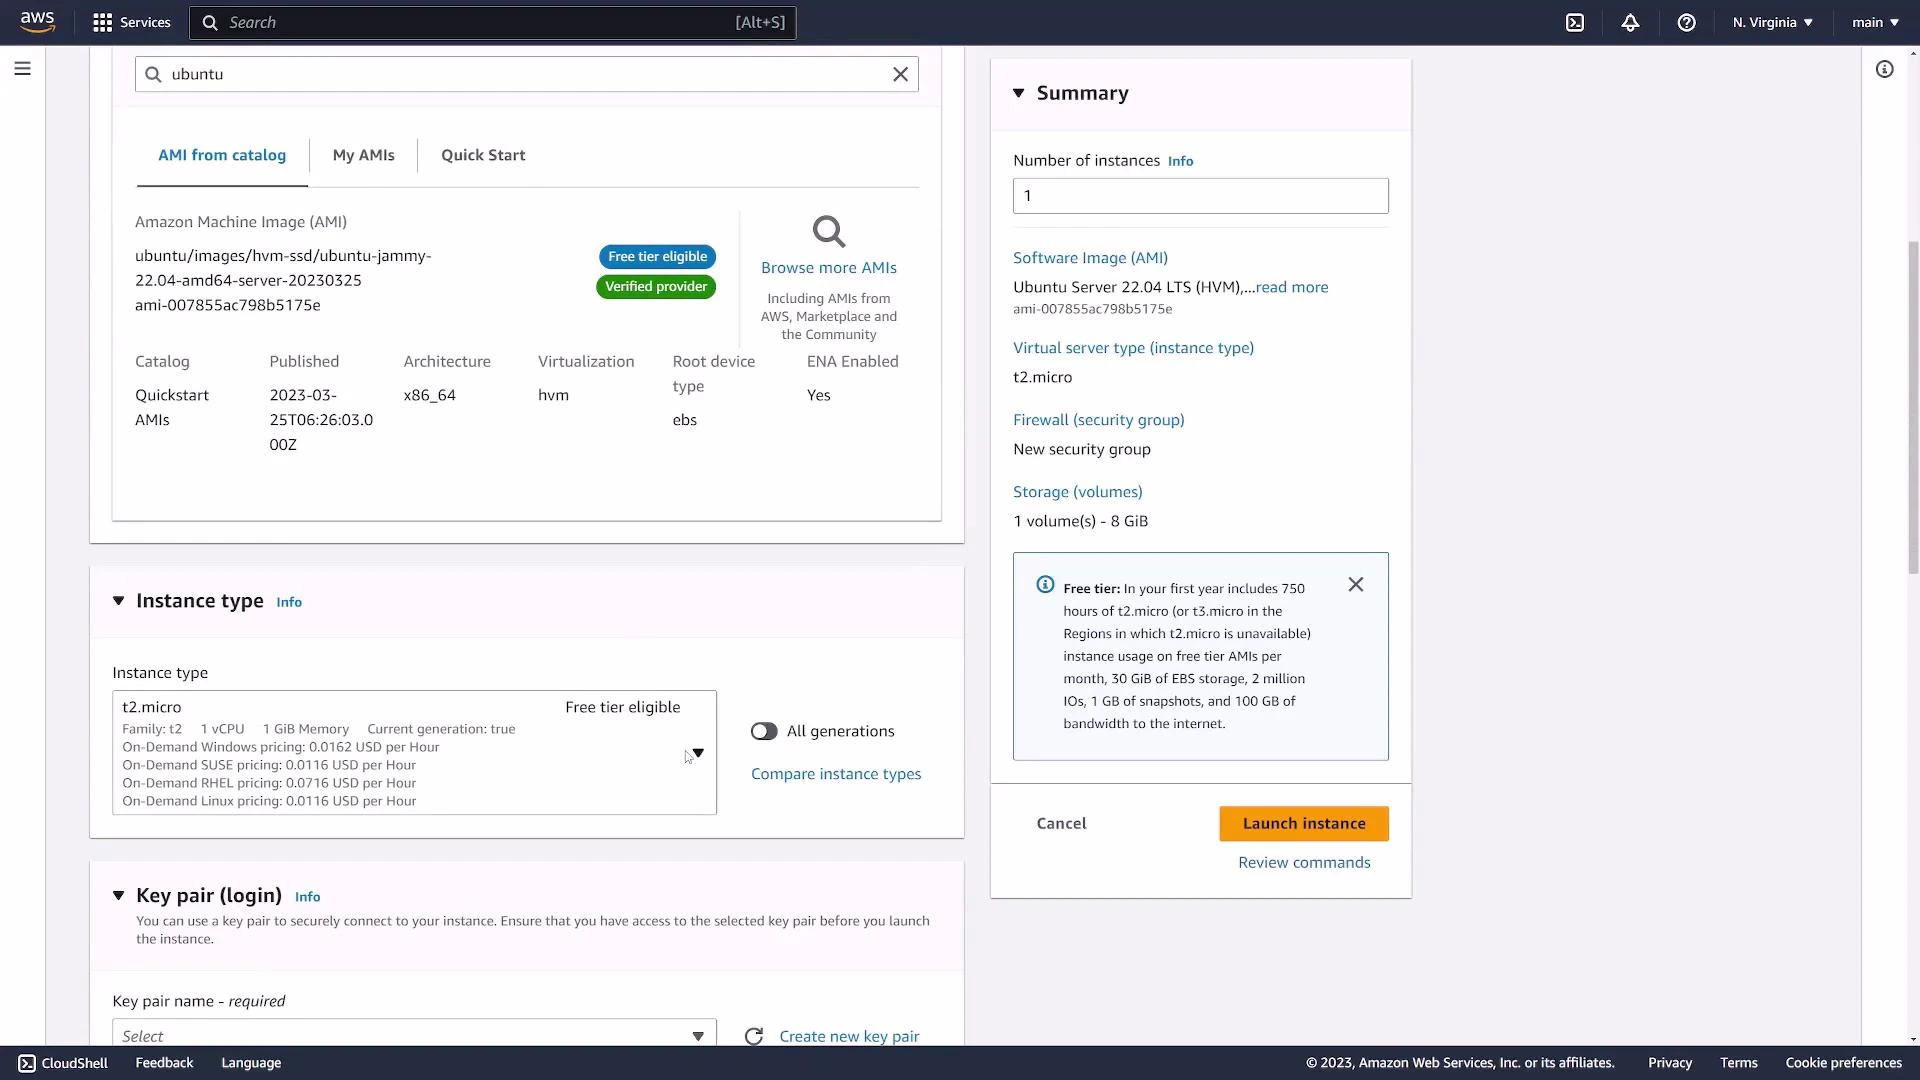
* Select the instance type that matches your CPU, memory, and performance needs.
* For simple demos and free-tier accounts, t2.micro is frequently used (1 vCPU, 1 GiB RAM). Choose larger types for production workloads.
2. Instance type
* Select the instance type that matches your CPU, memory, and performance needs.
* For simple demos and free-tier accounts, t2.micro is frequently used (1 vCPU, 1 GiB RAM). Choose larger types for production workloads.
 3. Key pair (for SSH)
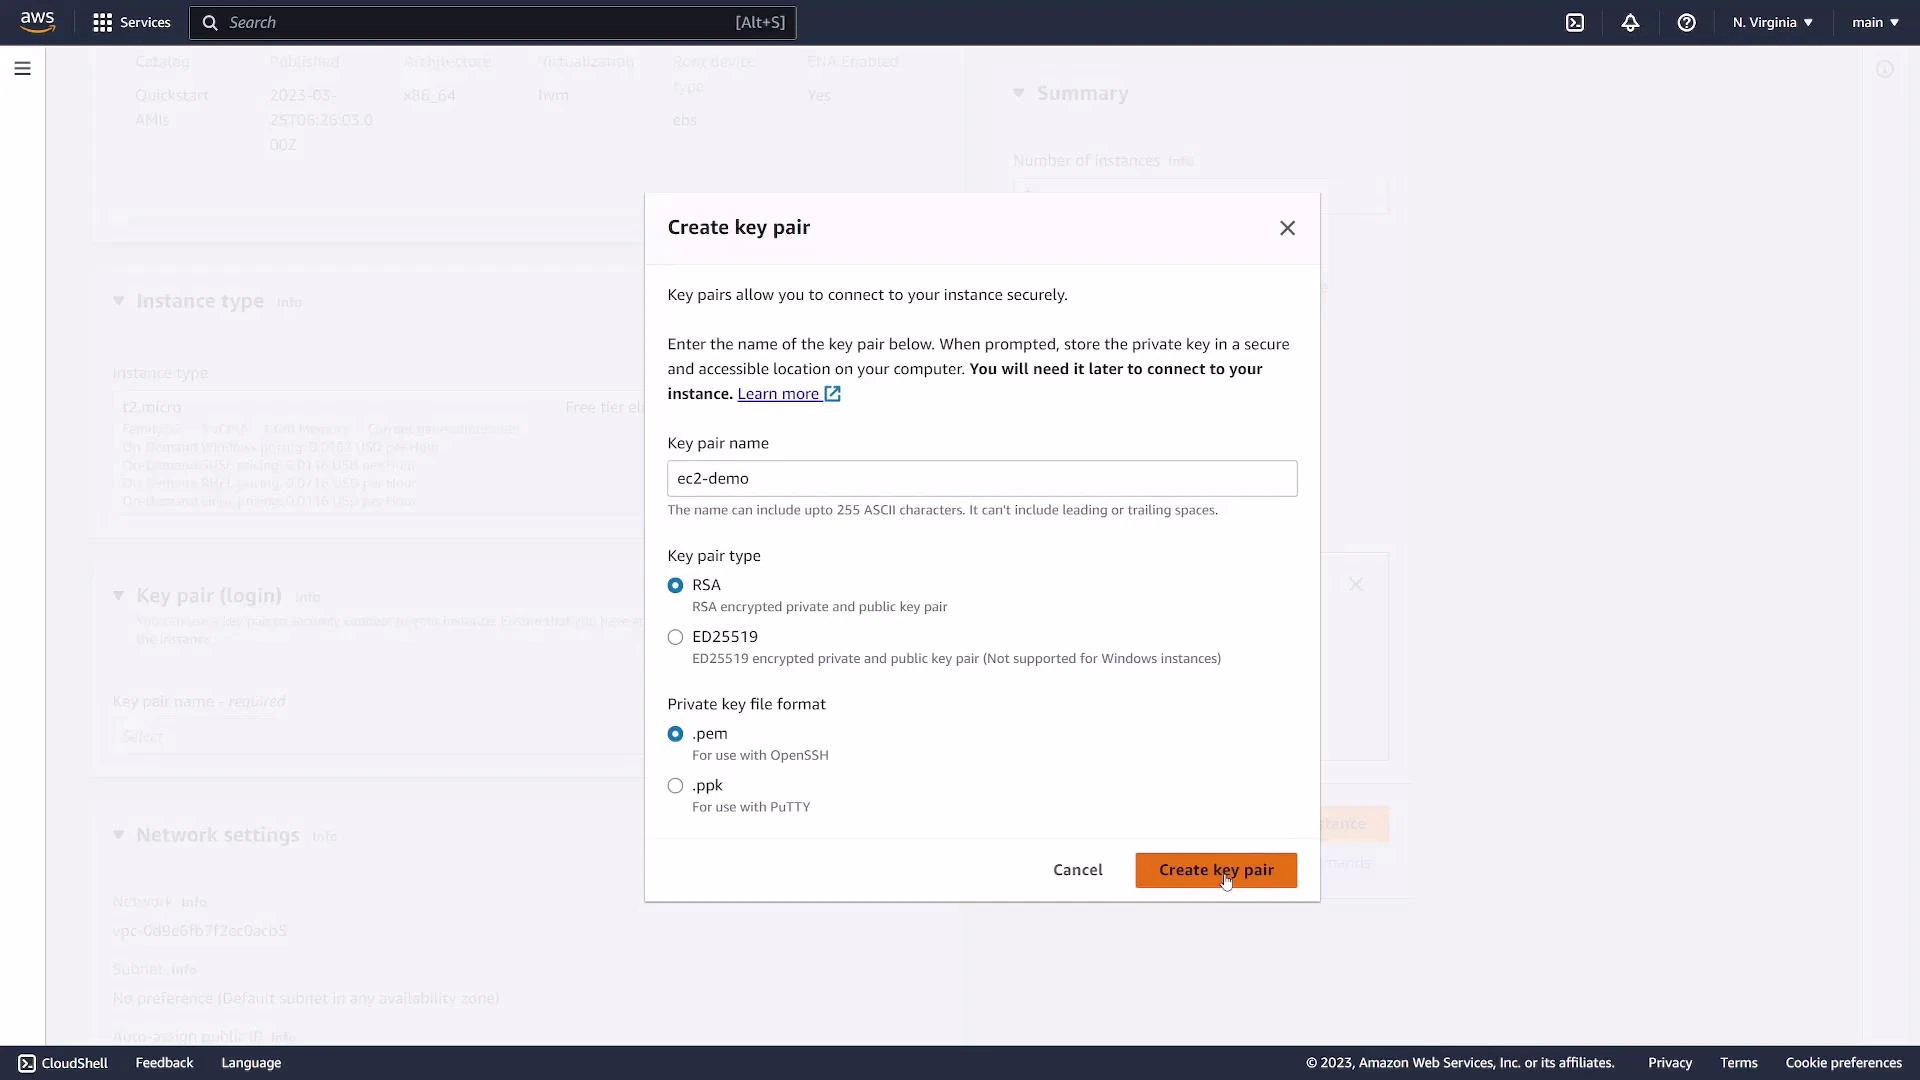
* A key pair enables secure SSH access to Linux instances without passwords.
* Either select an existing key pair or create a new one. If creating, give it a name (e.g., ec2-demo) and download the PEM private key file (.pem).
* Save the PEM securely — AWS does not retain a copy.
3. Key pair (for SSH)
* A key pair enables secure SSH access to Linux instances without passwords.
* Either select an existing key pair or create a new one. If creating, give it a name (e.g., ec2-demo) and download the PEM private key file (.pem).
* Save the PEM securely — AWS does not retain a copy.
 After downloading the PEM file, secure its file permissions before use (on Linux/macOS: chmod 400 ec2-demo.pem). Store it safely and back it up — you cannot re-download the same PEM from AWS later.
4. Network settings and security groups
* Pick a VPC and subnet (fresh accounts typically have a default VPC and subnets).
* Configure a security group: this is a virtual firewall controlling inbound/outbound traffic.
* For SSH access, add an inbound rule for TCP port 22 and limit the source to your client IP or range.
* The wizard may default to 0.0.0.0/0 (anywhere). Restrict this in production to reduce exposure.
After downloading the PEM file, secure its file permissions before use (on Linux/macOS: chmod 400 ec2-demo.pem). Store it safely and back it up — you cannot re-download the same PEM from AWS later.
4. Network settings and security groups
* Pick a VPC and subnet (fresh accounts typically have a default VPC and subnets).
* Configure a security group: this is a virtual firewall controlling inbound/outbound traffic.
* For SSH access, add an inbound rule for TCP port 22 and limit the source to your client IP or range.
* The wizard may default to 0.0.0.0/0 (anywhere). Restrict this in production to reduce exposure.
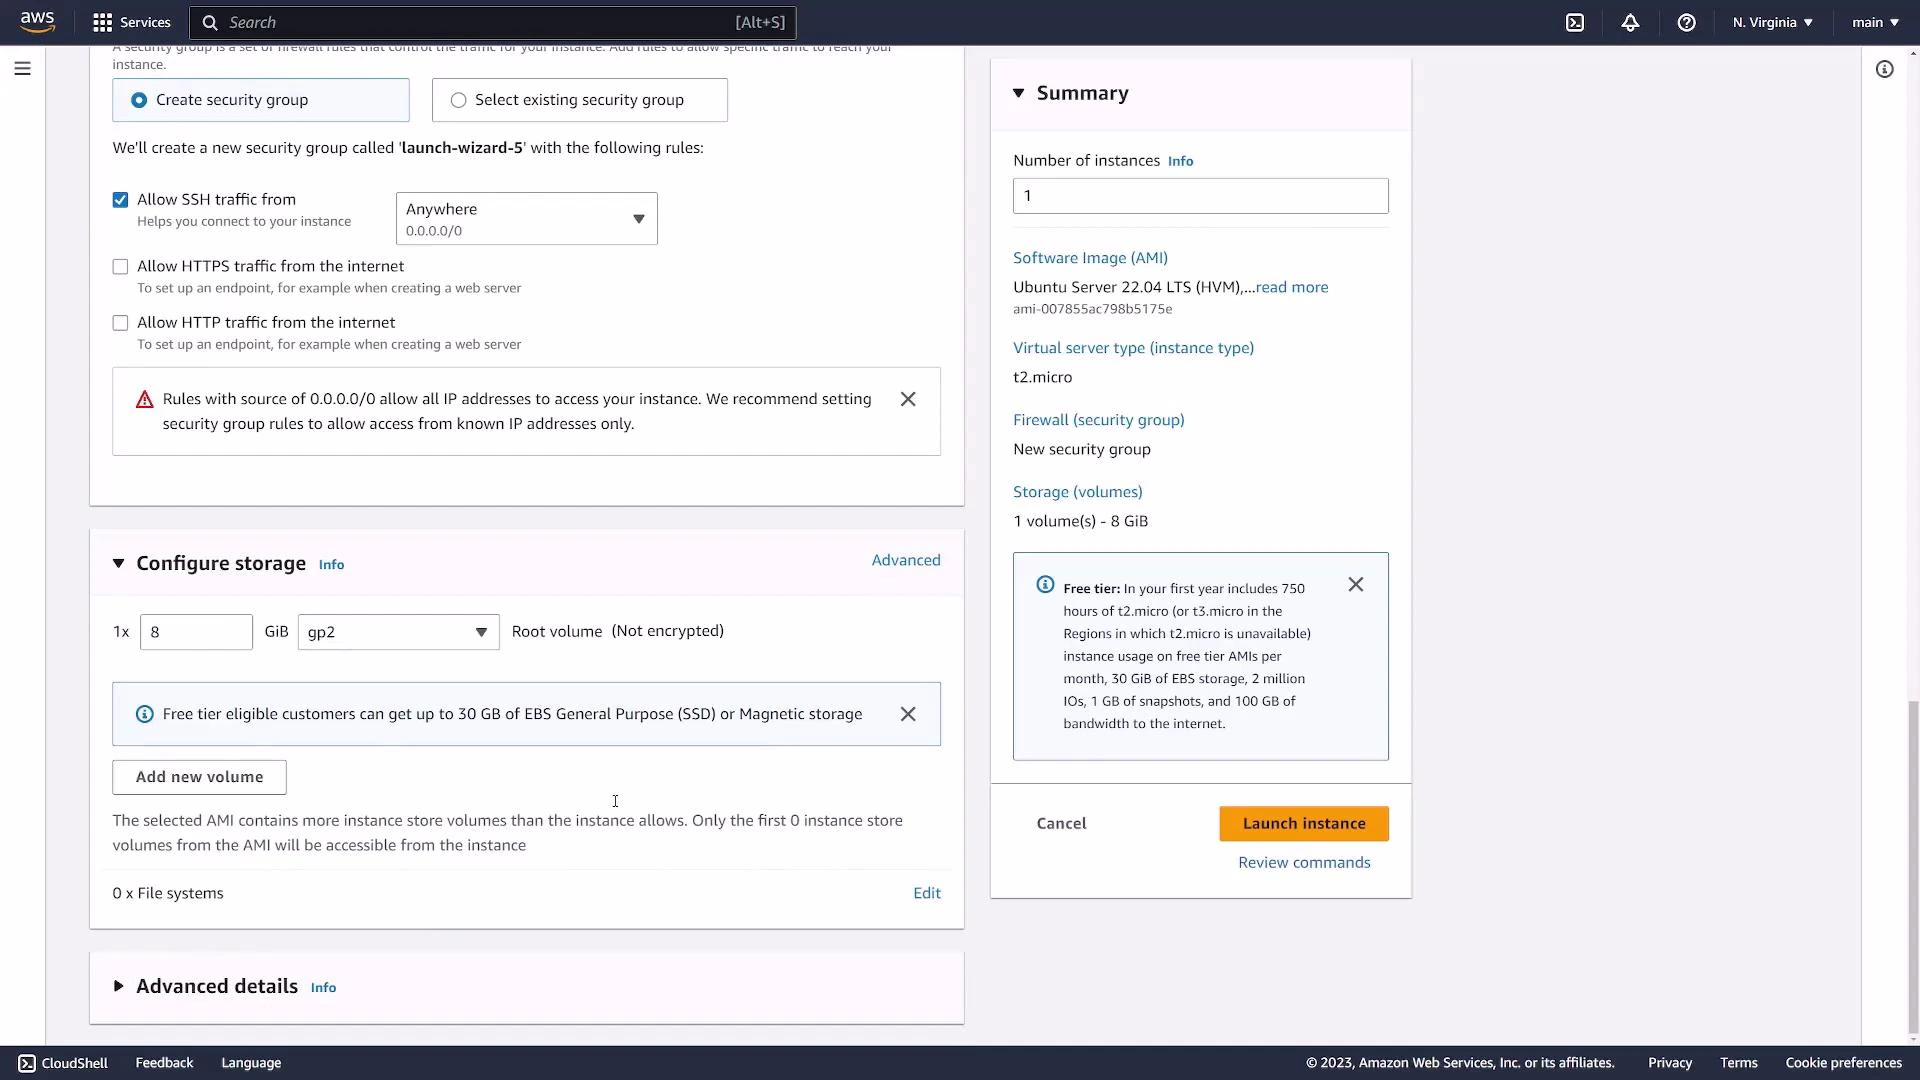 Do not leave SSH (port 22) open to 0.0.0.0/0 in production. Limit inbound SSH access to the specific IP addresses or ranges that require connectivity.
5. Storage and advanced settings
* Configure the root EBS volume size (8 GiB is common for a basic Ubuntu instance).
* Additional advanced options exist (user data, IAM role, monitoring, etc.) but are not required for a basic demo.
Launch and inspect the instance
* Click Launch and wait for the instance to be created. It first appears in the Instances list with state "pending" and transitions to "running" after boot.
* The Instances view shows the instance ID, public/private IPv4 addresses, instance type, AMI, VPC and subnet IDs, and more metadata.
Do not leave SSH (port 22) open to 0.0.0.0/0 in production. Limit inbound SSH access to the specific IP addresses or ranges that require connectivity.
5. Storage and advanced settings
* Configure the root EBS volume size (8 GiB is common for a basic Ubuntu instance).
* Additional advanced options exist (user data, IAM role, monitoring, etc.) but are not required for a basic demo.
Launch and inspect the instance
* Click Launch and wait for the instance to be created. It first appears in the Instances list with state "pending" and transitions to "running" after boot.
* The Instances view shows the instance ID, public/private IPv4 addresses, instance type, AMI, VPC and subnet IDs, and more metadata.
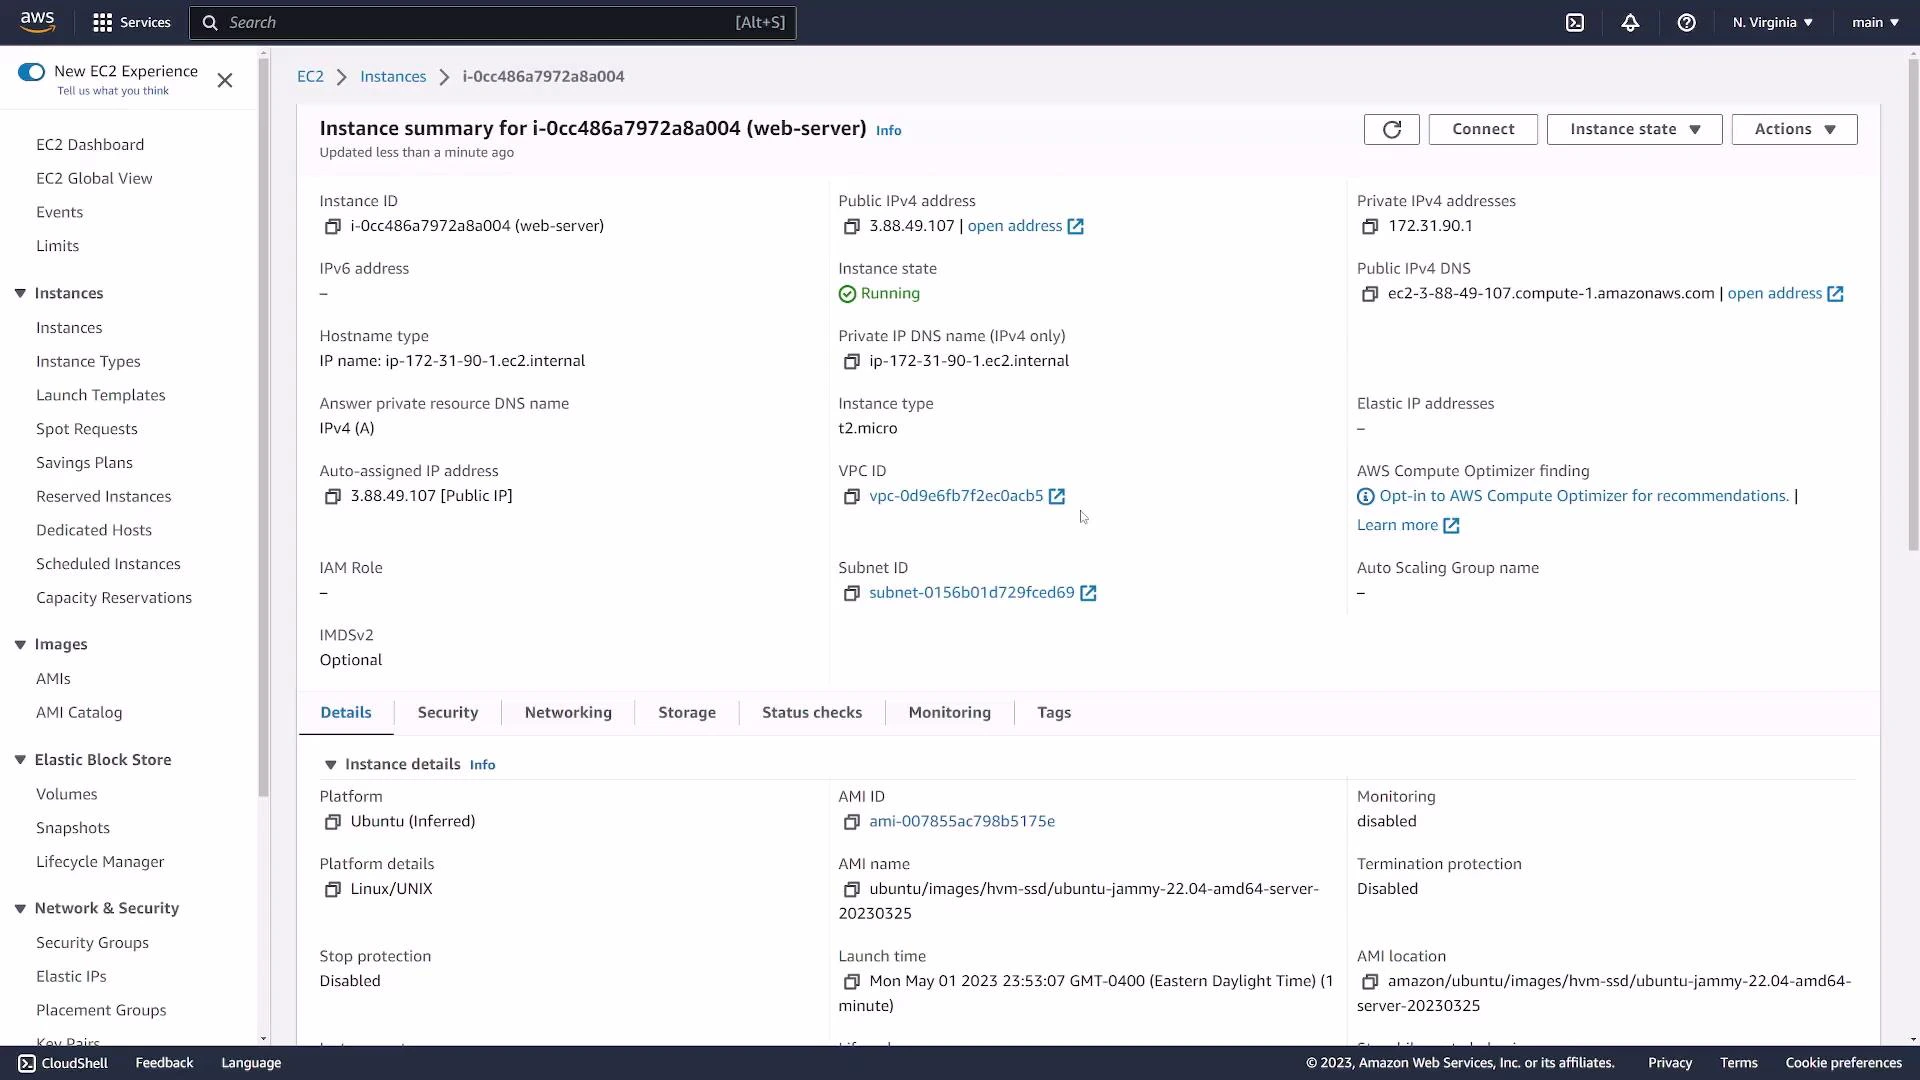 Instance details and security group review
* Click the instance ID to view detailed information: public IPv4 address (if assigned), public DNS, private IP, associated key pair name, and tags.
* Under Security, inspect the security group(s) attached and their inbound/outbound rules. Security groups are stateful: if inbound is allowed, return traffic is permitted automatically.
Instance details and security group review
* Click the instance ID to view detailed information: public IPv4 address (if assigned), public DNS, private IP, associated key pair name, and tags.
* Under Security, inspect the security group(s) attached and their inbound/outbound rules. Security groups are stateful: if inbound is allowed, return traffic is permitted automatically.
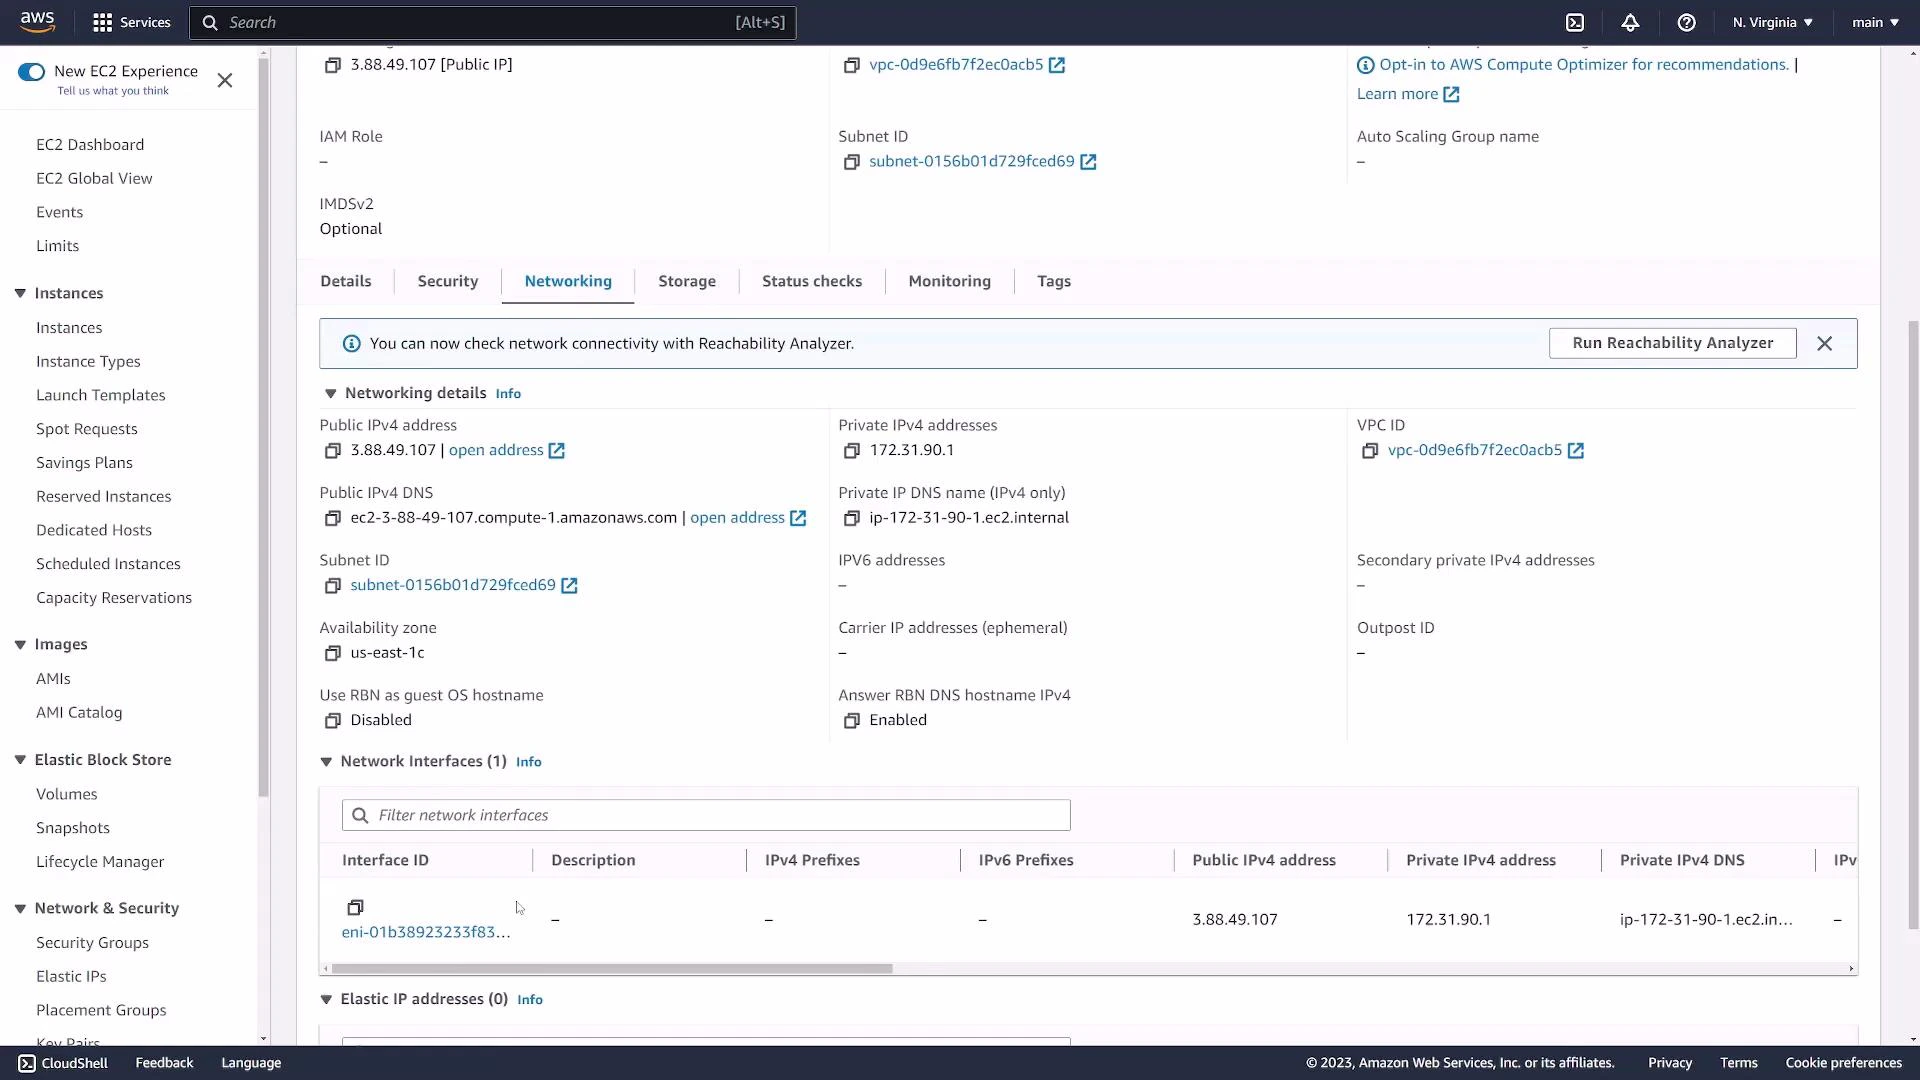
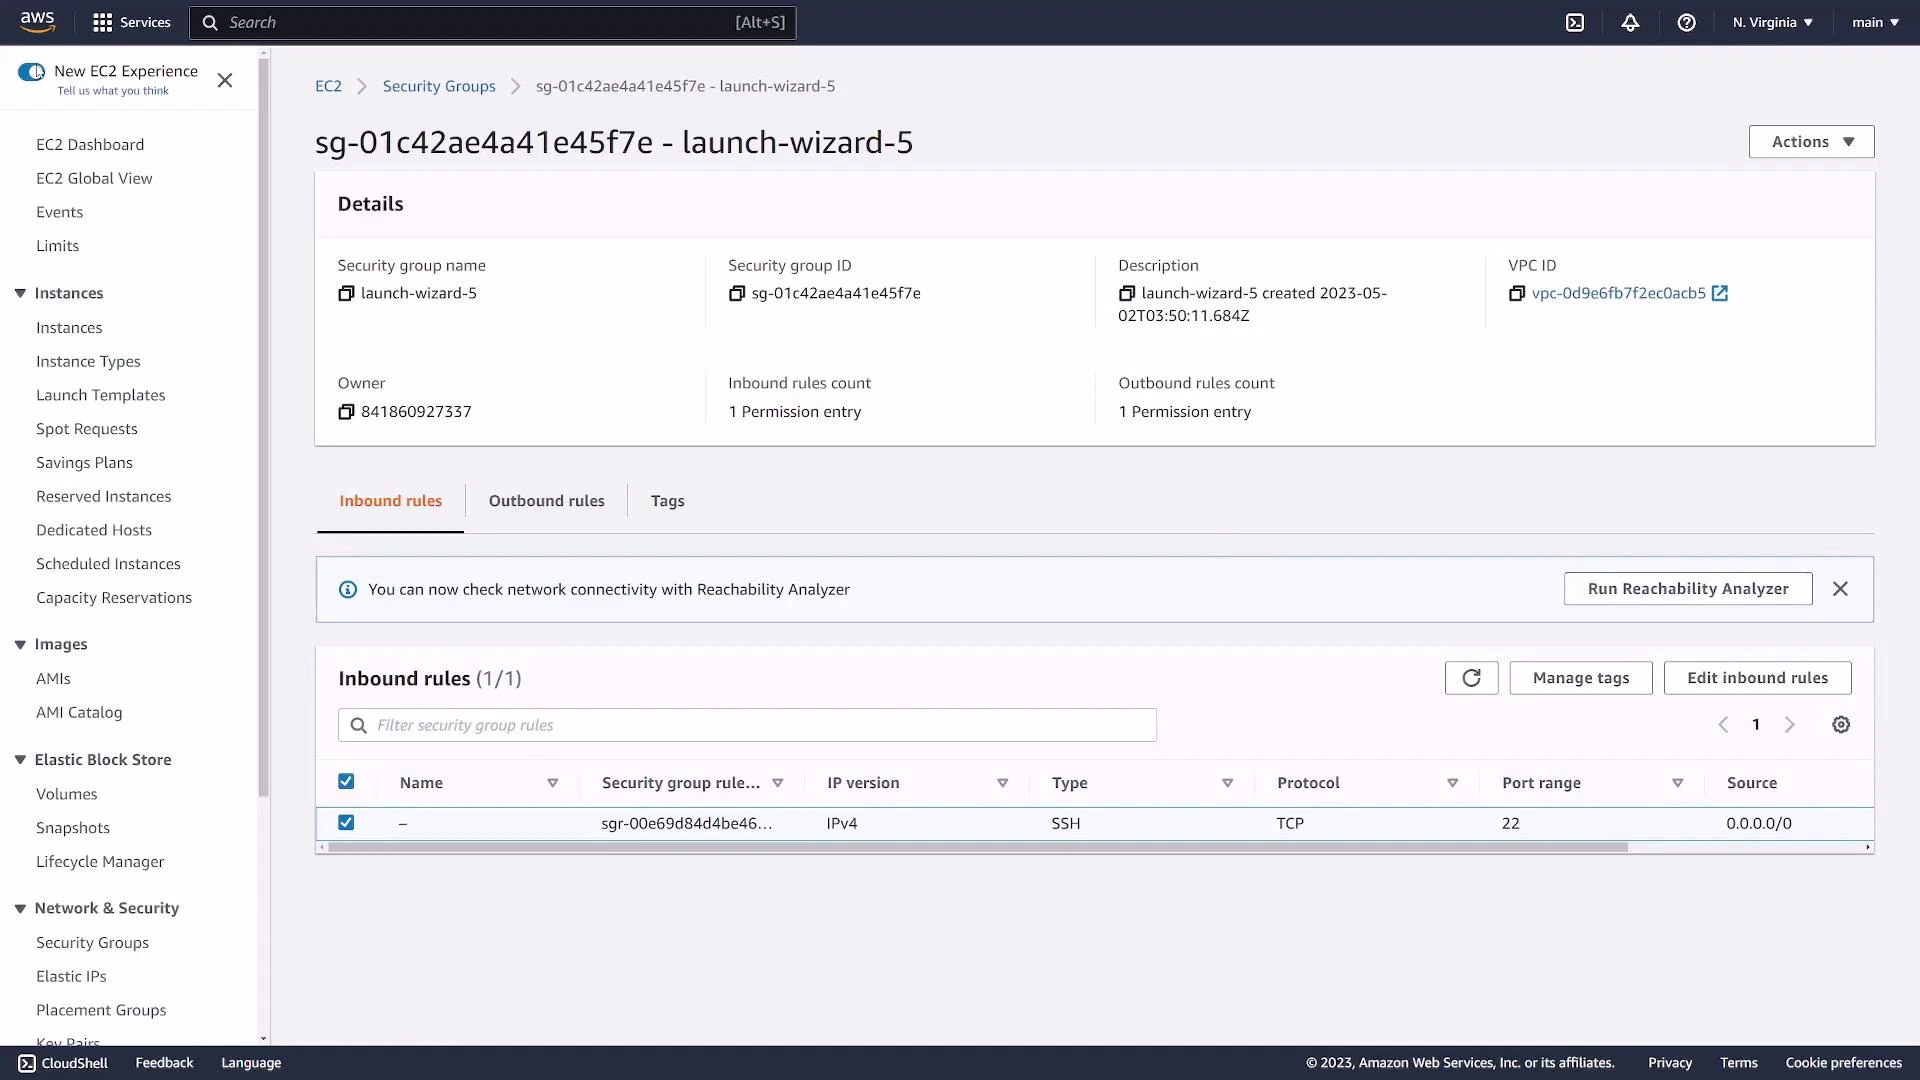 Networking and monitoring
* The Networking tab displays IP addresses, network interface(s), and any attached Elastic IPs. EC2 instances can have multiple ENIs when needed.
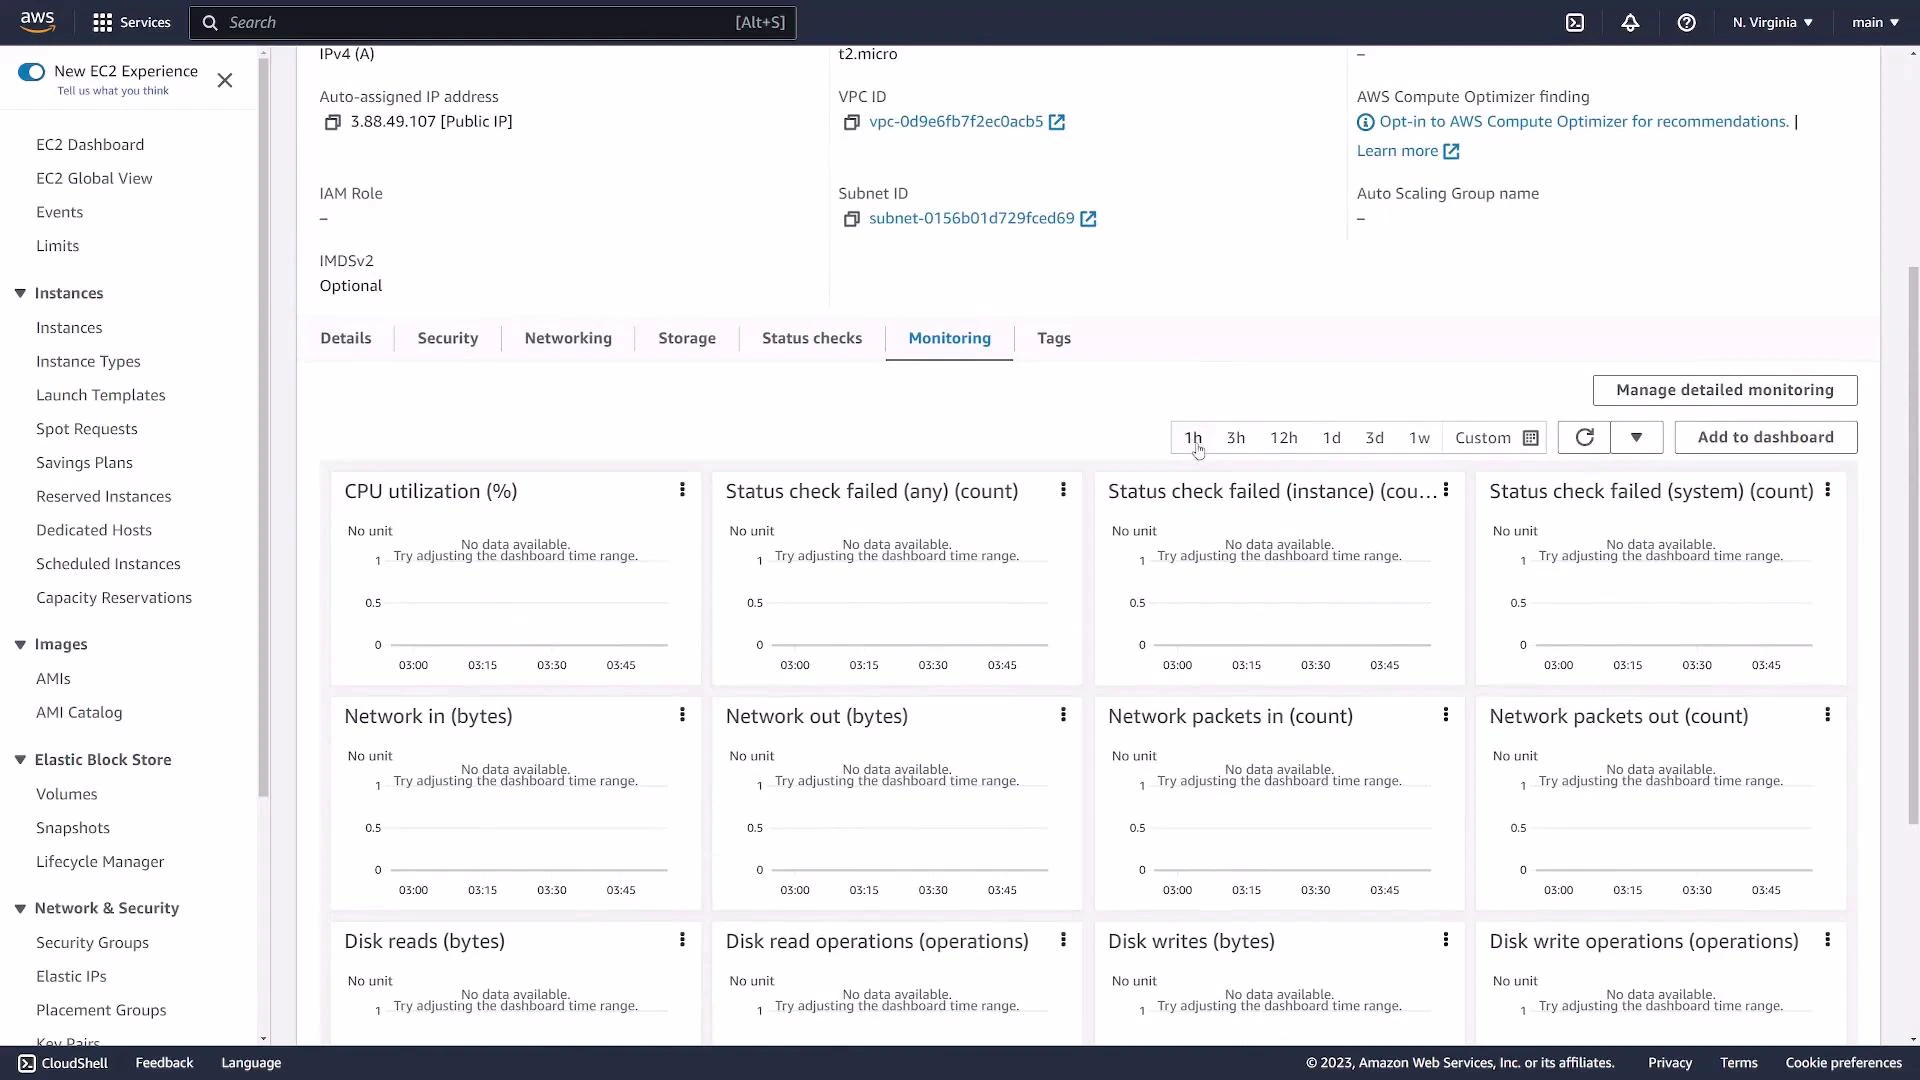
* The Monitoring tab provides CPU, network, disk, and status check metrics. Immediately after launch, graphs may be empty until metrics are collected.
Networking and monitoring
* The Networking tab displays IP addresses, network interface(s), and any attached Elastic IPs. EC2 instances can have multiple ENIs when needed.
* The Monitoring tab provides CPU, network, disk, and status check metrics. Immediately after launch, graphs may be empty until metrics are collected.
 Actions and instance lifecycle
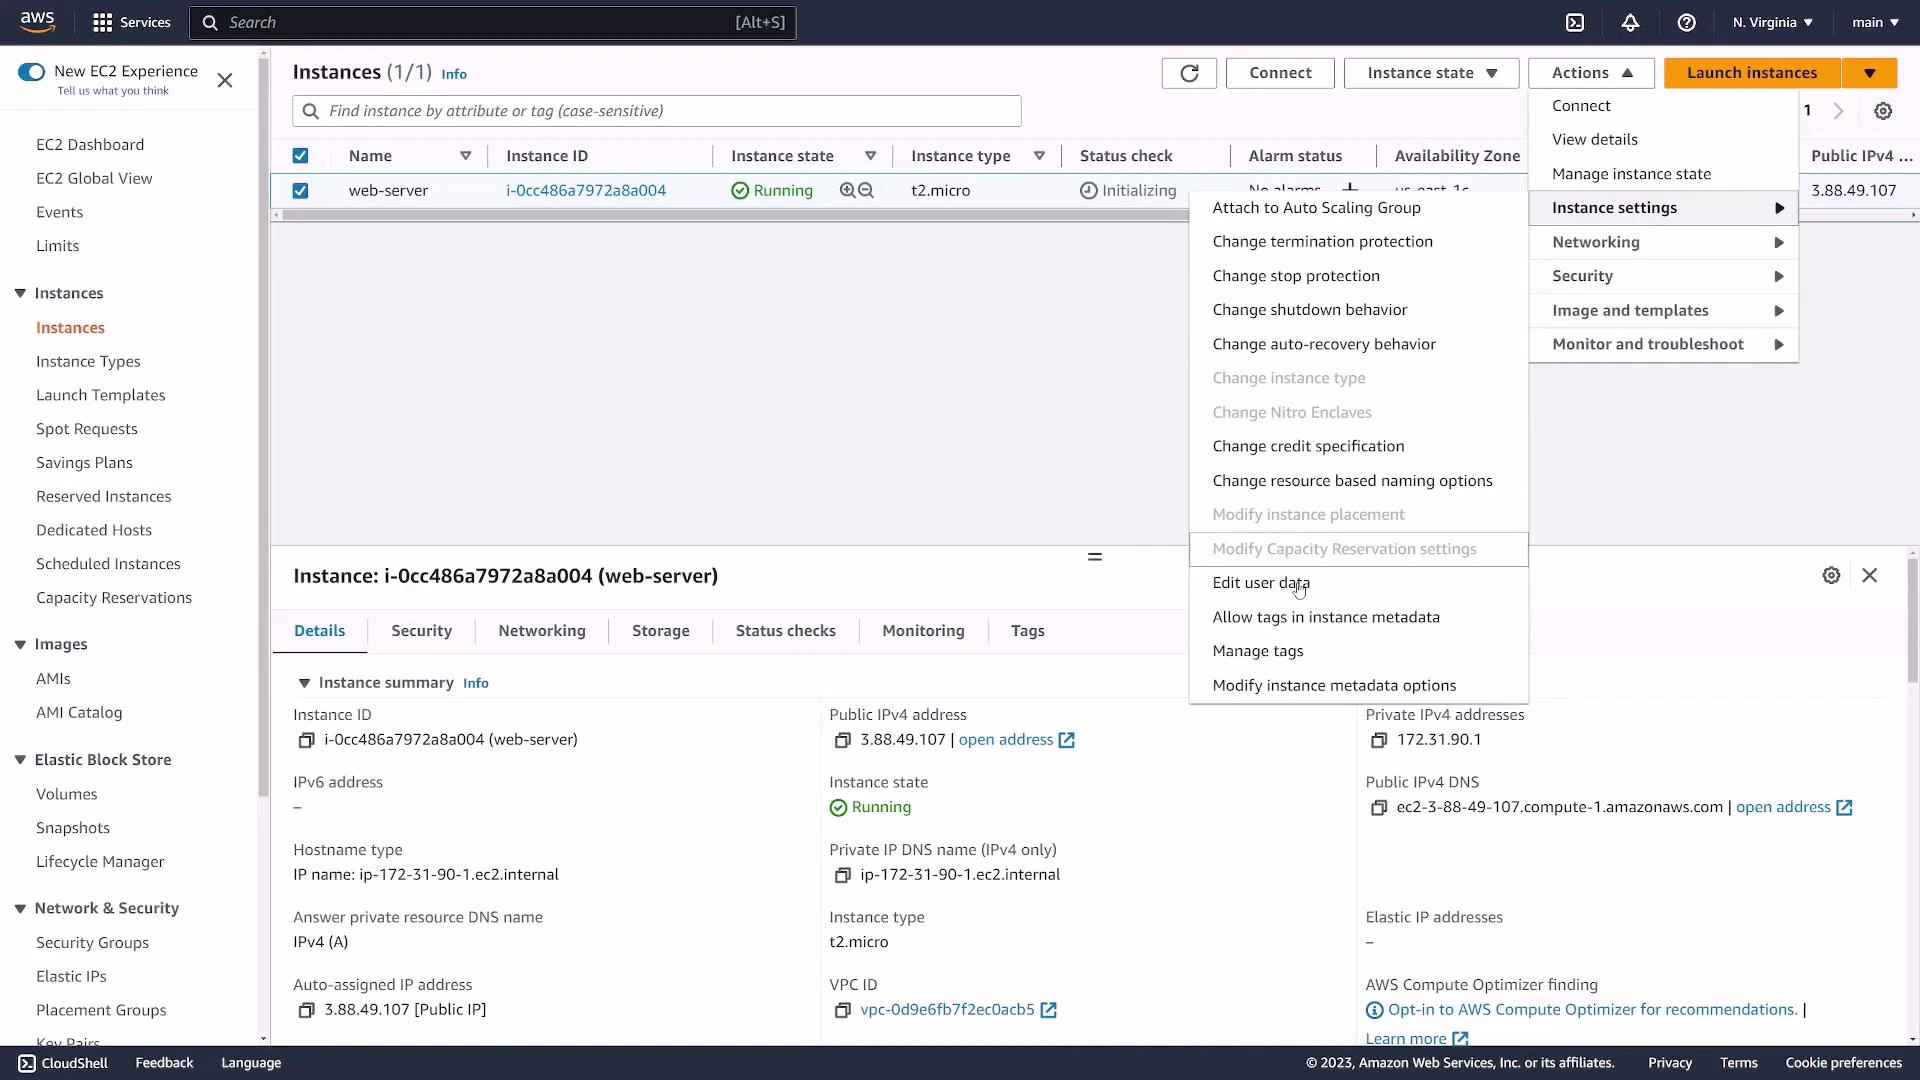
* From the Instances list select the instance and open the Actions menu to:
* Edit user data, networking, and security group attachments
* Change the instance state: Stop, Reboot, Start, or Terminate
Actions and instance lifecycle
* From the Instances list select the instance and open the Actions menu to:
* Edit user data, networking, and security group attachments
* Change the instance state: Stop, Reboot, Start, or Terminate
 Connect to the instance with SSH
* You need the instance's public IPv4 address (or public DNS) and the PEM key you downloaded.
* Usernames vary by AMI:
* ubuntu → "ubuntu"
* Amazon Linux → "ec2-user"
* Check the AMI documentation if unsure: [https://docs.aws.amazon.com/AWSEC2/latest/UserGuide/AccessingInstancesLinux.html](https://docs.aws.amazon.com/AWSEC2/latest/UserGuide/AccessingInstancesLinux.html)
Example commands (Linux/macOS):
```bash theme={null}
# Restrict PEM permissions (required on many systems)
chmod 400 ec2-demo.pem
# SSH to the instance (replace with the instance's public IPv4)
ssh -i ec2-demo.pem ubuntu@
```
* On first connect you may be prompted to accept the host key (type "yes").
* After successful authentication you will see the remote shell prompt, e.g.:
```bash theme={null}
ubuntu@ip-172-31-90-1:~$ ls -la
```
Windows options
* Convert PEM to PPK for PuTTY using PuTTYgen ([https://www.putty.org/](https://www.putty.org/)) or
* Use Windows Subsystem for Linux ([https://learn.microsoft.com/windows/wsl/](https://learn.microsoft.com/windows/wsl/)) or native OpenSSH ([https://www.openssh.com/](https://www.openssh.com/)) to run the same ssh commands as above.
Stop vs Terminate
* Stop: powers off the instance and preserves the EBS root volume. You can later Start it again.
* Terminate: deletes the instance and (by default) its associated root volume; data not backed up will be lost.
References
* AWS EC2 documentation: [https://docs.aws.amazon.com/ec2/](https://docs.aws.amazon.com/ec2/)
* Accessing instances (SSH): [https://docs.aws.amazon.com/AWSEC2/latest/UserGuide/AccessingInstancesLinux.html](https://docs.aws.amazon.com/AWSEC2/latest/UserGuide/AccessingInstancesLinux.html)
* PuTTY and PuTTYgen: [https://www.putty.org/](https://www.putty.org/)
* Windows Subsystem for Linux: [https://learn.microsoft.com/windows/wsl/](https://learn.microsoft.com/windows/wsl/)
This completes the quick demo: launching an EC2 instance, inspecting its configuration, connecting via SSH, and managing its lifecycle.
Connect to the instance with SSH
* You need the instance's public IPv4 address (or public DNS) and the PEM key you downloaded.
* Usernames vary by AMI:
* ubuntu → "ubuntu"
* Amazon Linux → "ec2-user"
* Check the AMI documentation if unsure: [https://docs.aws.amazon.com/AWSEC2/latest/UserGuide/AccessingInstancesLinux.html](https://docs.aws.amazon.com/AWSEC2/latest/UserGuide/AccessingInstancesLinux.html)
Example commands (Linux/macOS):
```bash theme={null}
# Restrict PEM permissions (required on many systems)
chmod 400 ec2-demo.pem
# SSH to the instance (replace with the instance's public IPv4)
ssh -i ec2-demo.pem ubuntu@
```
* On first connect you may be prompted to accept the host key (type "yes").
* After successful authentication you will see the remote shell prompt, e.g.:
```bash theme={null}
ubuntu@ip-172-31-90-1:~$ ls -la
```
Windows options
* Convert PEM to PPK for PuTTY using PuTTYgen ([https://www.putty.org/](https://www.putty.org/)) or
* Use Windows Subsystem for Linux ([https://learn.microsoft.com/windows/wsl/](https://learn.microsoft.com/windows/wsl/)) or native OpenSSH ([https://www.openssh.com/](https://www.openssh.com/)) to run the same ssh commands as above.
Stop vs Terminate
* Stop: powers off the instance and preserves the EBS root volume. You can later Start it again.
* Terminate: deletes the instance and (by default) its associated root volume; data not backed up will be lost.
References
* AWS EC2 documentation: [https://docs.aws.amazon.com/ec2/](https://docs.aws.amazon.com/ec2/)
* Accessing instances (SSH): [https://docs.aws.amazon.com/AWSEC2/latest/UserGuide/AccessingInstancesLinux.html](https://docs.aws.amazon.com/AWSEC2/latest/UserGuide/AccessingInstancesLinux.html)
* PuTTY and PuTTYgen: [https://www.putty.org/](https://www.putty.org/)
* Windows Subsystem for Linux: [https://learn.microsoft.com/windows/wsl/](https://learn.microsoft.com/windows/wsl/)
This completes the quick demo: launching an EC2 instance, inspecting its configuration, connecting via SSH, and managing its lifecycle.