> ## Documentation Index
> Fetch the complete documentation index at: https://notes.kodekloud.com/llms.txt
> Use this file to discover all available pages before exploring further.
# Deploying the sample application on EC2 instance
> Guide to deploy, run, and verify a Flask sample application on an Amazon EC2 instance, including setup, dependencies, security group configuration, and noting missing RDS database connectivity.
Hello and welcome to this lesson.
In this guide you'll deploy a small Flask-based sample application to an Amazon EC2 instance, run it, and verify the app is reachable from a browser. This lesson demonstrates the application lifecycle on EC2 (installation, running, and basic verification). Database connectivity (RDS configuration) is intentionally excluded here — the app will start, but form submissions will fail until an RDS endpoint and credentials are configured.
What you'll do
* Launch an EC2 instance to host a Flask app.
* Connect to the instance and install packages.
* Clone and run the sample app.
* Verify the web app is reachable externally.
* Attempt a data submission (expected to fail due to missing DB configuration).
Why this matters (SEO keywords): EC2 deploy Flask app, run Flask on EC2, EC2 security group open port 5000, connect EC2 via EC2 Instance Connect, install git and pip on Amazon Linux.
***
## Step 1 — Launch an EC2 instance
1. Open the EC2 console (use the AWS console search bar).
2. Click **Launch Instance** and give the instance a name, for example: `User Information App`.
3. Choose the Amazon Linux AMI.
4. Create or select a security group. For this demo we allow SSH from anywhere, but in production restrict SSH to your IP address only.
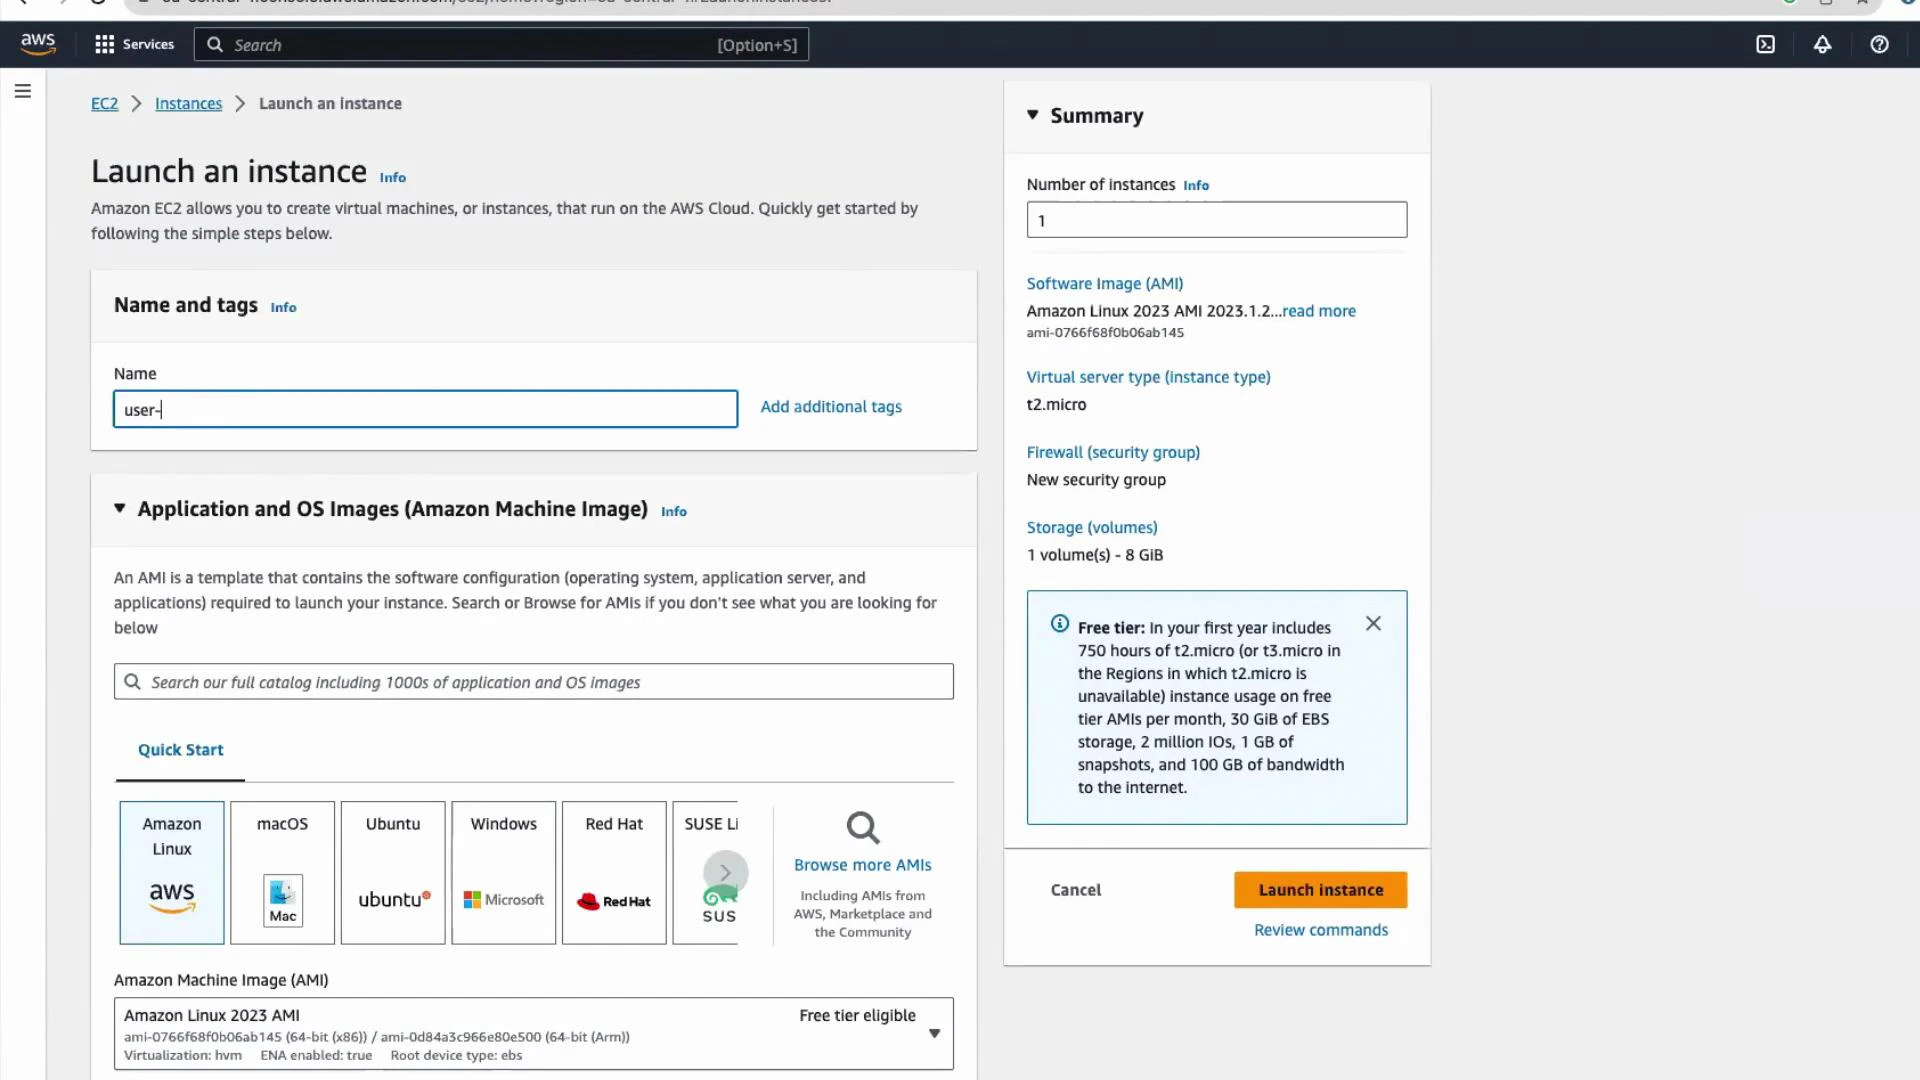 For security, do not open SSH (port 22) to 0.0.0.0/0 in production. Restrict SSH inbound access to specific IP addresses or your administrator network.
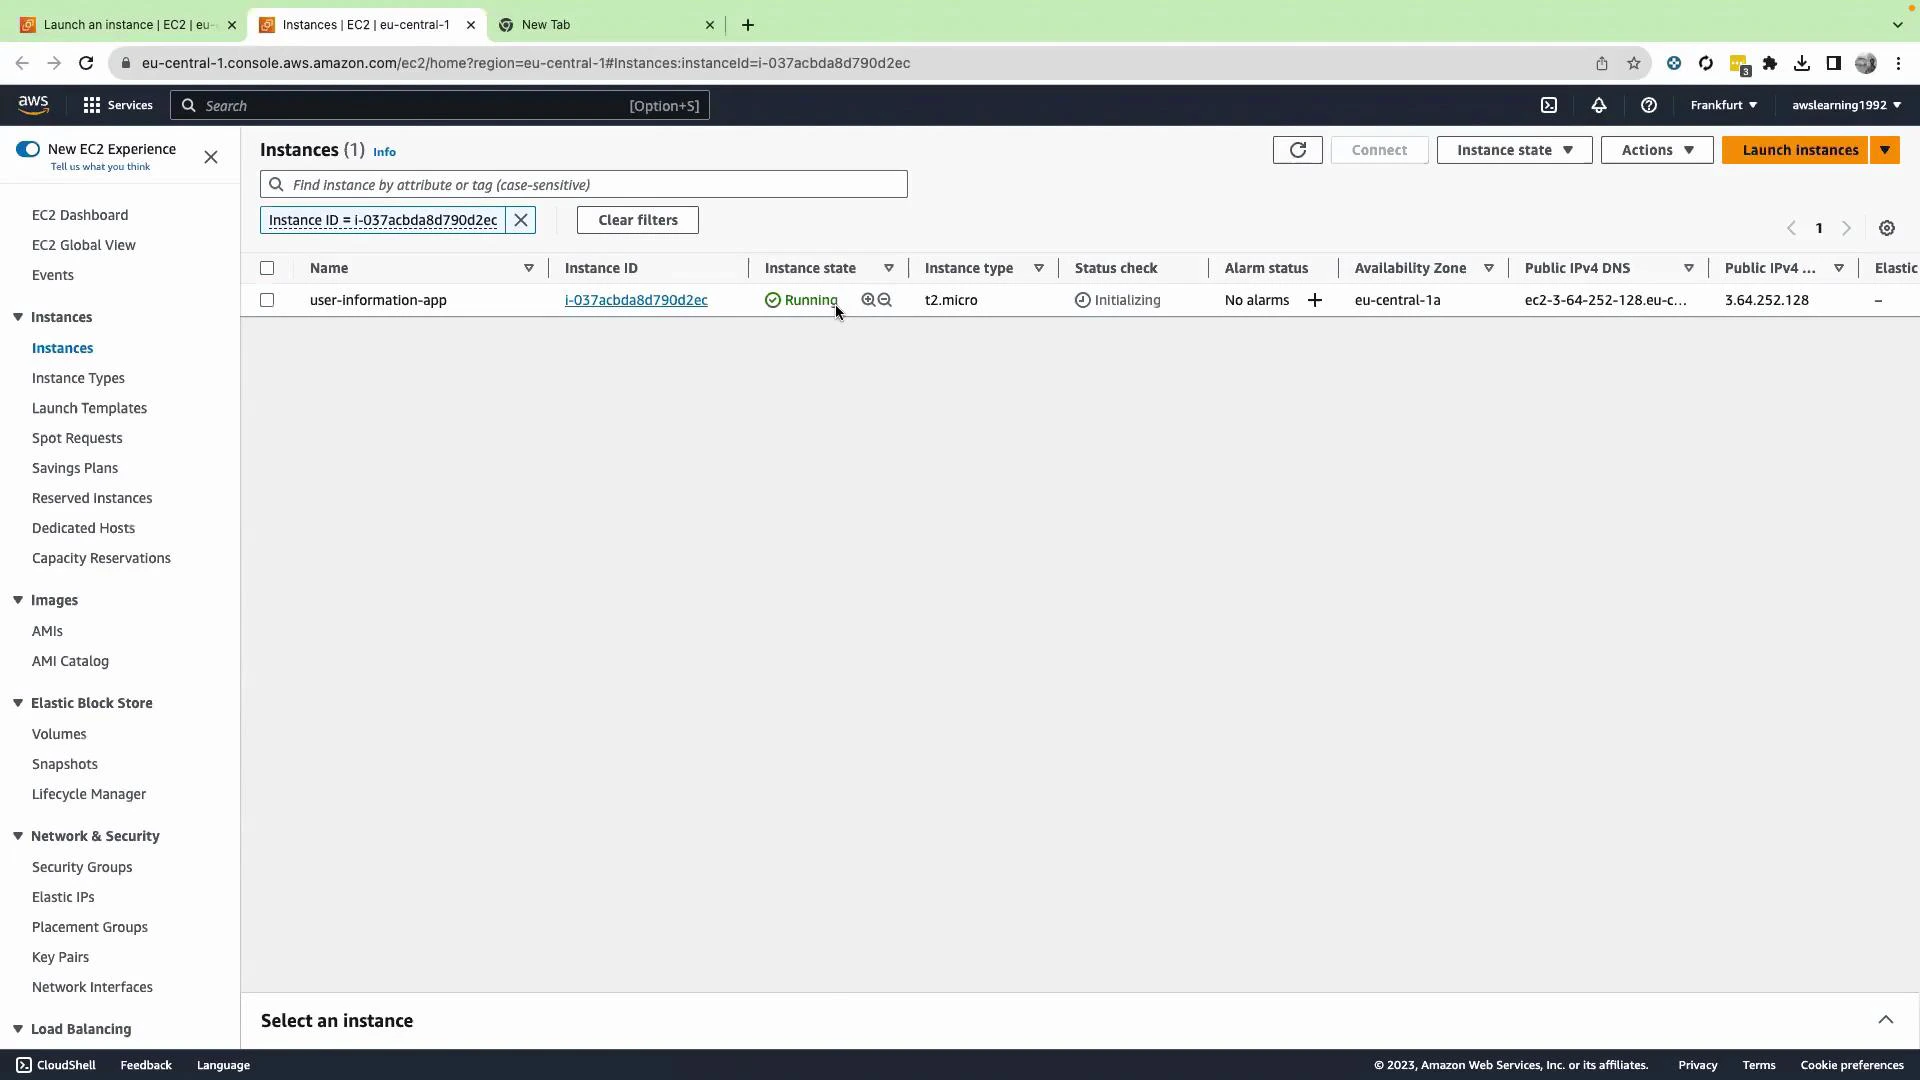
If you encounter a key-pair prompt and haven't created one, for this demo you can select "Proceed without key pair" (not recommended for production). Click **Launch Instance** and wait for the instance state to become **running**. Then select the instance to view its details.
For security, do not open SSH (port 22) to 0.0.0.0/0 in production. Restrict SSH inbound access to specific IP addresses or your administrator network.
If you encounter a key-pair prompt and haven't created one, for this demo you can select "Proceed without key pair" (not recommended for production). Click **Launch Instance** and wait for the instance state to become **running**. Then select the instance to view its details.
 ***
## Step 2 — Connect to the EC2 instance
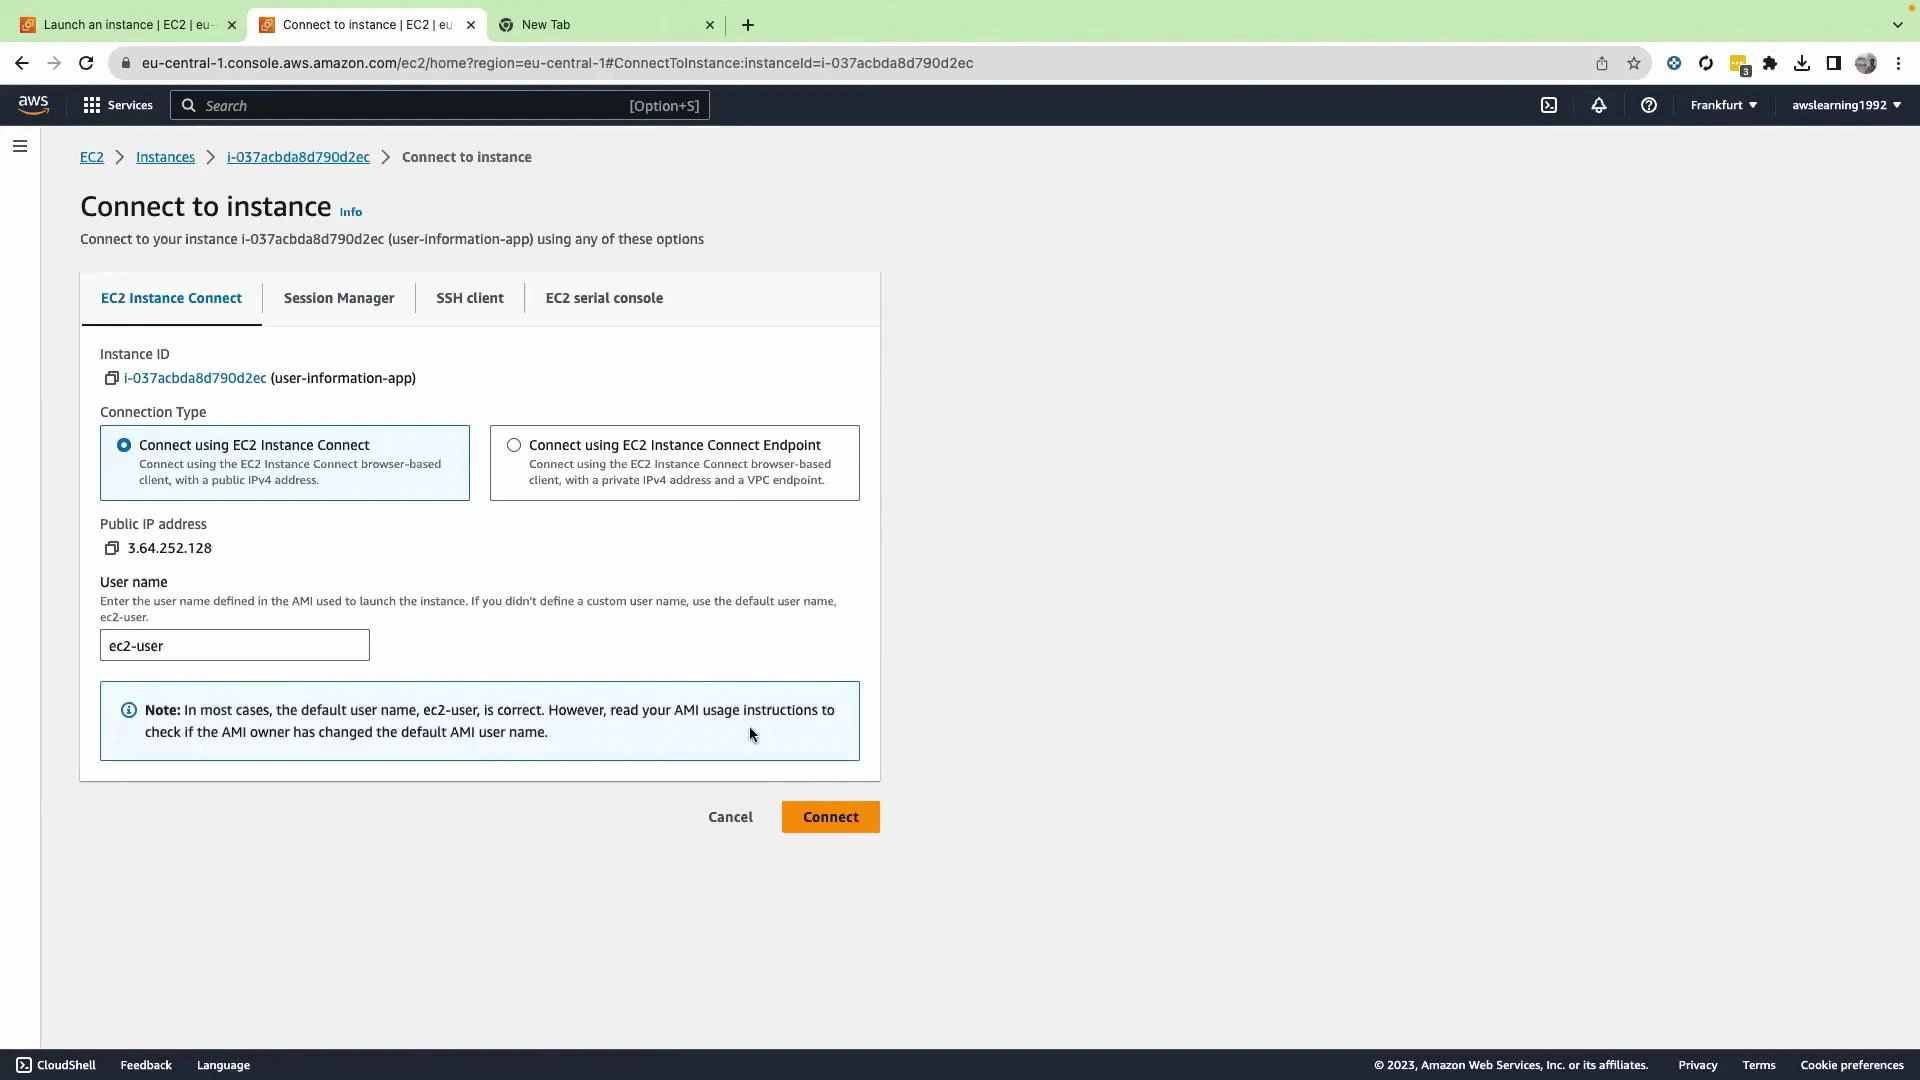
1. Select the instance in the console and click **Connect**.
2. Use **EC2 Instance Connect** to open a browser-based terminal. For Amazon Linux the username is typically `ec2-user`.
***
## Step 2 — Connect to the EC2 instance
1. Select the instance in the console and click **Connect**.
2. Use **EC2 Instance Connect** to open a browser-based terminal. For Amazon Linux the username is typically `ec2-user`.
 In the browser terminal, become root and switch to the home directory:
```bash theme={null}
sudo su
cd ~
```
***
## Step 3 — Get the application code from GitHub
On the repository page click **Code** and copy the HTTPS URL for cloning.
In the browser terminal, become root and switch to the home directory:
```bash theme={null}
sudo su
cd ~
```
***
## Step 3 — Get the application code from GitHub
On the repository page click **Code** and copy the HTTPS URL for cloning.
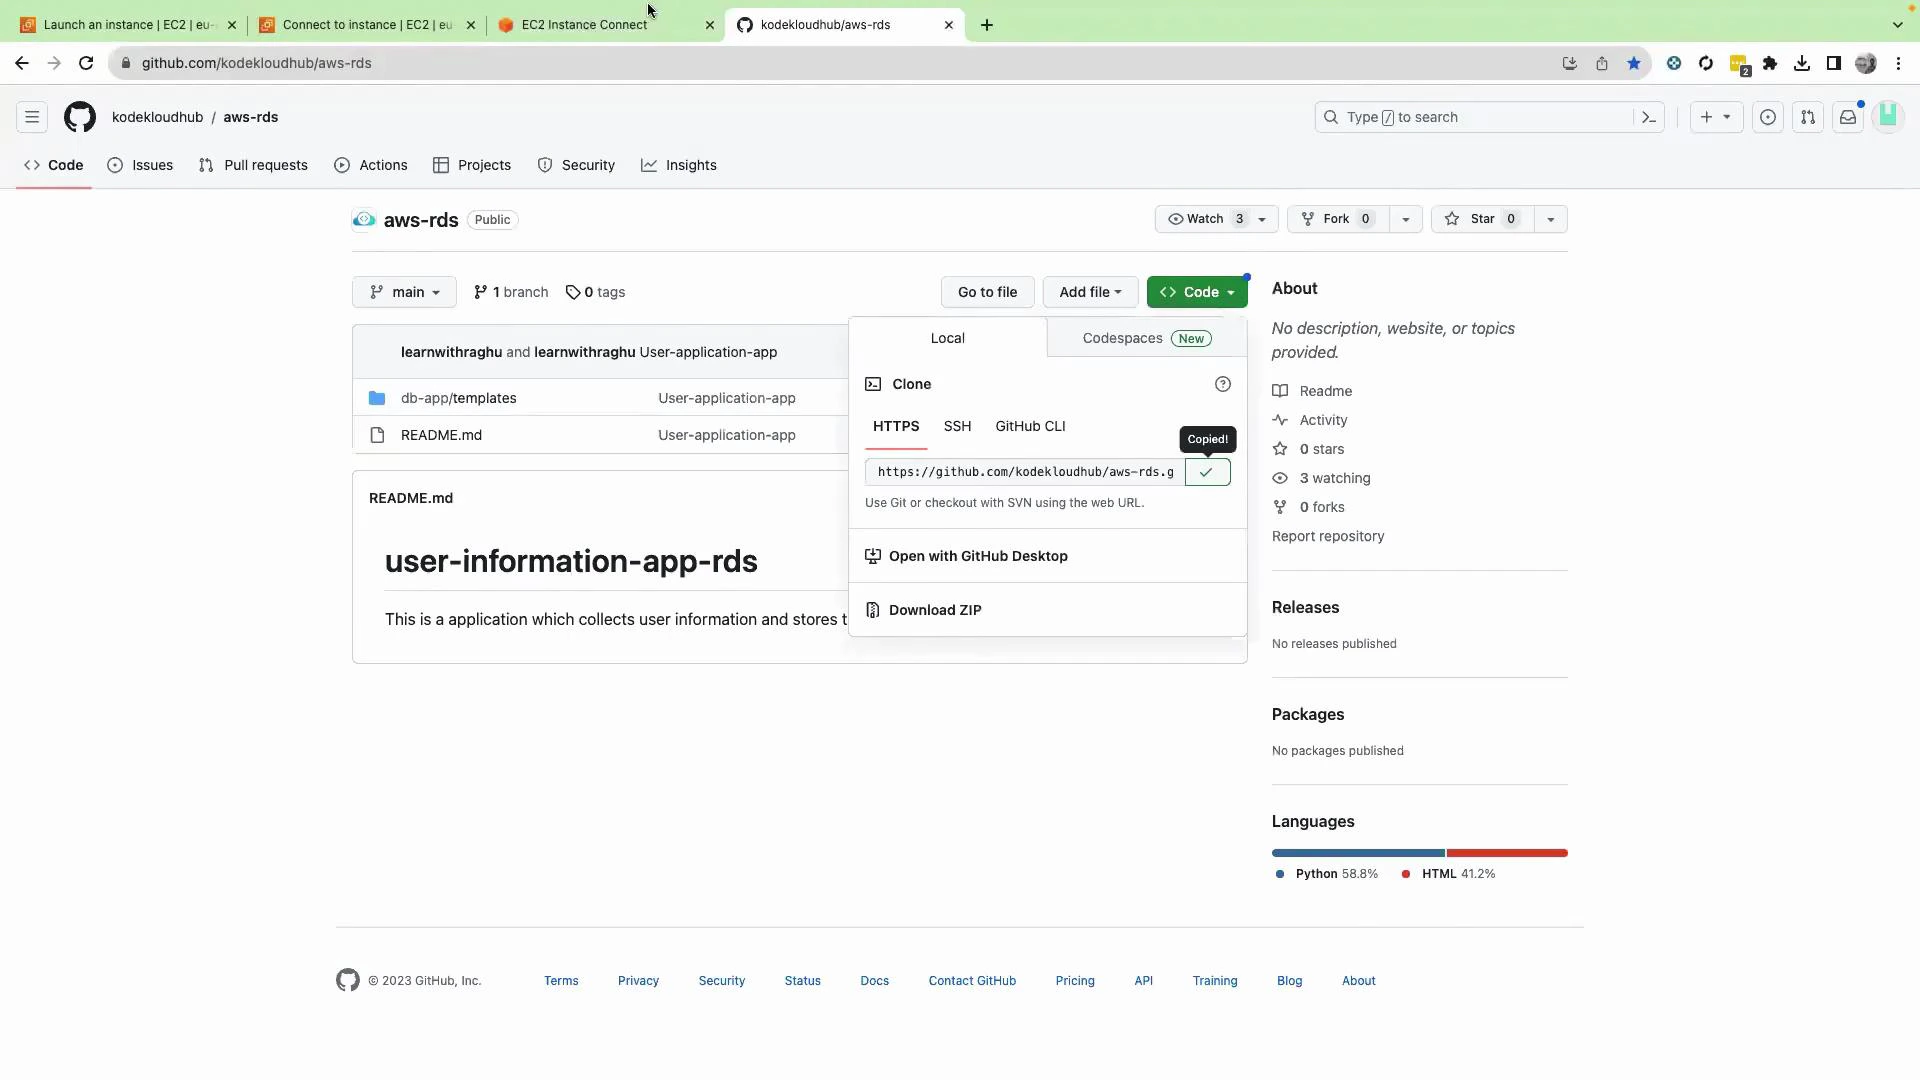 Try cloning the repo. If `git` is not installed you will see an error like:
```bash theme={null}
[root@ip-172-31-19-201 ~]# git clone https://github.com/kodekloudhub/aws-rds.git
bash: git: command not found
```
Install Git and pip (python3-pip on Amazon Linux), then install a PostgreSQL client driver (psycopg2-binary) which the app will use later when you configure an RDS backend:
```bash theme={null}
sudo yum install -y git
sudo yum install -y python3-pip
pip3 install psycopg2-binary
```
***
## Step 4 — Clone the repo and inspect the app
Clone the repository and change into the app folder:
```bash theme={null}
git clone https://github.com/kodekloudhub/aws-rds.git
cd aws-rds/db-app
ls -lrt
```
You should see the main application file and the templates folder:
```bash theme={null}
total 4
-rw-r--r--. 1 root root 3085 Aug 31 22:08 app.py
drwxr-xr-x. 2 root root 65 Aug 31 22:09 templates
```
***
## Step 5 — Install Python dependencies and attempt to start the app
Try running the Flask app:
```bash theme={null}
python3 app.py
```
If Flask is not installed you'll see an import error:
```text theme={null}
Traceback (most recent call last):
File "/root/aws-rds/db-app/app.py", line 1, in
from flask import Flask, render_template, request
ModuleNotFoundError: No module named 'flask'
```
The repository includes a requirements.txt file (in this repository it’s inside the `templates` folder). Install the required Python packages:
```bash theme={null}
cd templates
pip3 install -r requirements.txt
```
Typical packages to be installed include Flask, PyMySQL/Psycopg2, Jinja2, and Werkzeug. You may see a warning about running pip as root.
Tip: For cleaner dependency management, create and activate a Python virtual environment (venv) instead of installing packages globally. This prevents permission conflicts and keeps dependencies isolated.
***
## Step 6 — Start the Flask application
Return to the app folder and start the app:
```bash theme={null}
cd ..
python3 app.py
```
You should see the Flask development server start and bind to port 5000:
```text theme={null}
* Serving Flask app 'app' (lazy loading)
* Environment: production
WARNING: This is a development server. Do not use it in a production deployment.
Use a production WSGI server instead.
* Debug mode: off
* Running on all addresses (0.0.0.0)
* Running on http://127.0.0.1:5000
* Running on http://172.31.19.201:5000
Press CTRL+C to quit
```
The built-in Flask server is for development and testing only. For production, use a WSGI server such as Gunicorn or uWSGI and place it behind a reverse proxy (Nginx, Apache).
***
## Step 7 — Open port 5000 in the instance security group
By default the security group created during instance launch may only allow SSH (22), HTTP (80), and HTTPS (443). Port 5000 is not open, so the Flask app won't be accessible externally until you add an inbound rule.
Try cloning the repo. If `git` is not installed you will see an error like:
```bash theme={null}
[root@ip-172-31-19-201 ~]# git clone https://github.com/kodekloudhub/aws-rds.git
bash: git: command not found
```
Install Git and pip (python3-pip on Amazon Linux), then install a PostgreSQL client driver (psycopg2-binary) which the app will use later when you configure an RDS backend:
```bash theme={null}
sudo yum install -y git
sudo yum install -y python3-pip
pip3 install psycopg2-binary
```
***
## Step 4 — Clone the repo and inspect the app
Clone the repository and change into the app folder:
```bash theme={null}
git clone https://github.com/kodekloudhub/aws-rds.git
cd aws-rds/db-app
ls -lrt
```
You should see the main application file and the templates folder:
```bash theme={null}
total 4
-rw-r--r--. 1 root root 3085 Aug 31 22:08 app.py
drwxr-xr-x. 2 root root 65 Aug 31 22:09 templates
```
***
## Step 5 — Install Python dependencies and attempt to start the app
Try running the Flask app:
```bash theme={null}
python3 app.py
```
If Flask is not installed you'll see an import error:
```text theme={null}
Traceback (most recent call last):
File "/root/aws-rds/db-app/app.py", line 1, in
from flask import Flask, render_template, request
ModuleNotFoundError: No module named 'flask'
```
The repository includes a requirements.txt file (in this repository it’s inside the `templates` folder). Install the required Python packages:
```bash theme={null}
cd templates
pip3 install -r requirements.txt
```
Typical packages to be installed include Flask, PyMySQL/Psycopg2, Jinja2, and Werkzeug. You may see a warning about running pip as root.
Tip: For cleaner dependency management, create and activate a Python virtual environment (venv) instead of installing packages globally. This prevents permission conflicts and keeps dependencies isolated.
***
## Step 6 — Start the Flask application
Return to the app folder and start the app:
```bash theme={null}
cd ..
python3 app.py
```
You should see the Flask development server start and bind to port 5000:
```text theme={null}
* Serving Flask app 'app' (lazy loading)
* Environment: production
WARNING: This is a development server. Do not use it in a production deployment.
Use a production WSGI server instead.
* Debug mode: off
* Running on all addresses (0.0.0.0)
* Running on http://127.0.0.1:5000
* Running on http://172.31.19.201:5000
Press CTRL+C to quit
```
The built-in Flask server is for development and testing only. For production, use a WSGI server such as Gunicorn or uWSGI and place it behind a reverse proxy (Nginx, Apache).
***
## Step 7 — Open port 5000 in the instance security group
By default the security group created during instance launch may only allow SSH (22), HTTP (80), and HTTPS (443). Port 5000 is not open, so the Flask app won't be accessible externally until you add an inbound rule.
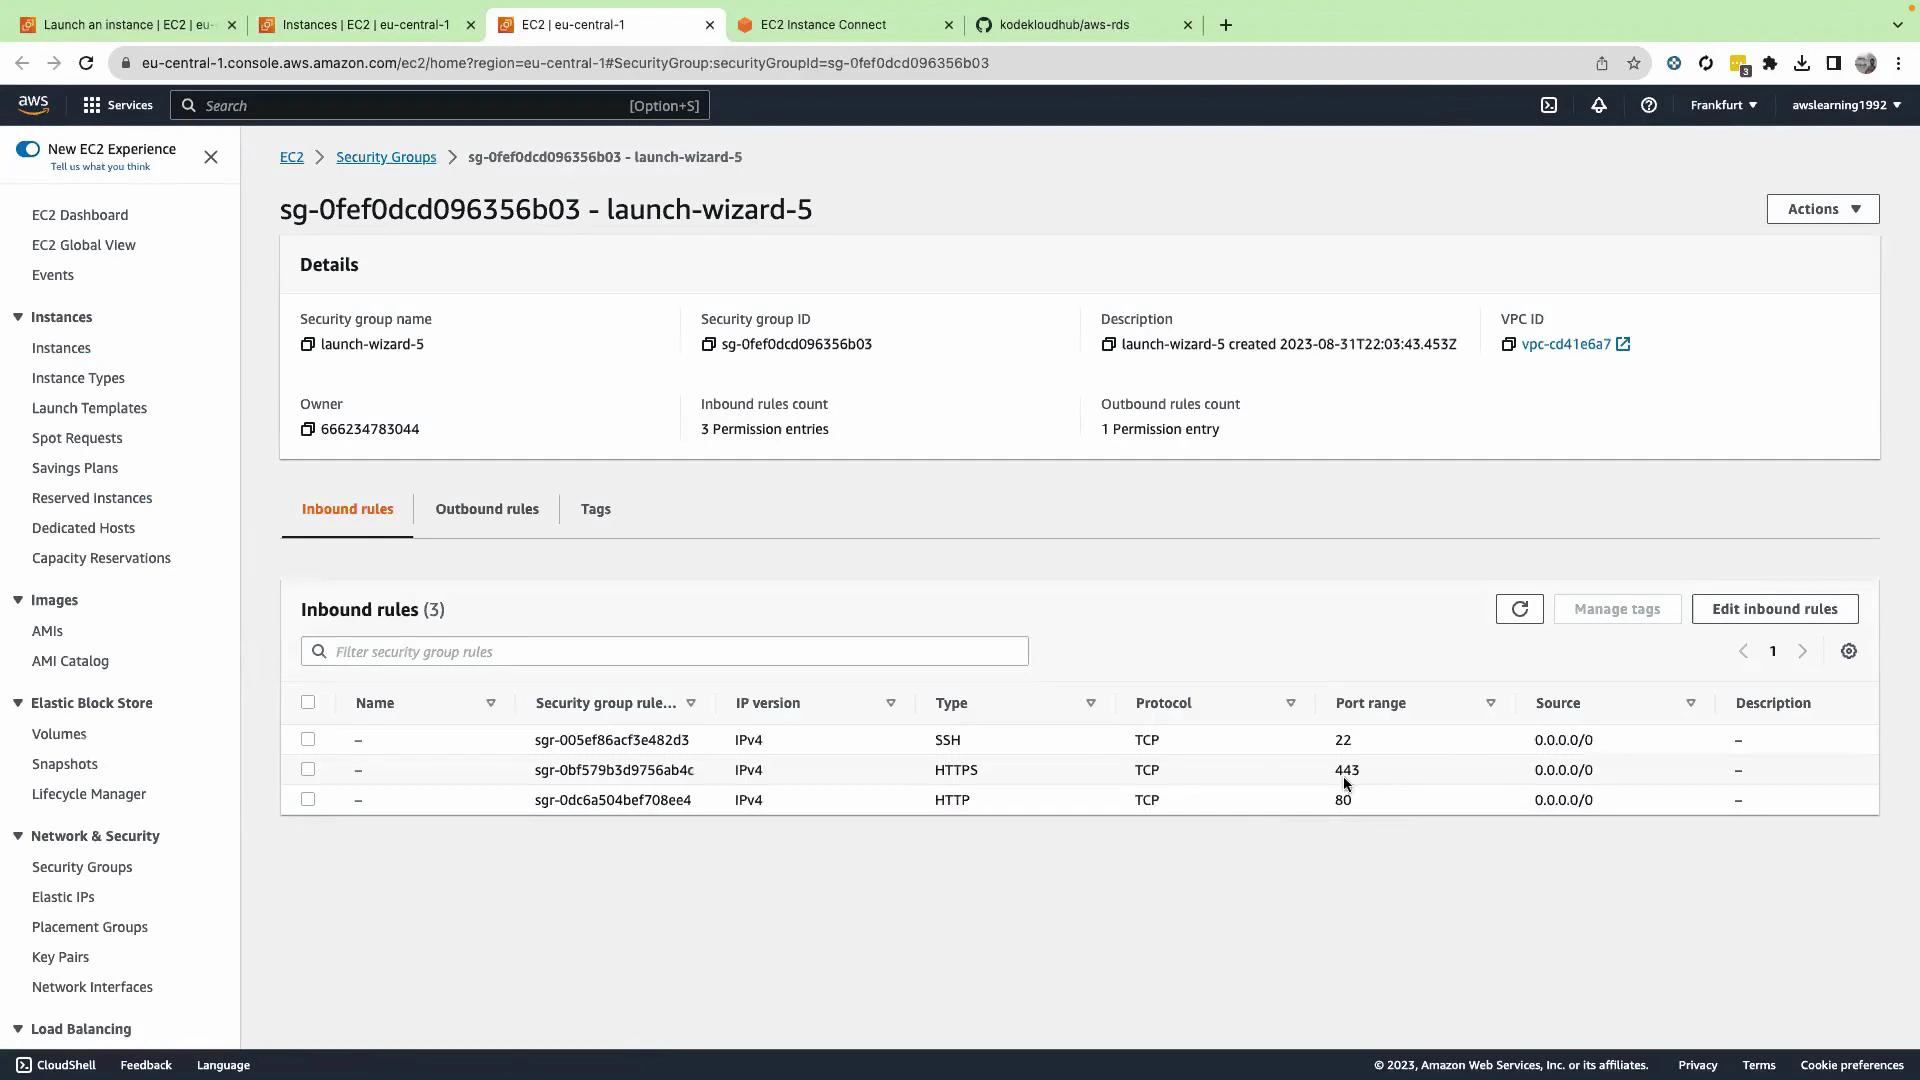 Edit the security group's inbound rules and add a rule allowing TCP port 5000 from your IP (or 0.0.0.0/0 for a quick demo). Save the changes.
Recommended inbound rules (example):
| Type | Protocol | Port range | Source | Use case |
| ---------- | -------- | ---------- | ------------------------------ | ----------------------------------- |
| SSH | TCP | 22 | Your IP (e.g., 203.0.113.4/32) | Secure shell access (restrict this) |
| HTTP | TCP | 80 | 0.0.0.0/0 | Web traffic (optional) |
| HTTPS | TCP | 443 | 0.0.0.0/0 | Encrypted web traffic (optional) |
| Custom TCP | TCP | 5000 | Your IP or 0.0.0.0/0 (demo) | Flask dev server port for testing |
***
## Step 8 — Access the application in a browser
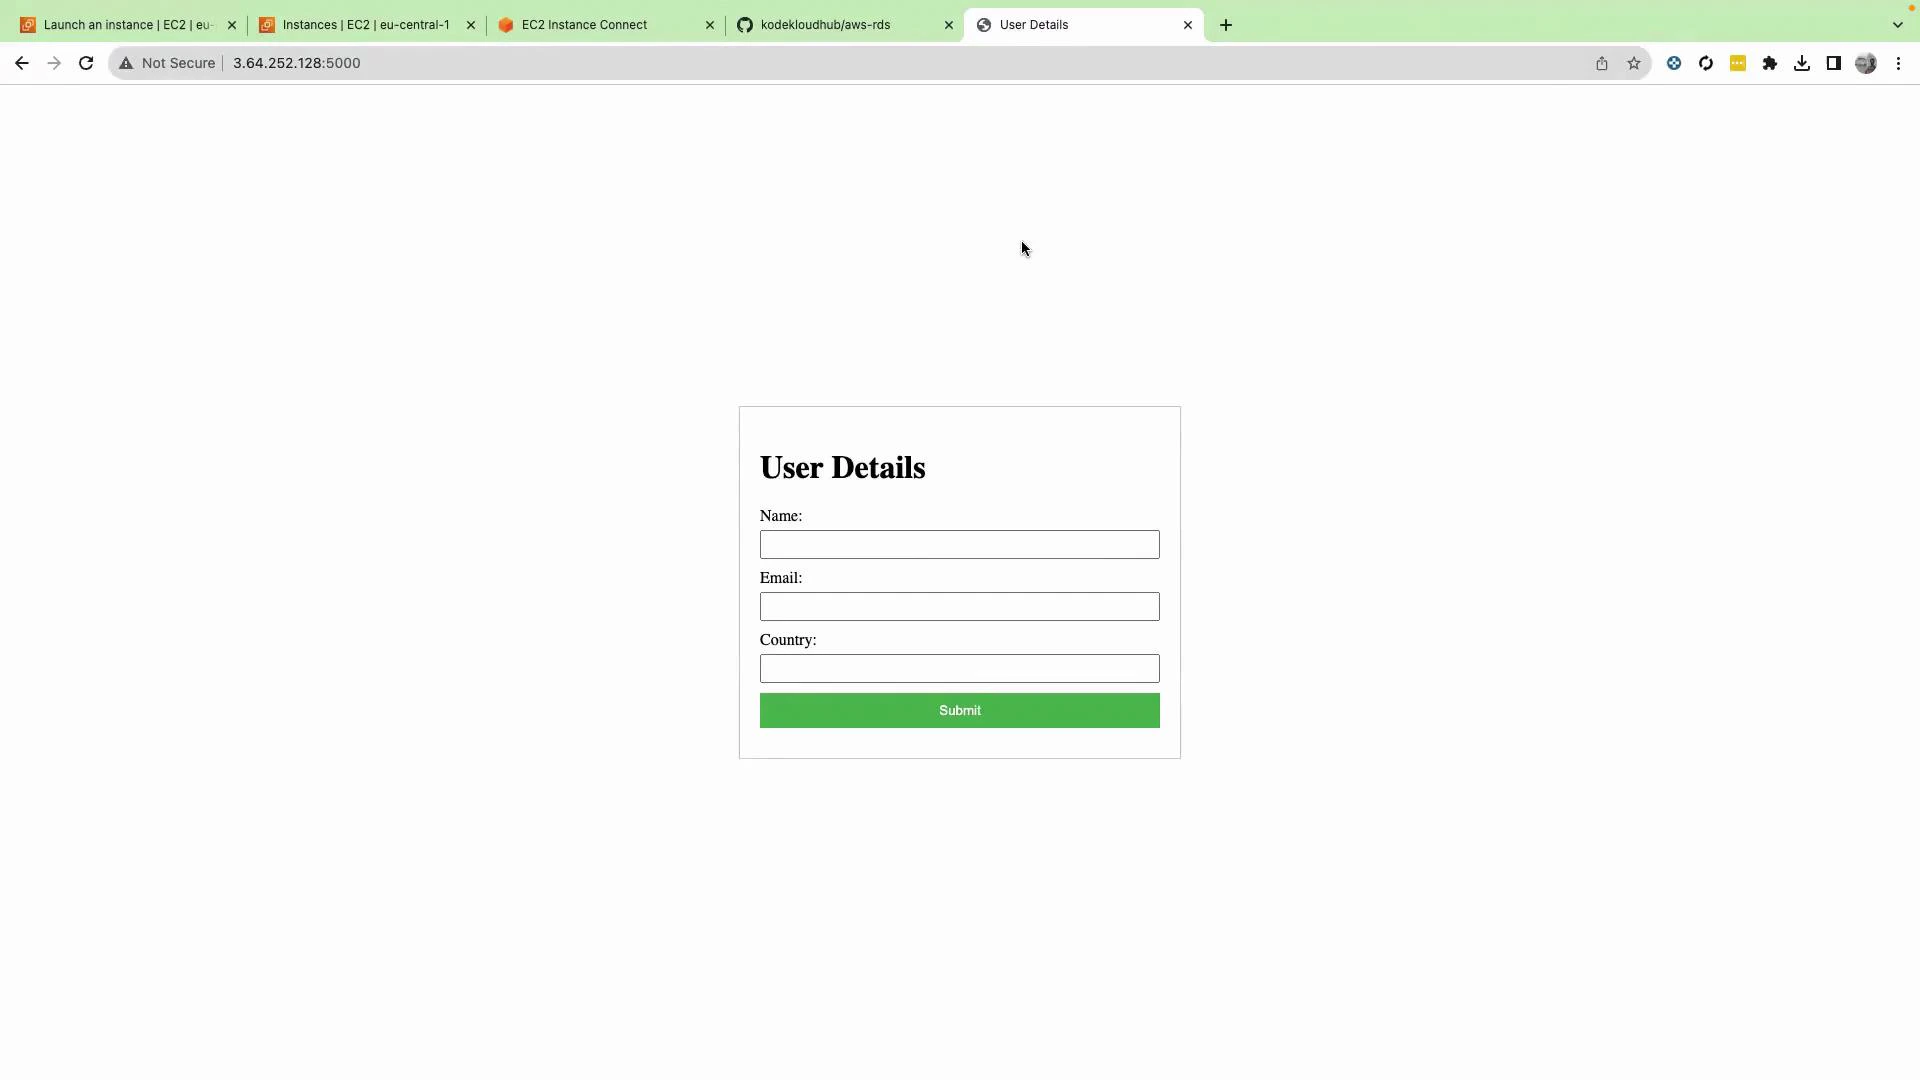
Copy the instance's public IPv4 address from the EC2 console and open the Flask app in a browser:
http\://\:5000
You should see the "User Details" form served by the Flask app:
Edit the security group's inbound rules and add a rule allowing TCP port 5000 from your IP (or 0.0.0.0/0 for a quick demo). Save the changes.
Recommended inbound rules (example):
| Type | Protocol | Port range | Source | Use case |
| ---------- | -------- | ---------- | ------------------------------ | ----------------------------------- |
| SSH | TCP | 22 | Your IP (e.g., 203.0.113.4/32) | Secure shell access (restrict this) |
| HTTP | TCP | 80 | 0.0.0.0/0 | Web traffic (optional) |
| HTTPS | TCP | 443 | 0.0.0.0/0 | Encrypted web traffic (optional) |
| Custom TCP | TCP | 5000 | Your IP or 0.0.0.0/0 (demo) | Flask dev server port for testing |
***
## Step 8 — Access the application in a browser
Copy the instance's public IPv4 address from the EC2 console and open the Flask app in a browser:
http\://\:5000
You should see the "User Details" form served by the Flask app:
 ***
## Step 9 — Submit data (expected failure)
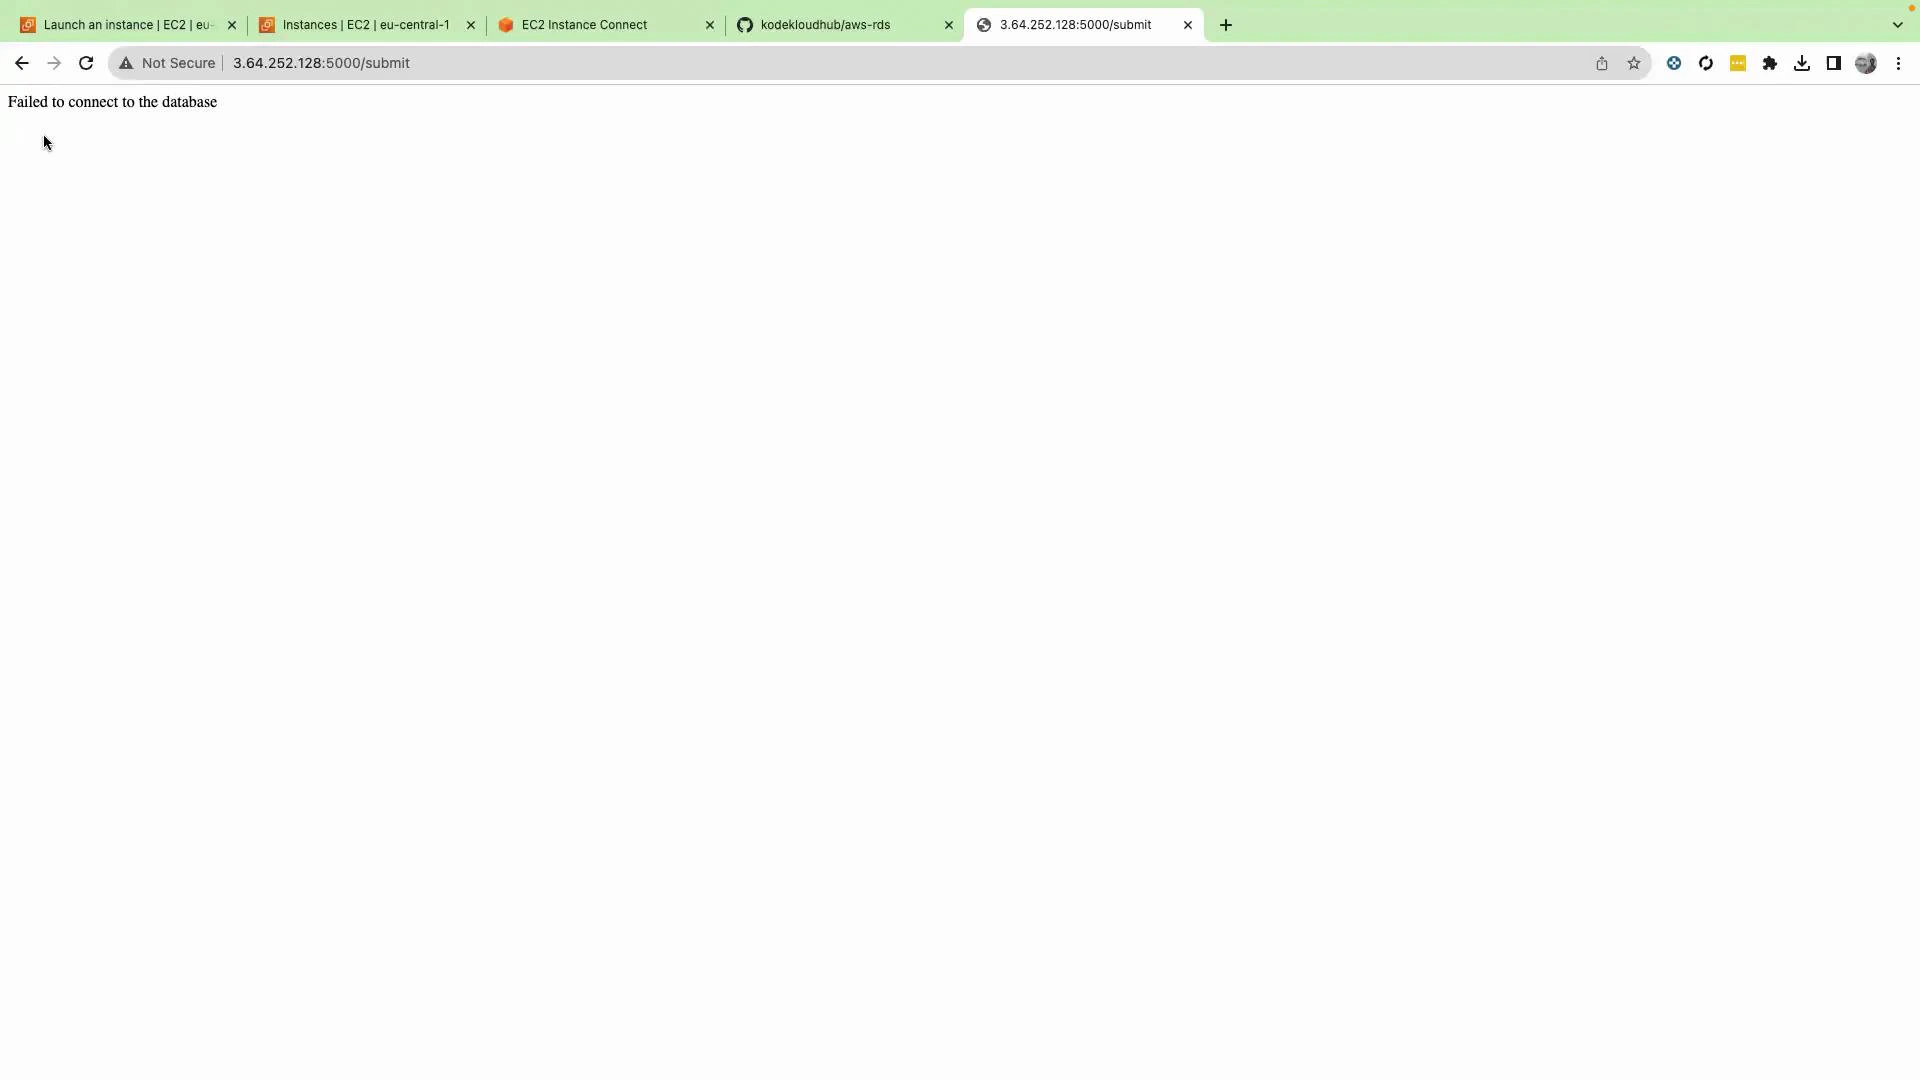
The app displays a form to collect user details. If you submit the form now, the app will likely fail to connect to a database and return an error like "Failed to connect to the database." This is expected — you have not yet configured RDS connection details (endpoint, port, username, password, database name) or the necessary network access (VPC, security group, routing).
***
## Step 9 — Submit data (expected failure)
The app displays a form to collect user details. If you submit the form now, the app will likely fail to connect to a database and return an error like "Failed to connect to the database." This is expected — you have not yet configured RDS connection details (endpoint, port, username, password, database name) or the necessary network access (VPC, security group, routing).
 ***
## Next steps — Connect the app to RDS (not covered in this lesson)
To complete the deployment and persist form submissions you will need to:
* Create an RDS instance (MySQL/Postgres) or use an existing database.
* Provide the application with the database endpoint, port, username, password, and database name (edit config or environment variables in the app).
* Ensure network connectivity: place EC2 and RDS in the same VPC/subnet or allow routing, and update security group inbound/outbound rules to permit traffic between EC2 and RDS.
* Re-test the form submission and verify data is inserted into the database.
Additional resources and references
* [Amazon EC2 documentation](https://docs.aws.amazon.com/ec2/)
* [EC2 Instance Connect](https://docs.aws.amazon.com/AWSEC2/latest/UserGuide/Connect-using-EC2-Instance-Connect.html)
* [Flask documentation](https://flask.palletsprojects.com/)
* [AWS RDS documentation](https://docs.aws.amazon.com/rds/)
* [Python virtual environments (venv)](https://docs.python.org/3/library/venv.html)
That’s it for this lesson — in the next lesson we will configure the RDS database and connect the app so form submissions persist successfully.
***
## Next steps — Connect the app to RDS (not covered in this lesson)
To complete the deployment and persist form submissions you will need to:
* Create an RDS instance (MySQL/Postgres) or use an existing database.
* Provide the application with the database endpoint, port, username, password, and database name (edit config or environment variables in the app).
* Ensure network connectivity: place EC2 and RDS in the same VPC/subnet or allow routing, and update security group inbound/outbound rules to permit traffic between EC2 and RDS.
* Re-test the form submission and verify data is inserted into the database.
Additional resources and references
* [Amazon EC2 documentation](https://docs.aws.amazon.com/ec2/)
* [EC2 Instance Connect](https://docs.aws.amazon.com/AWSEC2/latest/UserGuide/Connect-using-EC2-Instance-Connect.html)
* [Flask documentation](https://flask.palletsprojects.com/)
* [AWS RDS documentation](https://docs.aws.amazon.com/rds/)
* [Python virtual environments (venv)](https://docs.python.org/3/library/venv.html)
That’s it for this lesson — in the next lesson we will configure the RDS database and connect the app so form submissions persist successfully.