> ## Documentation Index
> Fetch the complete documentation index at: https://notes.kodekloud.com/llms.txt
> Use this file to discover all available pages before exploring further.
# Code Editor Alternative to JupyterLab Part 2
> Comparison of AWS SageMaker managed VS Code and JupyterLab, guiding when to use each, provisioning Code Editor spaces, debugging, refactoring notebooks into production scripts
If your work is focused on general software development—building applications, writing production code, and managing large code bases—the [AWS SageMaker](https://learn.kodekloud.com/user/courses/aws-sagemaker) Code Editor (managed VS Code) is generally a better fit. For exploratory workflows—data analysis, iterative visualization, experiment annotation, and fast prototyping—JupyterLab and Jupyter Notebooks remain the best choice.
 Creating a Code Editor space
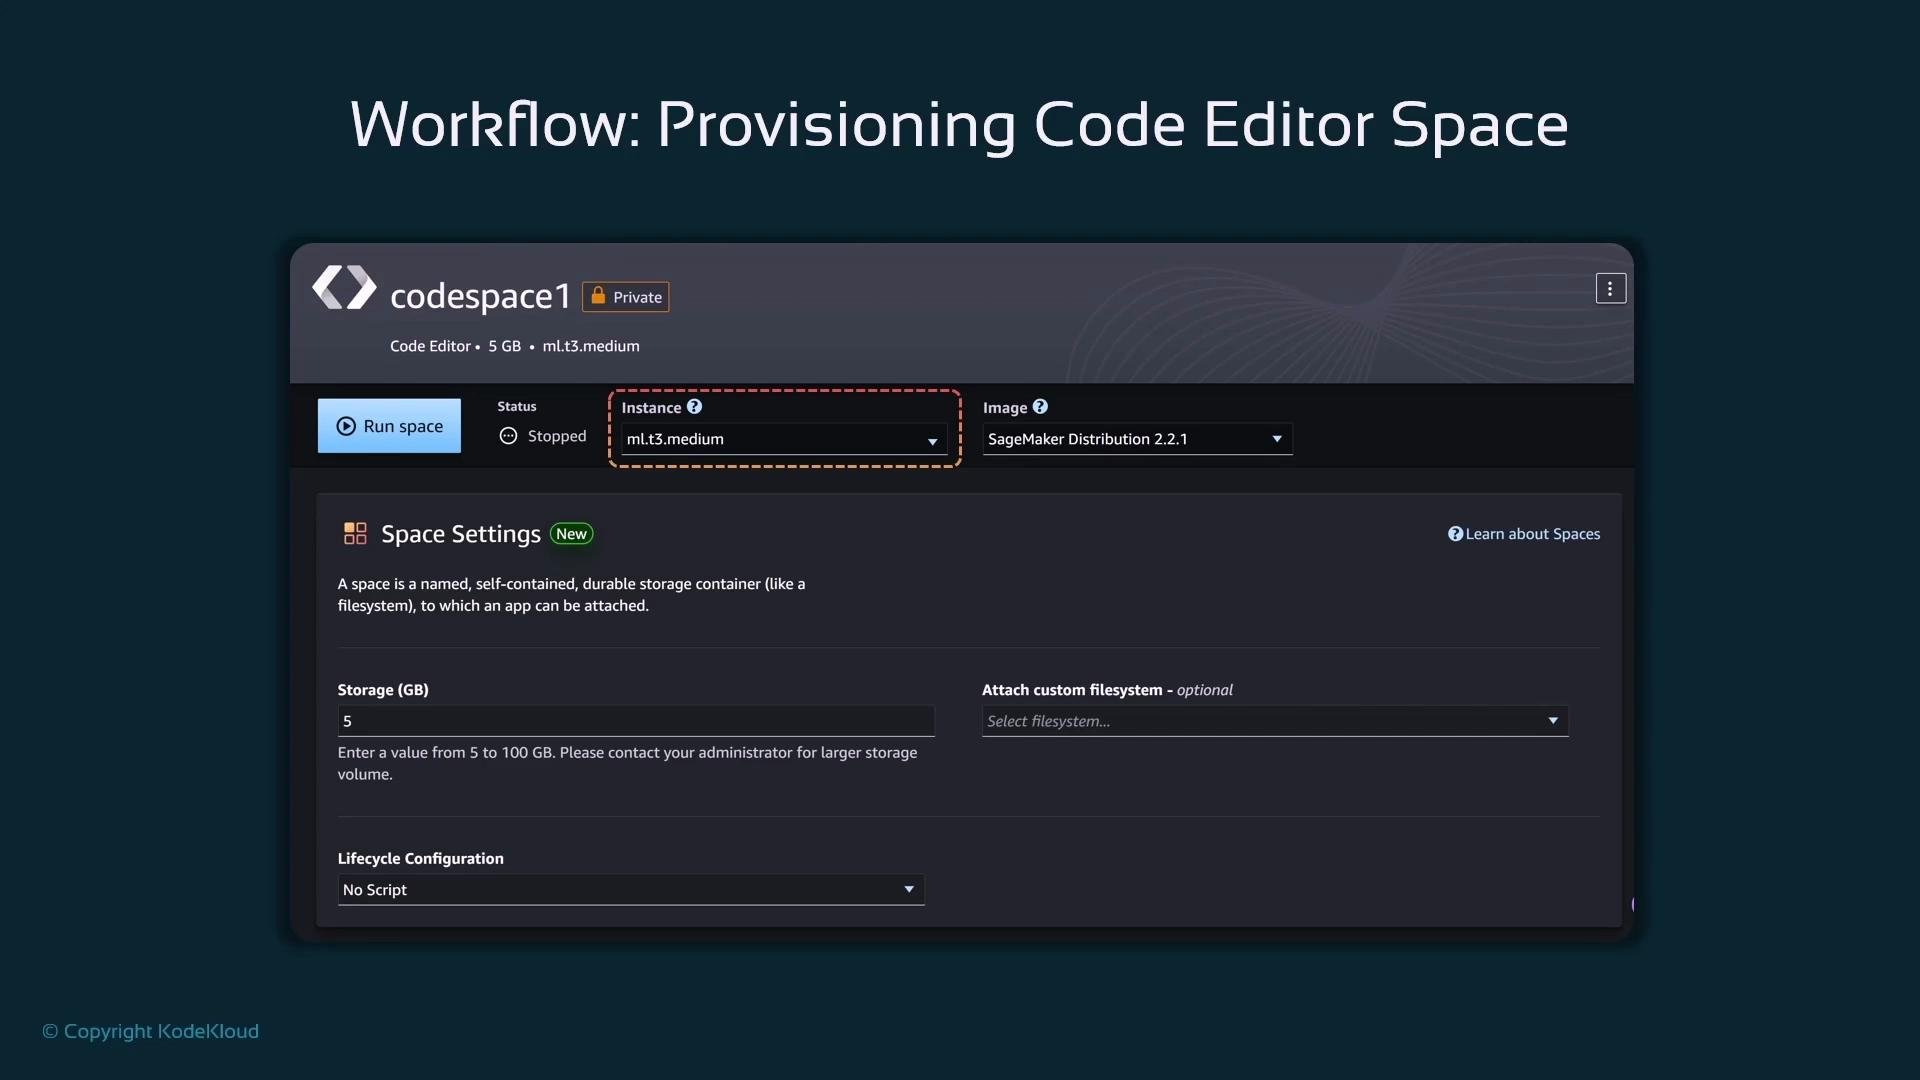
To create a Code Editor space in SageMaker Studio, open the Applications panel and find the Code Editor application. Creating a space provisions a managed Amazon EC2 instance and launches an instance of Visual Studio Code inside a container. When provisioning you must provide a name for the space (for example, "My Code Editor Space").
When the Code Editor space is provisioned you can inspect:
* the EC2 instance type (CPU/memory),
* the container image used,
* and the attached storage size.
Once the space state is Running, click Open Code Editor to launch the VS Code environment. The interface behaves like standard Visual Studio Code: a left activity bar for files and extensions, a central editor area with tabs, and full support for debugging and version control.
Creating a Code Editor space
To create a Code Editor space in SageMaker Studio, open the Applications panel and find the Code Editor application. Creating a space provisions a managed Amazon EC2 instance and launches an instance of Visual Studio Code inside a container. When provisioning you must provide a name for the space (for example, "My Code Editor Space").
When the Code Editor space is provisioned you can inspect:
* the EC2 instance type (CPU/memory),
* the container image used,
* and the attached storage size.
Once the space state is Running, click Open Code Editor to launch the VS Code environment. The interface behaves like standard Visual Studio Code: a left activity bar for files and extensions, a central editor area with tabs, and full support for debugging and version control.
 Key provisioning details
| Setting | Default | Notes |
| --------------- | ---------------------------- | ---------------------------------------------------------------------------------------------------------- |
| Instance size | ml.t3.medium | Change to larger instance types if you need more CPU or memory for heavy development tasks. |
| Container image | SageMaker distribution image | Includes common libraries for Python/VS Code. You can select custom images for framework-specific tooling. |
| Storage | 5 GB (EBS) | Can be increased up to 100 GB when provisioning. Use larger volumes for datasets and local artifacts. |
Debugging and running scripts
One of the primary benefits of the Code Editor is the built-in debugger. You can set breakpoints, step line-by-line, inspect variables, and trace exceptions—capabilities that make debugging production-style scripts far easier than in many notebook environments.
Below is a concise, corrected example script that downloads a CSV from S3, preprocesses the data, and uploads the processed file back to S3. This example includes the required imports, an initialized S3 client, and robust handling for numeric-only median imputation and scaling.
```python theme={null}
# clean_data.py
import argparse
import boto3
import pandas as pd
from sklearn.preprocessing import StandardScaler
s3 = boto3.client("s3")
def upload_to_s3(local_path, bucket, key):
"""Upload a local file to S3."""
s3.upload_file(local_path, bucket, key)
def process_data(input_path, output_path):
"""Perform data preprocessing: handle missing values and scale numeric columns."""
df = pd.read_csv(input_path)
# Fill missing values with median for numeric columns only
df.fillna(df.median(numeric_only=True), inplace=True)
# Standardize numeric columns
numeric_cols = df.select_dtypes(include=["float64", "int64"]).columns
scaler = StandardScaler()
if len(numeric_cols) > 0:
df[numeric_cols] = scaler.fit_transform(df[numeric_cols])
# Save processed data
df.to_csv(output_path, index=False)
if __name__ == "__main__":
parser = argparse.ArgumentParser(description="Process CSV data and upload results to S3.")
parser.add_argument("--input-bucket", type=str, required=True, help="S3 bucket containing input data")
parser.add_argument("--input-key", type=str, required=True, help="S3 key for input data")
parser.add_argument("--output-bucket", type=str, required=True, help="S3 bucket for processed data")
parser.add_argument("--output-key", type=str, required=True, help="S3 key for processed data")
args = parser.parse_args()
# Example local paths derived from S3 keys (adjust as needed)
input_path = "/tmp/input.csv"
output_path = "/tmp/output.csv"
# Download input from S3
s3.download_file(args.input_bucket, args.input_key, input_path)
# Process and upload
process_data(input_path, output_path)
upload_to_s3(output_path, args.output_bucket, args.output_key)
```
If you invoke the script without required CLI arguments, argparse will print a usage message and exit:
```text theme={null}
usage: clean_data.py [-h] --input-bucket INPUT_BUCKET --input-key INPUT_KEY --output-bucket OUTPUT_BUCKET --output-key OUTPUT_KEY
clean_data.py: error: the following arguments are required: --input-bucket, --input-key, --output-bucket, --output-key
```
When debugging in VS Code, set breakpoints (for example, inside process\_data), step into functions, and inspect variables like the DataFrame and the StandardScaler instance. This lets you reproduce and fix runtime exceptions that can be difficult to debug in notebook cells.
Note: VS Code supports notebooks, but its notebook experience typically lacks some of JupyterLab’s richer interactive visualization and exploratory tools. For interactive visual exploration, JupyterLab is usually superior.
Here is a small example demonstrating raw tabular data with missing values loaded into pandas:
```python theme={null}
import pandas as pd
data = {
"Bedrooms": [2, 3, 4, None],
"Price": [200000, 250000, None, 150000],
"Neighborhood": ["Downtown", None, "Suburb", "Rural"]
}
df = pd.DataFrame(data)
print(df)
```
Typical pandas output will represent missing numeric values as NaN:
Bedrooms Price Neighborhood
0 2.0 200000.0 Downtown
1 3.0 250000.0 NaN
2 4.0 NaN Suburb
3 NaN 150000.0 Rural
Why choose Code Editor vs JupyterLab
Use the Code Editor when your workflow emphasizes software engineering practices, productionization, and automation. Use JupyterLab for interactive exploration and visualization.
| Environment | Best for | Key benefits |
| ---------------------- | ------------------------------------------------------- | ----------------------------------------------------------------------------------- |
| JupyterLab / Notebooks | Early-stage exploration, visualization, ad-hoc analysis | Rich interactive plotting, cell-based experimentation, easy data inspection |
| Code Editor (VS Code) | Refactoring, production scripts, automation, CI/CD | Powerful debugger, Git integration, multi-file editing, lightweight for large repos |
Hybrid workflow recommendation: start with Jupyter Notebooks for exploration and prototyping, then refactor stable, reusable logic into modules and scripts in the Code Editor for productionization, testing, and automation.
Key provisioning details
| Setting | Default | Notes |
| --------------- | ---------------------------- | ---------------------------------------------------------------------------------------------------------- |
| Instance size | ml.t3.medium | Change to larger instance types if you need more CPU or memory for heavy development tasks. |
| Container image | SageMaker distribution image | Includes common libraries for Python/VS Code. You can select custom images for framework-specific tooling. |
| Storage | 5 GB (EBS) | Can be increased up to 100 GB when provisioning. Use larger volumes for datasets and local artifacts. |
Debugging and running scripts
One of the primary benefits of the Code Editor is the built-in debugger. You can set breakpoints, step line-by-line, inspect variables, and trace exceptions—capabilities that make debugging production-style scripts far easier than in many notebook environments.
Below is a concise, corrected example script that downloads a CSV from S3, preprocesses the data, and uploads the processed file back to S3. This example includes the required imports, an initialized S3 client, and robust handling for numeric-only median imputation and scaling.
```python theme={null}
# clean_data.py
import argparse
import boto3
import pandas as pd
from sklearn.preprocessing import StandardScaler
s3 = boto3.client("s3")
def upload_to_s3(local_path, bucket, key):
"""Upload a local file to S3."""
s3.upload_file(local_path, bucket, key)
def process_data(input_path, output_path):
"""Perform data preprocessing: handle missing values and scale numeric columns."""
df = pd.read_csv(input_path)
# Fill missing values with median for numeric columns only
df.fillna(df.median(numeric_only=True), inplace=True)
# Standardize numeric columns
numeric_cols = df.select_dtypes(include=["float64", "int64"]).columns
scaler = StandardScaler()
if len(numeric_cols) > 0:
df[numeric_cols] = scaler.fit_transform(df[numeric_cols])
# Save processed data
df.to_csv(output_path, index=False)
if __name__ == "__main__":
parser = argparse.ArgumentParser(description="Process CSV data and upload results to S3.")
parser.add_argument("--input-bucket", type=str, required=True, help="S3 bucket containing input data")
parser.add_argument("--input-key", type=str, required=True, help="S3 key for input data")
parser.add_argument("--output-bucket", type=str, required=True, help="S3 bucket for processed data")
parser.add_argument("--output-key", type=str, required=True, help="S3 key for processed data")
args = parser.parse_args()
# Example local paths derived from S3 keys (adjust as needed)
input_path = "/tmp/input.csv"
output_path = "/tmp/output.csv"
# Download input from S3
s3.download_file(args.input_bucket, args.input_key, input_path)
# Process and upload
process_data(input_path, output_path)
upload_to_s3(output_path, args.output_bucket, args.output_key)
```
If you invoke the script without required CLI arguments, argparse will print a usage message and exit:
```text theme={null}
usage: clean_data.py [-h] --input-bucket INPUT_BUCKET --input-key INPUT_KEY --output-bucket OUTPUT_BUCKET --output-key OUTPUT_KEY
clean_data.py: error: the following arguments are required: --input-bucket, --input-key, --output-bucket, --output-key
```
When debugging in VS Code, set breakpoints (for example, inside process\_data), step into functions, and inspect variables like the DataFrame and the StandardScaler instance. This lets you reproduce and fix runtime exceptions that can be difficult to debug in notebook cells.
Note: VS Code supports notebooks, but its notebook experience typically lacks some of JupyterLab’s richer interactive visualization and exploratory tools. For interactive visual exploration, JupyterLab is usually superior.
Here is a small example demonstrating raw tabular data with missing values loaded into pandas:
```python theme={null}
import pandas as pd
data = {
"Bedrooms": [2, 3, 4, None],
"Price": [200000, 250000, None, 150000],
"Neighborhood": ["Downtown", None, "Suburb", "Rural"]
}
df = pd.DataFrame(data)
print(df)
```
Typical pandas output will represent missing numeric values as NaN:
Bedrooms Price Neighborhood
0 2.0 200000.0 Downtown
1 3.0 250000.0 NaN
2 4.0 NaN Suburb
3 NaN 150000.0 Rural
Why choose Code Editor vs JupyterLab
Use the Code Editor when your workflow emphasizes software engineering practices, productionization, and automation. Use JupyterLab for interactive exploration and visualization.
| Environment | Best for | Key benefits |
| ---------------------- | ------------------------------------------------------- | ----------------------------------------------------------------------------------- |
| JupyterLab / Notebooks | Early-stage exploration, visualization, ad-hoc analysis | Rich interactive plotting, cell-based experimentation, easy data inspection |
| Code Editor (VS Code) | Refactoring, production scripts, automation, CI/CD | Powerful debugger, Git integration, multi-file editing, lightweight for large repos |
Hybrid workflow recommendation: start with Jupyter Notebooks for exploration and prototyping, then refactor stable, reusable logic into modules and scripts in the Code Editor for productionization, testing, and automation.
 When to refactor into scripts
As projects mature, move exploratory logic into well-tested, maintainable code:
* Extract reusable functions and modules from notebooks.
* Add robust error handling, input validation, and structured logging.
* Introduce unit tests and consider type hints for clearer interfaces.
* Use the Code Editor to refactor, debug, and integrate code into automation pipelines (SageMaker Pipelines, Step Functions, or Airflow).
When to refactor into scripts
As projects mature, move exploratory logic into well-tested, maintainable code:
* Extract reusable functions and modules from notebooks.
* Add robust error handling, input validation, and structured logging.
* Introduce unit tests and consider type hints for clearer interfaces.
* Use the Code Editor to refactor, debug, and integrate code into automation pipelines (SageMaker Pipelines, Step Functions, or Airflow).
 Summary
* The Code Editor in [AWS SageMaker](https://learn.kodekloud.com/user/courses/aws-sagemaker) Studio provides a managed VS Code environment ideal for application development, refactoring, and building automation.
* JupyterLab remains the go-to environment for exploratory data analysis and interactive visualization.
* A hybrid approach is common: notebooks for experimentation, then refactor to scripts and develop in an IDE for production.
* For automation (SageMaker Pipelines, Step Functions, Apache Airflow), develop and test robust scripts in the Code Editor and integrate them into your CI/CD and MLOps workflows.
Summary
* The Code Editor in [AWS SageMaker](https://learn.kodekloud.com/user/courses/aws-sagemaker) Studio provides a managed VS Code environment ideal for application development, refactoring, and building automation.
* JupyterLab remains the go-to environment for exploratory data analysis and interactive visualization.
* A hybrid approach is common: notebooks for experimentation, then refactor to scripts and develop in an IDE for production.
* For automation (SageMaker Pipelines, Step Functions, Apache Airflow), develop and test robust scripts in the Code Editor and integrate them into your CI/CD and MLOps workflows.
 Further reading and references
* [AWS SageMaker documentation](https://learn.kodekloud.com/user/courses/aws-sagemaker)
* [Amazon S3 developer guide](https://learn.kodekloud.com/user/courses/amazon-simple-storage-service-amazon-s3)
* [Amazon EC2 documentation](https://learn.kodekloud.com/user/courses/amazon-elastic-compute-cloud-ec2)
This wraps up the lesson. A brief discussion of SageMaker Studio Classic—what it is and why it is no longer the preferred environment—is provided in a separate module.
Further reading and references
* [AWS SageMaker documentation](https://learn.kodekloud.com/user/courses/aws-sagemaker)
* [Amazon S3 developer guide](https://learn.kodekloud.com/user/courses/amazon-simple-storage-service-amazon-s3)
* [Amazon EC2 documentation](https://learn.kodekloud.com/user/courses/amazon-elastic-compute-cloud-ec2)
This wraps up the lesson. A brief discussion of SageMaker Studio Classic—what it is and why it is no longer the preferred environment—is provided in a separate module.