Online Storage Migration
Online migration transfers data over a network rather than using physical disks. It provides a seamless way to move data between environments. Key tools and services include:- Windows Server Storage Migration Service
- Azure File Sync
- AzCopy
- Storage Explorer
- Azure CLI and PowerShell
Azure File Sync
Azure File Sync synchronizes on-premises file shares with an Azure file share. When synchronization is complete, on-premises file servers serve as caching points, allowing on-demand access without the need to locally store all data.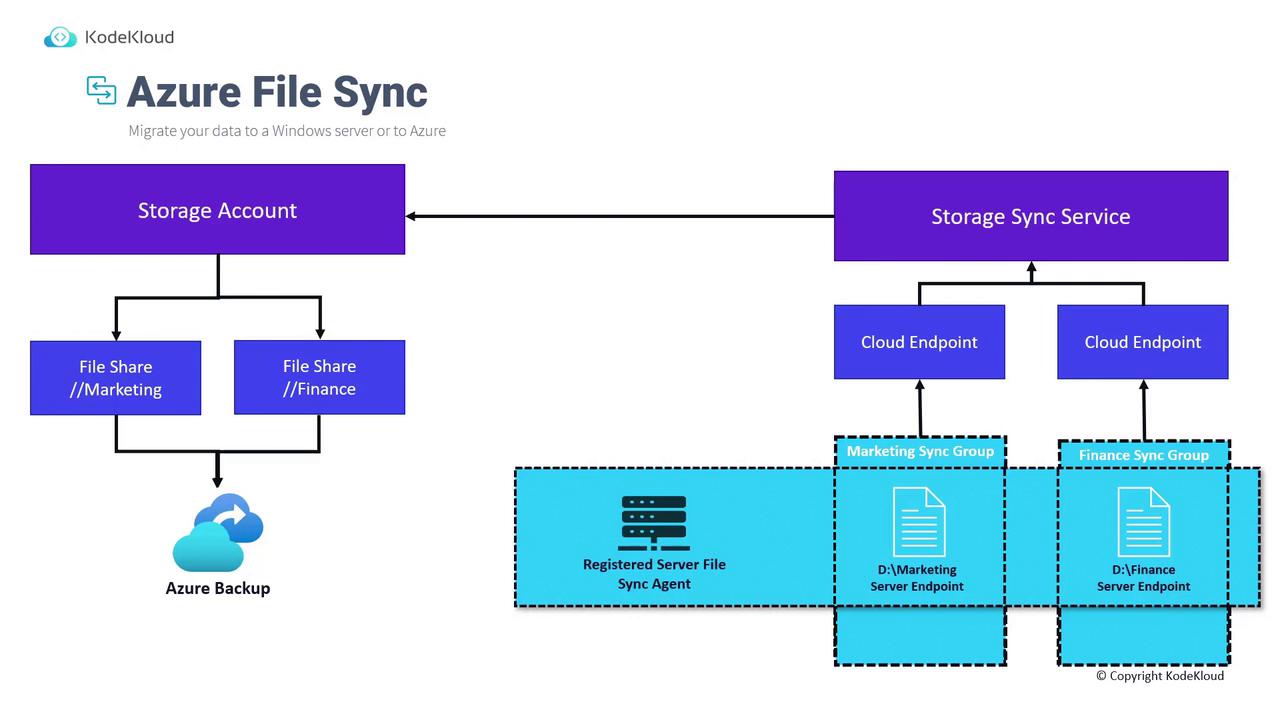
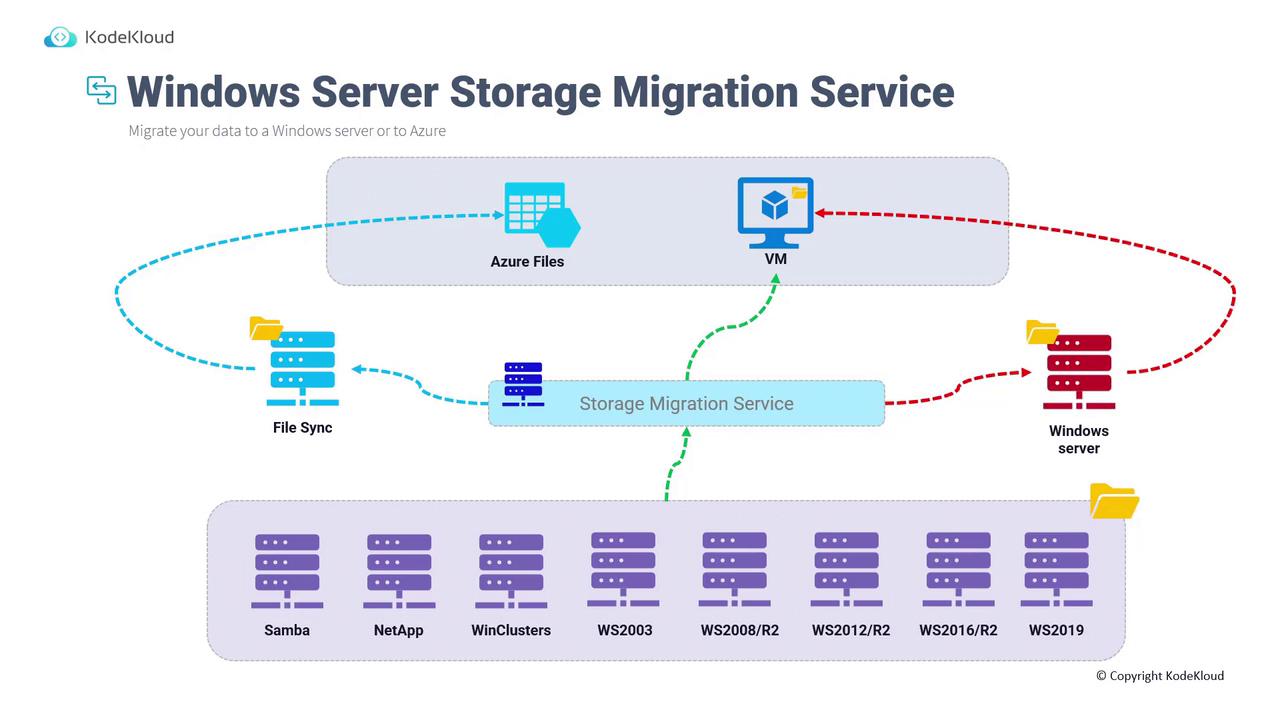
Windows Server Storage Migration Service
The Windows Server Storage Migration Service facilitates the migration of data from various on-premises file servers—including Samba, NetApp, and different Windows Server versions—to a new Windows Server hosted on-premises or in Azure. It supports several migration paths:- Direct migration to a Virtual Machine using the Storage Migration Service.
- Synchronization to Azure Files via Azure File Sync.
- Manual data copying to a Windows Server before migrating to Azure.
AzCopy and Storage Explorer
AzCopy is a command-line interface (CLI) tool designed for efficient data transfers, while Storage Explorer provides a graphical user interface (GUI) for similar tasks. Both tools are popular choices for transferring data from on-premises environments to Azure, as showcased in the AZ-104: Microsoft Azure Administrator course.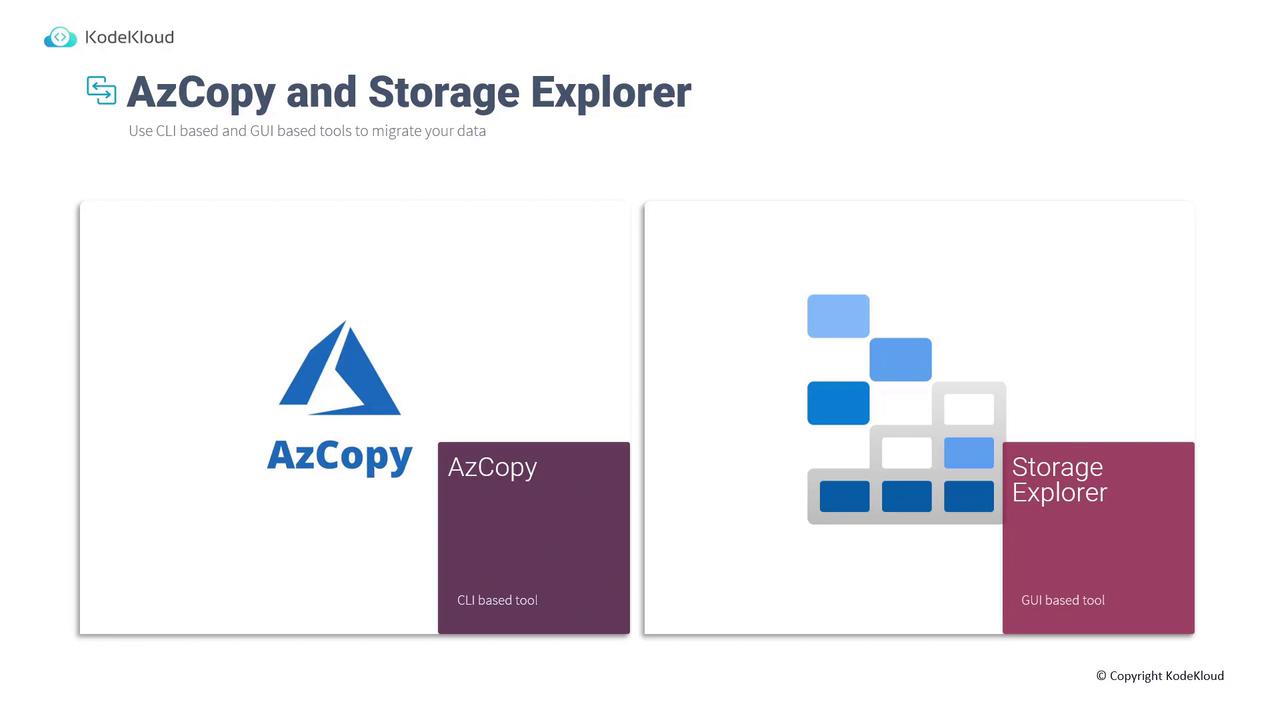
Offline Storage Migration
Offline migration involves transferring data by physically moving storage devices. Two primary services offered for offline migration include:- Azure Import/Export Service
- Azure Data Box
Azure Import/Export Service
The Azure Import/Export Service is designed to move large datasets between on-premises environments and Azure. It supports two distinct workflows: import (from on-premises to Azure) and export (from Azure to on-premises).Import Workflow
- Identify the data to be transferred (e.g., 40 terabytes).
- Prepare the disk and copy the data onto it using the WA Import/Export tool.
- Generate journal files to ensure data integrity.
- Create an import job in Azure with a reference to the destination storage account, and upload the journal files.
- Ship the prepared drives to an Azure data center using a carrier service (e.g., UPS, FedEx). The job includes the data center’s address and an optional return address.
- Once processed, the data is copied to the Azure Storage Account, and the disks are returned.
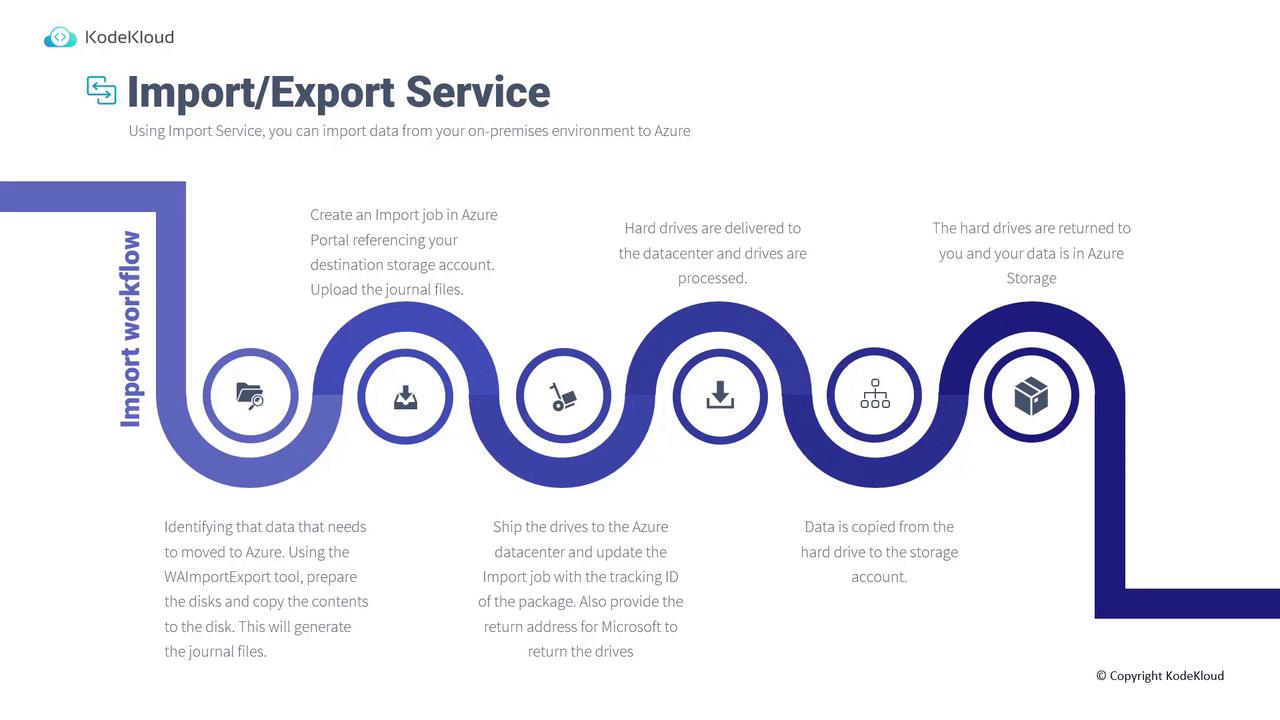
Ensure that journal files are properly generated, as they play a critical role in maintaining data integrity during the import process.
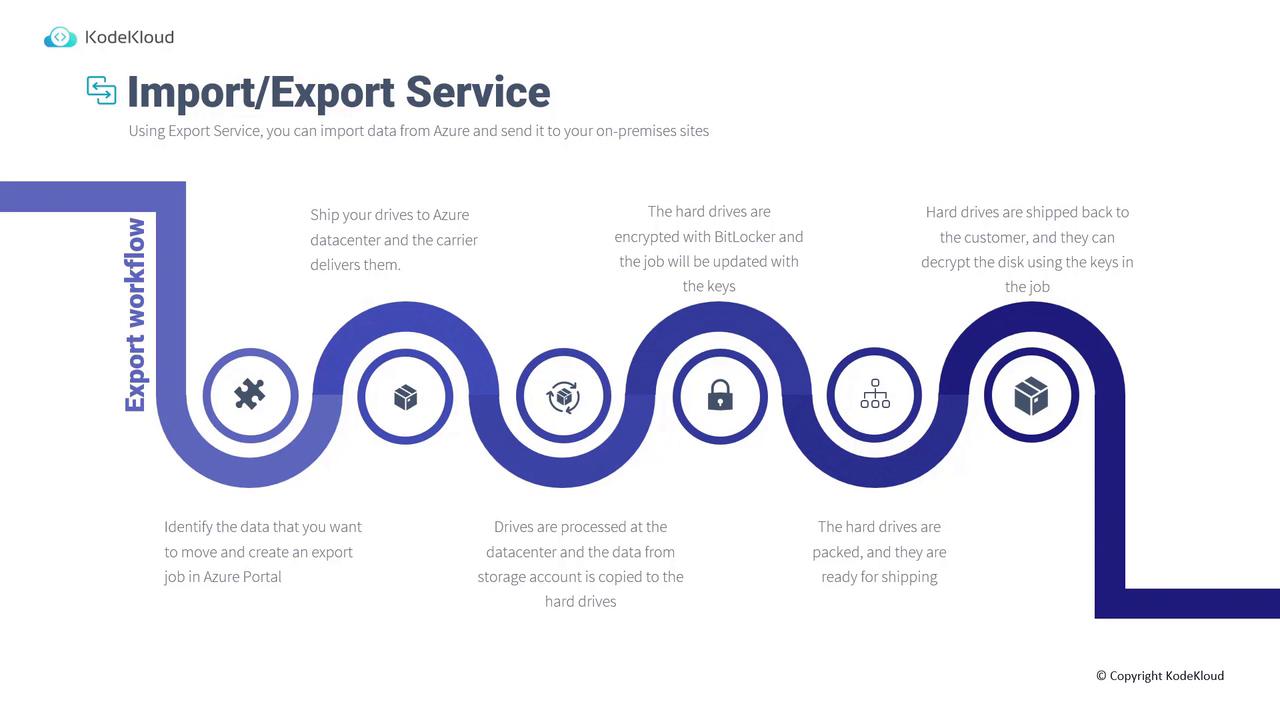
Export Workflow
To export data from Azure to an on-premises environment, follow these steps:- Identify the data to be exported and create an export job in the Azure portal.
- Specify the destination address for shipping the disks in the export job.
- Ship the disks to the designated Azure data center.
- At the data center, the selected data is copied onto the hard drives.
- The disks are encrypted with BitLocker, with decryption keys included in the job details.
- The disks are packaged and shipped back to the specified return address.
- Use the provided decryption keys to access your data on-premises.
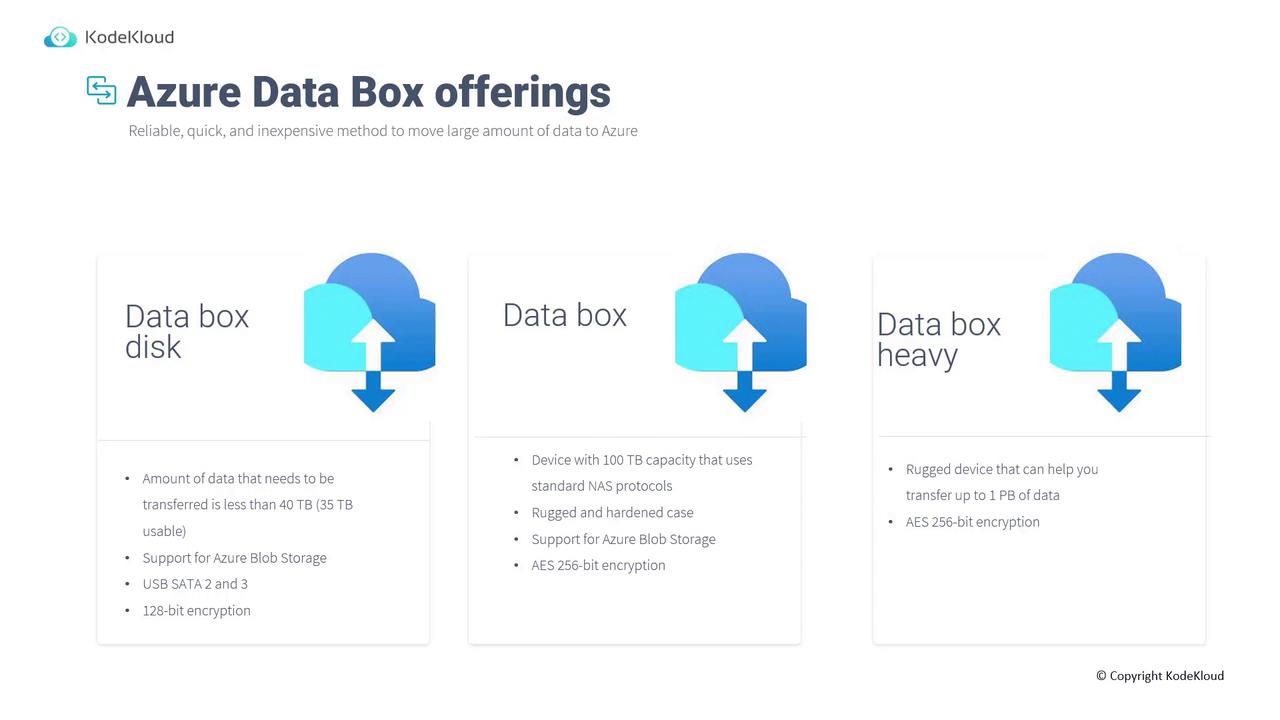
Azure Data Box
Azure Data Box is a managed appliance designed for offline data transfers. Unlike the Import/Export Service where you need to prepare your own disks, Azure Data Box provides secure, tamper-proof hardware. There are three offerings:- Data Box Disk: Ideal for transferring less than 40 terabytes. It offers 35 terabytes of usable capacity, supports Azure Blob Storage, and features SATA II and SATA III interfaces with 128-bit encryption.
- Data Box: Provides up to 100 terabytes capacity, supports standard NAS protocols, comes with a rugged casing, Azure Blob Storage support, and 256-bit encryption.
- Data Box Heavy: Suitable for extremely large data transfers—up to one petabyte—with a robust design and 256-bit encryption.
When to Use Azure Data Box
Azure Data Box is a cost-effective solution in scenarios such as:- One-time migrations when on-premises storage capacity is limited.
- Initial bulk transfers followed by incremental updates.
- Regular uploads from a data center with large quantities of data.
- Disaster recovery as part of a comprehensive business continuity and disaster recovery (BCDR) strategy.
- Data migration between on-premises environments and various cloud providers.
Migration Tools Comparison
Selecting the right migration tool depends on the dataset size and available network bandwidth. The following comparison provides guidance on choosing the appropriate solution: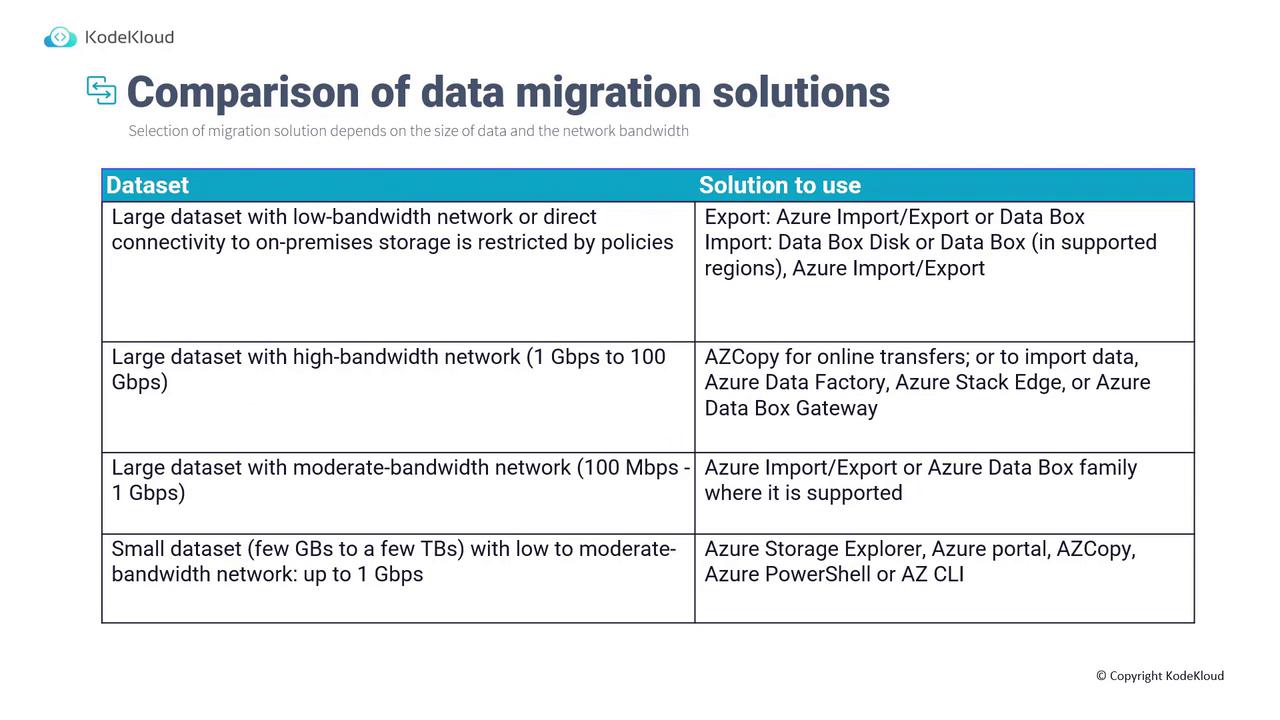
- For large datasets with very low network bandwidth, use Azure Import/Export or Data Box.
- For large datasets with high bandwidth (ranging from 1 Gbps to 100 Gbps), AzCopy is recommended. In such cases, also consider Azure Data Factory, Azure Stack Edge, or Azure Data Box Gateway.
- For moderately large datasets with moderate bandwidth (100 Mbps to 1 Gbps), Azure Import/Export or Data Box provide balanced solutions.
- For smaller datasets (a few gigabytes to a few terabytes) with low to moderate bandwidth, tools like Storage Explorer, the Azure portal, AzCopy, Azure PowerShell, or Azure CLI are effective.
Review your data volume and network capabilities to determine the most efficient migration tool for your scenario.
Conclusion
Choosing the appropriate storage migration solution depends on your data volume, network bandwidth, and your preferred approach—online or offline. The range of tools and services outlined in this article offers flexible options for a smooth and secure data migration. Thank you for reading. Microsoft Mechanicswww.microsoft.com
www.microsoft.com