> ## Documentation Index
> Fetch the complete documentation index at: https://notes.kodekloud.com/llms.txt
> Use this file to discover all available pages before exploring further.

# Creating Public IP Addresses

> Guide to creating and configuring Azure public IP addresses, attaching one to a VM NIC, and verifying connectivity by installing Apache while highlighting best practices and security considerations.

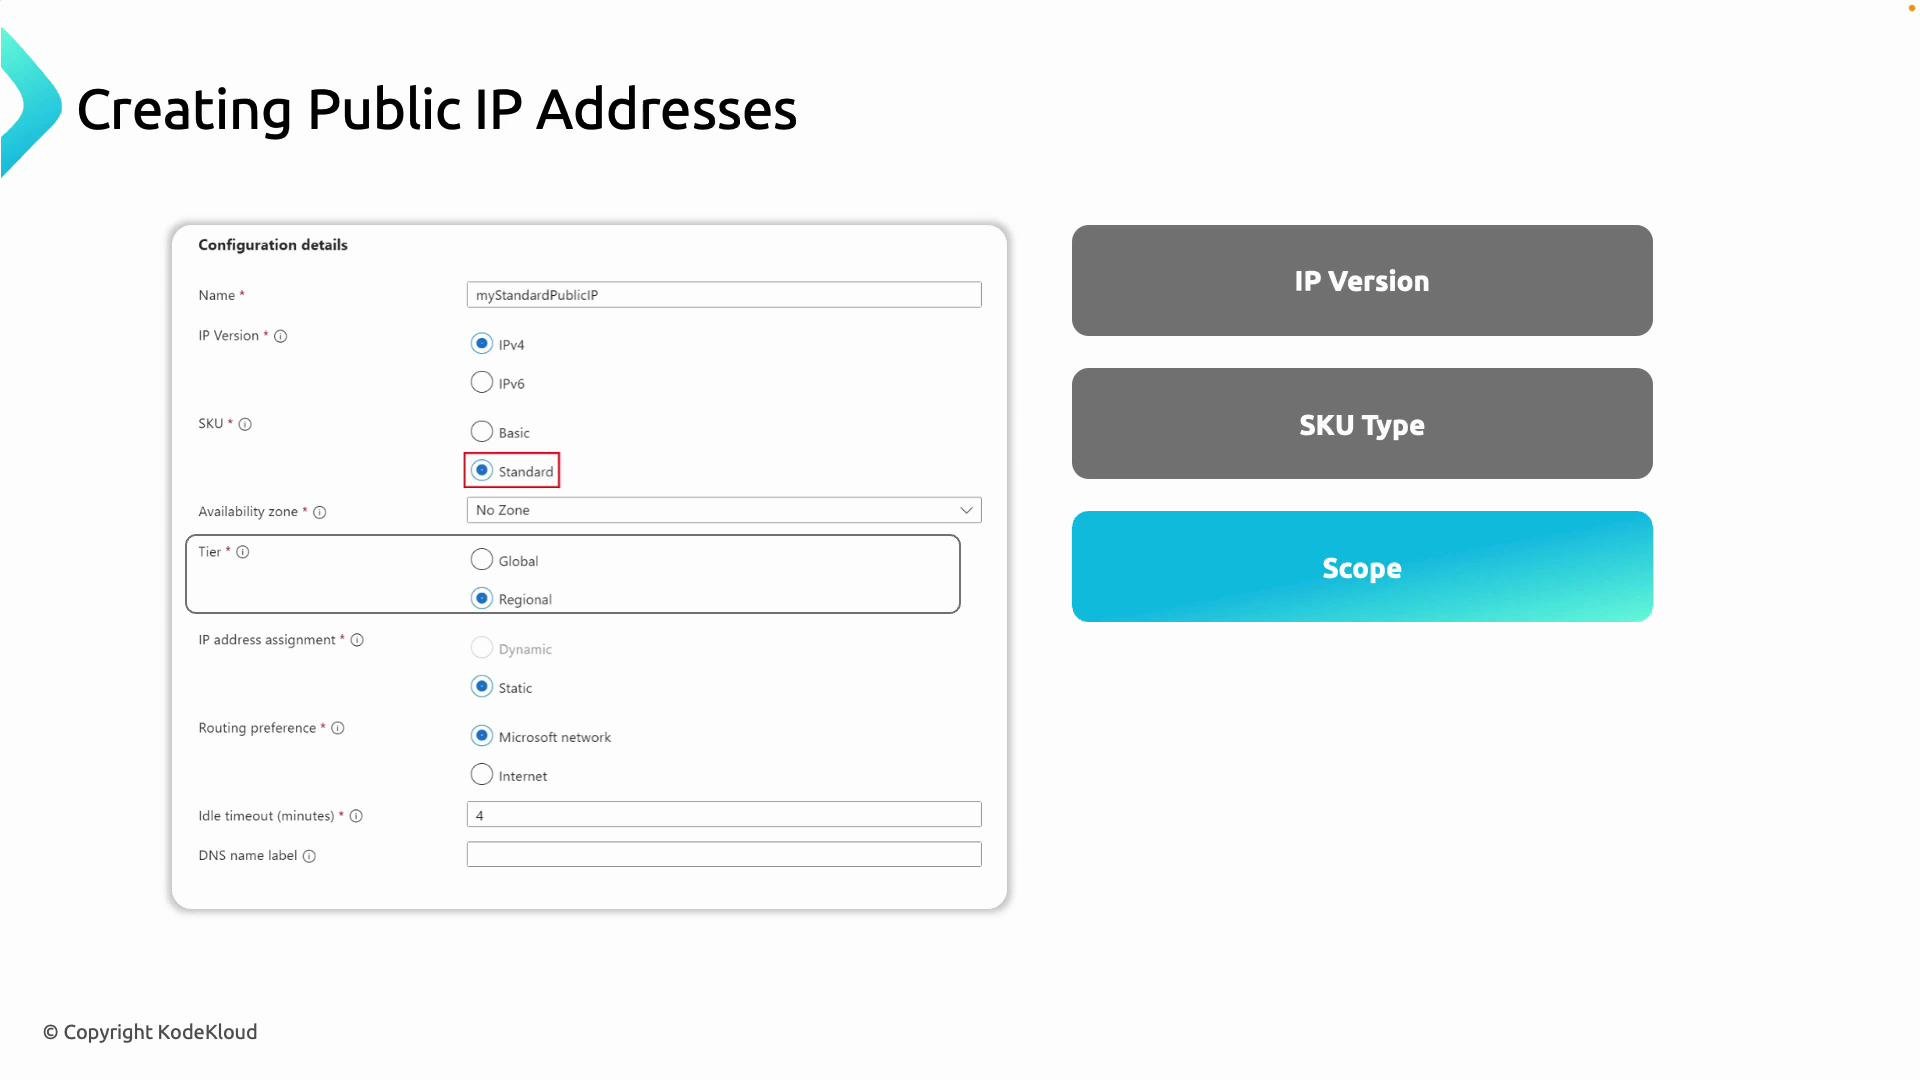
Creating an Azure public IP address starts with the usual basics—subscription, resource group, and region—but also includes several configuration choices that affect availability, routing, and security. This guide walks through each option, shows a hands-on demo attaching a public IP to a VM NIC, and demonstrates verifying connectivity with Apache.

## Key configuration options

* IP version: IPv4 or IPv6. IPv4 is the default for most deployments; choose IPv6 when your design requires it.
* SKU: Standard or Basic. Use Standard for production (better security, static allocation, and SLA). Basic is legacy.
* Scope (Tier): Regional or Global. Regional for most resources; Global for cross-region load balancers.
* Allocation (Assignment): Static or Dynamic. Standard SKU supports Static only; Basic supports Dynamic or Static.
* Routing preference: `Microsoft network` (keeps traffic on Azure’s private backbone, recommended) or `Internet` (may traverse the public internet).
* Additional settings: Idle timeout and optional DNS name label for a friendly hostname.

<Frame>
  <img src="https://mintcdn.com/kodekloud-c4ac6d9a/OMkQqgpN2jgRj5WR/images/AZ-700-Designing-and-Implementing-Microsoft-Azure-Networking-Solutions/Configure-Public-IP-Addresses/Creating-Public-IP-Addresses/public-ip-address-configuration-form.jpg?fit=max&auto=format&n=OMkQqgpN2jgRj5WR&q=85&s=5669d9df01a994e599175de4d9bea246" alt="The image displays a configuration form for creating public IP addresses, including options for IP version, SKU type, availability zone, tier, IP address assignment, and routing preference." width="1920" height="1080" data-path="images/AZ-700-Designing-and-Implementing-Microsoft-Azure-Networking-Solutions/Configure-Public-IP-Addresses/Creating-Public-IP-Addresses/public-ip-address-configuration-form.jpg" />
</Frame>

## Quick reference table

| Option             | Choices                         | Guidance                                                           |
| ------------------ | ------------------------------- | ------------------------------------------------------------------ |
| IP version         | IPv4, IPv6                      | Use `IPv4` unless you require IPv6 addressing.                     |
| SKU                | `Standard`, `Basic`             | Use `Standard` for production; `Basic` is legacy.                  |
| Scope / Tier       | Regional, Global                | Use `Regional` for most resources.                                 |
| Assignment         | `Static`, `Dynamic`             | Prefer `Static` for production. (`Standard` supports static only.) |
| Routing preference | `Microsoft network`, `Internet` | Choose `Microsoft network` for performance and reliability.        |
| DNS name label     | `<label>`                       | Optional friendly DNS name (e.g., `webserver-west-europe`).        |
| Idle timeout       | Minutes                         | Configure per application requirements.                            |

<Callout icon="lightbulb" color="#1CB2FE">
  For most new deployments, choose Standard SKU + Static assignment + Regional tier, and set routing preference to `Microsoft network` for best performance and reliability.
</Callout>

<Callout icon="warning" color="#FF6B6B">
  Exposing a VM to the internet requires careful Network Security Group (NSG) rules. Only open necessary ports (e.g., SSH, HTTP) and consider using Jump Boxes, Bastion, or Just-In-Time access for management.
</Callout>

## Demo: create a VM and attach a Public IP

This demo shows how to create a VM in an existing virtual network, provision a Standard static Public IP, and associate it with the VM's NIC.

VM creation (portal):

* Resource group: the same RG used earlier (example: `RG-AZ-700-VM-PIP`)
* VM name: `vm-az700-pip`
* Region: `West Europe`
* Image: Ubuntu
* Size: choose a small size to save costs
* Authentication: Password (enter and confirm)
* Inbound ports: enable SSH and HTTP (ensure NSG rules are configured accordingly)
* OS disk: Standard SSD

Follow the Azure portal VM creation flow and configure as needed.

<Frame>
  <img src="https://mintcdn.com/kodekloud-c4ac6d9a/OMkQqgpN2jgRj5WR/images/AZ-700-Designing-and-Implementing-Microsoft-Azure-Networking-Solutions/Configure-Public-IP-Addresses/Creating-Public-IP-Addresses/azure-portal-virtual-machine-interface.jpg?fit=max&auto=format&n=OMkQqgpN2jgRj5WR&q=85&s=d1c6c3eac988633e36a5200c50162696" alt="The image shows a Microsoft Azure portal interface for creating a virtual machine. It includes project and instance details like subscription, resource group, and region selection." width="1920" height="1080" data-path="images/AZ-700-Designing-and-Implementing-Microsoft-Azure-Networking-Solutions/Configure-Public-IP-Addresses/Creating-Public-IP-Addresses/azure-portal-virtual-machine-interface.jpg" />
</Frame>

### Networking selection during VM creation

* Select the pre-created virtual network.
* Choose the intended subnet (for example, a `web` subnet).
* For Public IP: you may create a Public IP during VM provisioning or set it to `None` and create/attach it later. This demo sets Public IP to `None` so we can create and attach the Public IP as a separate resource.

Finish the Management and other tabs and deploy the VM. The VM will receive a private IP from the vNet but no public IP until you attach one.

After deployment, check the VM overview to confirm there's no public IP listed.

<Frame>
  <img src="https://mintcdn.com/kodekloud-c4ac6d9a/OMkQqgpN2jgRj5WR/images/AZ-700-Designing-and-Implementing-Microsoft-Azure-Networking-Solutions/Configure-Public-IP-Addresses/Creating-Public-IP-Addresses/azure-portal-vm-az700-overview.jpg?fit=max&auto=format&n=OMkQqgpN2jgRj5WR&q=85&s=3d8b8c46252bff35350ac64afbb4639f" alt="The image shows the Microsoft Azure portal displaying the overview of a virtual machine named &#x22;vm-az700-pip,&#x22; which is currently running with details such as resource group, location, and operating system (Linux)." width="1920" height="1080" data-path="images/AZ-700-Designing-and-Implementing-Microsoft-Azure-Networking-Solutions/Configure-Public-IP-Addresses/Creating-Public-IP-Addresses/azure-portal-vm-az700-overview.jpg" />
</Frame>

## Create a Public IP resource (portal)

1. Navigate to **Public IP addresses** and select **Create**.
2. Configure:
   * Resource group: same RG as the VM
   * Region: `West Europe`
   * Name: `pip-vm-az700`
   * IP version: `IPv4`
   * SKU: `Standard`
   * Tier: `Regional`
   * Assignment: `Static`
   * DNS name label: optional (left blank in this demo)
3. Deploy the Public IP.

Once deployment completes, the public IP resource is provisioned.

<Frame>
  <img src="https://mintcdn.com/kodekloud-c4ac6d9a/OMkQqgpN2jgRj5WR/images/AZ-700-Designing-and-Implementing-Microsoft-Azure-Networking-Solutions/Configure-Public-IP-Addresses/Creating-Public-IP-Addresses/azure-portal-public-ip-deployment-complete.jpg?fit=max&auto=format&n=OMkQqgpN2jgRj5WR&q=85&s=70822f2db0df048fff8287fabafcd0c5" alt="The image shows a Microsoft Azure portal page indicating that a deployment named &#x22;PublicIPAddress-ARM&#x22; is complete, along with details like the subscription name and resource group." width="1920" height="1080" data-path="images/AZ-700-Designing-and-Implementing-Microsoft-Azure-Networking-Solutions/Configure-Public-IP-Addresses/Creating-Public-IP-Addresses/azure-portal-public-ip-deployment-complete.jpg" />
</Frame>

## Associate the Public IP to the VM NIC

Public IPs attach to a VM's network interface (NIC). From the public IP resource:

* Click **Associate**.
* Set Resource type to **Network interface**.
* Select the VM's NIC from the list (e.g., `vm-az700-pip-nic`).
* Save the association.

After the association, the public IP will be attached to the NIC and the address (for example `4.210.189.55`) will be visible in the portal.

<Frame>
  <img src="https://mintcdn.com/kodekloud-c4ac6d9a/OMkQqgpN2jgRj5WR/images/AZ-700-Designing-and-Implementing-Microsoft-Azure-Networking-Solutions/Configure-Public-IP-Addresses/Creating-Public-IP-Addresses/azure-portal-ip-address-configuration.jpg?fit=max&auto=format&n=OMkQqgpN2jgRj5WR&q=85&s=bec1de271eee4dc3fffda7e30cfc0926" alt="The image shows a Microsoft Azure portal interface where a public IP address is being associated with either a load balancer or a network interface. It includes various settings and options related to the IP address configuration." width="1920" height="1080" data-path="images/AZ-700-Designing-and-Implementing-Microsoft-Azure-Networking-Solutions/Configure-Public-IP-Addresses/Creating-Public-IP-Addresses/azure-portal-ip-address-configuration.jpg" />
</Frame>

Check the VM overview to see the public IP listed and copy the address for remote access.

<Frame>
  <img src="https://mintcdn.com/kodekloud-c4ac6d9a/OMkQqgpN2jgRj5WR/images/AZ-700-Designing-and-Implementing-Microsoft-Azure-Networking-Solutions/Configure-Public-IP-Addresses/Creating-Public-IP-Addresses/vm-az700-pip-azure-overview.jpg?fit=max&auto=format&n=OMkQqgpN2jgRj5WR&q=85&s=3440ffe26542e2326f20d7b6d67833cb" alt="The image shows an overview of a virtual machine named &#x22;vm-az700-pip&#x22; running on Microsoft Azure, displaying its configuration details such as operating system, location, and networking information." width="1920" height="1080" data-path="images/AZ-700-Designing-and-Implementing-Microsoft-Azure-Networking-Solutions/Configure-Public-IP-Addresses/Creating-Public-IP-Addresses/vm-az700-pip-azure-overview.jpg" />
</Frame>

## SSH into the VM and install Apache

From your terminal, SSH to the VM using the public IP and the username created during provisioning (example: `azureuser`):

```bash theme={null}
cd ~
ssh azureuser@4.210.189.55
```

On first connect, type `yes` to accept the host key. Then update packages and install Apache:

```bash theme={null}
sudo apt update
sudo apt install -y apache2
```

Example trimmed apt output:

```bash theme={null}
Hit:1 http://azure.archive.ubuntu.com/ubuntu jammy InRelease
Hit:2 http://azure.archive.ubuntu.com/ubuntu jammy-updates InRelease
Hit:3 http://azure.archive.ubuntu.com/ubuntu jammy-backports InRelease
Hit:4 http://azure.archive.ubuntu.com/ubuntu jammy-security InRelease
Reading package lists... Done
Building dependency tree... Done
Reading state information... Done
6 packages can be upgraded. Run 'apt list --upgradable' to see them.

The following NEW packages will be installed:
  apache2 apache2-data apache2-utils ...
Need to get 2142 kB of archives.
After this operation, 852 kB of additional disk space will be used.
Do you want to continue? [Y/n] Y
```

Once Apache is running, open a browser and navigate to the public IP (for example, `http://4.210.189.55`). You should see the default Apache landing page.

<Frame>
  <img src="https://mintcdn.com/kodekloud-c4ac6d9a/OMkQqgpN2jgRj5WR/images/AZ-700-Designing-and-Implementing-Microsoft-Azure-Networking-Solutions/Configure-Public-IP-Addresses/Creating-Public-IP-Addresses/apache2-welcome-page-ubuntu-overview.jpg?fit=max&auto=format&n=OMkQqgpN2jgRj5WR&q=85&s=0676f711e423627e8d0f7317297fbbe7" alt="This image shows the default Apache2 web server welcome page on Ubuntu, indicating that the server is functioning properly. It includes configuration overview details and file directory instructions." width="1920" height="1080" data-path="images/AZ-700-Designing-and-Implementing-Microsoft-Azure-Networking-Solutions/Configure-Public-IP-Addresses/Creating-Public-IP-Addresses/apache2-welcome-page-ubuntu-overview.jpg" />
</Frame>

## Summary

* Azure public IPs are configurable across IP version, SKU, scope (tier), assignment, routing preference, DNS label, and idle timeout.
* Recommended defaults for new deployments: Standard SKU + Static assignment + Regional tier + `Microsoft network` routing.
* For VMs, public IPs attach to the NIC. You can create them during VM provisioning or create and associate them afterward.
* Always secure inbound access with NSG rules, Bastion, or other hardened access methods.

## Links and references

* [Azure Public IP Documentation](https://learn.microsoft.com/azure/virtual-network/public-ip-addresses)
* [Azure Virtual Machines Documentation](https://learn.microsoft.com/azure/virtual-machines)
* [Azure Network Security Groups (NSG)](https://learn.microsoft.com/azure/virtual-network/network-security-groups-overview)

Next topic idea: bring-your-own-IP (BYOIP) — how to bring preowned IP ranges into Azure and configure them for your resources.

<CardGroup>
  <Card title="Watch Video" icon="video" cta="Learn more" href="https://learn.kodekloud.com/user/courses/az-700-designing-and-implementing-microsoft-azure-networking-solutions/module/d1f14b43-f5eb-48e5-a79d-22d1469571be/lesson/b00032cd-438b-4160-bbe2-bc61d0061bf6" />
</CardGroup>