> ## Documentation Index
> Fetch the complete documentation index at: https://notes.kodekloud.com/llms.txt
> Use this file to discover all available pages before exploring further.
# Creating Virtual Network
> Guide to creating and configuring Azure virtual networks, covering subnet planning, service specific subnets, peering, security options, and portal or CLI deployment steps.
Creating an Azure virtual network (VNet) is a core task when designing cloud networks. This guide walks you step-by-step through creating a VNet in the Azure portal, explains important design decisions (region, subscription, peering), and highlights subnet planning and service-specific requirements.
Why this matters: A correctly planned VNet reduces operational issues, avoids IP overlap, and ensures service compatibility (VPN Gateway, Bastion, Firewall, etc.). Use this walkthrough whether you're creating a development VNet or designing production network topology.
Key Azure concepts to understand before you begin
* Region-specific deployment: Each VNet is deployed to a specific Azure region (for example, East US, West Europe). The region determines the physical location of your resources and can affect latency and compliance.
* Subscription-level scope: VNets are created inside an Azure subscription. Subscriptions are used for billing, quotas, and access control—separate subscriptions are common for dev, test, and prod.
* Virtual network peering: Azure VNet peering enables low-latency, secure network connectivity across VNets in the same or different regions and subscriptions. Plan IP ranges to avoid overlap if you intend to peer VNets.
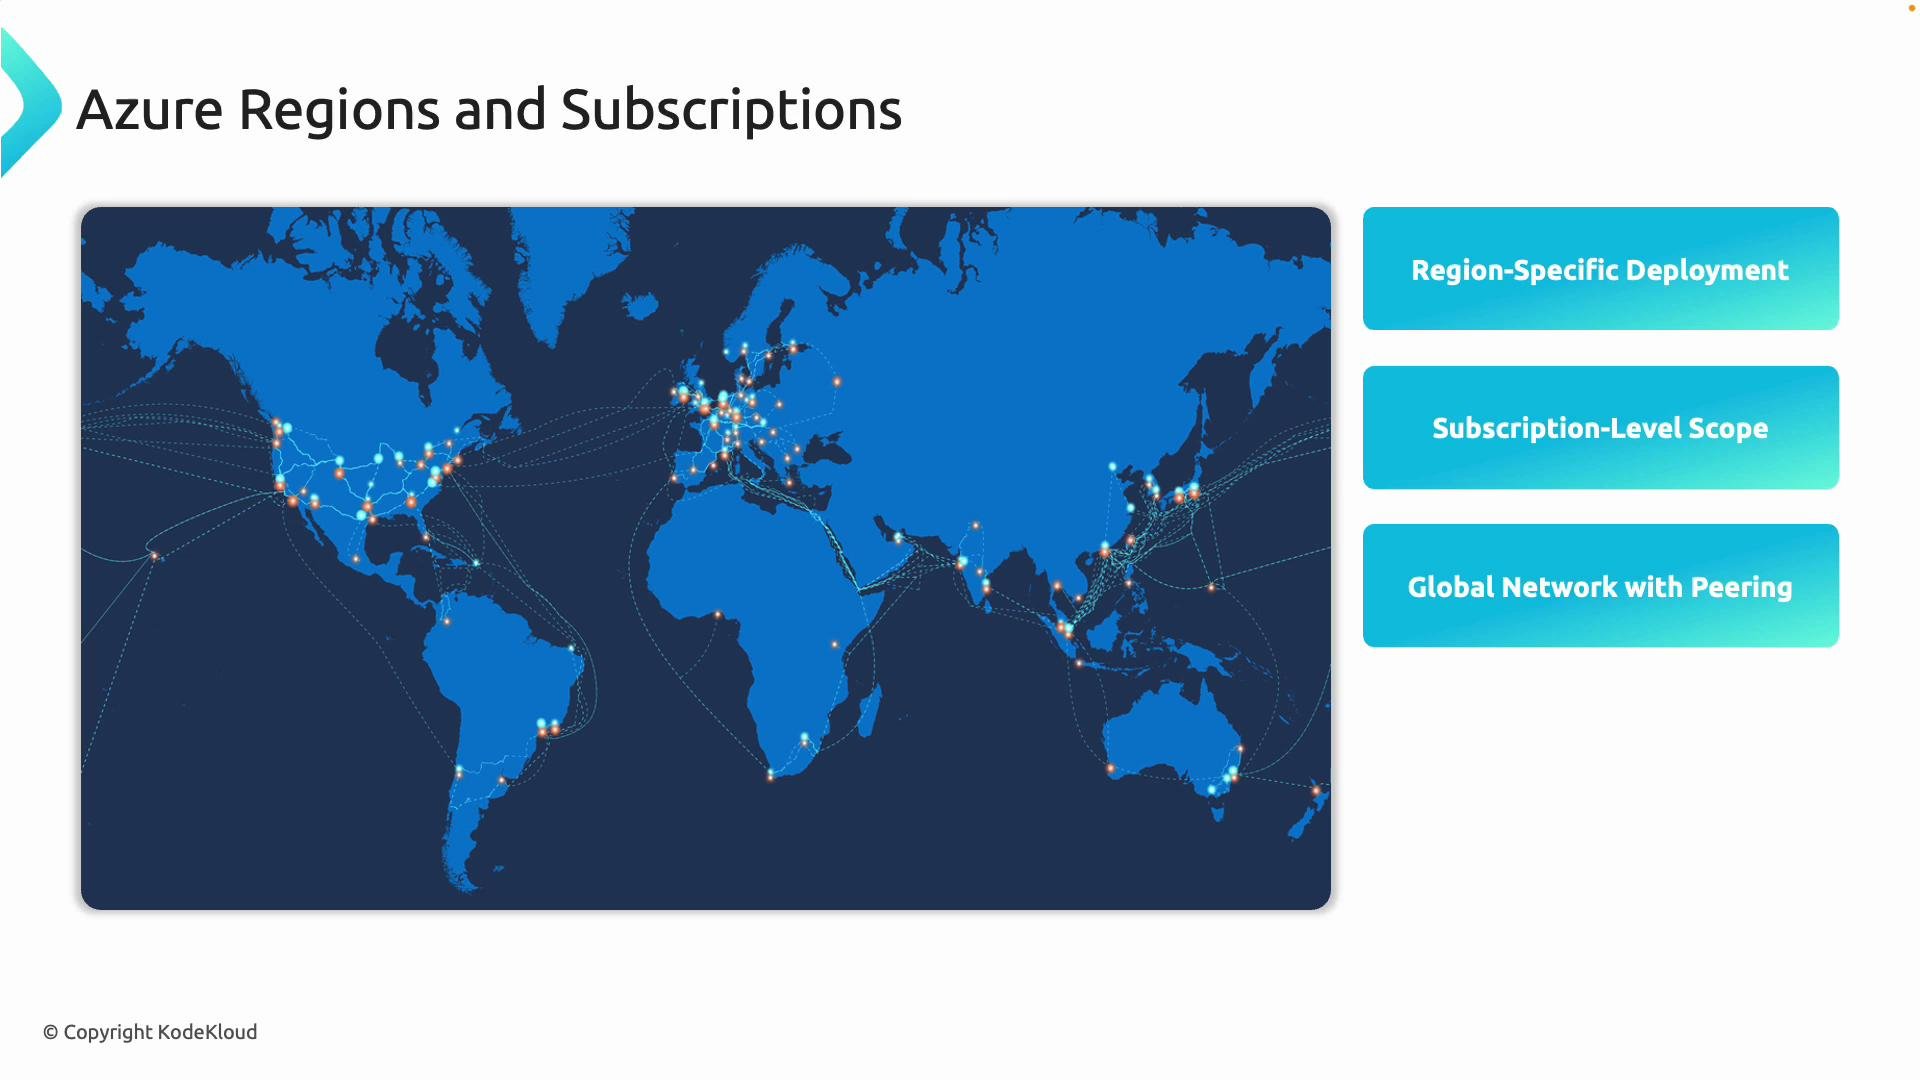 This article focuses on creating a VNet using the Azure portal and calls out considerations for peering, service-specific subnets, and optional security features as you progress.
Step-by-step: Create a virtual network in the Azure portal
1. Start the VNet creation wizard
* Sign in to the Azure portal.
* Search for "Virtual Network" and select it.
* Click Create (or Create a virtual network) to open the guided setup.
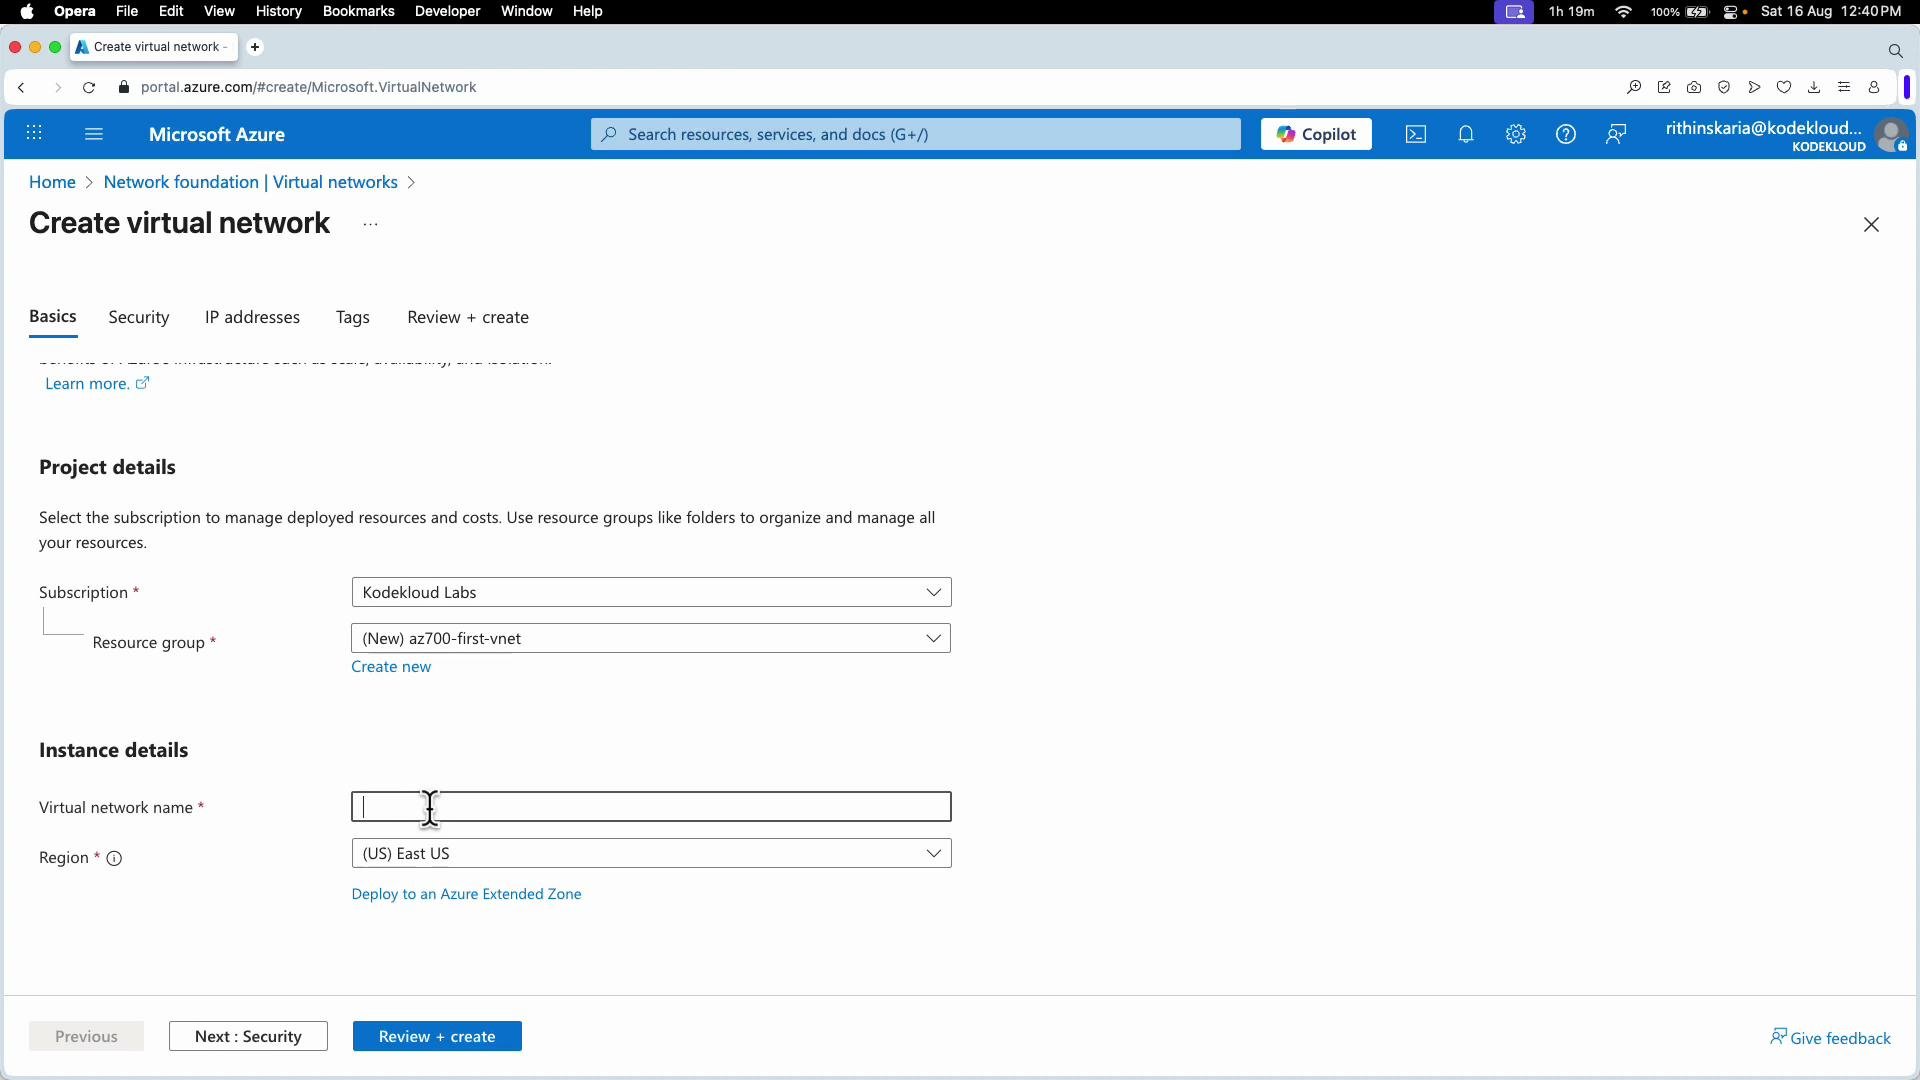
2. Project / Instance details
* Select the target subscription.
* Create or select a resource group to contain the VNet and related resources.
* Provide a descriptive VNet name and choose the region for deployment (match region to where your resources or users are located).
This article focuses on creating a VNet using the Azure portal and calls out considerations for peering, service-specific subnets, and optional security features as you progress.
Step-by-step: Create a virtual network in the Azure portal
1. Start the VNet creation wizard
* Sign in to the Azure portal.
* Search for "Virtual Network" and select it.
* Click Create (or Create a virtual network) to open the guided setup.
2. Project / Instance details
* Select the target subscription.
* Create or select a resource group to contain the VNet and related resources.
* Provide a descriptive VNet name and choose the region for deployment (match region to where your resources or users are located).
 3. Optional security and add-on features
* The portal shows optional security services such as Azure Bastion, Azure Firewall, and DDoS Protection. You can enable them during VNet creation or attach them later.
* Note: many services require dedicated subnets and exact subnet names (for example, `GatewaySubnet` for VPN Gateway, `AzureBastionSubnet` for Bastion, and `AzureFirewallSubnet` for Firewall). Plan subnet names and sizes ahead of deployment.
4. Configure IP address space and subnets
* Define the VNet address space (CIDR), e.g., `192.168.0.0/16`. This is the IP range the VNet will contain.
* Add one or more subnets inside that address space. For each subnet, provide:
* Name (use consistent naming conventions, e.g., `snet-web`, `snet-db`)
* Prefix (CIDR), e.g., `192.168.0.0/27`
* When sizing subnets, remember Azure reserves 5 IPs per subnet (the first 4 and the last). These addresses are not assignable to VMs or PaaS services.
3. Optional security and add-on features
* The portal shows optional security services such as Azure Bastion, Azure Firewall, and DDoS Protection. You can enable them during VNet creation or attach them later.
* Note: many services require dedicated subnets and exact subnet names (for example, `GatewaySubnet` for VPN Gateway, `AzureBastionSubnet` for Bastion, and `AzureFirewallSubnet` for Firewall). Plan subnet names and sizes ahead of deployment.
4. Configure IP address space and subnets
* Define the VNet address space (CIDR), e.g., `192.168.0.0/16`. This is the IP range the VNet will contain.
* Add one or more subnets inside that address space. For each subnet, provide:
* Name (use consistent naming conventions, e.g., `snet-web`, `snet-db`)
* Prefix (CIDR), e.g., `192.168.0.0/27`
* When sizing subnets, remember Azure reserves 5 IPs per subnet (the first 4 and the last). These addresses are not assignable to VMs or PaaS services.
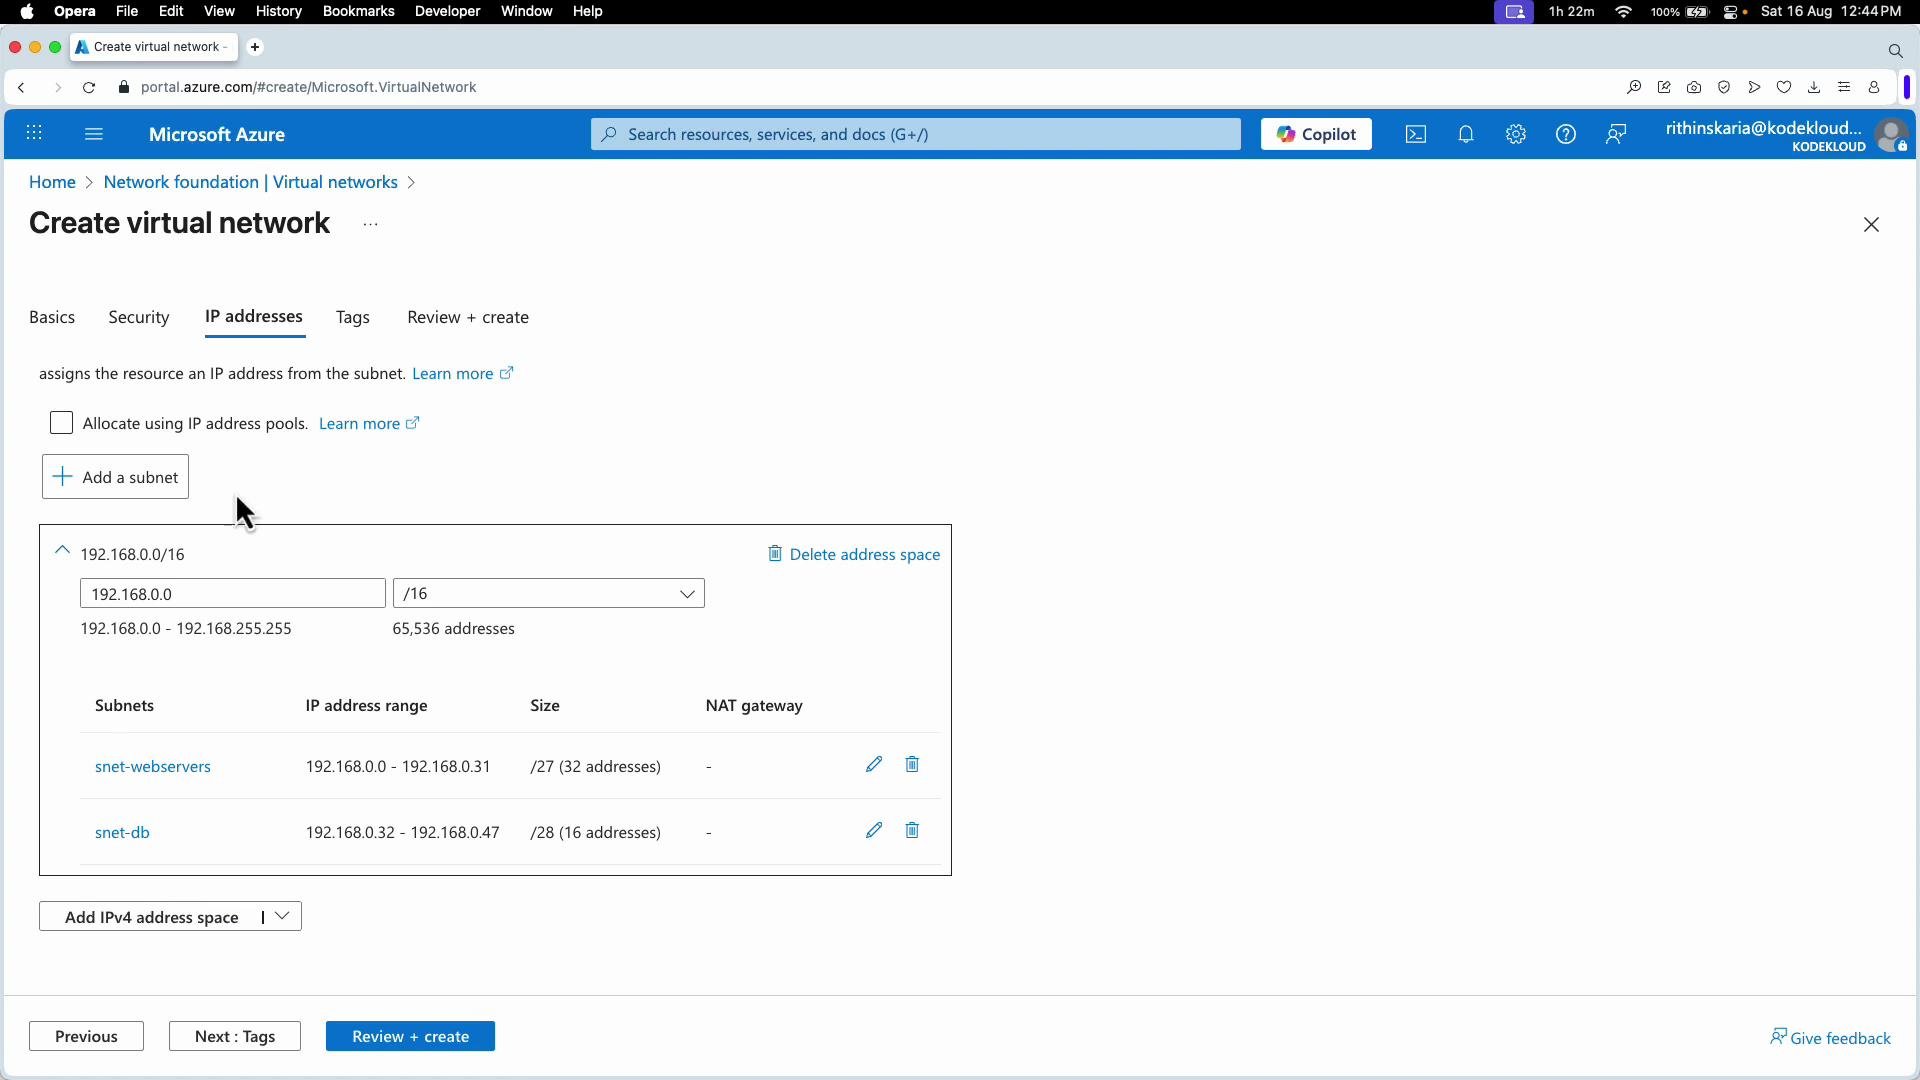 Azure reserves five addresses in each subnet (the first four and the last). Some Azure services also require subnets with specific names, e.g., `GatewaySubnet` for VPN Gateway and `AzureBastionSubnet` for Bastion. Create those subnets with the required names and sizes if you plan to use those services.
Subnet sizing quick reference
| Prefix | Total addresses | Usable addresses (after Azure reservation) |
| -----: | --------------: | -----------------------------------------: |
| /28 | 16 | 11 |
| /27 | 32 | 27 |
| /24 | 256 | 251 |
Example VNet + Subnet plan
* VNet address space: `192.168.0.0/16` (65,536 addresses)
* Subnet 1: `snet-webservers` -> `192.168.0.0/27` (32 total; 27 usable)
* Subnet 2: `snet-db` -> `192.168.0.32/28` (16 total; 11 usable)
5. Add additional address spaces (optional)
* A single VNet can include multiple address spaces. If you anticipate growth or need to avoid overlaps with on-prem networks, you can add CIDR blocks to the VNet later.
6. Review + Create
* Click Review + Create. Azure validates your configuration (checks for overlapping ranges, invalid names, and service-specific subnet requirements).
* If validation passes, click Create to deploy the VNet. Deployment usually completes in seconds to a few minutes.
7. Verify the deployed VNet
* After deployment, click Go to resource to open the VNet blade.
* Select Subnets to view the configured subnets and the available IP addresses (note the portal reflects Azure’s reserved addresses in the available count).
* Check Networking | Peerings if you plan to connect this VNet to other VNets.
Optional: create a VNet with Azure CLI
* Example command (run in Cloud Shell or locally with `az` signed in):
```bash theme={null}
az network vnet create \
--resource-group myResourceGroup \
--name myVNet \
--address-prefixes 192.168.0.0/16 \
--subnet-name snet-webservers \
--subnet-prefix 192.168.0.0/27 \
--location eastus
```
Use the `--subnet` flag multiple times or add subnets separately with `az network vnet subnet create` if you need more than one subnet at creation time.
Checklist before you create a VNet
* [ ] Choose the correct region and subscription for deployment.
* [ ] Plan address space to avoid IP overlap with other VNets and on-prem networks.
* [ ] Reserve subnet names and sizes for required services (`GatewaySubnet`, `AzureBastionSubnet`, `AzureFirewallSubnet`).
* [ ] Decide on peering and whether VNets across subscriptions/regions need connectivity.
* [ ] Consider NSGs, route tables, Firewall, and DDoS requirements and whether to attach them now or later.
Related topics and references
* Azure Virtual Network documentation: [https://learn.microsoft.com/azure/virtual-network/](https://learn.microsoft.com/azure/virtual-network/)
* VNet peering overview: [https://learn.microsoft.com/azure/virtual-network/virtual-network-peering-overview](https://learn.microsoft.com/azure/virtual-network/virtual-network-peering-overview)
* Azure CLI reference for networking: [https://learn.microsoft.com/cli/azure/network/vnet](https://learn.microsoft.com/cli/azure/network/vnet)
That's the end-to-end flow to create a basic, well-structured Azure VNet using the portal. From here you can add network security groups (NSGs), route tables, peering, Bastion, Firewall, and DDoS protection as your architecture requires.
Azure reserves five addresses in each subnet (the first four and the last). Some Azure services also require subnets with specific names, e.g., `GatewaySubnet` for VPN Gateway and `AzureBastionSubnet` for Bastion. Create those subnets with the required names and sizes if you plan to use those services.
Subnet sizing quick reference
| Prefix | Total addresses | Usable addresses (after Azure reservation) |
| -----: | --------------: | -----------------------------------------: |
| /28 | 16 | 11 |
| /27 | 32 | 27 |
| /24 | 256 | 251 |
Example VNet + Subnet plan
* VNet address space: `192.168.0.0/16` (65,536 addresses)
* Subnet 1: `snet-webservers` -> `192.168.0.0/27` (32 total; 27 usable)
* Subnet 2: `snet-db` -> `192.168.0.32/28` (16 total; 11 usable)
5. Add additional address spaces (optional)
* A single VNet can include multiple address spaces. If you anticipate growth or need to avoid overlaps with on-prem networks, you can add CIDR blocks to the VNet later.
6. Review + Create
* Click Review + Create. Azure validates your configuration (checks for overlapping ranges, invalid names, and service-specific subnet requirements).
* If validation passes, click Create to deploy the VNet. Deployment usually completes in seconds to a few minutes.
7. Verify the deployed VNet
* After deployment, click Go to resource to open the VNet blade.
* Select Subnets to view the configured subnets and the available IP addresses (note the portal reflects Azure’s reserved addresses in the available count).
* Check Networking | Peerings if you plan to connect this VNet to other VNets.
Optional: create a VNet with Azure CLI
* Example command (run in Cloud Shell or locally with `az` signed in):
```bash theme={null}
az network vnet create \
--resource-group myResourceGroup \
--name myVNet \
--address-prefixes 192.168.0.0/16 \
--subnet-name snet-webservers \
--subnet-prefix 192.168.0.0/27 \
--location eastus
```
Use the `--subnet` flag multiple times or add subnets separately with `az network vnet subnet create` if you need more than one subnet at creation time.
Checklist before you create a VNet
* [ ] Choose the correct region and subscription for deployment.
* [ ] Plan address space to avoid IP overlap with other VNets and on-prem networks.
* [ ] Reserve subnet names and sizes for required services (`GatewaySubnet`, `AzureBastionSubnet`, `AzureFirewallSubnet`).
* [ ] Decide on peering and whether VNets across subscriptions/regions need connectivity.
* [ ] Consider NSGs, route tables, Firewall, and DDoS requirements and whether to attach them now or later.
Related topics and references
* Azure Virtual Network documentation: [https://learn.microsoft.com/azure/virtual-network/](https://learn.microsoft.com/azure/virtual-network/)
* VNet peering overview: [https://learn.microsoft.com/azure/virtual-network/virtual-network-peering-overview](https://learn.microsoft.com/azure/virtual-network/virtual-network-peering-overview)
* Azure CLI reference for networking: [https://learn.microsoft.com/cli/azure/network/vnet](https://learn.microsoft.com/cli/azure/network/vnet)
That's the end-to-end flow to create a basic, well-structured Azure VNet using the portal. From here you can add network security groups (NSGs), route tables, peering, Bastion, Firewall, and DDoS protection as your architecture requires.