> ## Documentation Index
> Fetch the complete documentation index at: https://notes.kodekloud.com/llms.txt
> Use this file to discover all available pages before exploring further.
# Pipeline Caching
> Guide to using Jenkins Job Cacher plugin to cache node_modules via lockfile-driven caching, speeding CI builds, reducing bandwidth, and sharing dependencies across pipeline stages
Efficient dependency caching in Jenkins Pipelines reduces build time by reusing previously created artifacts (for example, `node_modules`) instead of reinstalling them on every run. This is particularly valuable for ephemeral agents or fresh containers where every build starts from a clean environment.
In this lesson you'll learn how to enable and use the Jenkins Job Cacher plugin to cache dependencies (like `node_modules`) and reuse them across builds, speeding up CI and reducing load on package registries.
## Why cache dependencies?
* Fast feedback: Large JavaScript projects with thousands of packages can spend significant time in the install step. Caching reduces iteration time.
* Bandwidth and registry load: Re-using previously downloaded packages reduces reliance on external registries.
* Stability: Using a lockfile-driven cache helps ensure consistent dependency versions across builds.
## How to enable caching in Jenkins
1. Install the Job Cacher plugin from the Jenkins plugin manager.
2. Configure a cache either using the Pipeline Snippet Generator or by adding the snippet directly to your `Jenkinsfile`.
3. Use a cache validity file (for npm: `package-lock.json`; for yarn: `yarn.lock`) to decide when to invalidate and recreate the cache.
First, install the plugin:
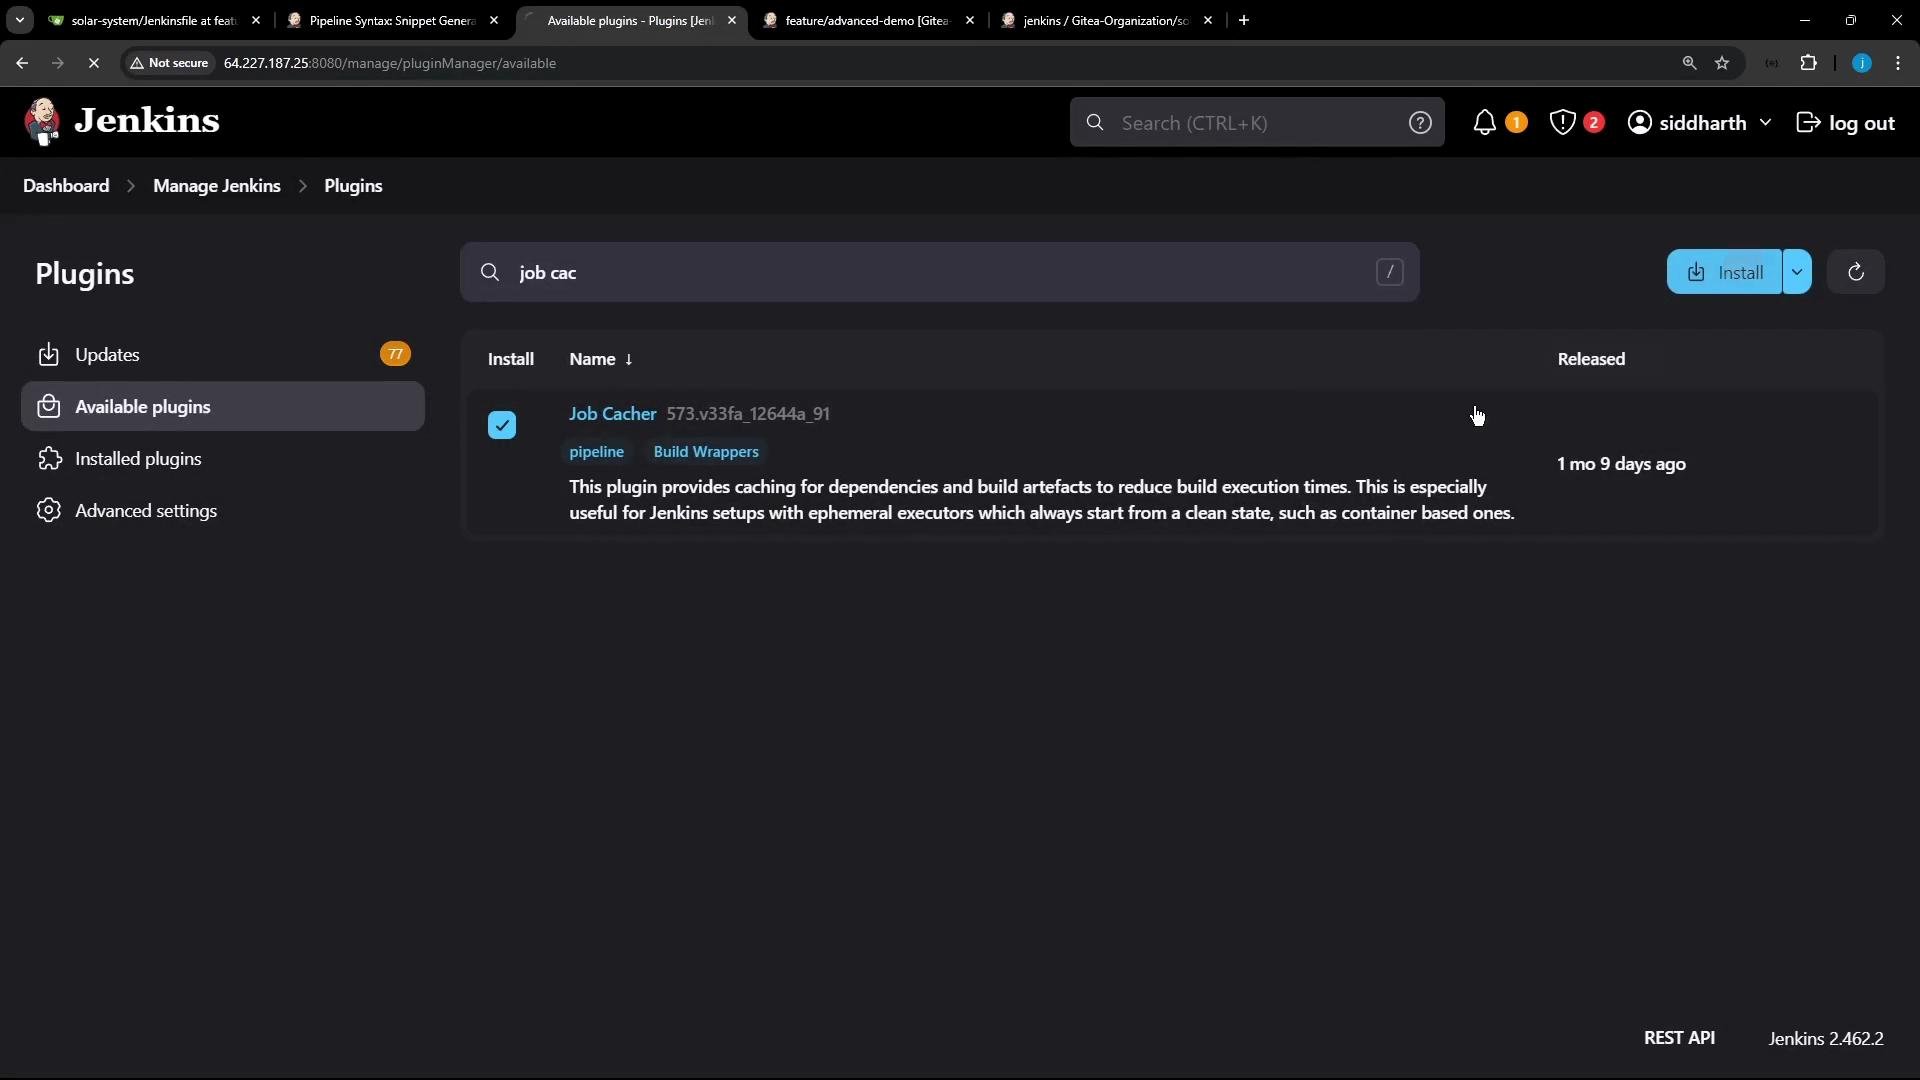 After installation you may be prompted to restart Jenkins. Once Jenkins is running again, you can create cache definitions using the Pipeline Snippet Generator.
## Configuring the cache (Pipeline Snippet Generator)
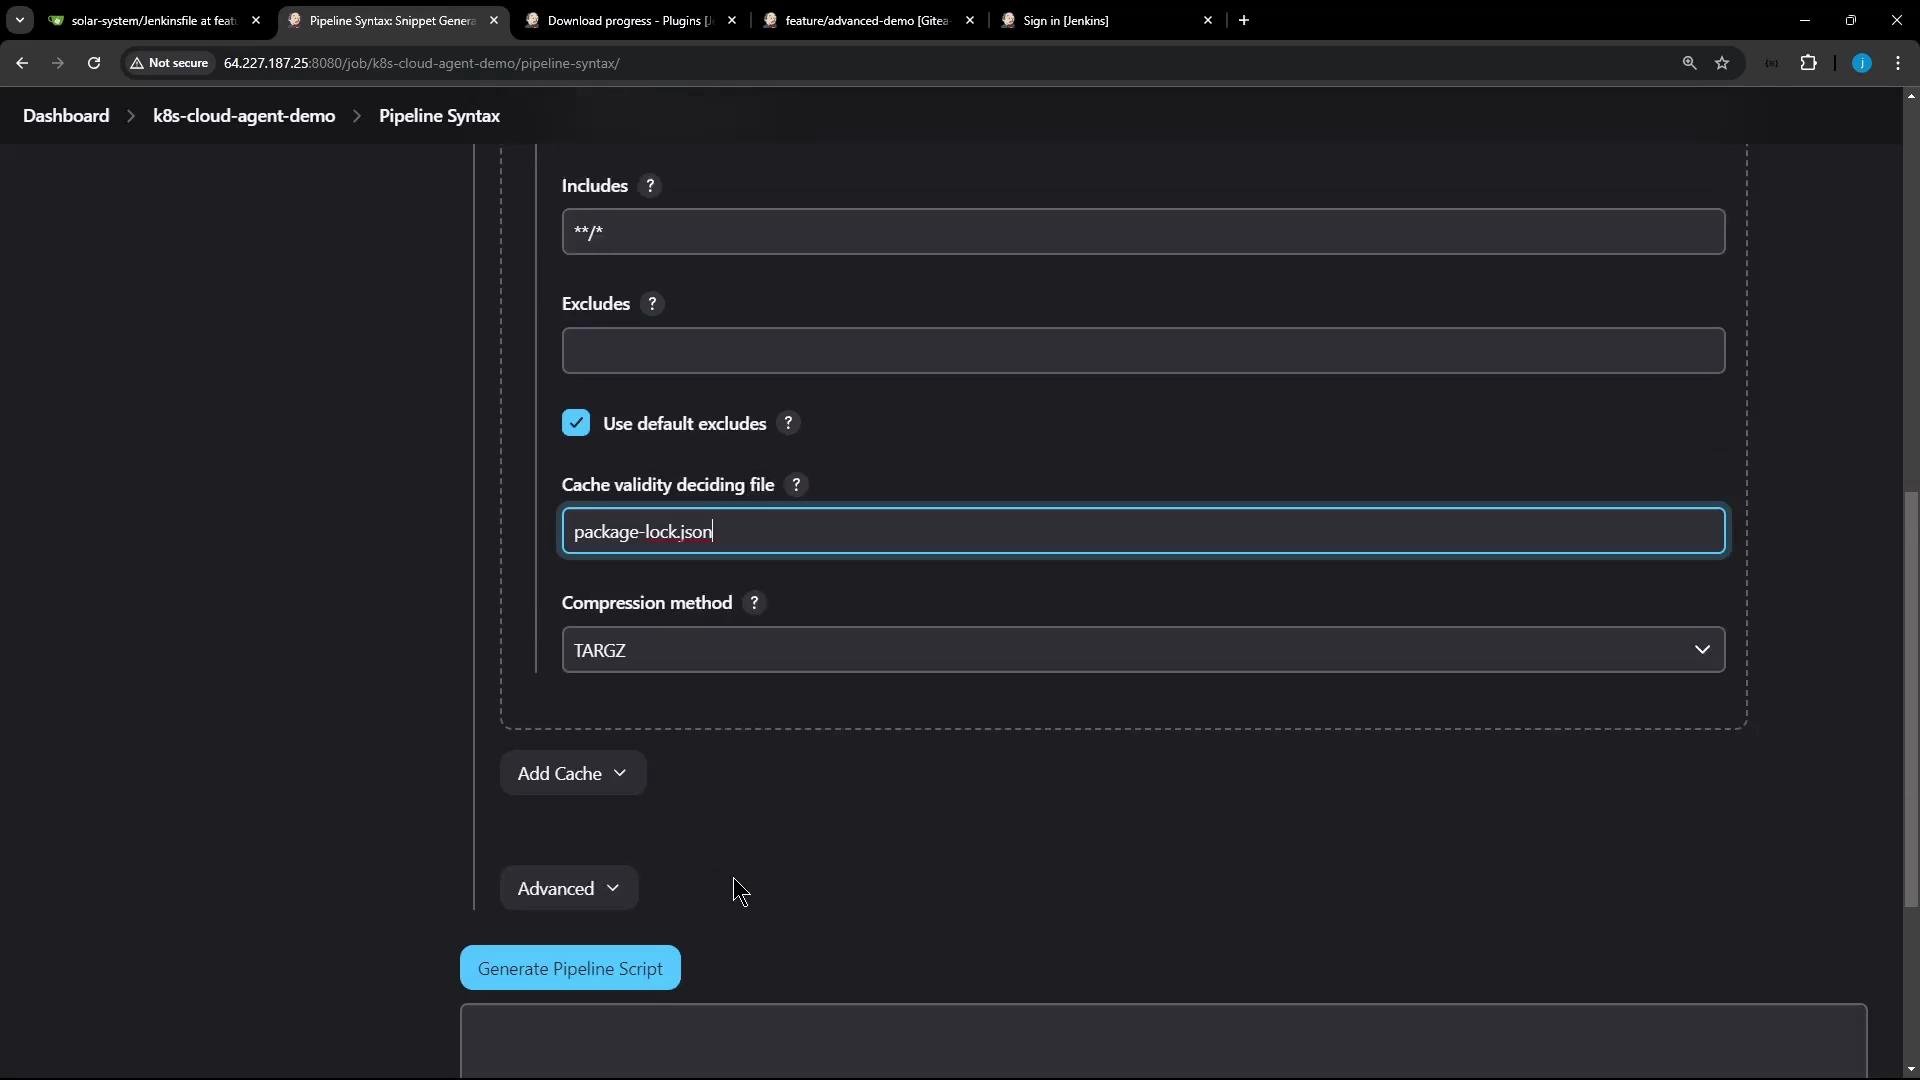
Recommended snippet settings for caching Node.js dependencies:
* `path`: the directory to cache (e.g., `node_modules`)
* `cacheName`: an identifiable name (e.g., `npm-dependency-cache`)
* `cacheValidityDecidingFile`: a lockfile such as `package-lock.json` or `yarn.lock` used to detect changes
* `compression`: choose an archive format (e.g., `TARGZ`)
* `maxCacheSize`: a reasonable size limit (e.g., `550 MB`)
In the Snippet Generator, choose the `cache` snippet and complete those fields. Example configuration in the Snippet Generator (screenshot):
After installation you may be prompted to restart Jenkins. Once Jenkins is running again, you can create cache definitions using the Pipeline Snippet Generator.
## Configuring the cache (Pipeline Snippet Generator)
Recommended snippet settings for caching Node.js dependencies:
* `path`: the directory to cache (e.g., `node_modules`)
* `cacheName`: an identifiable name (e.g., `npm-dependency-cache`)
* `cacheValidityDecidingFile`: a lockfile such as `package-lock.json` or `yarn.lock` used to detect changes
* `compression`: choose an archive format (e.g., `TARGZ`)
* `maxCacheSize`: a reasonable size limit (e.g., `550 MB`)
In the Snippet Generator, choose the `cache` snippet and complete those fields. Example configuration in the Snippet Generator (screenshot):
 Avoid caching sensitive files or environment-specific binaries. Use the cache for reproducible dependencies (like `node_modules`) and ensure the cache validity deciding file (lockfile) is trusted.
Tip: Use `package-lock.json` or `yarn.lock` as the cache validity deciding file. When the lockfile hash changes, the plugin will consider the cache stale and recreate it automatically.
## Example Jenkinsfile snippets
Below are concise examples showing where to place the `cache` step in a Declarative Pipeline and how to use `stash`/`unstash` alongside caching when stages run on different agents.
Installing Dependencies stage (cache `node_modules` and stash for later stages)
```groovy theme={null}
pipeline {
agent any
stages {
stage('Installing Dependencies') {
agent any
options { timestamps() }
steps {
cache(maxCacheSize: 550, caches: [
arbitraryFileCache(
cacheName: 'npm-dependency-cache',
cacheValidityDecidingFile: 'package-lock.json',
includes: '**/*',
path: 'node_modules'
)
]) {
sh 'node -v'
sh 'npm install --no-audit'
// Use stash to transfer node_modules between stages/agents
stash(includes: 'node_modules/', name: 'solar-system-node-modules')
}
}
}
stage('Dependency Scanning') {
steps {
// dependency scanning steps here
}
}
}
}
```
Notes:
* `cache` wraps the steps that create or consume files under `path`. On first run the plugin will create the cache; on subsequent runs it will attempt to restore it.
* Use `stash`/`unstash` to move files between stages or agents when the cache restore occurs on a different executor (for example, controller vs Kubernetes pod).
Unit Testing stage (unstash before running tests)
```groovy theme={null}
stage('Unit Testing') {
parallel {
stage('NodeJS 18') {
options { retry(2) }
steps {
sh 'node -v'
unstash 'solar-system-node-modules'
sh 'npm test'
}
}
stage('NodeJS 19') {
options { retry(2) }
steps {
container('node-19') {
sh 'sleep 10s' // example - waiting for container readiness
sh 'node -v'
unstash 'solar-system-node-modules'
sh 'npm test'
}
}
}
}
}
```
Code Coverage stage example (non-blocking failures with catchError)
```groovy theme={null}
stage('Code Coverage') {
steps {
catchError(buildResult: 'SUCCESS', message: 'Coverage failures are non-blocking for now') {
sh 'node -v'
unstash 'solar-system-node-modules'
sh 'npm run coverage'
}
}
}
```
## Running the pipeline and interpreting cache logs
On the first run:
* The plugin searches job and default caches.
* If no up-to-date cache exists it will skip restoring, run the install step, then create and upload a new cache keyed by the lockfile hash.
On later runs:
* If the lockfile hash matches a cached entry, the plugin restores the cache quickly and avoids re-downloading packages.
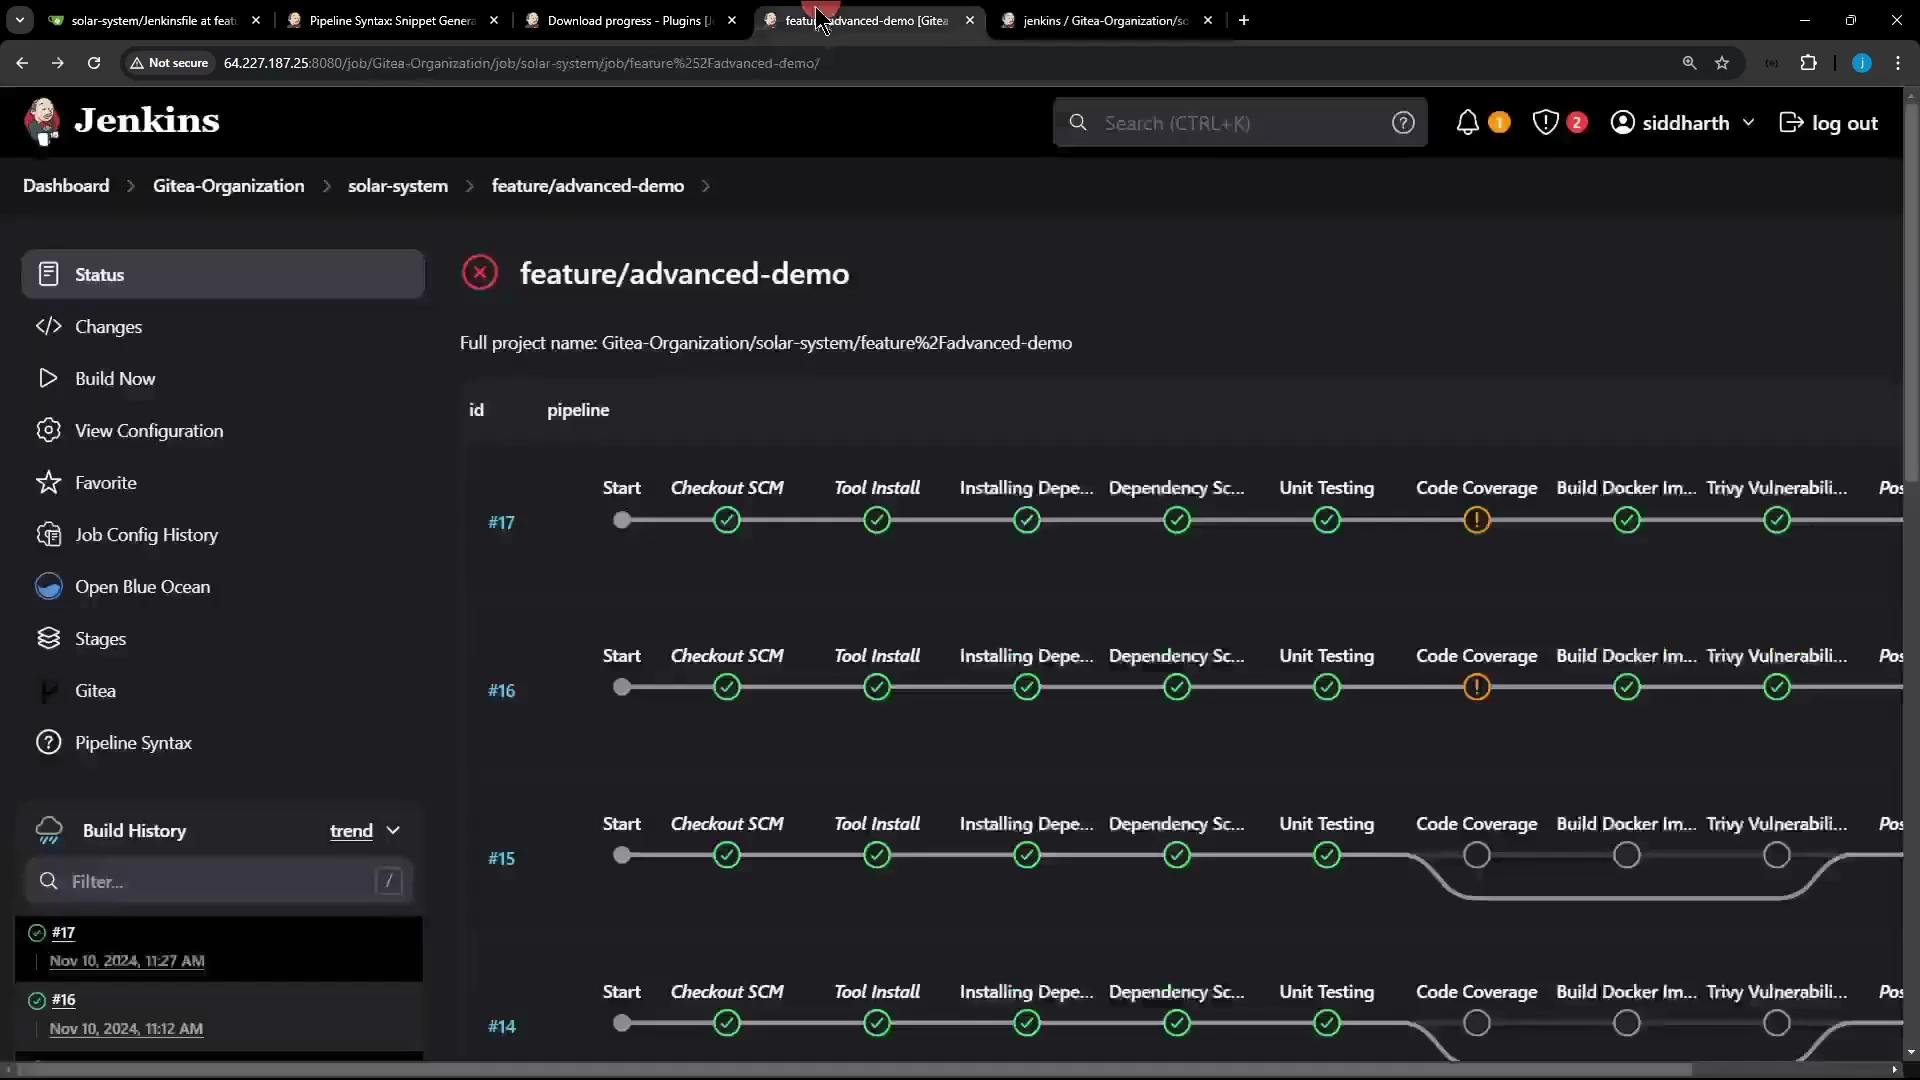
You can inspect the detailed cache-related entries in the classic Jenkins console output (look for lines beginning with `[Cache]`).
View the job and build runs for visual feedback:
Avoid caching sensitive files or environment-specific binaries. Use the cache for reproducible dependencies (like `node_modules`) and ensure the cache validity deciding file (lockfile) is trusted.
Tip: Use `package-lock.json` or `yarn.lock` as the cache validity deciding file. When the lockfile hash changes, the plugin will consider the cache stale and recreate it automatically.
## Example Jenkinsfile snippets
Below are concise examples showing where to place the `cache` step in a Declarative Pipeline and how to use `stash`/`unstash` alongside caching when stages run on different agents.
Installing Dependencies stage (cache `node_modules` and stash for later stages)
```groovy theme={null}
pipeline {
agent any
stages {
stage('Installing Dependencies') {
agent any
options { timestamps() }
steps {
cache(maxCacheSize: 550, caches: [
arbitraryFileCache(
cacheName: 'npm-dependency-cache',
cacheValidityDecidingFile: 'package-lock.json',
includes: '**/*',
path: 'node_modules'
)
]) {
sh 'node -v'
sh 'npm install --no-audit'
// Use stash to transfer node_modules between stages/agents
stash(includes: 'node_modules/', name: 'solar-system-node-modules')
}
}
}
stage('Dependency Scanning') {
steps {
// dependency scanning steps here
}
}
}
}
```
Notes:
* `cache` wraps the steps that create or consume files under `path`. On first run the plugin will create the cache; on subsequent runs it will attempt to restore it.
* Use `stash`/`unstash` to move files between stages or agents when the cache restore occurs on a different executor (for example, controller vs Kubernetes pod).
Unit Testing stage (unstash before running tests)
```groovy theme={null}
stage('Unit Testing') {
parallel {
stage('NodeJS 18') {
options { retry(2) }
steps {
sh 'node -v'
unstash 'solar-system-node-modules'
sh 'npm test'
}
}
stage('NodeJS 19') {
options { retry(2) }
steps {
container('node-19') {
sh 'sleep 10s' // example - waiting for container readiness
sh 'node -v'
unstash 'solar-system-node-modules'
sh 'npm test'
}
}
}
}
}
```
Code Coverage stage example (non-blocking failures with catchError)
```groovy theme={null}
stage('Code Coverage') {
steps {
catchError(buildResult: 'SUCCESS', message: 'Coverage failures are non-blocking for now') {
sh 'node -v'
unstash 'solar-system-node-modules'
sh 'npm run coverage'
}
}
}
```
## Running the pipeline and interpreting cache logs
On the first run:
* The plugin searches job and default caches.
* If no up-to-date cache exists it will skip restoring, run the install step, then create and upload a new cache keyed by the lockfile hash.
On later runs:
* If the lockfile hash matches a cached entry, the plugin restores the cache quickly and avoids re-downloading packages.
You can inspect the detailed cache-related entries in the classic Jenkins console output (look for lines beginning with `[Cache]`).
View the job and build runs for visual feedback:
 Console log excerpts (first build — cache not found, then created)
```text theme={null}
[Cache] Searching cache in job specific caches...
[Cache] Searching cache in default caches...
[Cache] Skip restoring cache as no up-to-date cache exists
+ node -v
v22.6.0
+ npm install --no-audit
up to date in 1s
[Pipeline] stash
Stashed 4993 file(s)
[Cache] Creating cache...
[Cache] got hash a47b9ef02dbc79db72ab6385105e0142 for cacheValidityDecidingFile(s) - actual file(s): /var/lib/jenkins/workspace/lar-system_feature_advanced-demo/package-lock.json
[Cache] Cache created in 1648ms
```
Console log excerpts (second build — cache restored)
```text theme={null}
[Cache] got hash a47b9ef02dbc79db72ab6385105e0142 for cacheValidityDecidingFile(s) - actual file(s): /var/lib/jenkins/workspace/lar-system_feature_advanced-demo/package-lock.json
[Cache] Found cache in job specific caches
[Cache] Restoring cache...
[Cache] Cache restored in 771ms
+ node -v
v22.6.0
+ npm install --no-audit
up to date in 1s
[Pipeline] stash
Stashed 4993 file(s)
[Cache] Skip cache creation as the cache is up-to-date
```
## Quick reference
| Setting | Purpose | Example |
| --------------------------- | ----------------------------------------------------------- | ---------------------- |
| `path` | Directory to cache | `node_modules` |
| `cacheName` | Identifies the cache | `npm-dependency-cache` |
| `cacheValidityDecidingFile` | File used to compute cache hash and invalidate stale caches | `package-lock.json` |
| `compression` | Archive format for upload/download | `TARGZ` |
| `maxCacheSize` | Limit uploads to reasonable size | `550` (MB) |
## Summary
* Install the Job Cacher plugin and configure a `node_modules` cache.
* Use a lockfile (such as `package-lock.json` or `yarn.lock`) as the cache validity deciding file so the cache is recreated whenever dependencies change.
* Combine `cache` with `stash`/`unstash` when stages run on different agents or when you need to transfer dependencies between stages.
* Inspect the classic Jenkins console log for `[Cache]` entries to verify cache restore/create behavior.
Use the lockfile as the cache validity deciding file. This ensures the cache is recreated whenever dependencies change, preventing stale or incompatible node\_modules from being reused.
References
* Jenkins Job Cacher plugin documentation: [https://plugins.jenkins.io/job-cacher/](https://plugins.jenkins.io/job-cacher/)
* npm lockfile guide: [https://docs.npmjs.com/cli/v9/configuring-npm/package-lock-json](https://docs.npmjs.com/cli/v9/configuring-npm/package-lock-json)
That's all for this lesson — try modifying dependencies to see cache invalidation and recreation in action.
Console log excerpts (first build — cache not found, then created)
```text theme={null}
[Cache] Searching cache in job specific caches...
[Cache] Searching cache in default caches...
[Cache] Skip restoring cache as no up-to-date cache exists
+ node -v
v22.6.0
+ npm install --no-audit
up to date in 1s
[Pipeline] stash
Stashed 4993 file(s)
[Cache] Creating cache...
[Cache] got hash a47b9ef02dbc79db72ab6385105e0142 for cacheValidityDecidingFile(s) - actual file(s): /var/lib/jenkins/workspace/lar-system_feature_advanced-demo/package-lock.json
[Cache] Cache created in 1648ms
```
Console log excerpts (second build — cache restored)
```text theme={null}
[Cache] got hash a47b9ef02dbc79db72ab6385105e0142 for cacheValidityDecidingFile(s) - actual file(s): /var/lib/jenkins/workspace/lar-system_feature_advanced-demo/package-lock.json
[Cache] Found cache in job specific caches
[Cache] Restoring cache...
[Cache] Cache restored in 771ms
+ node -v
v22.6.0
+ npm install --no-audit
up to date in 1s
[Pipeline] stash
Stashed 4993 file(s)
[Cache] Skip cache creation as the cache is up-to-date
```
## Quick reference
| Setting | Purpose | Example |
| --------------------------- | ----------------------------------------------------------- | ---------------------- |
| `path` | Directory to cache | `node_modules` |
| `cacheName` | Identifies the cache | `npm-dependency-cache` |
| `cacheValidityDecidingFile` | File used to compute cache hash and invalidate stale caches | `package-lock.json` |
| `compression` | Archive format for upload/download | `TARGZ` |
| `maxCacheSize` | Limit uploads to reasonable size | `550` (MB) |
## Summary
* Install the Job Cacher plugin and configure a `node_modules` cache.
* Use a lockfile (such as `package-lock.json` or `yarn.lock`) as the cache validity deciding file so the cache is recreated whenever dependencies change.
* Combine `cache` with `stash`/`unstash` when stages run on different agents or when you need to transfer dependencies between stages.
* Inspect the classic Jenkins console log for `[Cache]` entries to verify cache restore/create behavior.
Use the lockfile as the cache validity deciding file. This ensures the cache is recreated whenever dependencies change, preventing stale or incompatible node\_modules from being reused.
References
* Jenkins Job Cacher plugin documentation: [https://plugins.jenkins.io/job-cacher/](https://plugins.jenkins.io/job-cacher/)
* npm lockfile guide: [https://docs.npmjs.com/cli/v9/configuring-npm/package-lock-json](https://docs.npmjs.com/cli/v9/configuring-npm/package-lock-json)
That's all for this lesson — try modifying dependencies to see cache invalidation and recreation in action.