> ## Documentation Index
> Fetch the complete documentation index at: https://notes.kodekloud.com/llms.txt
> Use this file to discover all available pages before exploring further.

# Demo EC2 image builder

> Learn to automate AMI creation using EC2 Image Builder to build a custom Nginx AMI with validation and testing.

Learn how to automate AMI creation with EC2 Image Builder. In this guide, we'll set up a pipeline that uses Amazon Linux 2 as a base, installs Nginx, runs validation and reboot tests, and outputs a ready-to-use Nginx AMI.

<Callout icon="lightbulb" color="#1CB2FE">
  * An AWS account with Image Builder, EC2, and IAM permissions
  * An IAM role or instance profile with `ImageBuilderInstanceProfile` and `iam:PassRole`
  * AWS Management Console access
</Callout>

***

## 1. Access EC2 Image Builder

1. Sign in to the AWS Management Console.
2. In the Services menu, search for **EC2 Image Builder**.
3. Open the service to view the Image Builder dashboard, which highlights three main steps: Recipe, Infrastructure configuration, and Distribution.
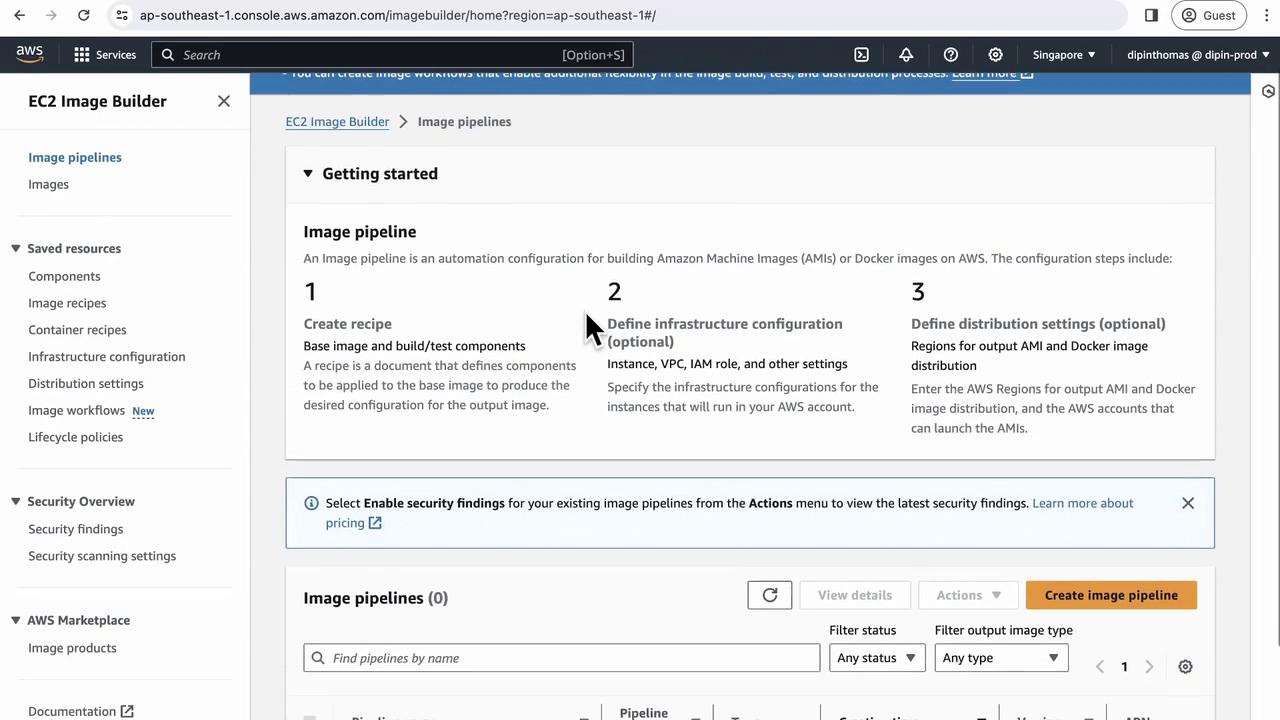
<Frame>
  ![The image shows the AWS EC2 Image Builder interface, detailing steps for creating an image pipeline, including creating a recipe, defining infrastructure configuration, and setting distribution options.](https://kodekloud.com/kk-media/image/upload/v1752869051/notes-assets/images/Amazon-Elastic-Compute-Cloud-EC2-Demo-EC2-image-builder/aws-ec2-image-builder-pipeline-steps.jpg)
</Frame>

***

## 2. Create a New Image Pipeline

1. Click **Create image pipeline**.
2. Enter a **Pipeline name** (e.g., `nginx-pipeline`).
3. Add a description such as *Install Nginx*.
4. Enable **Enhanced metadata collection** to capture detailed build metrics.
5. Optionally, turn on security scanning for vulnerability reports.
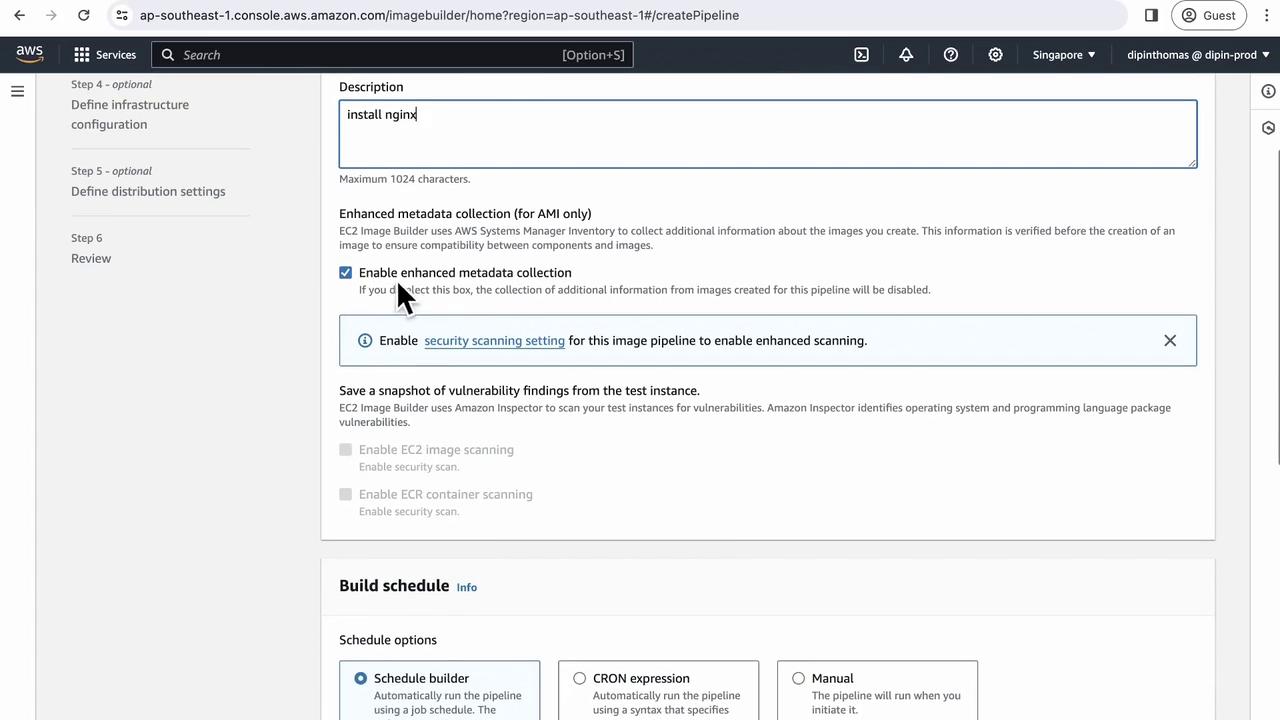
<Frame>
  ![The image shows an AWS console interface for creating an image pipeline, with options for enhanced metadata collection and security scanning settings. A description field is filled with "install nginx," and there are scheduling options for the build.](https://kodekloud.com/kk-media/image/upload/v1752869053/notes-assets/images/Amazon-Elastic-Compute-Cloud-EC2-Demo-EC2-image-builder/aws-console-image-pipeline-settings.jpg)
</Frame>

***

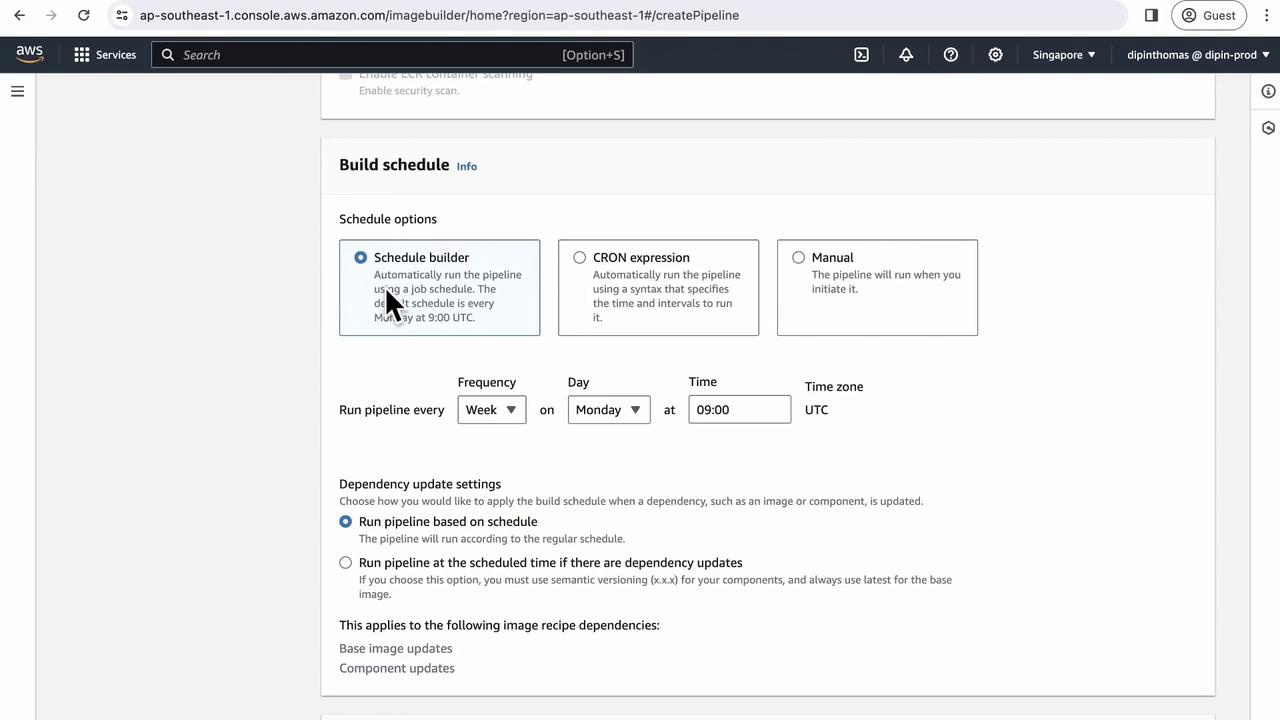
## 3. Schedule Your Builds

You can trigger your image builds automatically or manually.

| Schedule Type | Description                              |
| ------------- | ---------------------------------------- |
| Manual        | Run the pipeline on demand               |
| CRON          | Automate builds on a time-based schedule |

For this demo, select **Manual**.
<Frame>
  ![The image shows an AWS console interface for setting up a build schedule in Image Builder, with options for schedule builder, CRON expression, and manual execution. The selected schedule is set to run weekly on Mondays at 09:00 UTC.](https://kodekloud.com/kk-media/image/upload/v1752869054/notes-assets/images/Amazon-Elastic-Compute-Cloud-EC2-Demo-EC2-image-builder/aws-console-image-builder-schedule.jpg)
</Frame>

***

## 4. Define Your Recipe

A recipe lists the components and settings for your AMI.

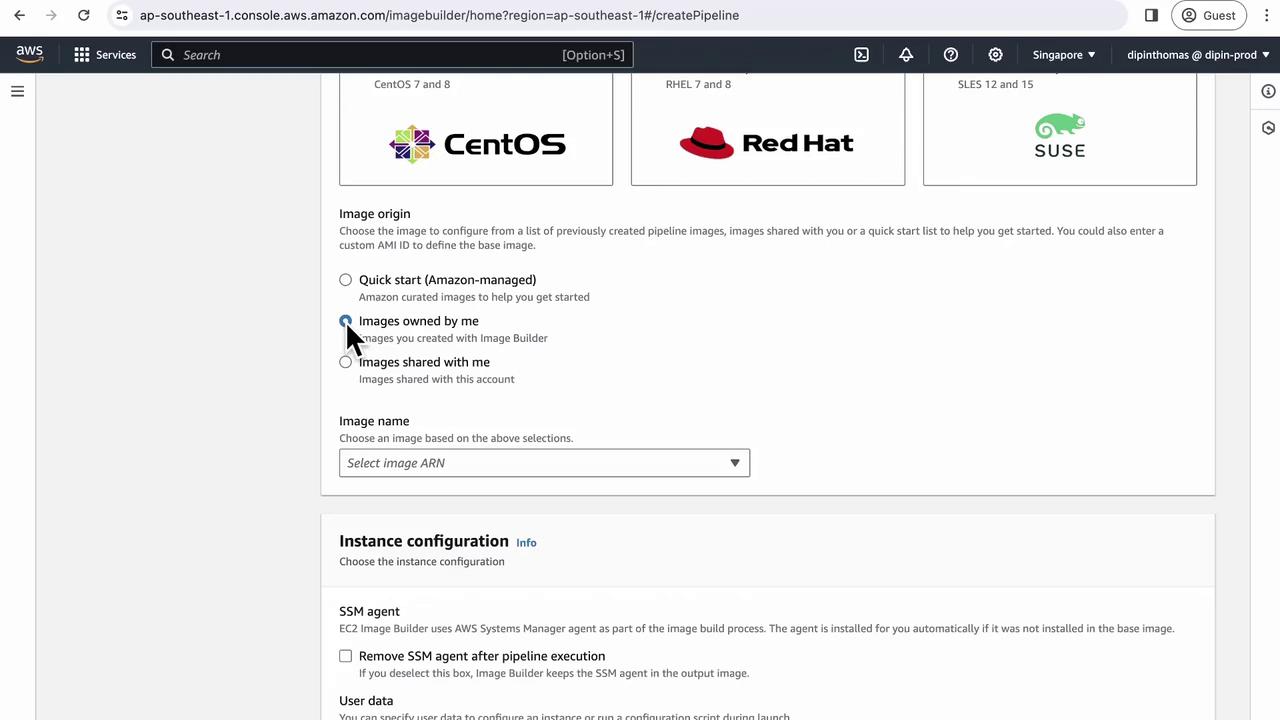
1. Click **Next** and choose **Create new recipe**.
2. Select **AMI** as the target image type.
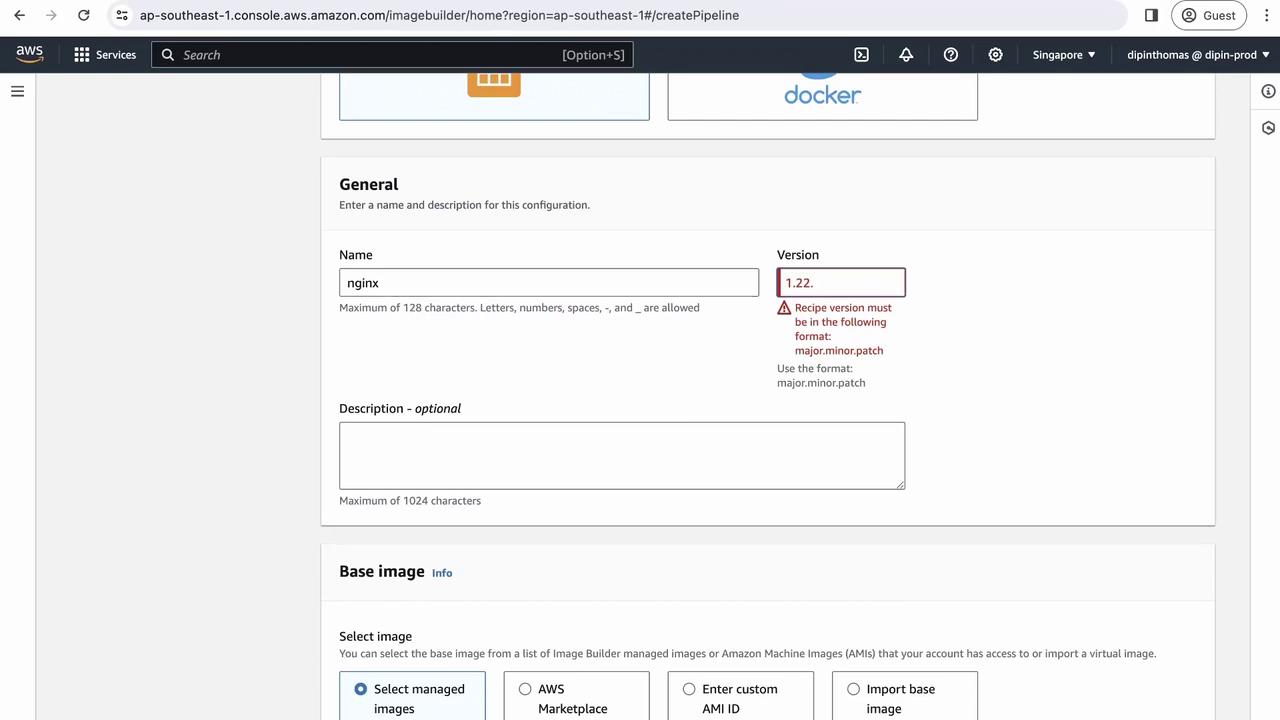
3. Fill out the form:

| Field       | Value                                |
| ----------- | ------------------------------------ |
| Name        | nginx                                |
| Version     | 1.22.0                               |
| Description | Install Nginx latest                 |
| Base Image  | Quick Start → Amazon Linux 2 (ARM64) |

4. Check **Remove after build** to uninstall the SSM agent post-build.
5. Leave the working directory at `/tmp`.

<Callout icon="lightbulb" color="#1CB2FE">
  Ensure the version follows semantic versioning (`x.y.z`) to avoid validation errors.
</Callout>

<Frame>
  ![The image shows an AWS Image Builder configuration screen where a user is setting up a pipeline with the name "nginx" and version "1.22," but there's an error indicating the version format is incorrect.](https://kodekloud.com/kk-media/image/upload/v1752869055/notes-assets/images/Amazon-Elastic-Compute-Cloud-EC2-Demo-EC2-image-builder/aws-image-builder-nginx-pipeline-error.jpg)
</Frame>

<Frame>
  ![The image shows an AWS console interface for creating a pipeline, with options to select image origins like CentOS, Red Hat, and SUSE, and configuration settings for instance management.](https://kodekloud.com/kk-media/image/upload/v1752869056/notes-assets/images/Amazon-Elastic-Compute-Cloud-EC2-Demo-EC2-image-builder/aws-console-pipeline-image-origins-settings.jpg)
</Frame>

***

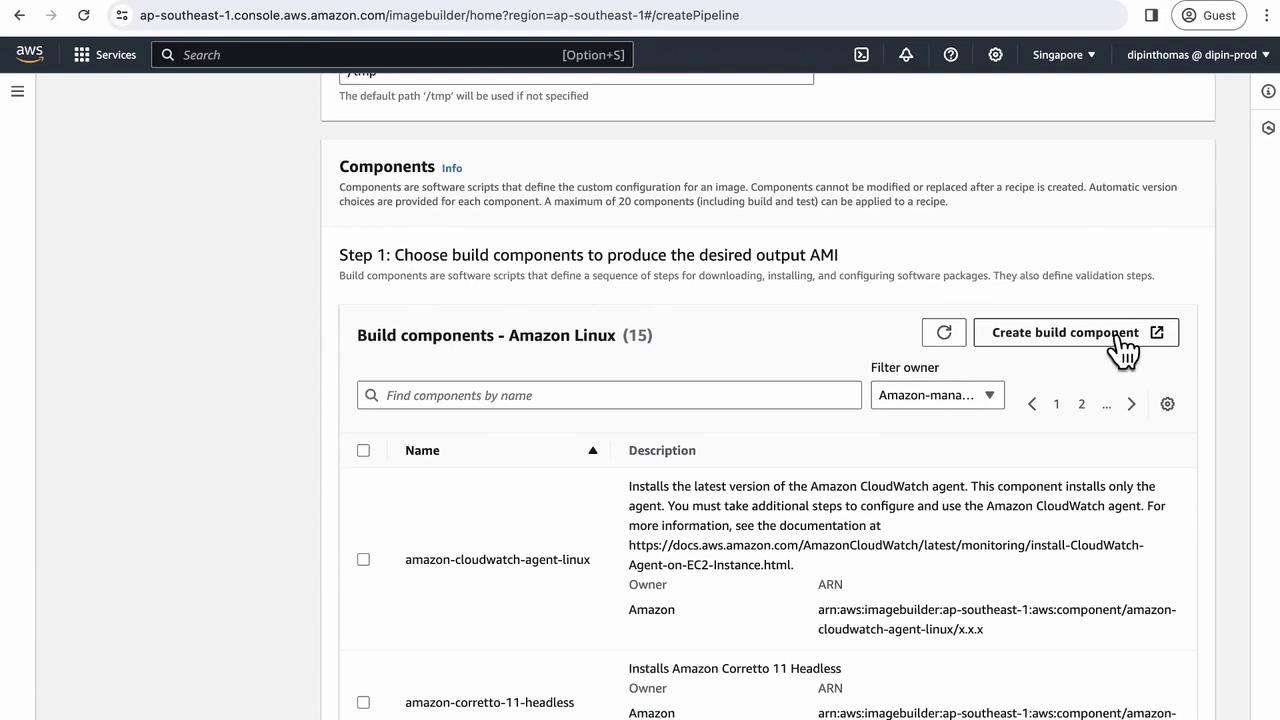
## 5. Create a Build Component

Components are YAML definitions that execute commands in phases.

1. Click **Create build component**.

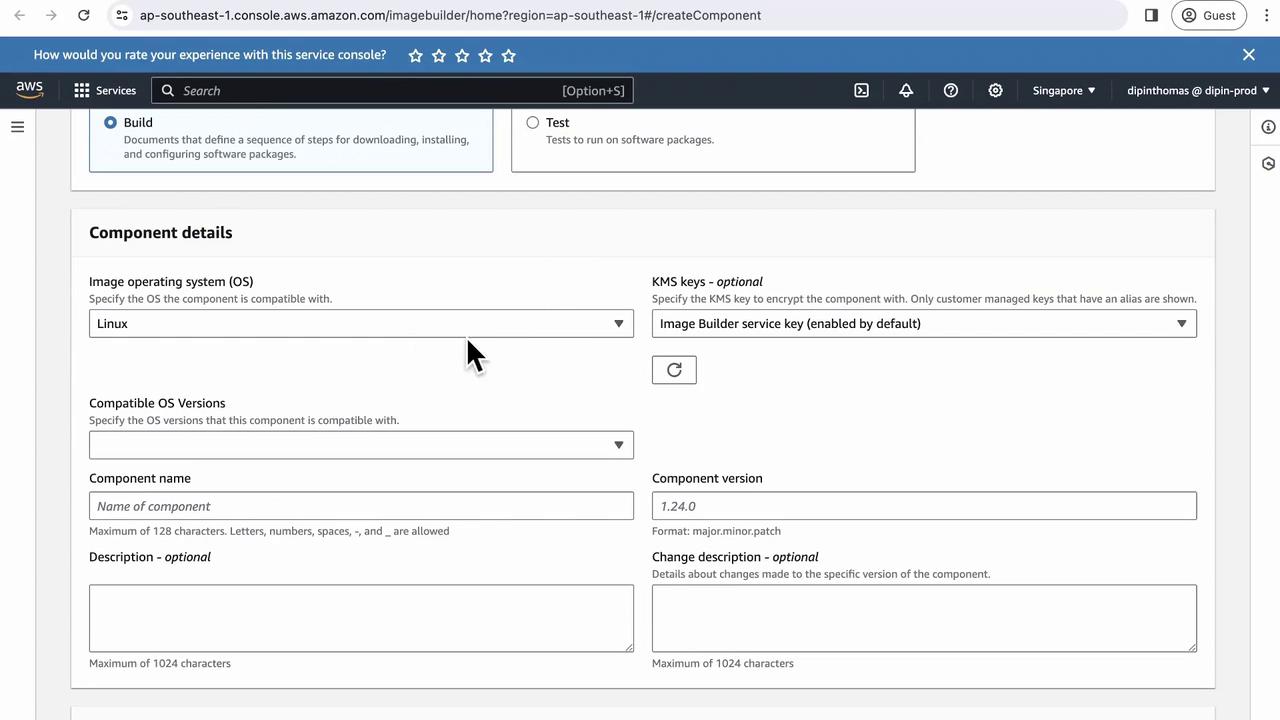
2. Choose **Linux** as the compatible OS.

3. Fill in component details:

   * **Name**: `nginx`
   * **Version**: `1.22.0`
   * **Description**: Install Nginx version 1.22.0

4. In the YAML editor, define the **build**, **validate**, and **test** phases:

```yaml theme={null}
name: install-nginx-latest
description: Install Nginx version 1.22.0
schemaVersion: 1.0

phases:
  - name: build
    steps:
      - name: update-os
        action: ExecuteBash
        inputs:
          commands:
            - sudo yum update -y
      - name: install-nginx
        action: ExecuteBash
        inputs:
          commands:
            - sudo amazon-linux-extras enable nginx1
            - sudo yum install nginx -y
      - name: enable-nginx
        action: ExecuteBash
        inputs:
          commands:
            - sudo systemctl enable nginx

  - name: validate
    steps:
      - name: validate-status
        action: ExecuteBash
        inputs:
          commands:
            - systemctl status nginx

  - name: test
    steps:
      - name: reboot-test
        action: ExecuteBash
        inputs:
          commands:
            - sudo reboot
```
<Frame>
  ![The image shows an AWS console interface for creating a build component in Amazon Linux, with options to select and filter components. A cursor is hovering over the "Create build component" button.](https://kodekloud.com/kk-media/image/upload/v1752869057/notes-assets/images/Amazon-Elastic-Compute-Cloud-EC2-Demo-EC2-image-builder/aws-console-create-build-component.jpg)
</Frame>

<Frame>
  ![The image shows an AWS Image Builder console screen where a user is configuring component details, including selecting the operating system as Linux and specifying component version and name.](https://kodekloud.com/kk-media/image/upload/v1752869059/notes-assets/images/Amazon-Elastic-Compute-Cloud-EC2-Demo-EC2-image-builder/aws-image-builder-linux-component-configuration.jpg)
</Frame>

Save the component. Back in the pipeline wizard, filter **Components** by **Owned by me** and select your `nginx` component.

***

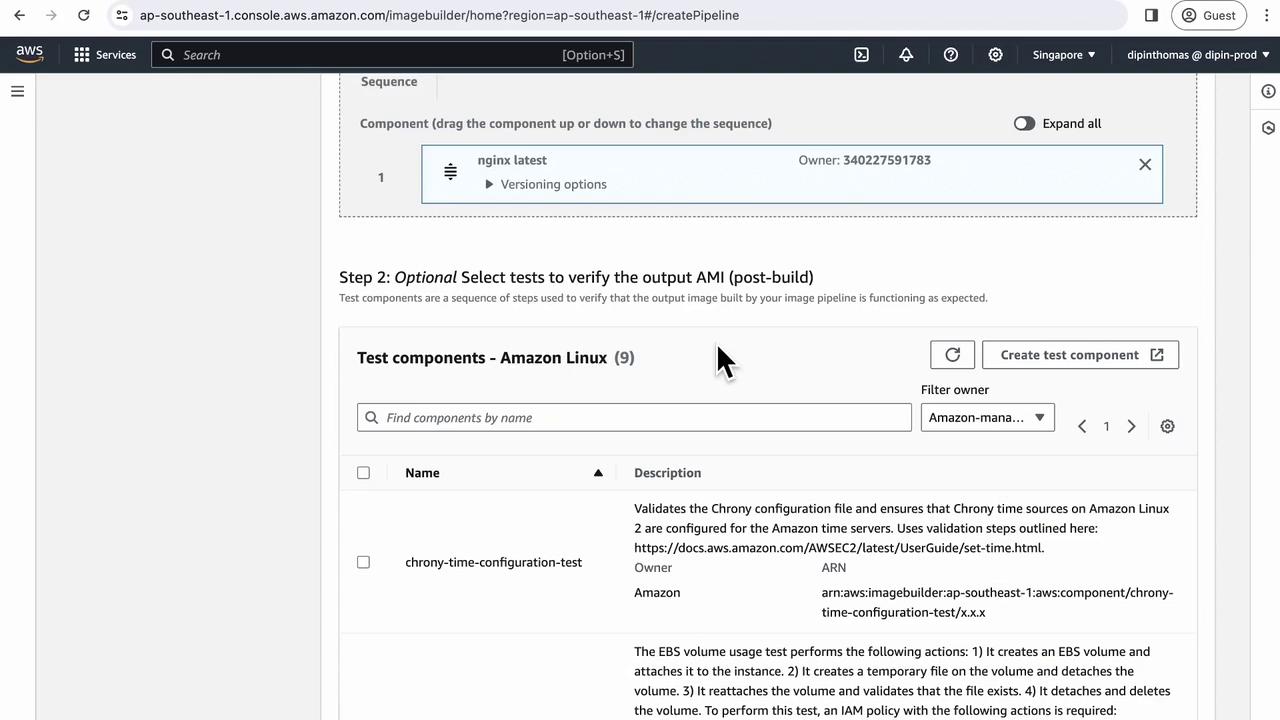
## 6. Add Tests

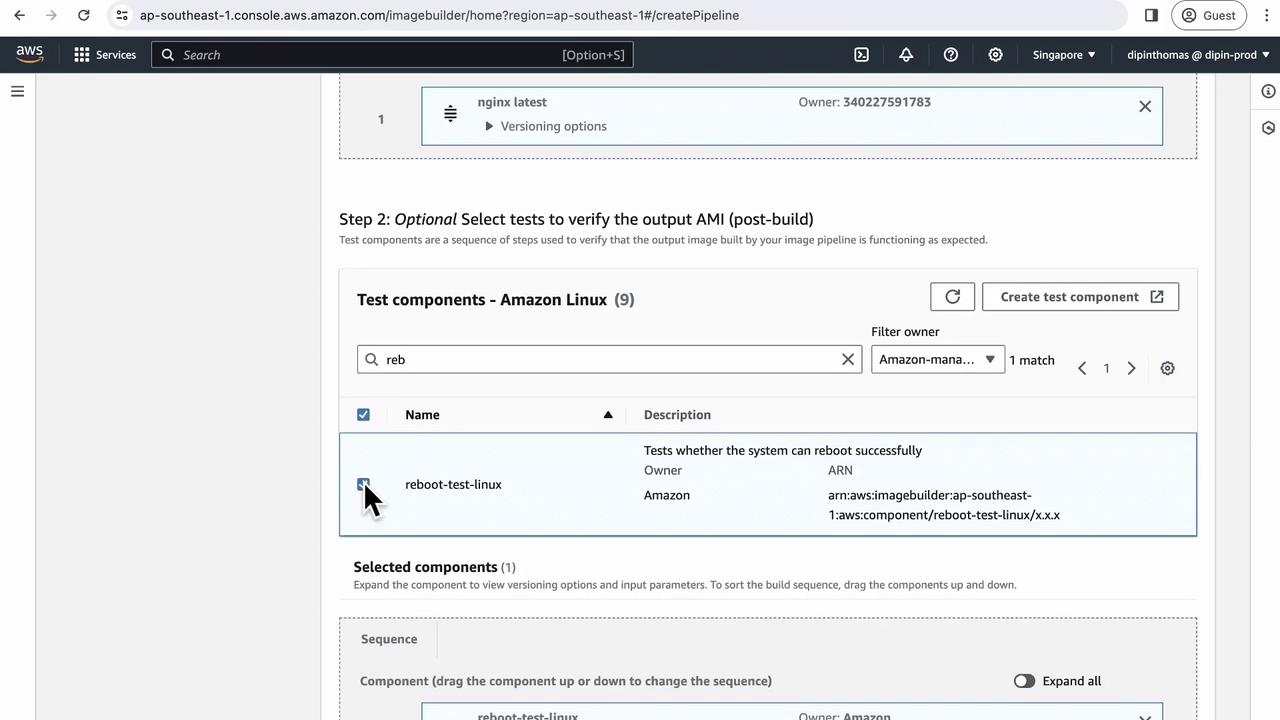
By default, Image Builder offers several tests. Select the **Reboot Test** to ensure the AMI boots correctly after a restart.
<Frame>
  ![The image shows an AWS console interface for creating an image pipeline, specifically focusing on selecting test components for Amazon Linux. It includes options for verifying the output AMI and a list of test components.](https://kodekloud.com/kk-media/image/upload/v1752869060/notes-assets/images/Amazon-Elastic-Compute-Cloud-EC2-Demo-EC2-image-builder/aws-console-image-pipeline-test-components.jpg)
</Frame>

<Frame>
  ![The image shows an AWS console interface for creating a pipeline, specifically selecting test components for Amazon Linux, with a focus on a "reboot-test-linux" component.](https://kodekloud.com/kk-media/image/upload/v1752869062/notes-assets/images/Amazon-Elastic-Compute-Cloud-EC2-Demo-EC2-image-builder/aws-console-pipeline-reboot-test-linux.jpg)
</Frame>

***

## 7. Configure Storage

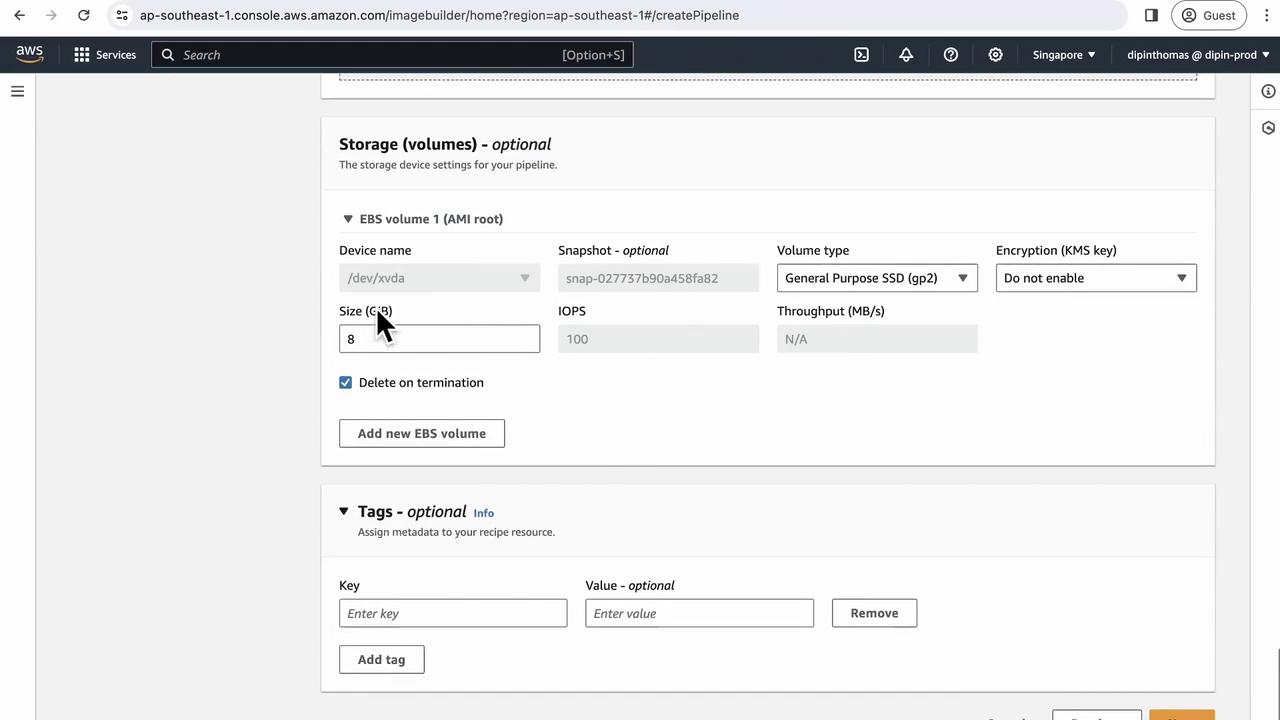
Specify EBS settings for the build instance’s root volume:

* **Size**: 8 GB
* **Type**: gp3
* **IOPS**: Default
* **Encryption**: Enable (recommended)
<Frame>
  ![The image shows an AWS console interface for configuring storage volumes, including options for EBS volume size, type, and encryption settings. There are also fields for adding tags to the configuration.](https://kodekloud.com/kk-media/image/upload/v1752869063/notes-assets/images/Amazon-Elastic-Compute-Cloud-EC2-Demo-EC2-image-builder/aws-console-storage-volumes-configuration.jpg)
</Frame>

***

## 8. Select a Workflow

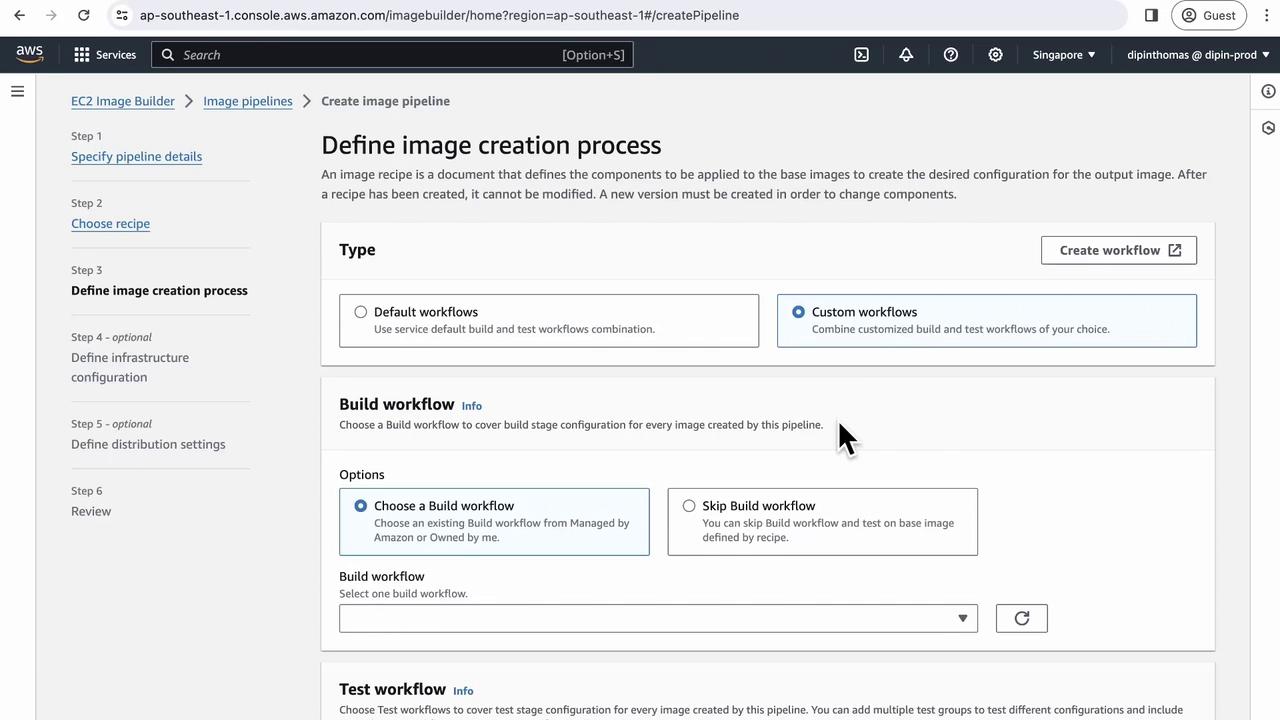
Choose **Default** to let Image Builder orchestrate phases automatically. Use **Custom** if you need to reorder or skip specific steps.
<Frame>
  ![The image shows an AWS EC2 Image Builder interface where a user is defining an image creation process, with options for selecting default or custom workflows.](https://kodekloud.com/kk-media/image/upload/v1752869064/notes-assets/images/Amazon-Elastic-Compute-Cloud-EC2-Demo-EC2-image-builder/aws-ec2-image-builder-workflow-interface.jpg)
</Frame>

***

## 9. Infrastructure Configuration

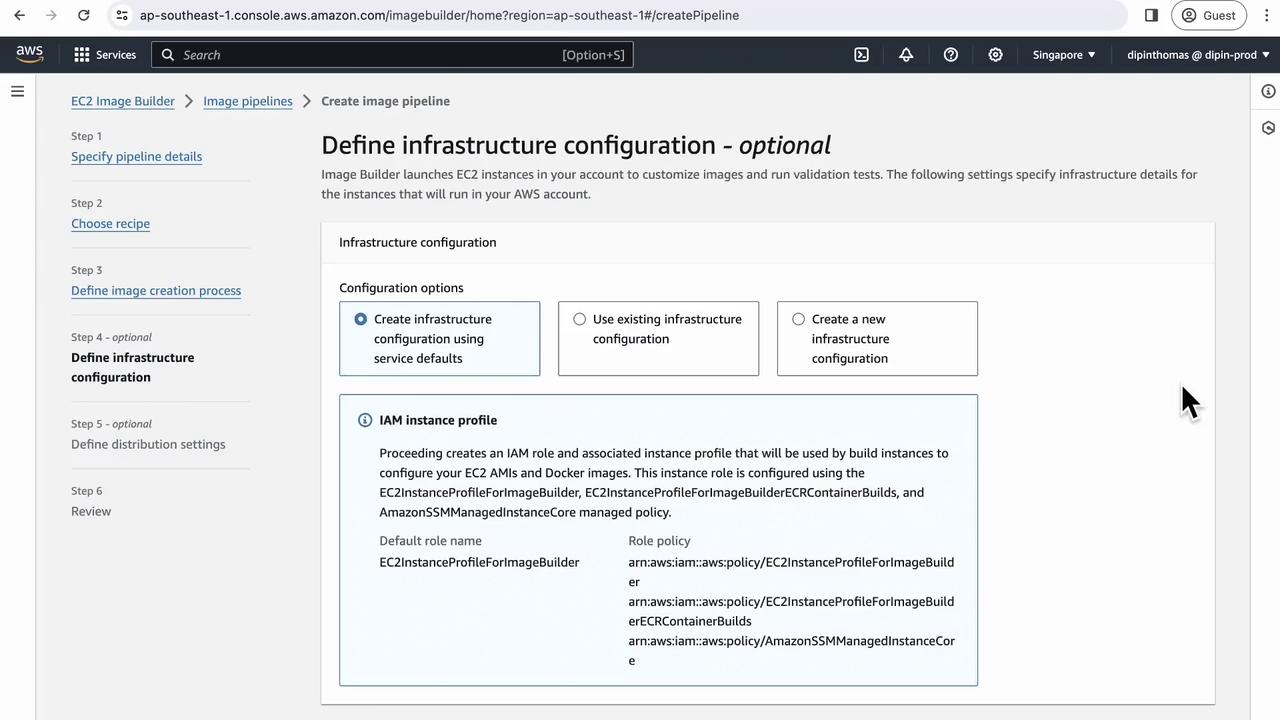
Define the compute environment for builds:

1. Click **Create new configuration**.
2. Name it (e.g., `nginx-build-config`).
3. Attach an IAM instance profile with `ImageBuilderInstanceProfile`.
4. Choose an instance type, such as `t4g.medium` for ARM64.
5. Optionally, add an SNS topic for notifications.
<Frame>
  ![The image shows an AWS EC2 Image Builder interface for defining infrastructure configuration, with options to create or use existing configurations and details about IAM instance profiles.](https://kodekloud.com/kk-media/image/upload/v1752869065/notes-assets/images/Amazon-Elastic-Compute-Cloud-EC2-Demo-EC2-image-builder/aws-ec2-image-builder-interface.jpg)
</Frame>

***

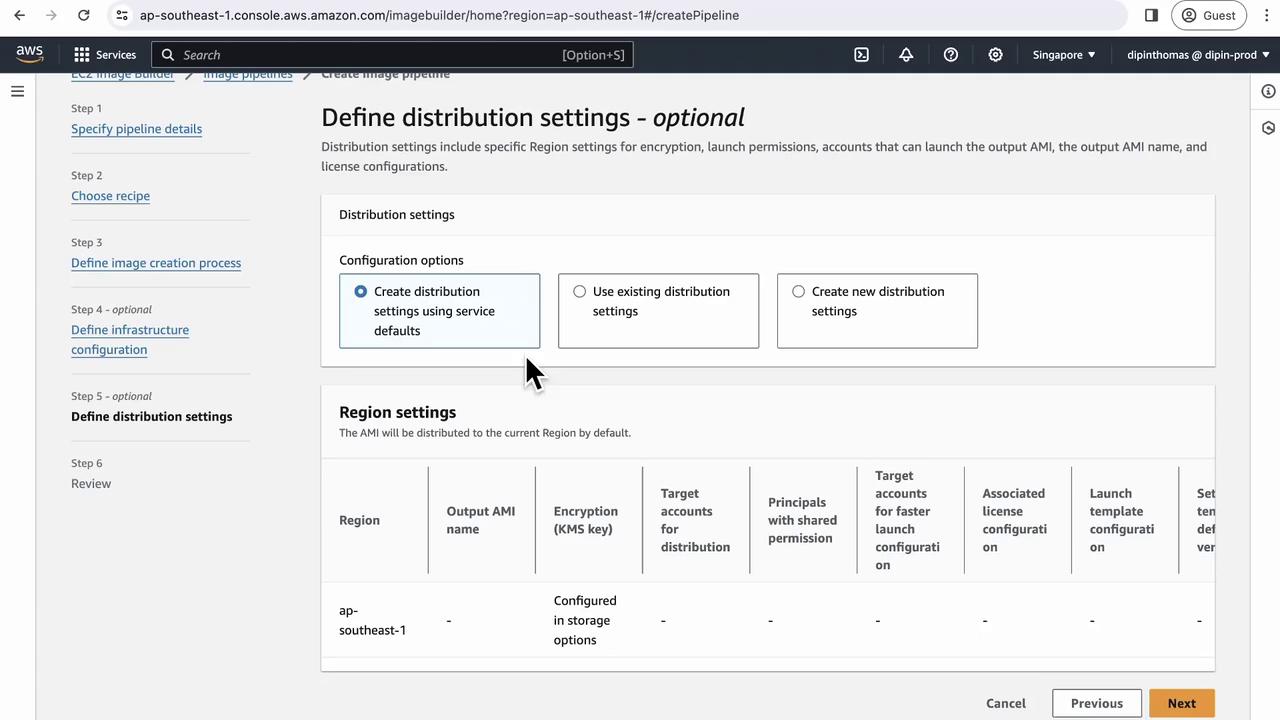
## 10. Distribution Settings

By default, the AMI is shared in the current account and region. Add other accounts or regions if you need cross-account or cross-region distribution.
<Frame>
  ![The image shows an AWS console interface for defining distribution settings in an EC2 image builder pipeline. It includes options for configuration and region settings.](https://kodekloud.com/kk-media/image/upload/v1752869066/notes-assets/images/Amazon-Elastic-Compute-Cloud-EC2-Demo-EC2-image-builder/aws-console-ec2-image-builder-settings.jpg)
</Frame>

***

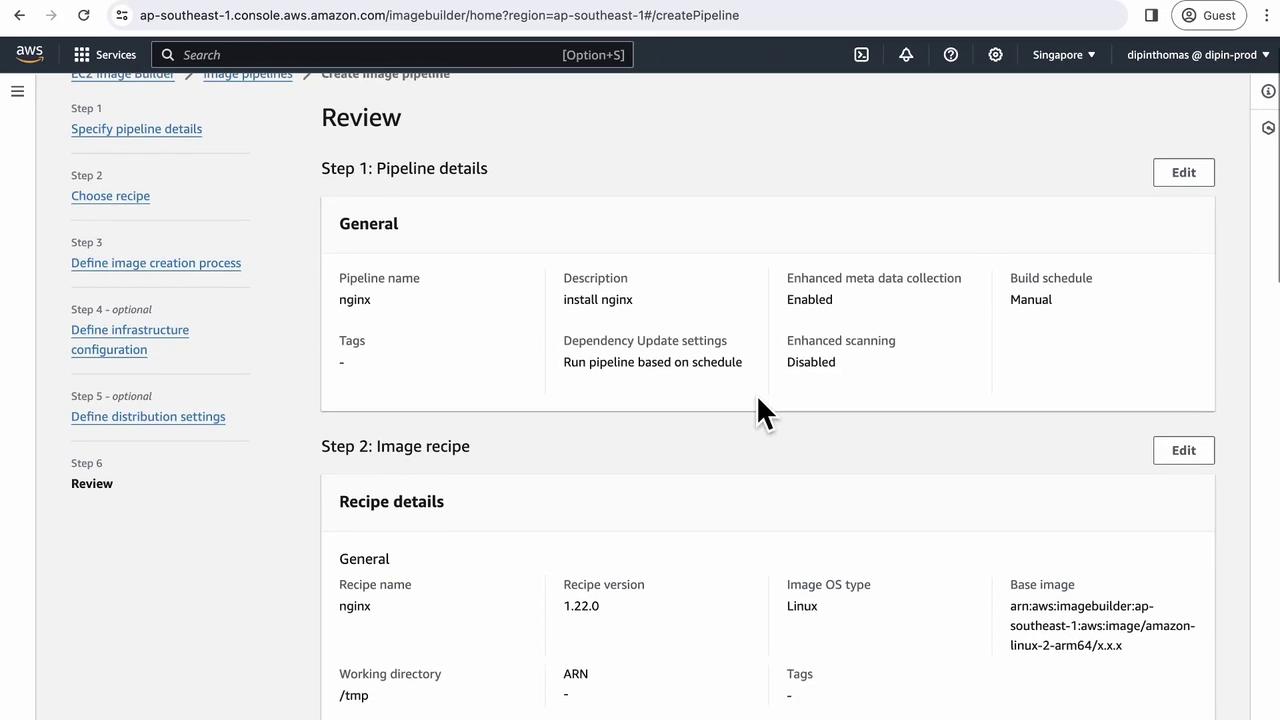
## 11. Review & Create

Double-check all settings:

* Pipeline name and metadata
* Recipe details
* Component tests
* Storage configuration
* Workflow selection
* Infrastructure profile
* Distribution targets

Click **Create pipeline** to launch.
<Frame>
  ![The image shows an AWS EC2 Image Builder interface reviewing pipeline details for creating an image pipeline named "nginx," with settings for metadata collection and scanning.](https://kodekloud.com/kk-media/image/upload/v1752869067/notes-assets/images/Amazon-Elastic-Compute-Cloud-EC2-Demo-EC2-image-builder/aws-ec2-image-builder-nginx-pipeline.jpg)
</Frame>

<Frame>
  ![The image shows an AWS console interface for creating an image pipeline, detailing instance configuration, storage volumes, and image creation process steps.](https://kodekloud.com/kk-media/image/upload/v1752869068/notes-assets/images/Amazon-Elastic-Compute-Cloud-EC2-Demo-EC2-image-builder/aws-console-image-pipeline-configuration.jpg)
</Frame>

***

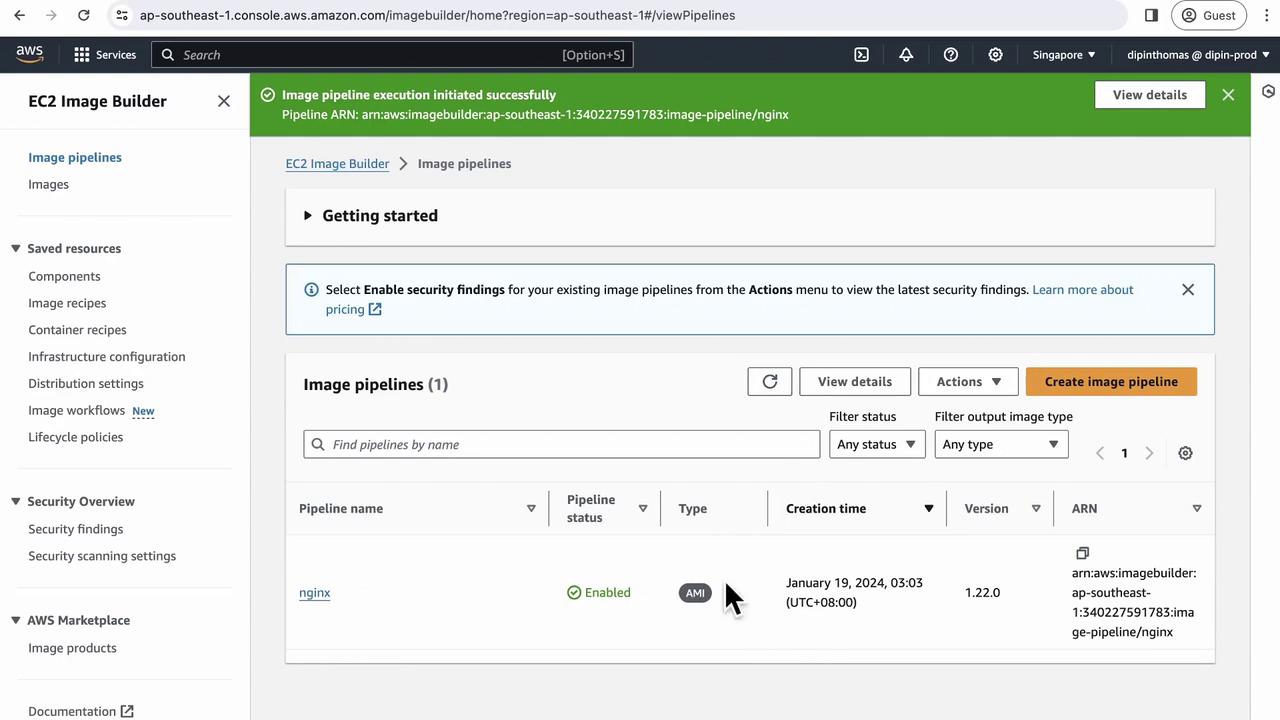
## 12. Run the Pipeline

1. Navigate to **Image pipelines** in the console.
2. Select your newly created `nginx-pipeline`.
3. Click **Run pipeline**.

The status will change to **Building**.
<Frame>
  ![The image shows the AWS EC2 Image Builder interface with a successful image pipeline execution notification. It displays details of an image pipeline named "nginx" with its status, type, creation time, version, and ARN.](https://kodekloud.com/kk-media/image/upload/v1752869069/notes-assets/images/Amazon-Elastic-Compute-Cloud-EC2-Demo-EC2-image-builder/aws-ec2-image-builder-nginx-pipeline-2.jpg)
</Frame>

***

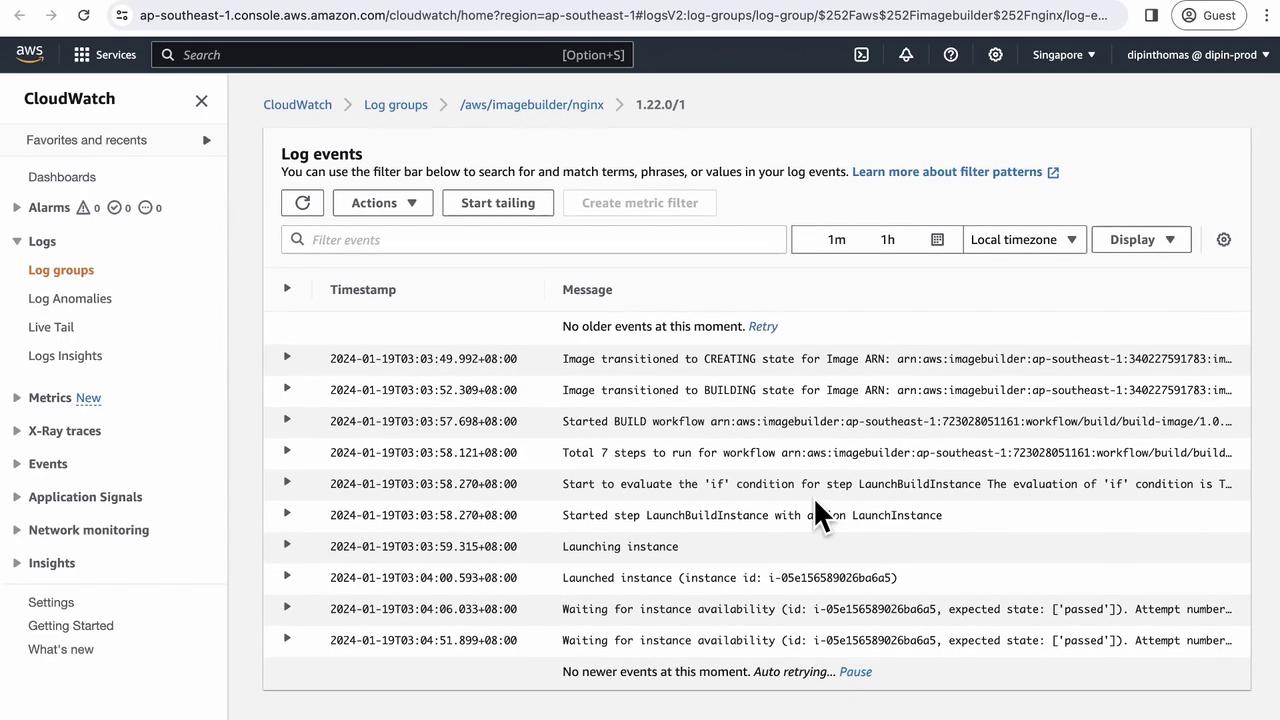
## 13. Monitor Build Execution

As the pipeline runs, a build instance spins up. To view logs:

1. Under **Pipeline executions**, select the active run.
2. Click **Log stream** to open CloudWatch Logs.
<Frame>
  ![The image shows an AWS CloudWatch interface displaying log events related to an image build process, including timestamps and messages about the state transitions and instance launches.](https://kodekloud.com/kk-media/image/upload/v1752869070/notes-assets/images/Amazon-Elastic-Compute-Cloud-EC2-Demo-EC2-image-builder/aws-cloudwatch-log-events-image-build.jpg)
</Frame>

***

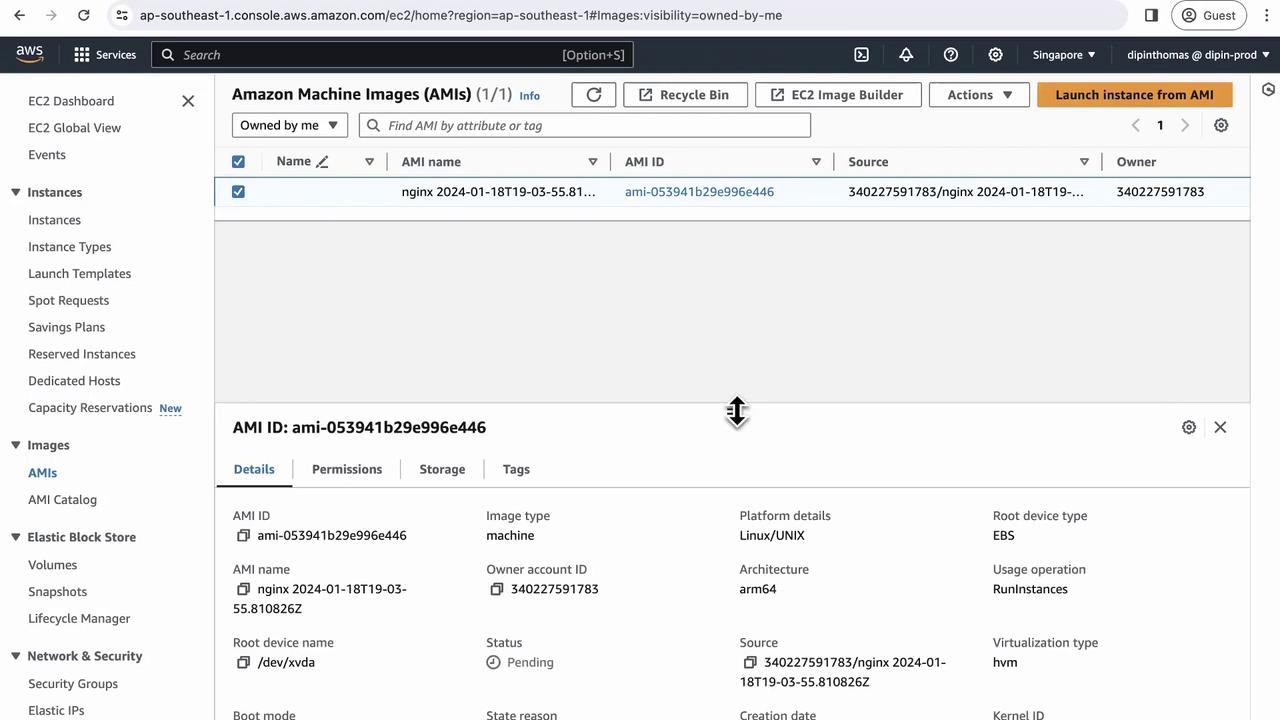
## 14. Verify AMI Creation

After completion, go to the EC2 **AMIs** console.\
Filter by **Owned by me** to confirm your new AMI and its status.
<Frame>
  ![The image shows an Amazon Web Services (AWS) EC2 console displaying details of an Amazon Machine Image (AMI) with ID ami-053941b29e996e446, including its status, architecture, and platform details.](https://kodekloud.com/kk-media/image/upload/v1752869071/notes-assets/images/Amazon-Elastic-Compute-Cloud-EC2-Demo-EC2-image-builder/aws-ec2-console-ami-details.jpg)
</Frame>

***

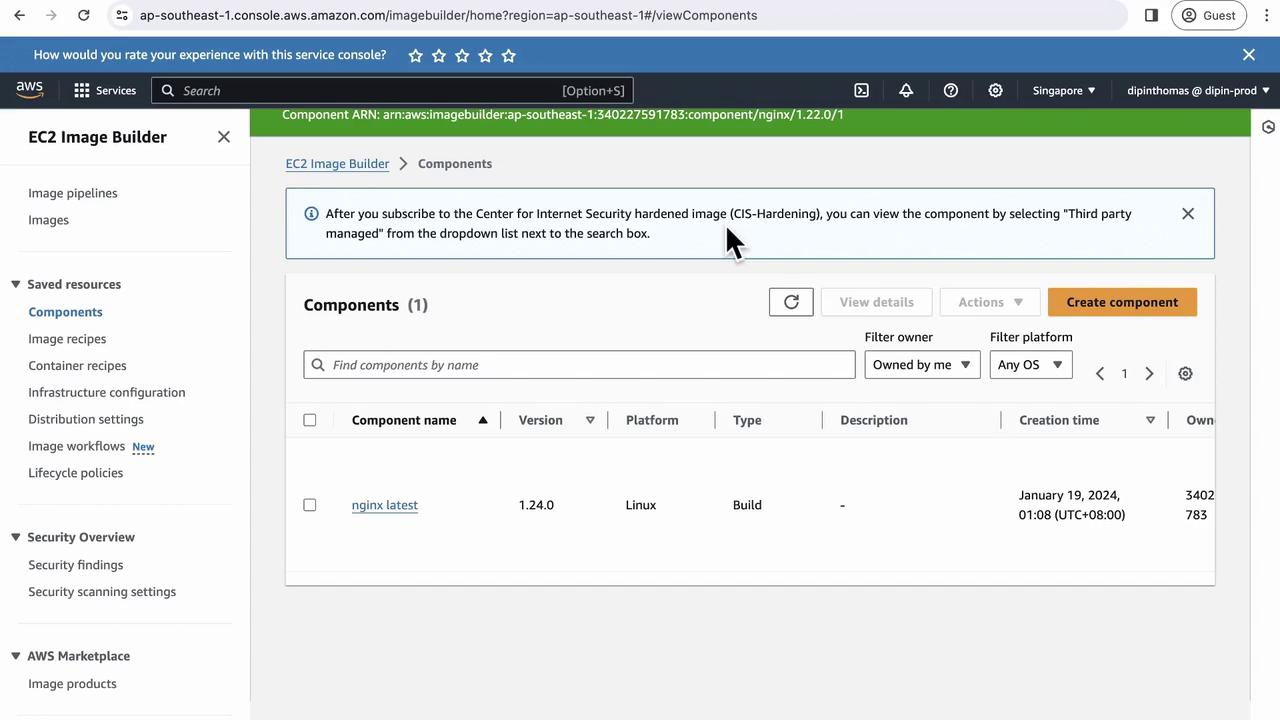
## 15. Test Instance Launch

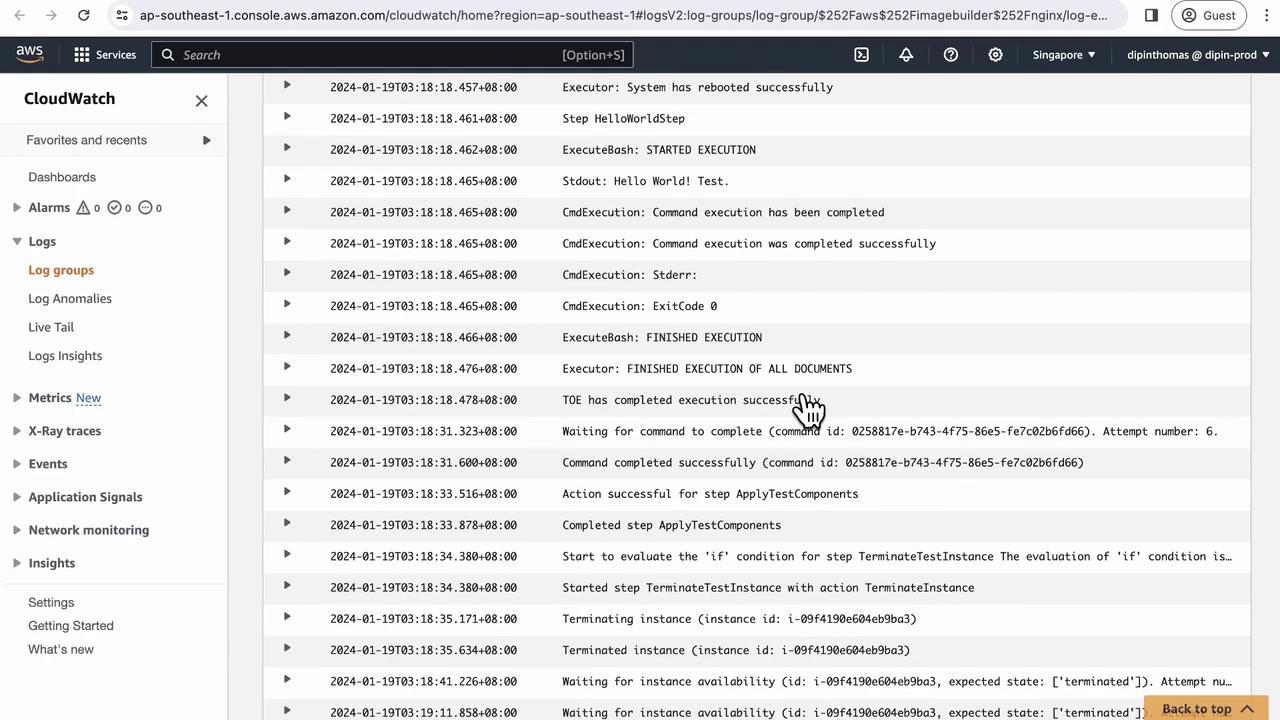
Image Builder automatically launches a test instance:

1. It boots the AMI.
2. Runs the **reboot-test**.
3. Terminates the instance upon success.

Check the EC2 Instances console or the component library to confirm.
<Frame>
  ![The image shows an AWS EC2 Image Builder interface displaying a list of components, with one component named "nginx latest" for Linux. There's a notification about viewing components after subscribing to a CIS-hardened image.](https://kodekloud.com/kk-media/image/upload/v1752869072/notes-assets/images/Amazon-Elastic-Compute-Cloud-EC2-Demo-EC2-image-builder/aws-ec2-image-builder-nginx-latest.jpg)
</Frame>

To dive deeper into execution details, view the CloudWatch logs:
<Frame>
  ![The image shows an AWS CloudWatch console displaying log entries related to system executions and command completions. The logs include timestamps and details about various execution steps and their outcomes.](https://kodekloud.com/kk-media/image/upload/v1752869073/notes-assets/images/Amazon-Elastic-Compute-Cloud-EC2-Demo-EC2-image-builder/aws-cloudwatch-logs-execution-details.jpg)
</Frame>

***

## 16. Completion

When the test instance terminates successfully and the pipeline status shows **Available**, your custom Nginx AMI is ready to deploy.

***

## Links and References

* [EC2 Image Builder User Guide](https://docs.aws.amazon.com/image-builder/latest/userguide/what-is-image-builder.html)
* [Amazon Linux 2 Documentation](https://docs.aws.amazon.com/linux/al2/)
* [AWS CLI Command Reference](https://docs.aws.amazon.com/cli/latest/index.html)
* [AMI Best Practices](https://aws.amazon.com/architecture/ami-encryption/)

<CardGroup>
  <Card title="Watch Video" icon="video" cta="Learn more" href="https://learn.kodekloud.com/user/courses/amazon-elastic-compute-cloud-ec2/module/1132ee02-eae9-44e0-a8a5-8f325254ba92/lesson/61b2f64b-d801-4c51-98f4-ea91b88058ae" />
</CardGroup>