Azure Kubernetes Service
Building and containerizing sample application
Building the sample ASP
Prerequisites
| Requirement | Purpose | Link |
|---|---|---|
| Docker Desktop | Container runtime and local Kubernetes cluster | https://www.docker.com |
| .NET 6 SDK | Build and run ASP.NET Core 6 applications | https://dotnet.microsoft.com/download/dotnet/6.0 |
| JetBrains Rider (or other IDE) | Project creation and code editing | https://www.jetbrains.com/rider/ |
Note
These steps work on Windows, macOS, or Linux. Adjust commands for your OS and editor of choice.
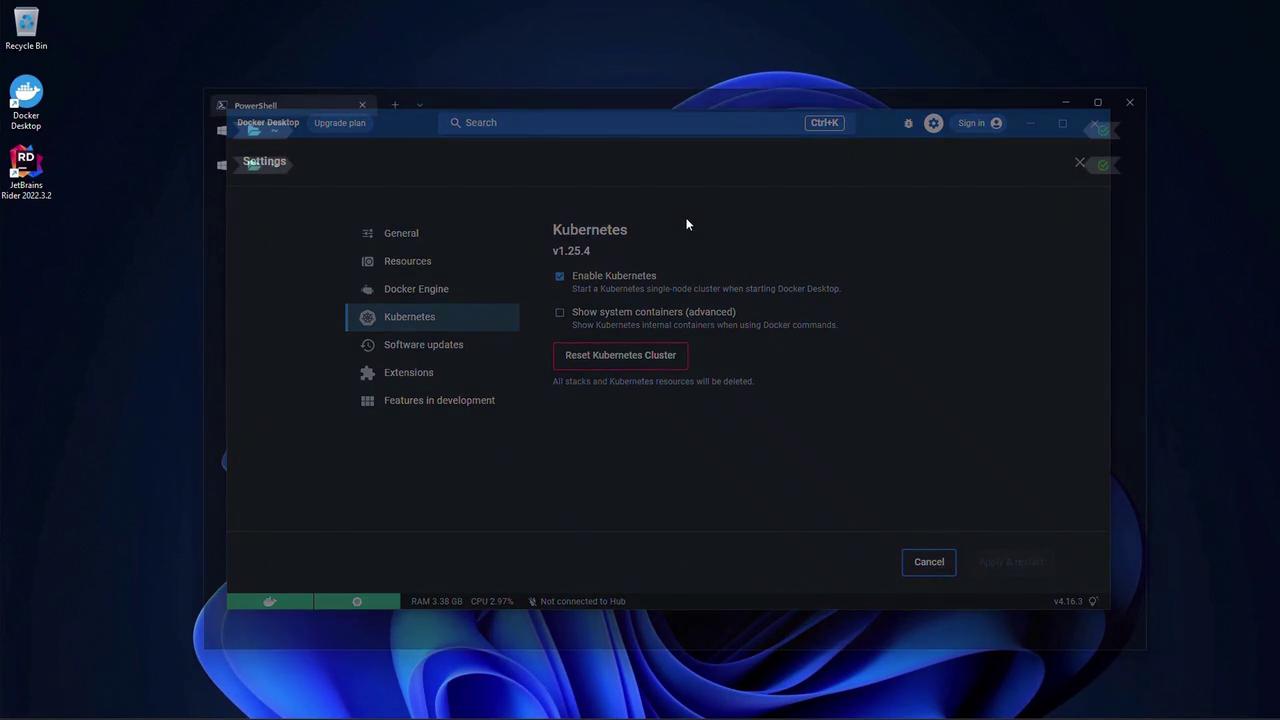
1. Enable Kubernetes in Docker Desktop
Open Docker Desktop, go to Settings > Kubernetes, then:
- Check Enable Kubernetes.
- Click Apply & Restart to bootstrap a single-node cluster.
2. Verify Your .NET 6 Installation
Run:
dotnet --list-sdks
Warning
Make sure .NET 6.x appears in the list. Earlier versions will not compile this sample.
3. Create the ASP.NET Core Web App
- Launch JetBrains Rider and click New Solution.
- Select ASP.NET Core Web Application. Name the project
KodeKloudAppand set the solution folder. - Choose the Web App template.
- Enable Docker support and select Linux containers.

4. Modify the Page Model
Open Pages/Index.cshtml.cs and inject IConfiguration to read a custom message:
using Microsoft.AspNetCore.Mvc.RazorPages;
using Microsoft.Extensions.Configuration;
using Microsoft.Extensions.Logging;

namespace KodeKloudApp.Pages
{
    public class IndexModel : PageModel
    {
        private readonly ILogger<IndexModel> _logger;
        private readonly IConfiguration _configuration;

        public string Message { get; set; }

        public IndexModel(ILogger<IndexModel> logger, IConfiguration configuration)
        {
            _logger = logger;
            _configuration = configuration;
        }

        public void OnGet()
        {
            Message = _configuration["Message"] ?? "Hello World";
        }
    }
}
5. Configure appsettings.json
Add the "Message" key to the JSON file:
{
  "Logging": {
    "LogLevel": {
      "Default": "Information",
      "Microsoft.AspNetCore": "Warning"
    }
  },
  "AllowedHosts": "*",
  "Message": ""
}
6. Update the Razor Page
In Pages/Index.cshtml, render the message:
@page
@model KodeKloudApp.Pages.IndexModel
@{
    ViewData["Title"] = "Home page";
}

<div class="text-center">
    <h1 class="display-4">Welcome</h1>
    <p>@Model.Message</p>
    <p>
      Learn about
      <a href="https://docs.microsoft.com/aspnet/core">
        building Web apps with ASP.NET Core
      </a>.
    </p>
</div>
7. Run and Validate
Start the application:
dotnet run
Open your browser to the displayed URL (e.g., https://localhost:5001). You should see Hello World.
Stop the app, update "Message" in appsettings.json to "Hello World changed", save, then restart and refresh:
{
  // ...
  "Message": "Hello World changed"
}

8. Multi-Stage Dockerfile
Use this Dockerfile to build and run with a minimal runtime image:
| Stage | Image | Purpose |
|---|---|---|
| base | mcr.microsoft.com/dotnet/aspnet:6.0 | Runtime |
| build | mcr.microsoft.com/dotnet/sdk:6.0 | Restore, build, publish |
| final | mcr.microsoft.com/dotnet/aspnet:6.0 | Copy published output and run |
FROM mcr.microsoft.com/dotnet/aspnet:6.0 AS base
WORKDIR /app
EXPOSE 80
EXPOSE 443

FROM mcr.microsoft.com/dotnet/sdk:6.0 AS build
WORKDIR /src
COPY ["KodeKloudApp.csproj", "./"]
RUN dotnet restore "KodeKloudApp.csproj"
COPY . .
RUN dotnet build "KodeKloudApp.csproj" -c Release -o /app/build

FROM build AS publish
RUN dotnet publish "KodeKloudApp.csproj" -c Release -o /app/publish

FROM base AS final
WORKDIR /app
COPY --from=publish /app/publish .
ENTRYPOINT ["dotnet", "KodeKloudApp.dll"]
9. Build and Push the Docker Image
From your project root:
cd RiderProjects/KodeKloudApp
docker build . -t kodekloudapp:1
docker image ls
Optionally, pull the sample image:
docker pull hpranav/kodekloudapp
Links and References
Watch Video
Watch video content