> ## Documentation Index
> Fetch the complete documentation index at: https://notes.kodekloud.com/llms.txt
> Use this file to discover all available pages before exploring further.
# Deploying an Azure Kubernetes Service AKS Cluster
> Guide to deploying and configuring an Azure Kubernetes Service cluster via the Azure portal covering resource groups, node pools, networking, integrations, authentication, monitoring, and CLI commands.
This guide shows how to deploy an Azure Kubernetes Service (AKS) cluster using the Azure portal. Follow along in the portal if you have an Azure subscription, or use a hands-on lab environment to practice.
Overview
* Create a resource group.
* Create an AKS cluster via the Azure portal.
* Configure node pools, networking, integrations (ACR, monitoring), and advanced settings.
* Review and create the cluster; Azure validates and deploys the resources.
Prerequisites
* An active Azure subscription.
* Appropriate permissions to create resource groups, AKS clusters, and associated networking and compute resources.
1. Start the AKS creation workflow
* Open the Azure portal: [https://portal.azure.com](https://portal.azure.com)
* Click Create a resource → Containers → Azure Kubernetes Service → Create.
* The wizard walks you through Project + cluster, Node pools, Authentication, Networking, Integrations, Advanced, and Review + create.
Configure Project + cluster
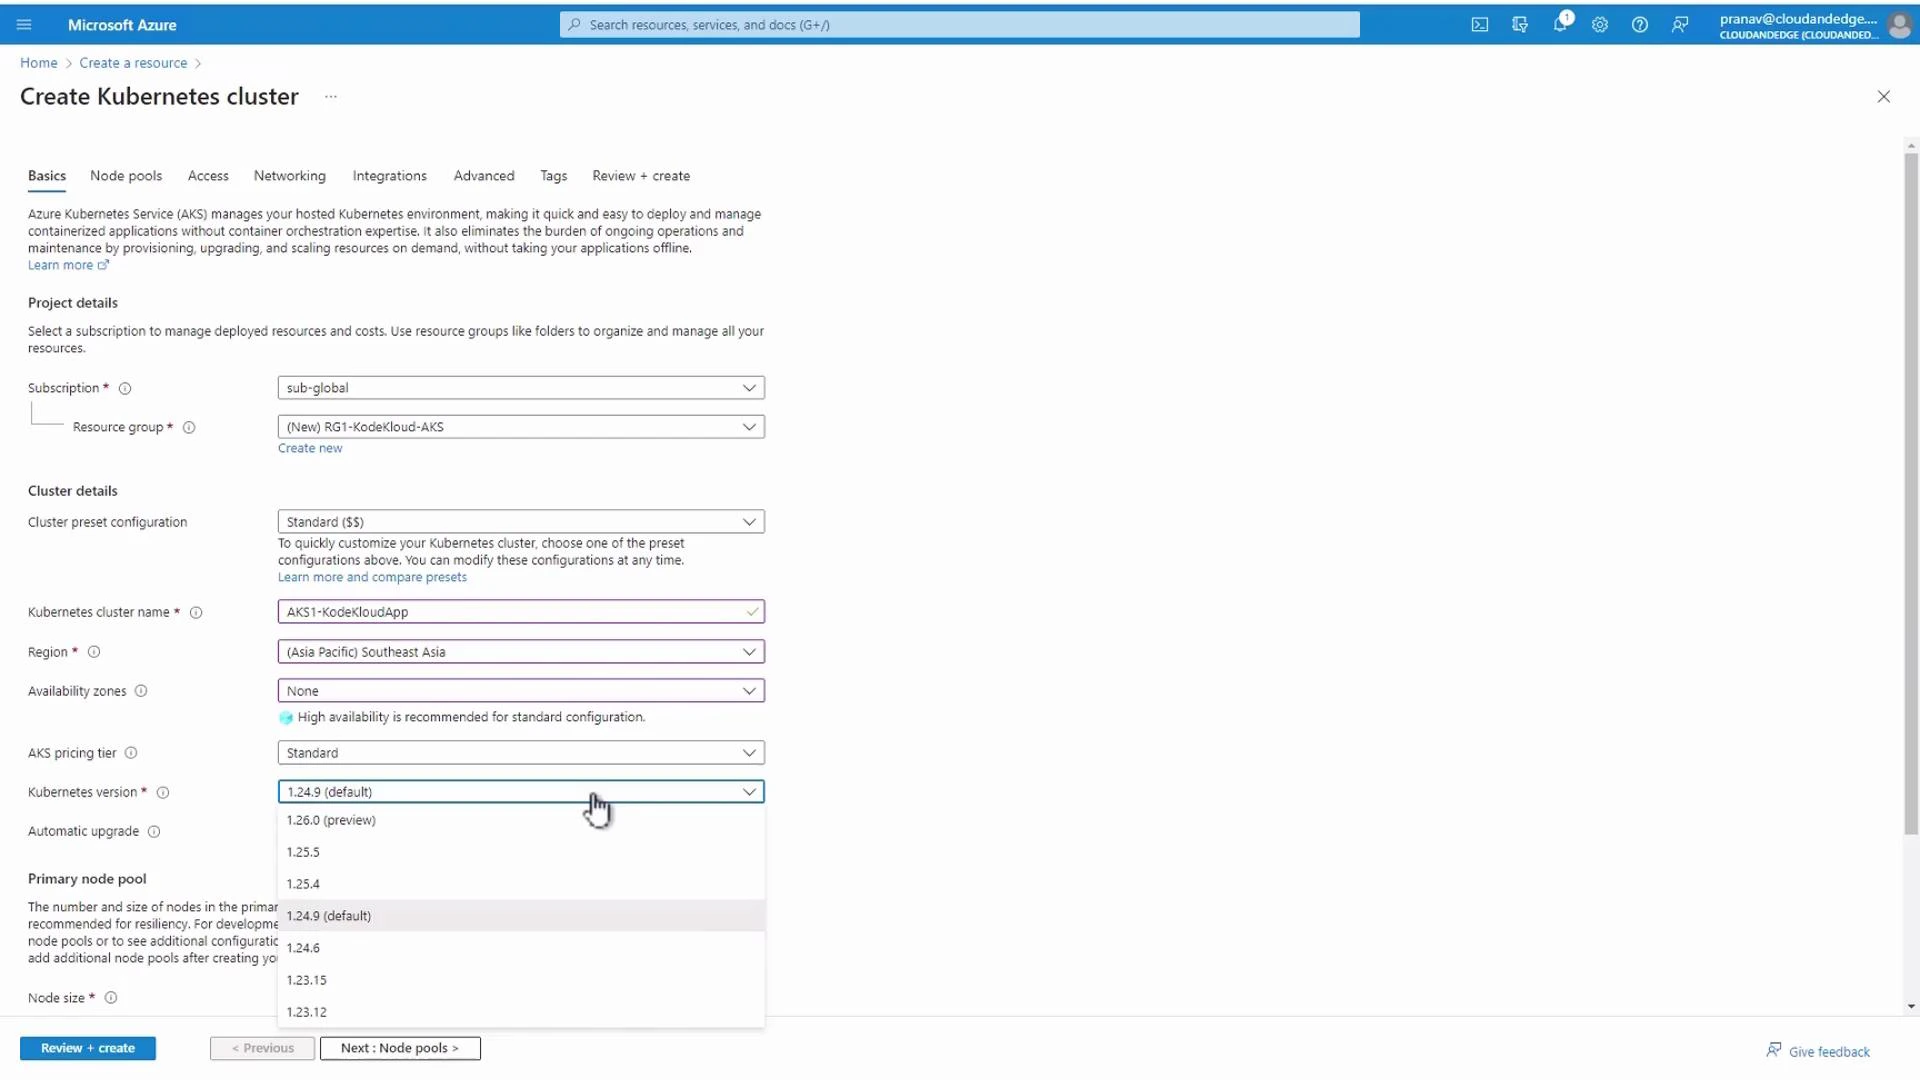
* Resource group: Create a new resource group (for example, rg1-kodekloud-aks) or select an existing one.
* Cluster name: Choose a unique name within the resource group (for example, aks1-KodeKloud-app).
* Region: Select the region closest to your users (e.g., Southeast Asia — Singapore).
* Kubernetes version: It’s safe to use the portal default. AKS supports generally available Kubernetes versions and provides upgrade paths.
Availability zones provide improved resiliency by distributing nodes across physically separate zones. Not all Azure regions support Availability Zones — check your chosen region’s capabilities before enabling them.
 2. Configure the Node pool
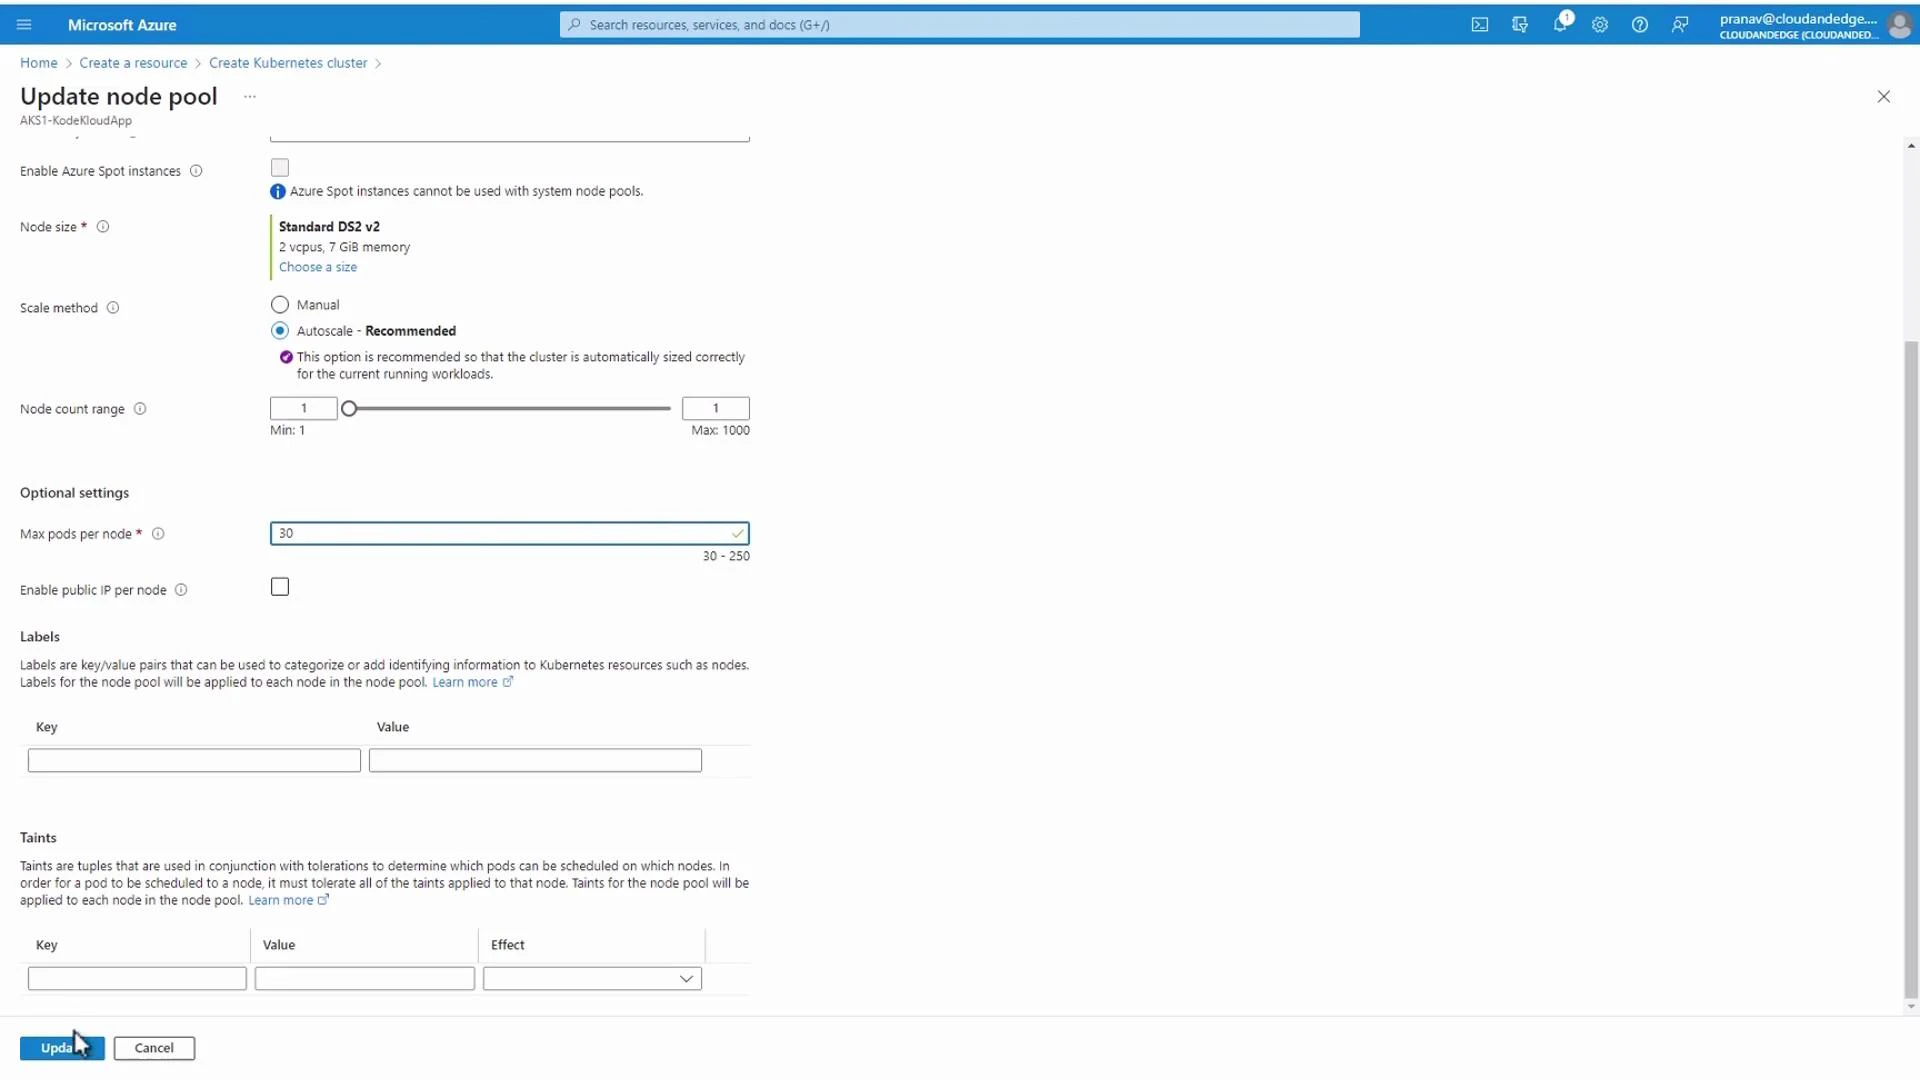
* VM size: Use the default or select a size that matches your workload. The DS2\_v2 example (2 vCPU, 7 GB) is common for demos.
* Initial node count: Set to 1 for demos; increase for production workloads.
* Scaling: You can enable autoscale or configure manual min/max node counts.
* Max pods per node: Default commonly appears as 110; you can change this per agent pool depending on your network/profile.
If you need to edit an existing agent pool’s VM size, scale method, node count range, or metadata (labels/taints), use the Update node pool workflow.
2. Configure the Node pool
* VM size: Use the default or select a size that matches your workload. The DS2\_v2 example (2 vCPU, 7 GB) is common for demos.
* Initial node count: Set to 1 for demos; increase for production workloads.
* Scaling: You can enable autoscale or configure manual min/max node counts.
* Max pods per node: Default commonly appears as 110; you can change this per agent pool depending on your network/profile.
If you need to edit an existing agent pool’s VM size, scale method, node count range, or metadata (labels/taints), use the Update node pool workflow.
 3. Authentication + authorization
* The portal shows options for enabling Kubernetes RBAC and Azure AD integration.
* For production clusters, plan your identity and authorization model carefully.
Leaving authentication and authorization at default settings can be fine for demos, but for production you should enable RBAC and integrate with Azure AD or other identity providers to control access securely.
4. Networking
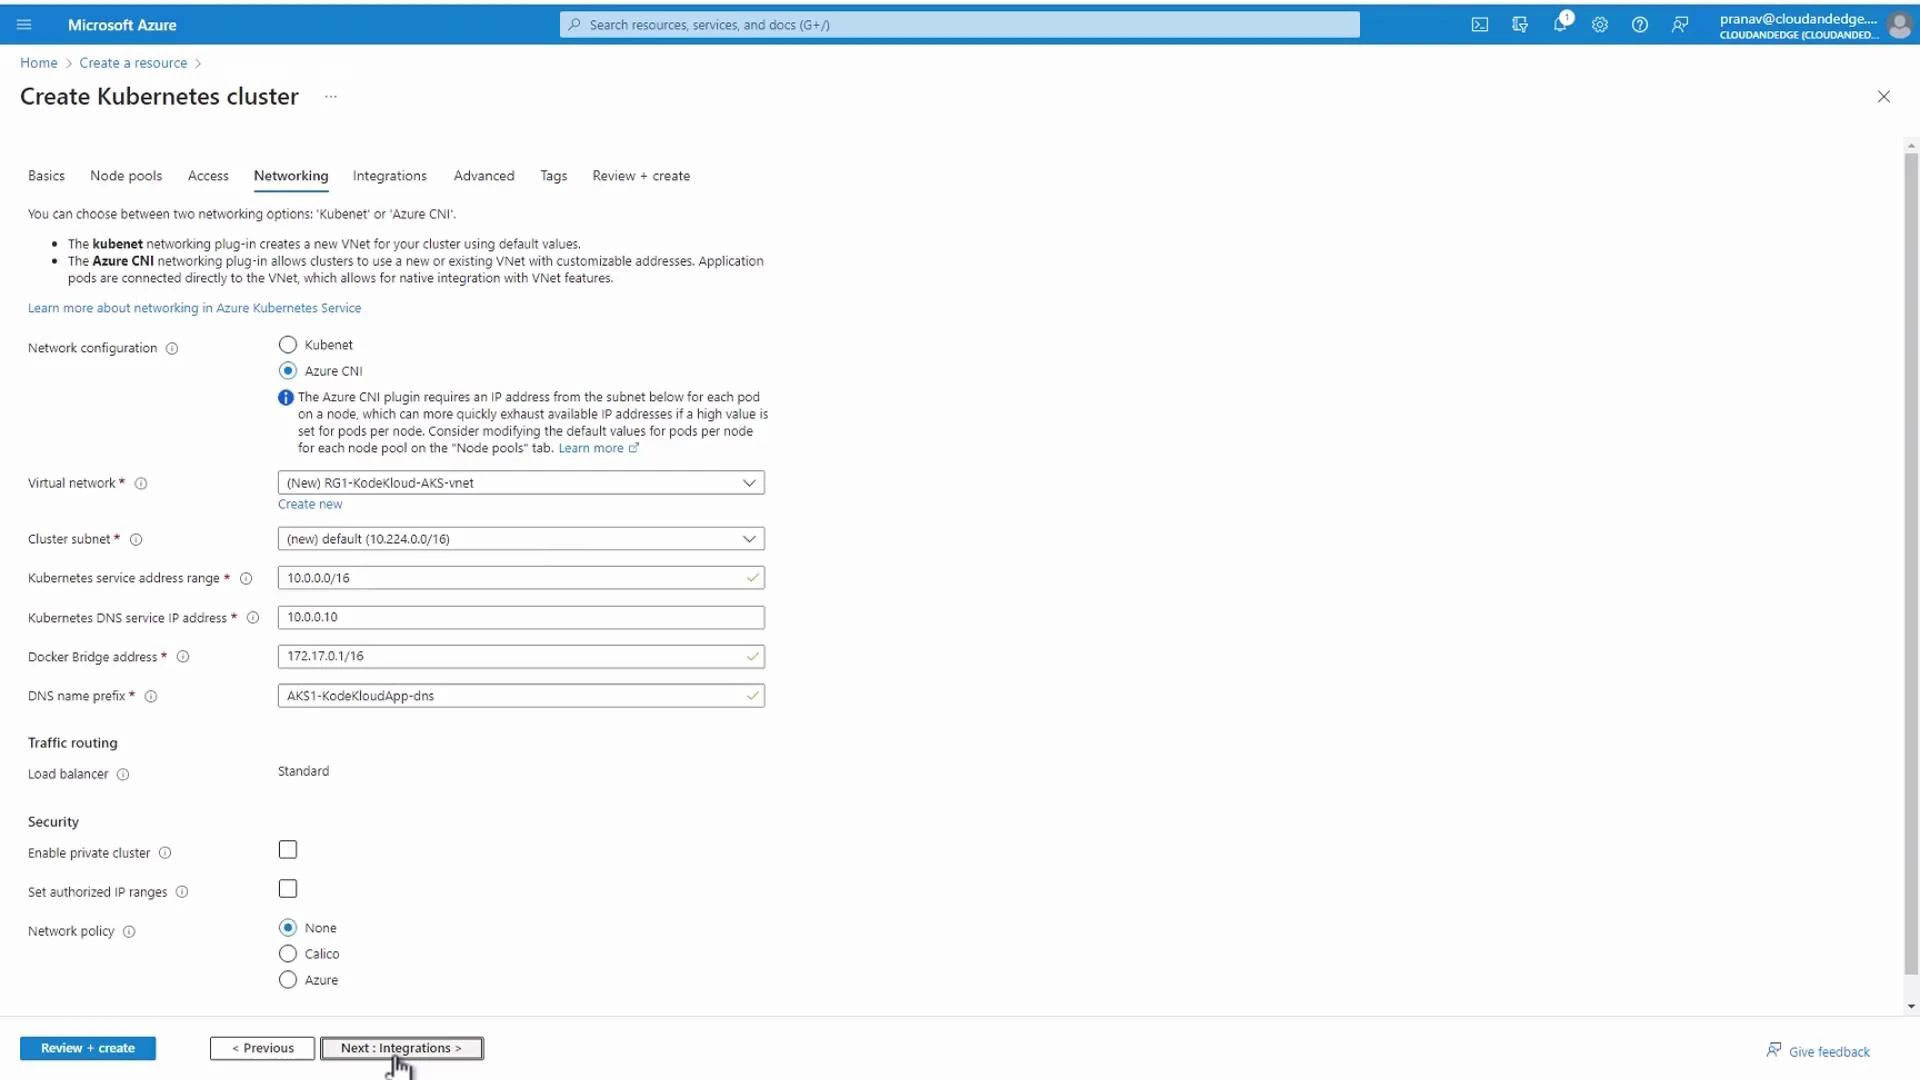
* Choose a network plugin:
* Azure CNI (recommended when you need each pod to get an IP address from the VNet).
* Kubenet (simpler IP management; uses NAT for outbound traffic).
* You can let Azure create a new virtual network or attach AKS to an existing VNet/subnet.
* Network policies and service IP ranges affect pod addressing and routing.
3. Authentication + authorization
* The portal shows options for enabling Kubernetes RBAC and Azure AD integration.
* For production clusters, plan your identity and authorization model carefully.
Leaving authentication and authorization at default settings can be fine for demos, but for production you should enable RBAC and integrate with Azure AD or other identity providers to control access securely.
4. Networking
* Choose a network plugin:
* Azure CNI (recommended when you need each pod to get an IP address from the VNet).
* Kubenet (simpler IP management; uses NAT for outbound traffic).
* You can let Azure create a new virtual network or attach AKS to an existing VNet/subnet.
* Network policies and service IP ranges affect pod addressing and routing.
 5. Integrations (optional)
* Azure Container Registry (ACR): Create an ACR to store container images. Place it in the same resource group/region for convenience and network proximity.
* Monitoring: Enable Container insights and send logs to a Log Analytics workspace for integrated monitoring.
6. Advanced settings
* Infrastructure resource group: AKS creates infrastructure resources (VMs, load balancers, NICs) in a separate resource group. Use the default name or customize it to match organizational naming conventions.
* Tags: Add tags for billing and management if required.
Review + Create
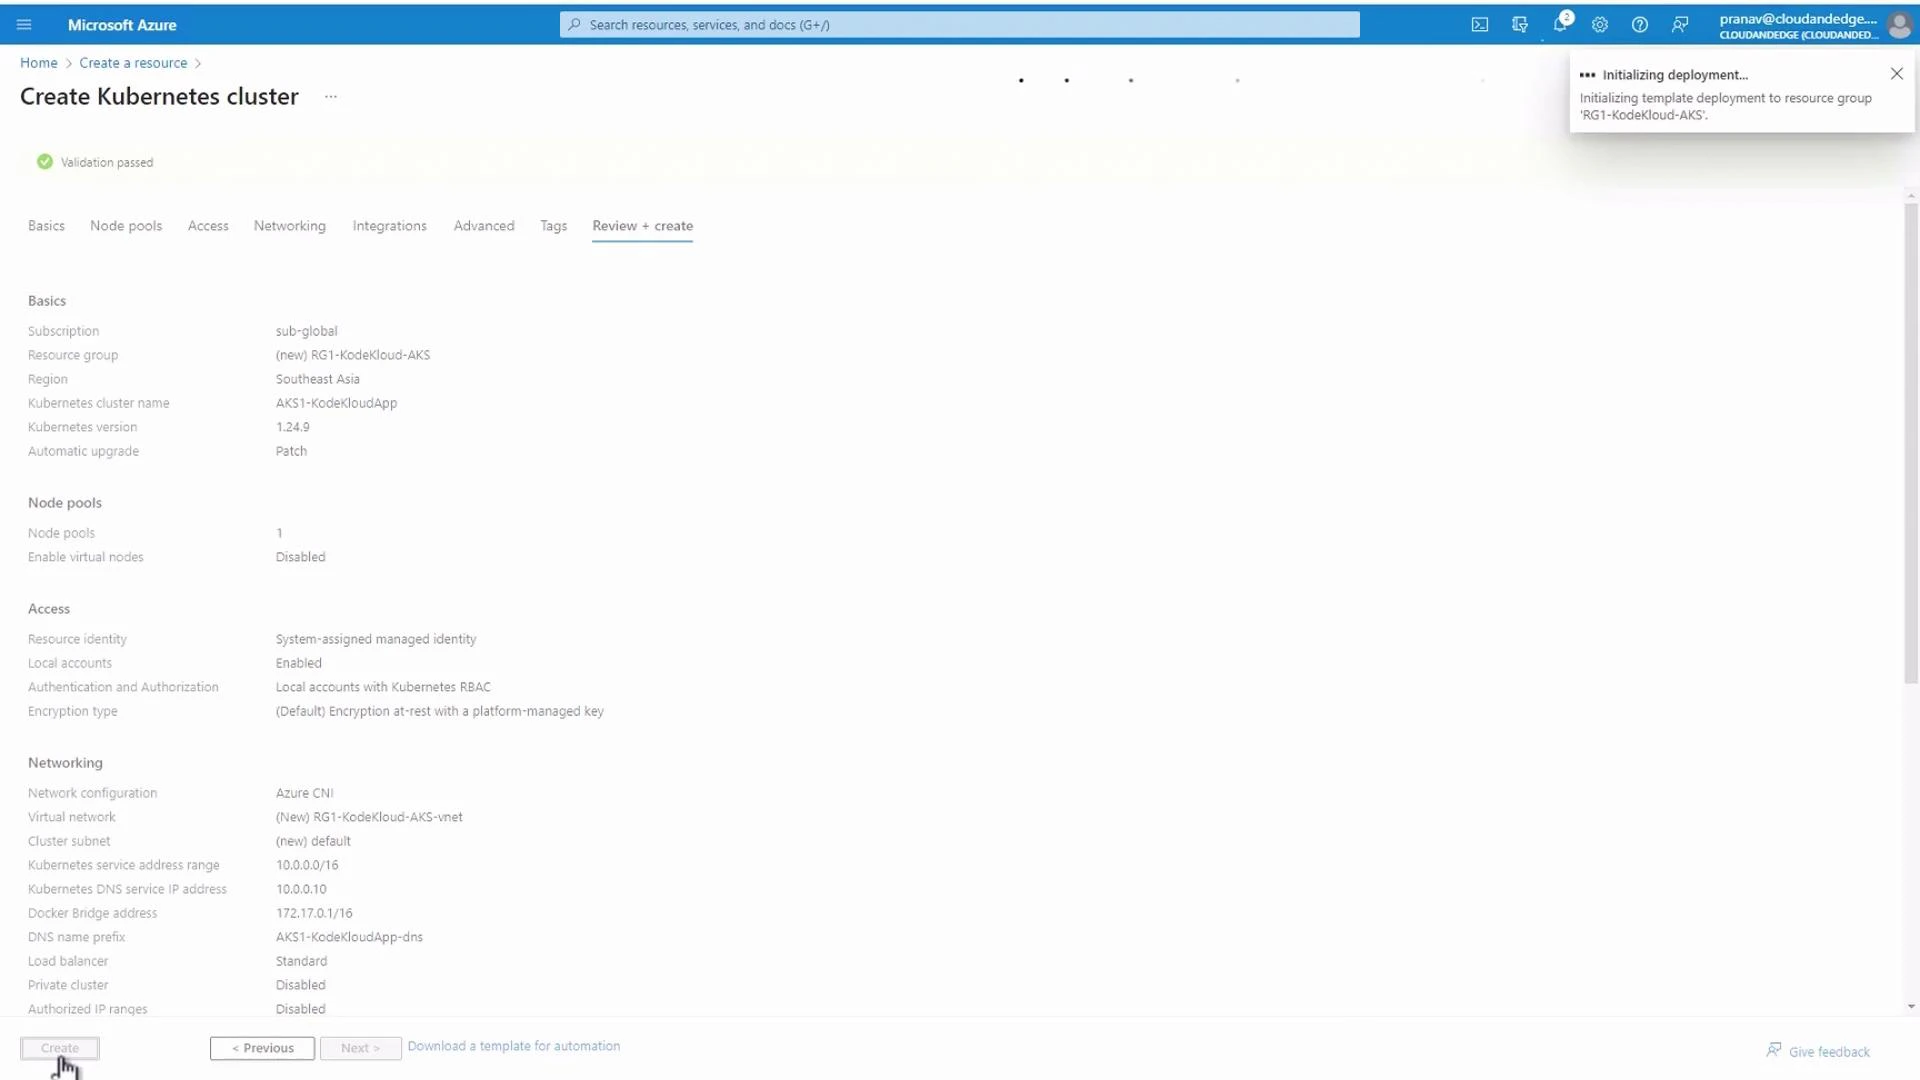
* The portal runs validation to ensure compatibility and required settings are present.
* If validation passes, click Create to start deployment. Azure provisions the cluster and associated resources.
5. Integrations (optional)
* Azure Container Registry (ACR): Create an ACR to store container images. Place it in the same resource group/region for convenience and network proximity.
* Monitoring: Enable Container insights and send logs to a Log Analytics workspace for integrated monitoring.
6. Advanced settings
* Infrastructure resource group: AKS creates infrastructure resources (VMs, load balancers, NICs) in a separate resource group. Use the default name or customize it to match organizational naming conventions.
* Tags: Add tags for billing and management if required.
Review + Create
* The portal runs validation to ensure compatibility and required settings are present.
* If validation passes, click Create to start deployment. Azure provisions the cluster and associated resources.
 Quick configuration summary
| Setting | Recommendation | Notes |
| ------------------ | ------------------------ | ------------------------------------------ |
| Resource Group | New or existing | Keep consistent naming policy |
| Cluster Name | Unique within RG | Example: aks1-KodeKloud-app |
| Region | Nearest region | Verify Availability Zone support if needed |
| Node VM size | DS2\_v2 (demo) or higher | Choose based on CPU/memory needs |
| Initial Node Count | 1 (demo) | Increase for production |
| Network Plugin | Azure CNI or Kubenet | Choose based on IP addressing needs |
| ACR | Create in same RG/region | Attach to AKS for private registry |
| Monitoring | Enable Log Analytics | Useful for Container insights |
CLI examples
* Create a resource group:
```bash theme={null}
az group create --name rg1-kodekloud-aks --location southeastasia
```
* Create an AKS cluster (Azure CNI, one node, DS2\_v2):
```bash theme={null}
az aks create \
--resource-group rg1-kodekloud-aks \
--name aks1-KodeKloud-app \
--node-count 1 \
--node-vm-size Standard_DS2_v2 \
--network-plugin azure \
--enable-managed-identity \
--generate-ssh-keys
```
* Scale a node pool (example, nodepool name "nodepool1"):
```bash theme={null}
az aks nodepool scale \
--resource-group rg1-kodekloud-aks \
--cluster-name aks1-KodeKloud-app \
--name nodepool1 \
--node-count 3
```
* Update max pods on an existing nodepool:
```bash theme={null}
az aks nodepool update \
--resource-group rg1-kodekloud-aks \
--cluster-name aks1-KodeKloud-app \
--name nodepool1 \
--max-pods 110
```
References and further reading
* [Azure Kubernetes Service (AKS) overview](https://learn.microsoft.com/en-us/azure/aks/)
* [Configure Azure CNI](https://learn.microsoft.com/en-us/azure/aks/configure-azure-cni)
* [Azure Container Registry (ACR)](https://learn.microsoft.com/en-us/azure/container-registry/)
* [Log Analytics overview](https://learn.microsoft.com/en-us/azure/azure-monitor/logs/log-analytics-overview)
* [az aks CLI reference](https://learn.microsoft.com/en-us/cli/azure/aks)
This completes the basic AKS deployment workflow. After the cluster is created, you can connect using kubectl (az aks get-credentials) and begin deploying workloads, configuring ingress, and enabling monitoring and security controls.
Quick configuration summary
| Setting | Recommendation | Notes |
| ------------------ | ------------------------ | ------------------------------------------ |
| Resource Group | New or existing | Keep consistent naming policy |
| Cluster Name | Unique within RG | Example: aks1-KodeKloud-app |
| Region | Nearest region | Verify Availability Zone support if needed |
| Node VM size | DS2\_v2 (demo) or higher | Choose based on CPU/memory needs |
| Initial Node Count | 1 (demo) | Increase for production |
| Network Plugin | Azure CNI or Kubenet | Choose based on IP addressing needs |
| ACR | Create in same RG/region | Attach to AKS for private registry |
| Monitoring | Enable Log Analytics | Useful for Container insights |
CLI examples
* Create a resource group:
```bash theme={null}
az group create --name rg1-kodekloud-aks --location southeastasia
```
* Create an AKS cluster (Azure CNI, one node, DS2\_v2):
```bash theme={null}
az aks create \
--resource-group rg1-kodekloud-aks \
--name aks1-KodeKloud-app \
--node-count 1 \
--node-vm-size Standard_DS2_v2 \
--network-plugin azure \
--enable-managed-identity \
--generate-ssh-keys
```
* Scale a node pool (example, nodepool name "nodepool1"):
```bash theme={null}
az aks nodepool scale \
--resource-group rg1-kodekloud-aks \
--cluster-name aks1-KodeKloud-app \
--name nodepool1 \
--node-count 3
```
* Update max pods on an existing nodepool:
```bash theme={null}
az aks nodepool update \
--resource-group rg1-kodekloud-aks \
--cluster-name aks1-KodeKloud-app \
--name nodepool1 \
--max-pods 110
```
References and further reading
* [Azure Kubernetes Service (AKS) overview](https://learn.microsoft.com/en-us/azure/aks/)
* [Configure Azure CNI](https://learn.microsoft.com/en-us/azure/aks/configure-azure-cni)
* [Azure Container Registry (ACR)](https://learn.microsoft.com/en-us/azure/container-registry/)
* [Log Analytics overview](https://learn.microsoft.com/en-us/azure/azure-monitor/logs/log-analytics-overview)
* [az aks CLI reference](https://learn.microsoft.com/en-us/cli/azure/aks)
This completes the basic AKS deployment workflow. After the cluster is created, you can connect using kubectl (az aks get-credentials) and begin deploying workloads, configuring ingress, and enabling monitoring and security controls.