CKA Certification Course - Certified Kubernetes Administrator

Core Concepts

Solution Services optional

In this lesson, we will walk through the solution for the lab on Services. You will learn how to inspect different aspects of services in a Kubernetes cluster and create a service to expose a web application. This guide is designed to help you understand Kubernetes Services, their types, endpoints, and best practices for deployment.


Listing Kubernetes Services

To start, list the services in your cluster. You can use either of the following commands:

kubectl get service

or

kubectl get svc

For example, running:

kubectl get service

produces the output:

NAME        TYPE        CLUSTER-IP    EXTERNAL-IP   PORT(S)    AGE
kubernetes  ClusterIP   10.43.0.1     <none>        443/TCP    10m

This output indicates that only the default Kubernetes service is present.

Below is an extended example using both commands:

controlplane ~ ⟪ kubectl get service
NAME         TYPE        CLUSTER-IP    EXTERNAL-IP    PORT(S)    AGE
kubernetes   ClusterIP   10.43.0.1     <none>         443/TCP    10m

controlplane ~ ⟪ kubectl get svc
NAME         TYPE        CLUSTER-IP    EXTERNAL-IP    PORT(S)    AGE
kubernetes   ClusterIP   10.43.0.1     <none>         443/TCP    10m

controlplane ~ ⟪

Note

The default Kubernetes service is automatically created and managed by the system.


Inspecting the Default Kubernetes Service

Next, inspect the default Kubernetes service to review its type and configuration. Running the following commands reveals that the service type is ClusterIP:

controlplane ~ ➜ kubectl get service
NAME         TYPE        CLUSTER-IP    EXTERNAL-IP   PORT(S)    AGE
kubernetes   ClusterIP   10.43.0.1     <none>        443/TCP    10m

controlplane ~ ➜ kubectl get svc
NAME         TYPE        CLUSTER-IP    EXTERNAL-IP   PORT(S)    AGE
kubernetes   ClusterIP   10.43.0.1     <none>        443/TCP    10m

controlplane ~ ➜

To inspect the target port configured on this service, use the kubectl describe command as shown below:

controlplane ~  ⇨  kubectl describe svc kubernetes
Name:              kubernetes
Namespace:         default
Labels:            component=apiserver
                   provider=kubernetes
Annotations:       <none>
Selector:          <none>
Type:              ClusterIP
IP Family Policy:  SingleStack
IP Families:       IPv4
IP:                10.43.0.1
IPs:               10.43.0.1
Port:              <unset> 443/TCP
TargetPort:        6443/TCP
Endpoints:         10.53.180.9:6443
Session Affinity:  None
Events:            <none>

controlplane ~  ⇨  #

From this output, you can see that the target port is set to 6443.


Understanding Labels and Endpoints

The Kubernetes service is labeled with key-value pairs that identify the API server:

  • component=apiserver
  • provider=kubernetes

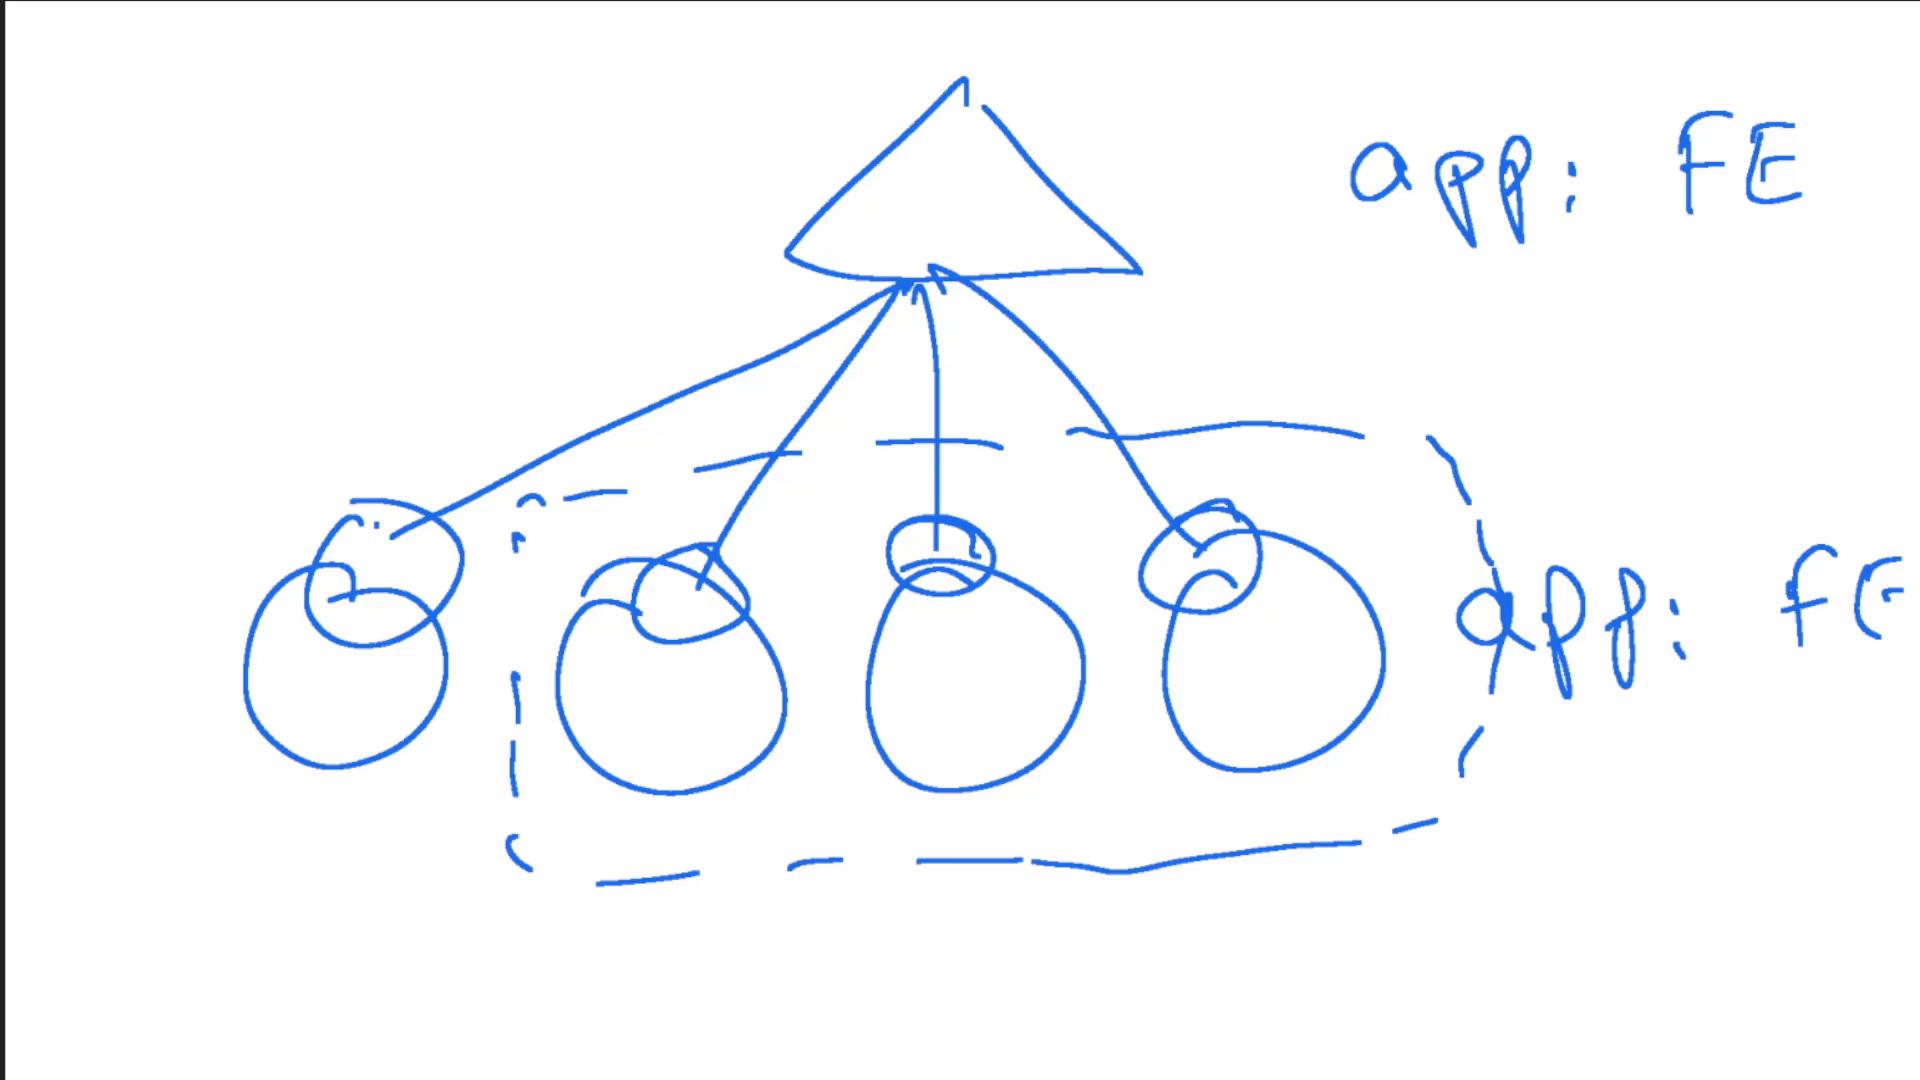
These labels help in managing and identifying the components of the cluster. Endpoints, on the other hand, define the pods that receive traffic from the service. Even if multiple pods match the selector criteria, the service lists all endpoints.

In our case, the Kubernetes service shows one endpoint:

controlplane ~ ⟩ kubectl get service
NAME         TYPE        CLUSTER-IP      EXTERNAL-IP   PORT(S)    AGE
kubernetes   ClusterIP   10.43.0.1       <none>        443/TCP    10m

controlplane ~ ⟩ kubectl get svc
NAME         TYPE        CLUSTER-IP      EXTERNAL-IP   PORT(S)    AGE
kubernetes   ClusterIP   10.43.0.1       <none>        443/TCP    10m

controlplane ~ ⟩ kubectl describe svc kubernetes
Name:                     kubernetes
Namespace:                default
Labels:                   component=apiserver
                          provider=kubernetes
Annotations:              <none>
Selector:                 <none>
Type:                     ClusterIP
IP Family Policy:         SingleStack
IP Families:              IPv4
IP:                       10.43.0.1
IPs:                      10.43.0.1
Port:                     <unset> 443/TCP
TargetPort:               6443/TCP
Endpoints:                10.53.180.9:6443
Session Affinity:         None
Events:                   <none>

controlplane ~ ⟩

Note

Endpoints represent the set of pod IP addresses and ports that receive traffic from the service. If the service’s selector mistakenly does not match any pods, the endpoints list will be empty.

An illustrative diagram outlines how endpoints connect to pods:

A hand-drawn diagram with a triangle connected to four circles, labeled "app: FE" and "app: FG," possibly representing a network or system architecture.


Inspecting Deployments

Now, let’s examine deployments within the default namespace. To list all deployments, run:

controlplane ~ -> kubectl get deploy
NAME                      READY   UP-TO-DATE   AVAILABLE   AGE
simple-webapp-deployment   0/4     4            0           15s

This output indicates that a deployment named simple-webapp-deployment exists.

Reviewing Deployment Details

To check details—such as the container image used—describe the deployment:

controlplane ~ ➜ kubectl describe deploy simple-webapp-deployment
Name:                   simple-webapp-deployment
Namespace:              default
CreationTimestamp:      Fri, 15 Apr 2022 20:35:47 +0000
Labels:                 <none>
Annotations:            deployment.kubernetes.io/revision: 1
Selector:               name=simple-webapp
Replicas:               4 desired | 4 updated | 4 total | 4 available | 0 unavailable
StrategyType:           RollingUpdate
MinReadySeconds:        0
RollingUpdateStrategy:  25% max unavailable, 25% max surge
Pod Template:
  Labels:       name=simple-webapp
  Containers:
   simple-webapp:
    Image:       kodekloud/simple-webapp:red
    Port:        8080/TCP
    Host Port:   0/TCP
    Environment: <none>
    Mounts:      <none>
Conditions:
  Type             Status  Reason
  ----             ------  -------
  Available        True    MinimumReplicasAvailable
  Progressing      True    NewReplicaSetAvailable
OldReplicaSet:     <none>
NewReplicaSet:     simple-webapp-deployment-7b59598d59 (4/4 replicas created)
Events:
  Type    Reason                Age   From                    Message
  ----    ------                ----  ----                    -------
  Normal  ScalingReplicaSet     63s   deployment-controller   Scaled up replica set simple-webapp-deployment-

The output confirms that the image used is kodekloud/simple-webapp:red.

Accessing the Web Application UI

If you attempt to access the web application UI without first exposing it through a service, you may encounter a "Bad Gateway" error. This occurs because no service directs traffic to your pods.

controlplane ~ -> kubectl get deploy
NAME                      READY   UP-TO-DATE   AVAILABLE   AGE
simple-webapp-deployment   0/4     4            0           15s

controlplane ~ -> kubectl describe deploy simple-webapp-deployment
Name:                   simple-webapp-deployment
Namespace:              default
CreationTimestamp:      Fri, 15 Apr 2022 20:35:47 +0000
Labels:                 <none>
Annotations:            deployment.kubernetes.io/revision: 1
Selector:               name=simple-webapp
Replicas:               4 desired | 4 updated | 4 total | 4 available | 0 unavailable
StrategyType:           RollingUpdate
MinReadySeconds:        0
RollingUpdateStrategy:  25% max unavailable, 25% max surge
Pod Template:
  Labels:       name=simple-webapp
  Containers:
   simple-webapp:
    Image:       kodekloud/simple-webapp:red
    Port:        8080/TCP
    Host Port:   0/TCP
    Environment: <none>
    Mounts:      <none>
Conditions:
  Type            Status  Reason
  ----            ------  -------
  Available       True    MinimumReplicasAvailable
  Progressing     True    NewReplicaSetAvailable
OldReplicaSet:    <none>
NewReplicaSet:    simple-webapp-deployment-7b59598d59 (4/4 replicas created)
Events:
  Type    Reason            Age   From                     Message
  ----    ------            ----  ----                     -------
  Normal  ScalingReplicaSet 63s   deployment-controller    Scaled up replica set simple-webapp-deployment-

To resolve this, create a service that exposes the web application.


Creating a Service for the Web Application

The next step is to create a NodePort service that makes the web application accessible. The diagram below shows the service definition framework:

The image shows a terminal interface with instructions to create a NodePort service for a web application, specifying ports and a selector.

Below is the basic framework for the service YAML file:

apiVersion: v1
kind: Service
metadata:
  name:
spec:
  type:
  ports:
    - targetPort:
      port:
      nodePort:
  selector:
    name:

For further guidance, consult the Kubernetes documentation on services. An example service YAML provided in the docs is shown below:

apiVersion: v1
kind: Service
metadata:
  name: my-service
spec:
  selector:
    app: MyApp
  ports:
    - protocol: TCP
      port: 80
      targetPort: 9376

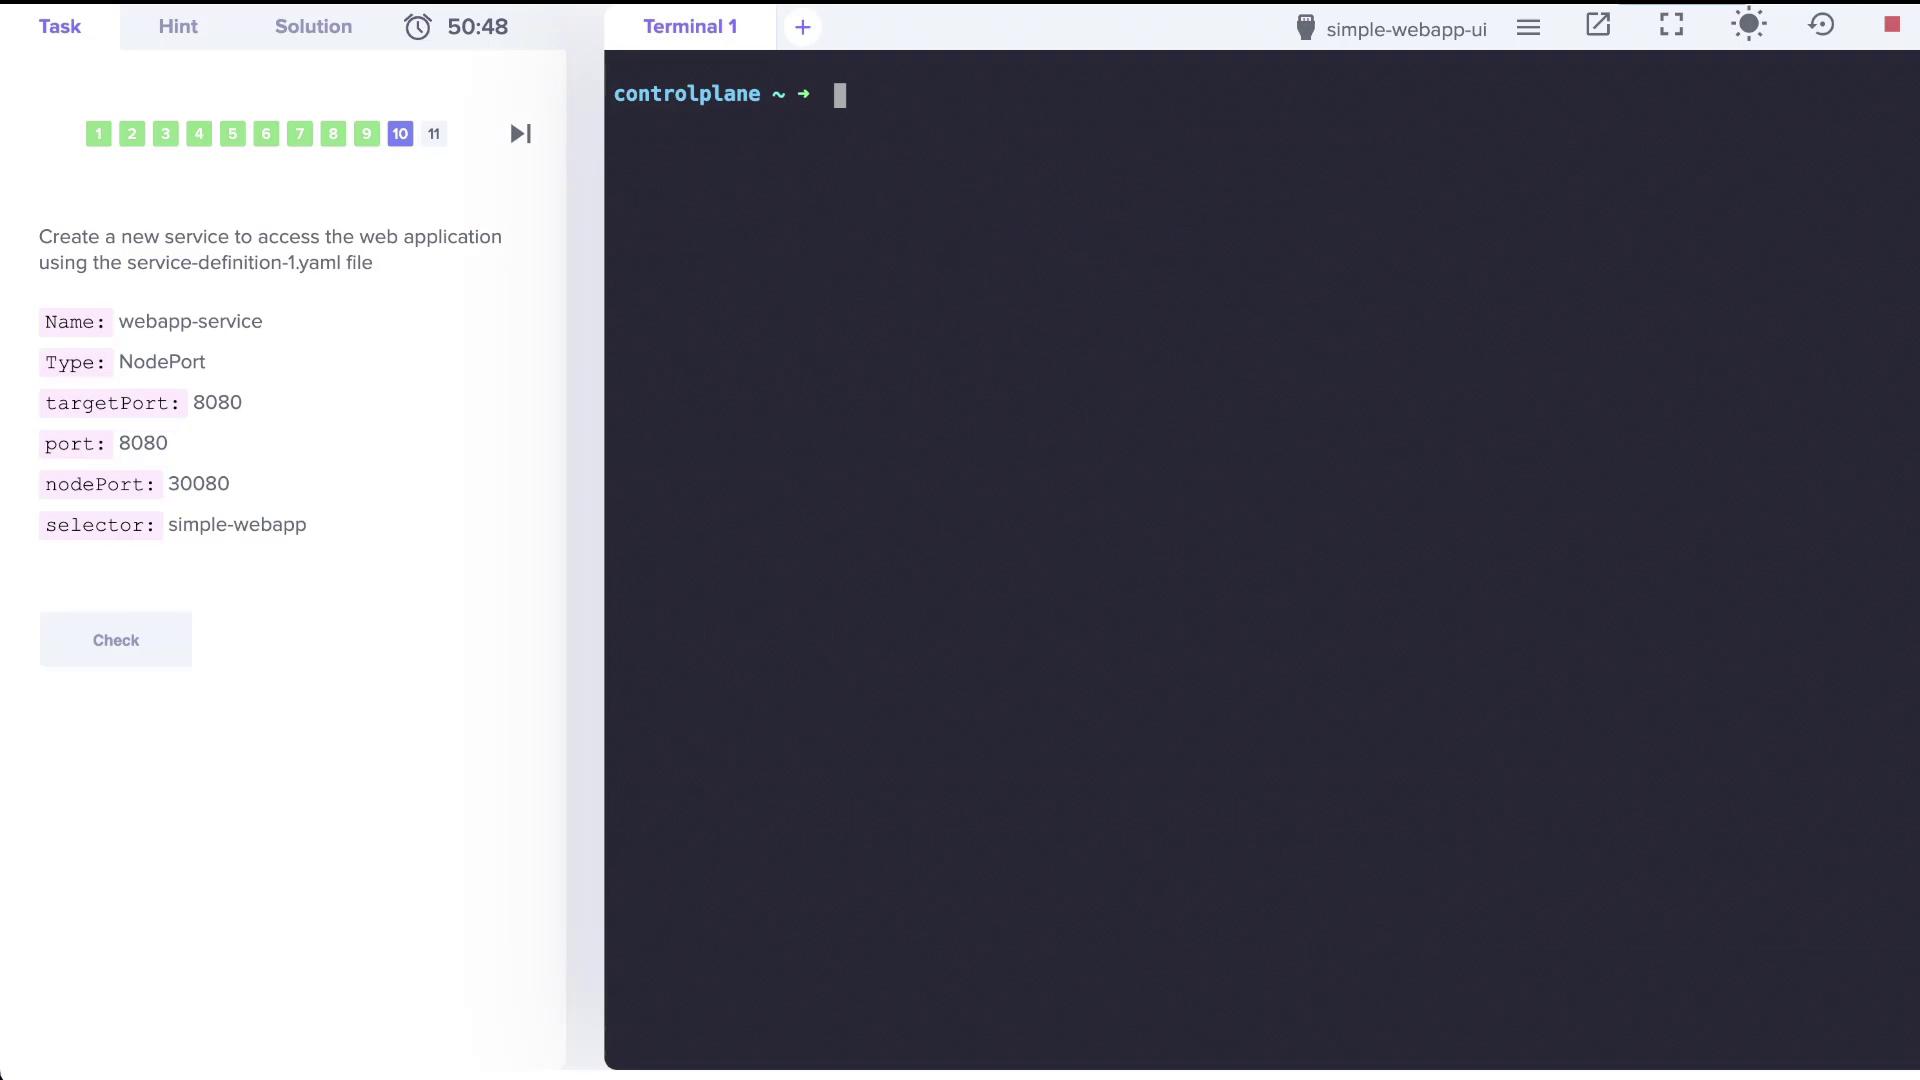
For this lab, create a NodePort service named webapp-service that exposes your web application on port 8080. The final service definition is as follows:

apiVersion: v1
kind: Service
metadata:
  name: webapp-service
spec:
  type: NodePort
  ports:
    - targetPort: 8080
      port: 8080
      nodePort: 30080
  selector:
    name: simple-webapp

Save this configuration as your service definition file (for example, service-definition-1.yaml) and then run the following commands to create the service:

controlplane ~ ✗ ls
service-definition-1.yaml

controlplane ~ ✗ cat service-definition-1.yaml
---
apiVersion: v1
kind: Service
metadata:
  name:
spec:
  type:
  ports:
  - targetPort:
    port:
    nodePort:
  selector:
    name:

controlplane ~ ✗ vi service-definition-1.yaml

controlplane ~ ✗ kubectl create -f service-definition-1.yaml
service/webapp-service created

controlplane ~ ✗

After creating the service, accessing the web application UI should work as expected.


Imperative Commands for Creating Services

In the subsequent sections, we will discuss additional imperative commands for creating services. Below are some sample commands that you might find useful for quickly generating service definitions:

kubectl expose pod redis --port=6379 --name=redis-service --dry-run=client -o yaml
kubectl create service clustertip redis --tcp=6379:6379 --dry-run=client -o yaml
kubectl expose pod nginx --type=NodePort --port=80 --name=nginx-service --dry-run=client -o yaml
kubectl create service nodeport nginx --tcp=80:30080

This concludes the lab for this lesson. In upcoming lessons, we will dive deeper into imperative commands and additional details on managing Kubernetes services effectively.

For further reading, check out these resources:

Watch Video

Watch video content

Previous
Services Loadbalancer