CKA Certification Course - Certified Kubernetes Administrator
Solution CKA Mock Exam 1 optional
In this lesson, we will guide you through a mock exam consisting of 12 hands-on questions to be completed in approximately one hour. This exam is designed to be more straightforward than other mocks, with increased complexity in subsequent exams. Let's dive in.
1. Deploy an NGINX Pod Using the NGINX Alpine Image
Before starting, ensure that your environment is properly set up. Check if the kubectl alias (k) is available and whether auto-completion is enabled:
root@controlplane:~# k
bash: k: command not found
root@controlplane:~# kubectl
If auto-completion is not enabled, set it up using the following commands.
Tip for Bash Users
For Bash, run:
source <(kubectl completion bash) # sets up autocomplete in the current shell (requires bash-completion package) echo "source <(kubectl completion bash)" >> ~/.bashrc # persists autocomplete permanently
alias k=kubectl complete -F __start_kubectl k
For Zsh, run:
source <(kubectl completion zsh)  # sets up autocomplete in the current shell
echo "[[ \$commands[kubectl] ]] && source <(kubectl completion zsh)" >> ~/.zshrc  # persists autocomplete permanently
Even if auto-completion isn’t enabled, you can always refer to the official kubectl cheat sheet online.
Deploy the pod named nginx-pod using the nginx:alpine image:
root@controlplane:~# k run nginx-pod --image=nginx:alpine
pod/nginx-pod created
root@controlplane:~# k get pod
NAME        READY   STATUS    RESTARTS   AGE
nginx-pod   1/1     Running   0          4s
Verify that the pod is running and the correct image is in use before proceeding.
2. Deploy a Messaging Pod Using the Redis Alpine Image with Labels
Deploy a pod named messaging using the redis:alpine image, attaching the label tier=msg:
root@controlplane:~# kubectl run messaging --image=redis:alpine --labels="tier=msg"
After deploying, confirm that the pod is running and verify that the label is correctly set.
3. Create a Namespace
Create the namespace apx-x9984574 and verify its creation:
root@controlplane:~# k create namespace apx-x9984574
namespace/apx-x9984574 created
root@controlplane:~# k get ns
NAME              STATUS   AGE
apx-x9984574      Active   3s
default           Active   42m
kube-node-lease   Active   43m
kube-public       Active   43m
kube-system       Active   43m
Next, export the list of nodes in JSON format to a file:
root@controlplane:~# kubectl get nodes -o json > /path/to/nodes.json
Review the file to ensure that it includes all the node details.
4. Create a ClusterIP Service for the Messaging Pod
Expose the messaging pod on port 6379 by creating a service named messaging-service:
root@controlplane:~# k expose pod messaging --port 6379 --name messaging-service
service/messaging-service exposed
Verify the service and its endpoints:
root@controlplane:~# k get pods
NAME        READY   STATUS    RESTARTS   AGE
messaging   1/1     Running   0          94s
nginx-pod   1/1     Running   0          2m40s

root@controlplane:~# k get svc
NAME                TYPE        CLUSTER-IP       EXTERNAL-IP   PORT(S)           AGE
kubernetes          ClusterIP   10.96.0.1        <none>        443/TCP           43m
messaging-service   ClusterIP   10.104.111.252   <none>        6379/TCP          3s
Confirm that the service endpoints match the messaging pod.
5. Create a Deployment for the HR Web App
Deploy the HR web application using the kodekloud/webapp-color image, running two replicas for efficient load handling:
root@controlplane:~# k create deployment hr-web-app --image=kodekloud/webapp-color --replicas=2
Verify that the deployment is created and that both pods are running successfully.
6. Create a Static Pod Named "static-busybox" on the Control Plane Node
Static pods are managed directly by the kubelet. Generate a YAML definition for a static pod named static-busybox using the busybox image and the command sleep 1000:
root@controlplane:~# k run static-busybox --image=busybox --command -- sleep 1000 --dry-run=client -o yaml > static-busybox.yaml
Review the generated YAML file to ensure it contains the proper image and command, then move the file to your manifests directory (commonly located at /etc/kubernetes/manifests) so that the kubelet recognizes it as a static pod.
After placing the file, verify the pod status:
root@controlplane:~# k get pod
7. Create a Pod in the Finance Namespace Using the Redis Alpine Image
Deploy a pod (for example, named temp-bus) in the finance namespace using the redis:alpine image:
root@controlplane:~# kubectl run temp-bus --image=redis:alpine --namespace=finance
Double-check that the pod is running in the specified namespace using the correct image.
8. Troubleshoot and Fix the Orange Application
An application named orange is failing with an Init:CrashLoopBackOff error. This error usually indicates an issue with the init container. Start by checking the pod status:
root@controlplane:~# k get pods
NAME                              READY   STATUS                    RESTARTS   AGE
...
orange                            0/1     Init:CrashLoopBackOff     5         4m14s
...
Investigate the issue by describing the pod:
root@controlplane:~# k describe pod orange
In the description, you may notice that the init container’s command is incorrect (for example, it might show "sleeeep 2;" instead of "sleep 2;"). To fix it, edit the pod configuration:
root@controlplane:~# k edit pod orange
Update the init container command (e.g., change sleeeep 2; to sleep 2;) and save your changes. If you receive an immutability error during the edit, force a replacement:
root@controlplane:~# k replace --force -f /tmp/kubectl-edit-9wg48.yaml
Monitor the pod until it transitions to a running state:
root@controlplane:~# k get pods --watch
9. Expose the HR Web App Deployment through a NodePort Service
Expose the hr-web-app deployment by creating a NodePort service named hr-web-app-service. Start by creating the service to target port 8080:
root@controlplane:~# k expose deploy hr-web-app --name=hr-web-app-service --type=NodePort --port=8080
service/hr-web-app-service exposed
Verify the service details:
root@controlplane:~# k get svc
NAME                 TYPE        CLUSTER-IP      EXTERNAL-IP   PORT(S)             AGE
hr-web-app-service   NodePort    10.98.47.111    <none>        8080:30229/TCP      3s
kubernetes           ClusterIP   10.96.0.1       <none>        443/TCP             55m
Then, edit the service to change the NodePort to 30082:
root@controlplane:~# k edit svc hr-web-app-service
In the YAML file, update the nodePort under the ports section to 30082, and save your changes. Verify the update:
root@controlplane:~# k get svc
NAME                  TYPE        CLUSTER-IP      EXTERNAL-IP   PORT(S)             AGE
hr-web-app-service    NodePort    10.98.47.111    <none>        8080:30082/TCP       52s
kubernetes            ClusterIP   10.96.0.1       <none>        443/TCP             56m
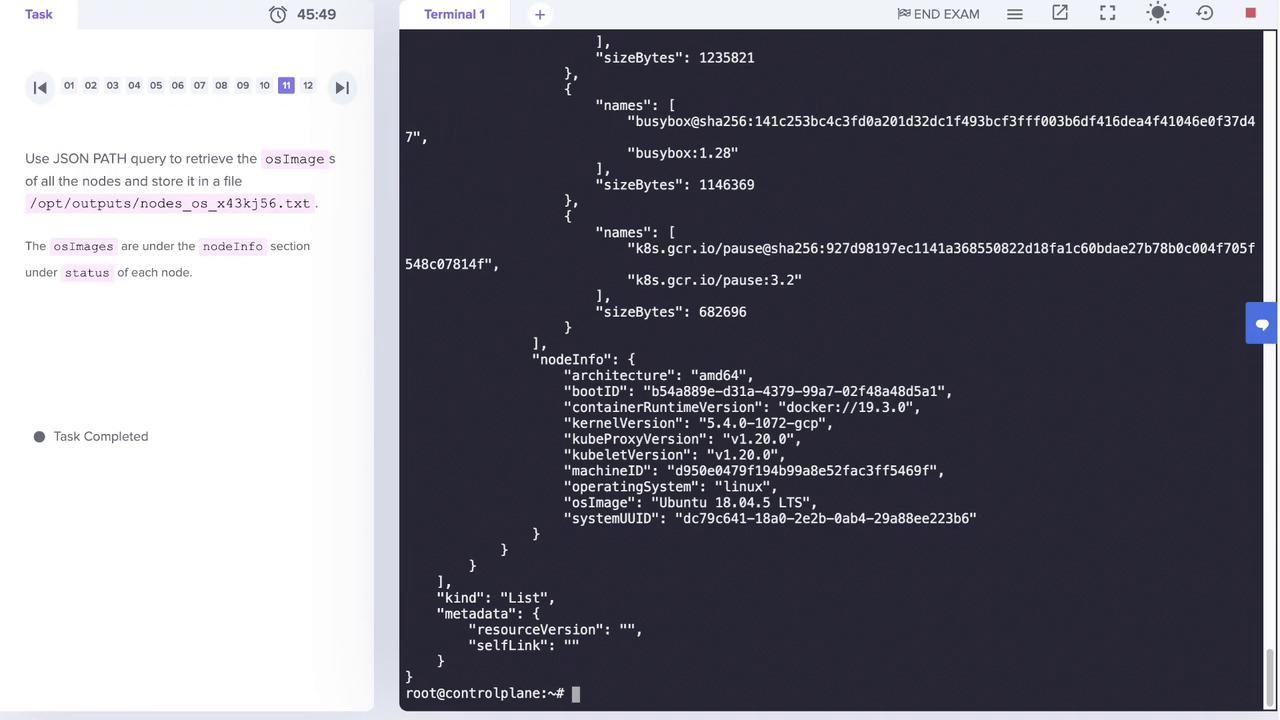
10. Retrieve OS Image Information of All Nodes Using JSONPath
Extract the operating system image from each node’s details using JSONPath. The relevant field is located at status.nodeInfo.osImage. Run the command below and save the output to a file:
root@controlplane:~# k get nodes -o jsonpath='{.items[*].status.nodeInfo.osImage}' > os-images.txt
Review the content of os-images.txt to confirm that it displays the OS image information (e.g., "Ubuntu 18.04.5 LTS").
11. Create a Persistent Volume (PV) with a Specific Specification
Since persistent volumes must be defined using YAML, create a file named pv.yaml with the following content:
apiVersion: v1
kind: PersistentVolume
metadata:
  name: pv-analytics
spec:
  capacity:
    storage: 100Mi
  accessModes:
    - ReadWriteMany
  hostPath:
    path: /pv/data-analytics
This configuration creates a persistent volume called pv-analytics with 100Mi of storage, using the ReadWriteMany access mode and a hostPath at /pv/data-analytics. Apply the configuration:
root@controlplane:~# k create -f pv.yaml
persistentvolume/pv-analytics created
Verify that the persistent volume is available:
root@controlplane:~# k get pv
NAME            CAPACITY   ACCESS MODES   RECLAIM POLICY   STATUS      CLAIM   STORAGECLASS   REASON   AGE
pv-analytics    100Mi      RWX            Retain           Available                        2s
12. Complete the Exam
After completing all the tasks and verifying each step, you have finished the exam. Congratulations on successfully addressing all the questions!
Thank you for following along in this lesson.
Watch Video
Watch video content
Practice Lab
Practice lab