This article provides a comprehensive guide on Kubernetes Ingress, covering its configuration, deployment, and use cases for managing external access to applications.
Use this file to discover all available pages before exploring further.
Welcome to this comprehensive guide on Kubernetes Ingress. In this article, we will explore the differences between Services and Ingress, explain when to use each, and demonstrate how to deploy and configure Ingress resources effectively. We begin by revisiting Services and then build toward understanding Ingress.
Imagine you are deploying an application for a company with an online store at myonlinestore.com. You build your application as a Docker image and deploy it on a Kubernetes cluster as a pod within a Deployment. The application requires a database, so you deploy a MySQL pod and expose it with a ClusterIP Service named MySQL service. Internally, your application functions properly.To expose the application externally, you create a Service of type NodePort, mapping the application to a high port (e.g., 38080) on your cluster nodes. In this configuration, users access your application using a URL like:http://<node_IP>:38080As traffic increases, the Service load-balances the requests among multiple application pods.In a production environment, however, you likely want users to access your application through a user-friendly domain name instead of a node IP address with a high port number. To achieve this, you would update your DNS configuration to point to your node IPs and deploy a proxy server that forwards requests from standard port 80 (or 443 for HTTPS) on your DNS to the NodePort defined in your cluster. With this approach, users can simply navigate to myonlinestore.com.Cloud-Native Approach with LoadBalancerIf your application is hosted on a public cloud platform like Google Cloud Platform (GCP), the process can be simplified further. Instead of creating a NodePort Service, you can deploy a Service of type LoadBalancer. In this setup:
Kubernetes assigns an internal high port.
It sends a request to GCP to deploy a network load balancer.
The cloud load balancer routes traffic to the internal port across all nodes.
An external IP is provided by the load balancer, which you point your DNS to.
This allows users to access your application directly using myonlinestore.com.
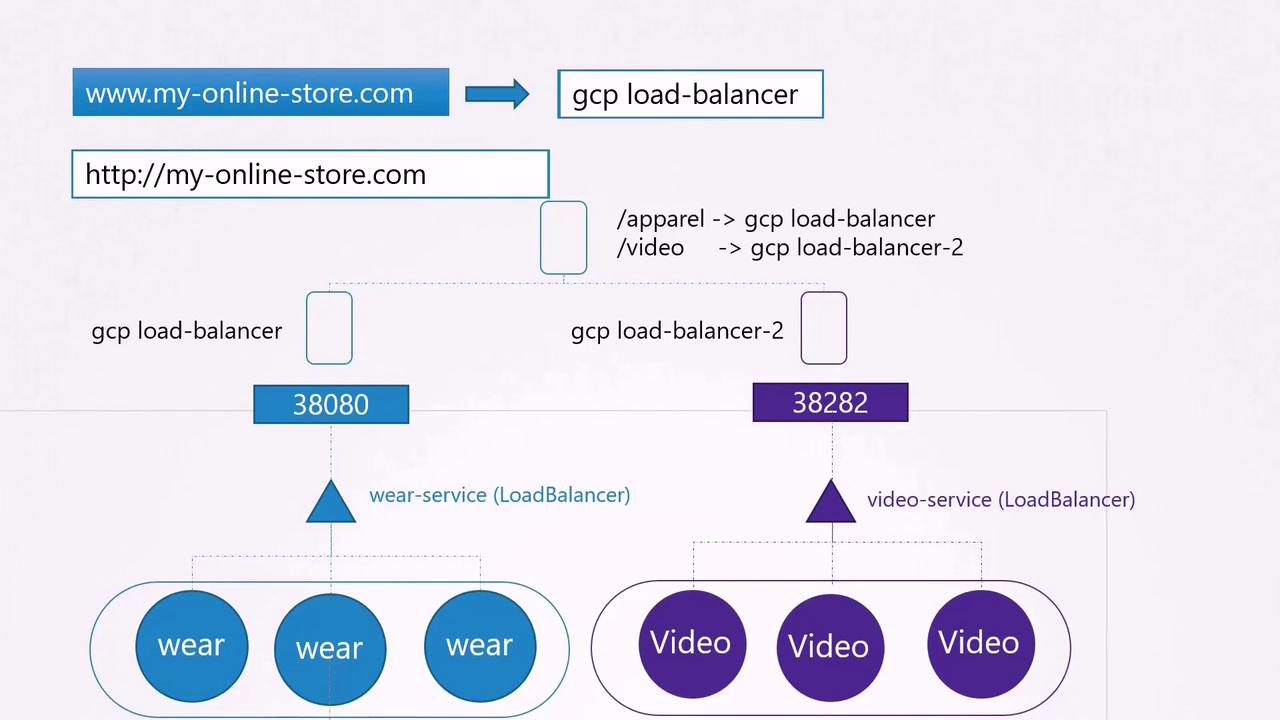
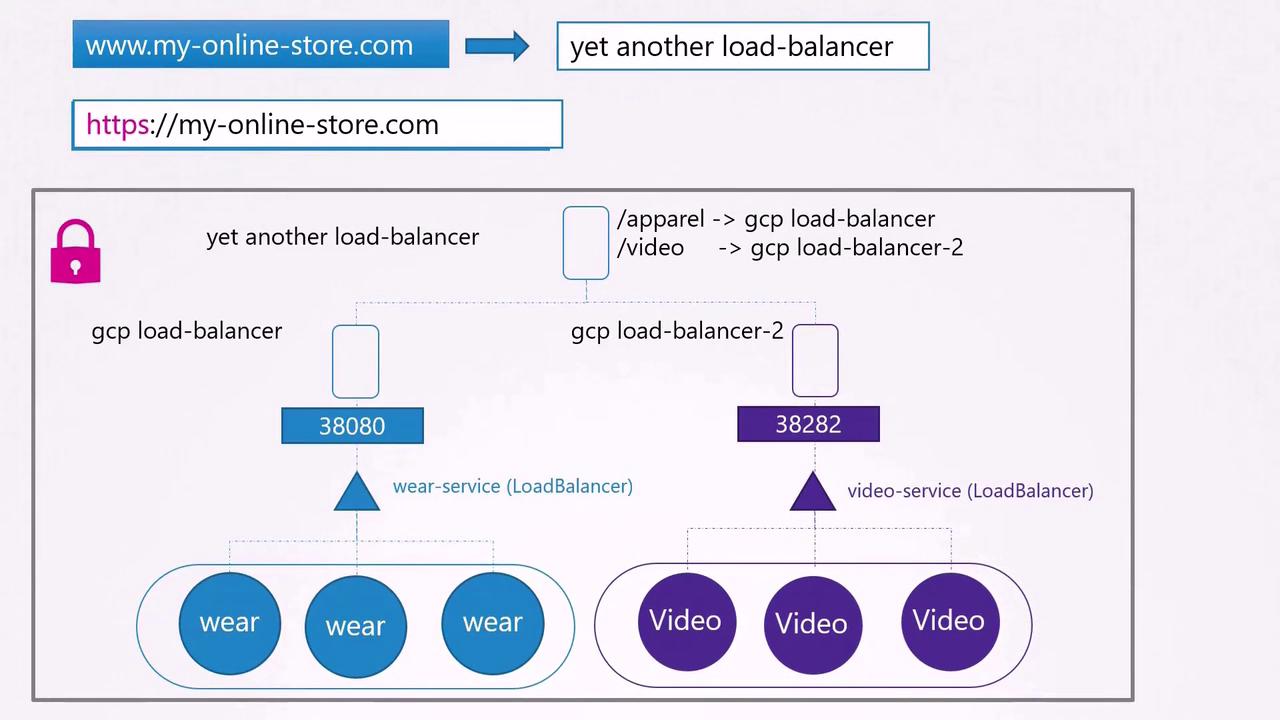
Imagine your company expands and you launch new services. For example, you might offer:
A video streaming service on myonlinestore.com/watch
The original application on myonlinestore.com/wear
Even if both applications run within the same cluster with separate Deployments and Services (e.g., a LoadBalancer Service for the video service), each service might get its own high port and cloud load balancer. Managing multiple load balancers can increase costs, add complexity, and complicate SSL/TLS (HTTPS) configurations.
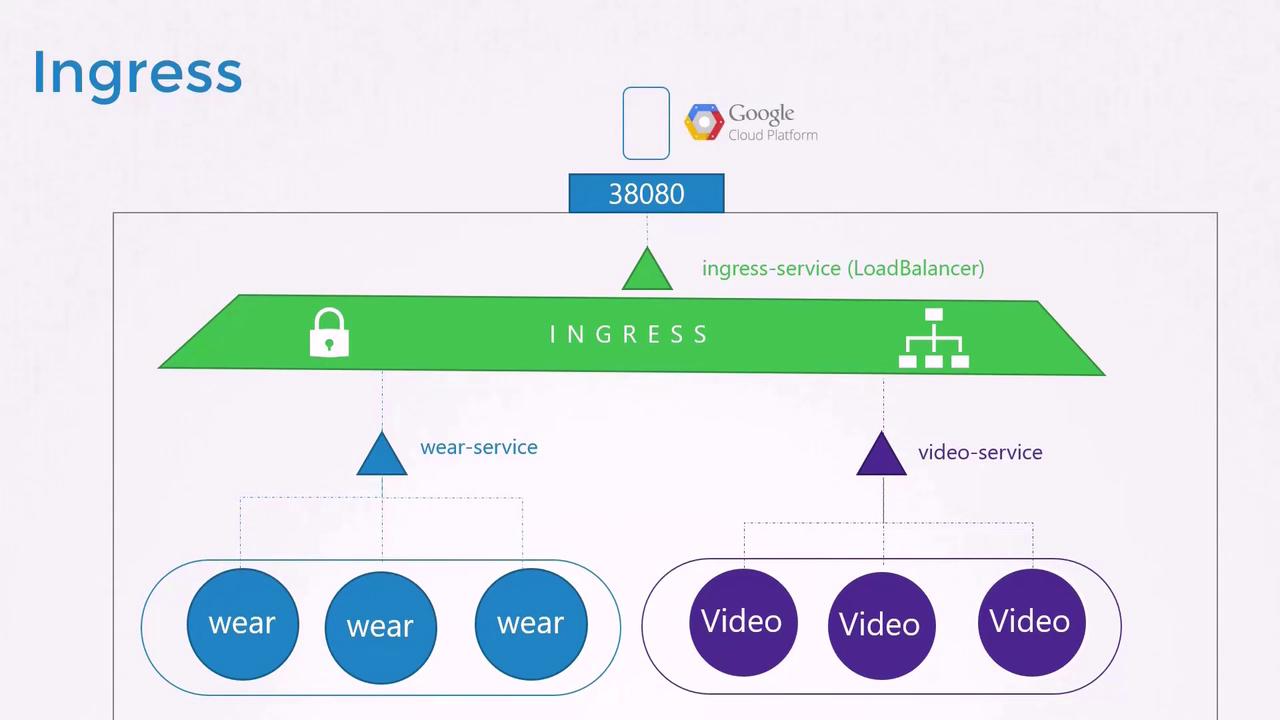
Ingress simplifies external access by providing a single externally accessible IP for your Kubernetes applications. It allows you to configure URL-based routing rules, SSL termination, authentication, and more—acting as a built-in layer 7 load balancer.Even with Ingress, you still need an initial exposure mechanism (via NodePort or a cloud-native LoadBalancer). However, once this is set up, all further changes are made through the Ingress controller.
Without Ingress, you would have to manually deploy and configure a reverse proxy or load balancer (such as NGINX, HAProxy, or Traefik) within your cluster to handle URL routing and manage SSL certificates. Ingress builds on these principles to offer an integrated solution.
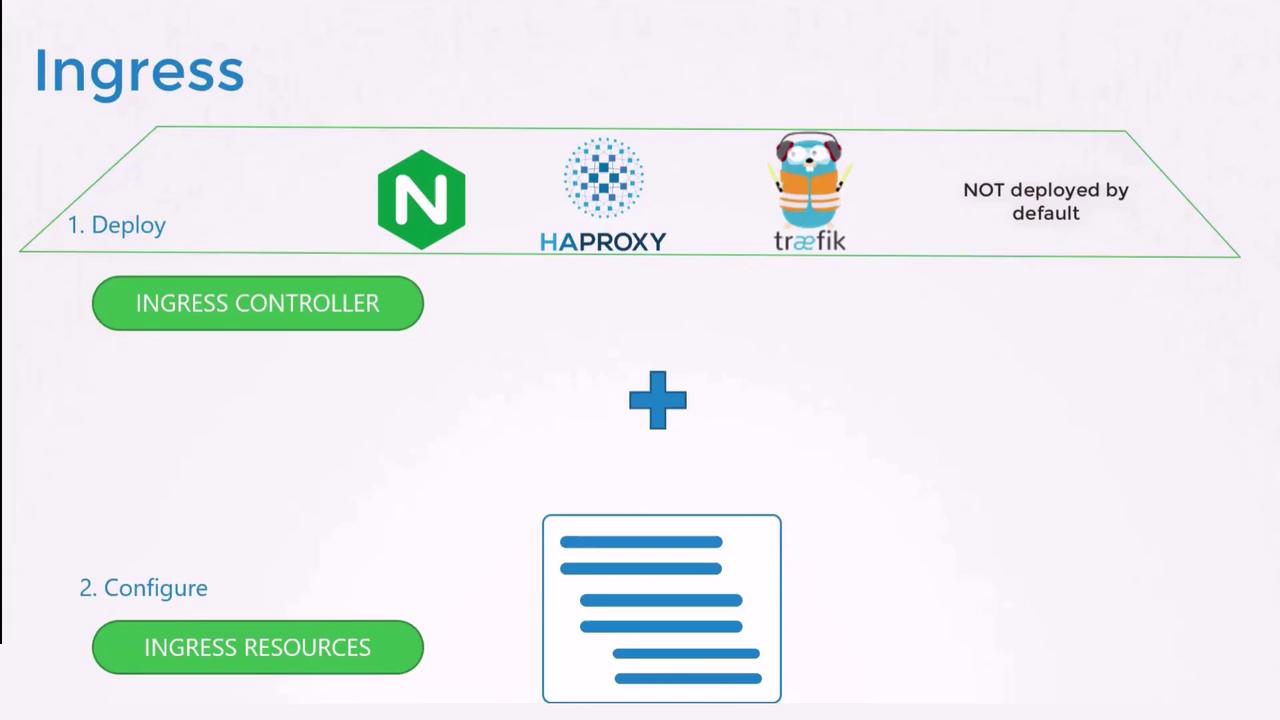
To use Ingress, you must first deploy an Ingress controller. The controller continuously monitors the cluster for changes in Ingress resources and reconfigures the underlying load balancing solution accordingly.
A Kubernetes cluster does not include an Ingress controller by default. If you create Ingress resources without deploying an Ingress controller, they will have no effect.
There are several Ingress controllers available, including GCE, NGINX, Contour, HAProxy, Traefik, and Istio. In this guide, we will use NGINX as the example.
This Deployment creates one replica of the NGINX Ingress controller using a Kubernetes-optimized NGINX image.To decouple configuration data from the image, you create a ConfigMap. This allows easy updates to log paths, keep-alive thresholds, SSL settings, session timeouts, and more without modifying the image.Below is an example Service to expose the NGINX Ingress controller using NodePort:
For a more comprehensive configuration, you can include environment variables to pass the Pod’s name and namespace to the container. This enables the Ingress controller to load its configuration dynamically. Here is a complete configuration that includes the Deployment, Service, ConfigMap, and ServiceAccount:
In addition to the objects above, you must create the necessary Roles, ClusterRoles, and RoleBindings so that the Ingress controller has permissions to monitor and modify Ingress resources in the cluster.
Once the NGINX Ingress controller is deployed, you can begin creating Ingress resources that define rules and configurations for routing external traffic to backend Services.
In this example, each rule handles traffic for a specific domain by routing all requests (”/”) to the designated backend Service.
Splitting traffic by URL involves one rule with multiple paths, whereas splitting traffic by domain requires multiple rules with specific host fields. If you do not define a host, the Ingress rule will match all incoming traffic, regardless of the domain.
This guide has walked through the process of setting up and configuring Ingress in Kubernetes. We explored a variety of use cases—from simple backend routing to complex rules based on URL paths and host names. The Ingress controller simplifies external access to your cluster, helps manage SSL/TLS termination, and consolidates your load balancing configuration.In practice tests or production environments, you may encounter labs where the Ingress controller and applications are pre-deployed, or more challenging labs where you need to deploy the Ingress controller and resources from scratch.Good luck with your Kubernetes projects, and we hope this article has been helpful in advancing your understanding of Kubernetes Ingress.For additional information, consider reviewing: