This article provides a comprehensive guide on network namespaces in Linux, focusing on network isolation and connectivity in containerized environments.
Welcome to this detailed guide on network namespaces in Linux. In this guide, we explain how network namespaces provide network isolation—a critical feature in containerized environments like Docker.Imagine your host as a house and namespaces as the individual rooms. Each room isolates its occupant (the container), ensuring that processes and network interfaces remain private. While the container only sees the processes within its own namespace, the host maintains oversight over all namespaces and can bridge communication between them when required.When a container is created, it is placed in its own network namespace. Inside this namespace, the container only sees its own processes. For example, inside a container, running:
Copy
ps auxUSER PID %CPU %MEM VSZ RSS TTY STAT START TIME COMMANDroot 1 0.0 0.0 4528 828 ? Ss 03:06 0:00 nginx
However, listing processes on the host as root shows all processes running on the system—including those inside containers:
Copy
ps aux
Copy
(On the container)USER PID %CPU %MEM VSZ RSS TTY STAT START TIME COMMANDroot 1 0.0 0.0 4528 828 ? Ss 03:06 0:00 nginx(On the host)USER PID %CPU %MEM VSZ RSS TTY STAT START TIME COMMANDproject 3720 0.1 0.1 95500 4916 ? R 06:06 0:00 sshd: project@pts/0project 3725 0.0 0.1 95196 4132 ? S 06:06 0:00 sshd: project@nottyproject 3727 0.2 0.1 21352 5340 pts/0 S 06:06 0:00 -bashroot 3802 0.0 0.0 8924 3616 ? S 06:06 0:00 docker-containerd-shim -namespace mroot 3816 1.0 0.0 4528 828 ? Ss 06:06 0:00 nginx
Notice that identical processes appear with different process IDs inside the container compared to the host. This behavior highlights how namespaces isolate container processes from the host’s process space.
On the networking front, the host maintains its own interfaces, ARP tables, and routing configurations—all of which remain hidden from containers. When a container is created, a dedicated network namespace gives it its own virtual interfaces, routing table, and ARP cache.For example, running the following command on your host:
Copy
ip link
displays the host’s interfaces (such as the loopback and Ethernet interfaces). To examine interfaces within a specific network namespace (for example, the “red” namespace), use:
Copy
ip netns exec red ip link
Or with the shorthand using the –n option:
Copy
ip -n red link
Inside the namespace, you typically see only a loopback interface, ensuring that host-specific interfaces (e.g., eth0) remain hidden. This isolation applies similarly to ARP and routing tables.
By default, a network namespace has no connectivity because it lacks defined interfaces or routes. To connect namespaces, you create virtual Ethernet (veth) pairs that act like cables between two entities.For example, to connect two namespaces—named “red” and “blue”—first create a veth pair:
Copy
ip link add veth-red type veth peer name veth-blue
Then, assign each end to its respective namespace:
Copy
ip link set veth-red netns redip link set veth-blue netns blue
Next, assign IP addresses to each namespace’s interface—for example, 192.168.15.1 for “red” and 192.168.15.2 for “blue”—and bring the interfaces up:
Copy
ip -n red addr add 192.168.15.1/24 dev veth-redip -n blue addr add 192.168.15.2/24 dev veth-blueip -n red link set veth-red upip -n blue link set veth-blue up
Test connectivity by pinging from the red namespace to the blue namespace:
Copy
ip netns exec red ping 192.168.15.2
Verify neighbor discovery using ARP from within the red namespace:
Copy
ip netns exec red arp
Expected output:
Copy
Address HWtype HWaddress Flags Mask Iface192.168.15.2 ether ba:b0:6d:68:09:e9 C veth-red
Similarly, checking the ARP table in the blue namespace should display an entry for the red namespace. Note that these internal veth interfaces do not appear in the host’s ARP table.
When working with more than two namespaces, linking every pair using veth pairs is impractical. Instead, establish a virtual network switch (or bridge) on the host to interconnect all namespaces. Linux offers tools such as the native Linux bridge or Open vSwitch.In this example, a Linux bridge is created:
Create a new bridge interface (named v-net-0):
Copy
ip link add v-net-0 type bridge
Bring the bridge interface up:
Copy
ip link set v-net-0 up
Namespaces can now be connected to this bridge. Remove the earlier direct veth pair as it is no longer necessary:
Copy
ip -n red link del veth-red
Next, create new veth pairs to link each namespace to the bridge. For example, create a pair with one end named veth-red (to be moved into the red namespace) and the other end named veth-red-br (to be attached to the bridge):
Copy
ip link add veth-red type veth peer name veth-red-brip link add veth-blue type veth peer name veth-blue-br
Attach the veth interfaces to their corresponding namespaces and the bridge:
Copy
ip link set veth-red netns redip link set veth-red-br master v-net-0ip link set veth-blue netns blueip link set veth-blue-br master v-net-0
Assign IP addresses and activate the interfaces inside each namespace:
Copy
ip -n red addr add 192.168.15.1/24 dev veth-redip -n blue addr add 192.168.15.2/24 dev veth-blueip -n red link set veth-red upip -n blue link set veth-blue up
To allow the host to communicate with the namespaces, assign an IP from the same subnet to the bridge interface:
Copy
ip addr add 192.168.15.5/24 dev v-net-0
You can now verify connectivity from the host, for example:
Copy
ping 192.168.15.1
All traffic within this network remains private to the host, ensuring that namespaces are not directly accessible from external networks.
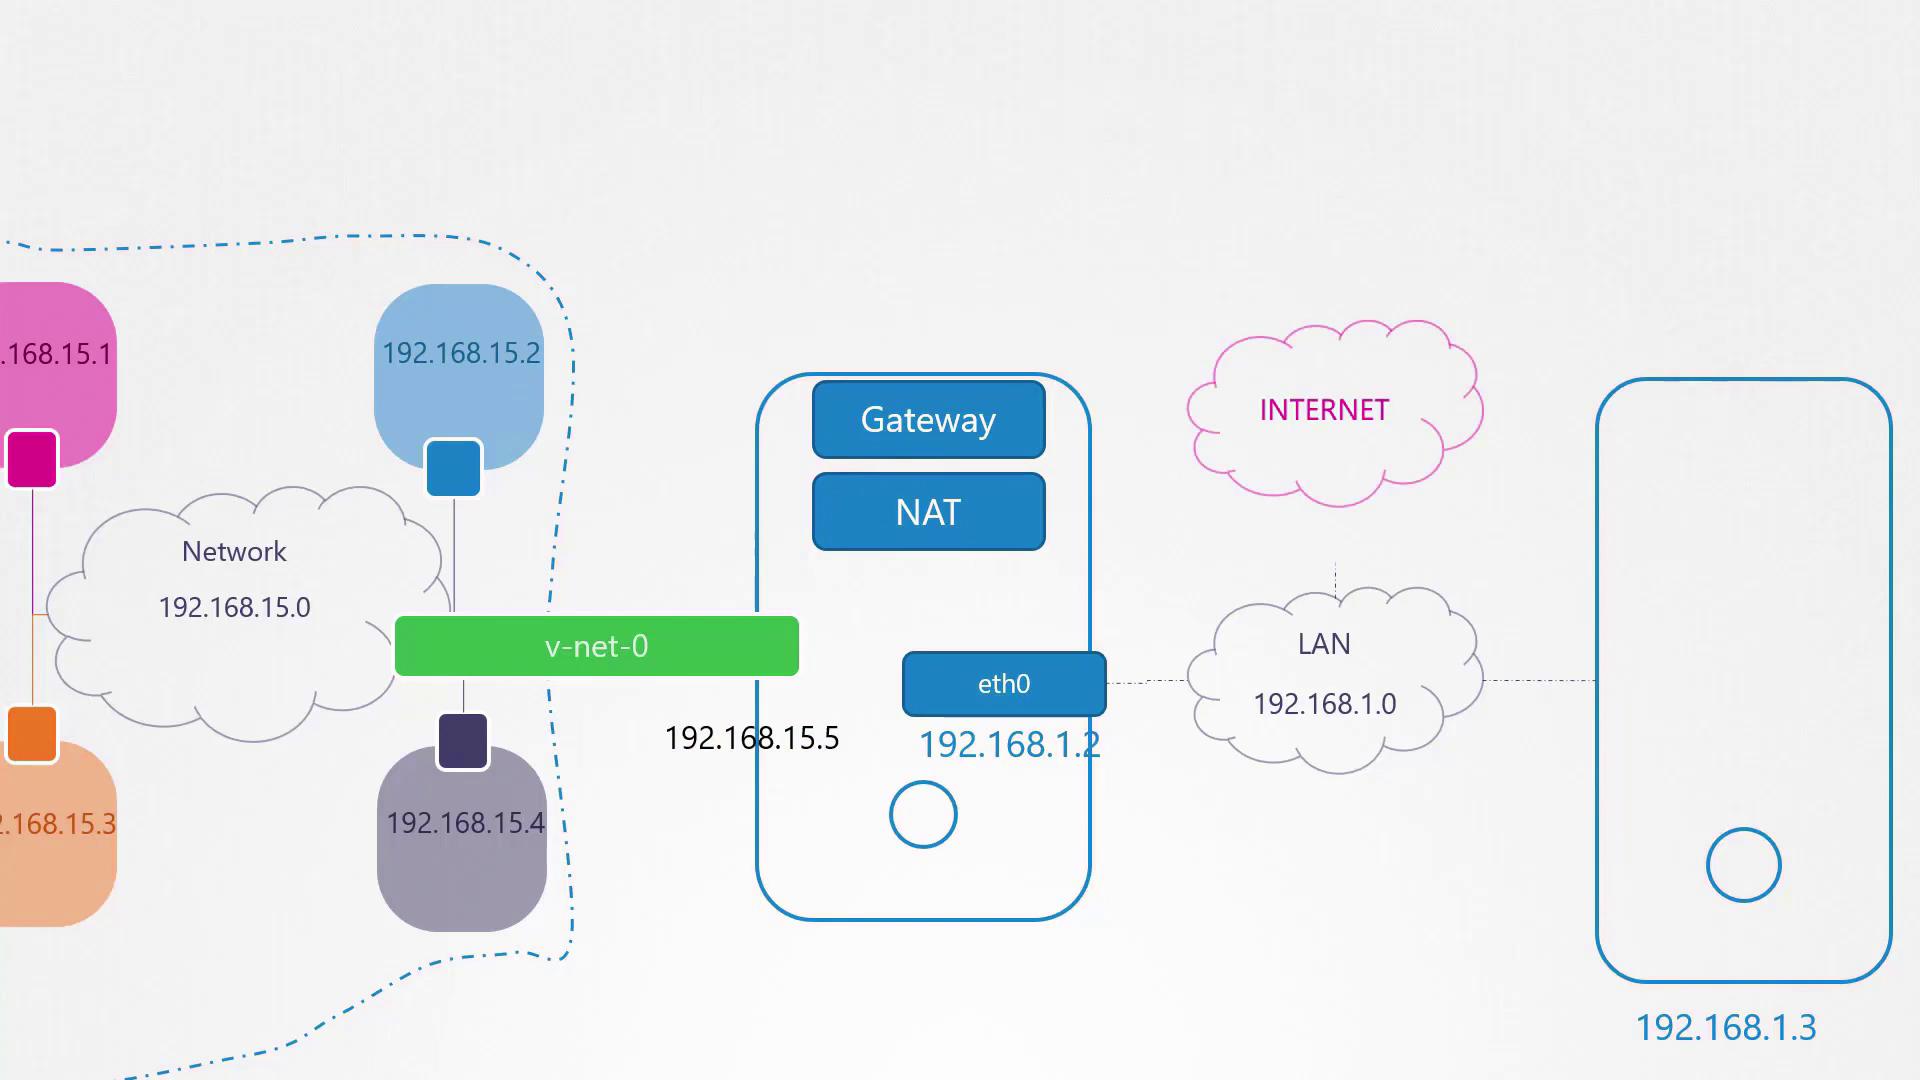
The internal network created by namespaces and a bridge is isolated from external networks. Suppose your host’s external interface utilizes a LAN subnet (e.g., 192.168.1.0/24) and you wish for namespaces to communicate with external systems. For instance, pinging an external host (192.168.1.3) from the blue namespace would initially result in a “Network is unreachable” error:
Copy
ip netns exec blue ping 192.168.1.3
Checking the routing table in the blue namespace using:
Copy
ip netns exec blue route
might display:
Copy
Destination Gateway Genmask Flags Metric Ref Use Iface192.168.15.0 0.0.0.0 255.255.255.0 U 0 0 0 veth-blue
To enable external connectivity, add a route in the blue namespace that directs traffic destined for 192.168.1.0/24 via the host’s IP on the bridge (192.168.15.5):
Copy
ip netns exec blue ip route add 192.168.1.0/24 via 192.168.15.5
After this route is added, the blue namespace can reach external networks. However, external networks will not recognize the private IP addresses. To address this, configure NAT on the host using iptables. This setup masquerades packets from the 192.168.15.0/24 network with the host’s external IP, making the traffic routable on the LAN.To provide namespaces with Internet access (such as pinging 8.8.8.8), add a default route in the namespace pointing to the host; the host must then perform NAT to forward the traffic correctly.
Thus far, namespaces are isolated on an internal network and are not directly accessible from external hosts. For instance, if the blue namespace runs a web application on port 80, external users cannot access it simply by targeting its private IP.There are two common solutions:
Add a static route on the external router or host so that traffic for the 192.168.15.0/24 network is directed through the host’s LAN IP (e.g., 192.168.1.2).
Use port forwarding via iptables on the host to redirect traffic arriving at a specific port (e.g., port 80) to the corresponding port in the namespace.
The port forwarding method is often preferred, as it eliminates the need to reconfigure external routing.
This concludes our guide on network namespaces. By following these steps, you can effectively isolate, connect, and manage network namespaces for containerized environments. Thank you for reading!