This article explains service networking in Kubernetes, covering pod and service communication, service types, and how traffic is managed within a cluster.
Welcome to this comprehensive lesson on service networking. In this discussion, we explore how services function within a Kubernetes cluster and how they differ from pods. We’ll also cover the inner workings of pod networking, including bridging, namespace assignments, interface attachments, and IP address management. This guide is designed to clarify how traffic flows through services to access applications running in pods.
Pod networking involves creating bridge networks on each node where pods receive individual namespaces, attach network interfaces, and obtain IP addresses from the node-specific subnet. This setup ensures that pods across different nodes can communicate via dedicated routes or overlay networks. However, rather than configuring pod-to-pod communication directly, you typically set up services. Services allow you to expose and reach applications with an assigned IP address and DNS name, simplifying internal and external access.
Imagine you have an “orange” pod that must be accessible to a “blue” pod. Instead of connecting the pods directly, you expose the orange pod with a service. This service is provided an IP address and DNS name, which the blue pod can use to establish a connection. When both pods reside on the same node, communication is straightforward; however, the process becomes more intricate when pods are distributed across multiple nodes.
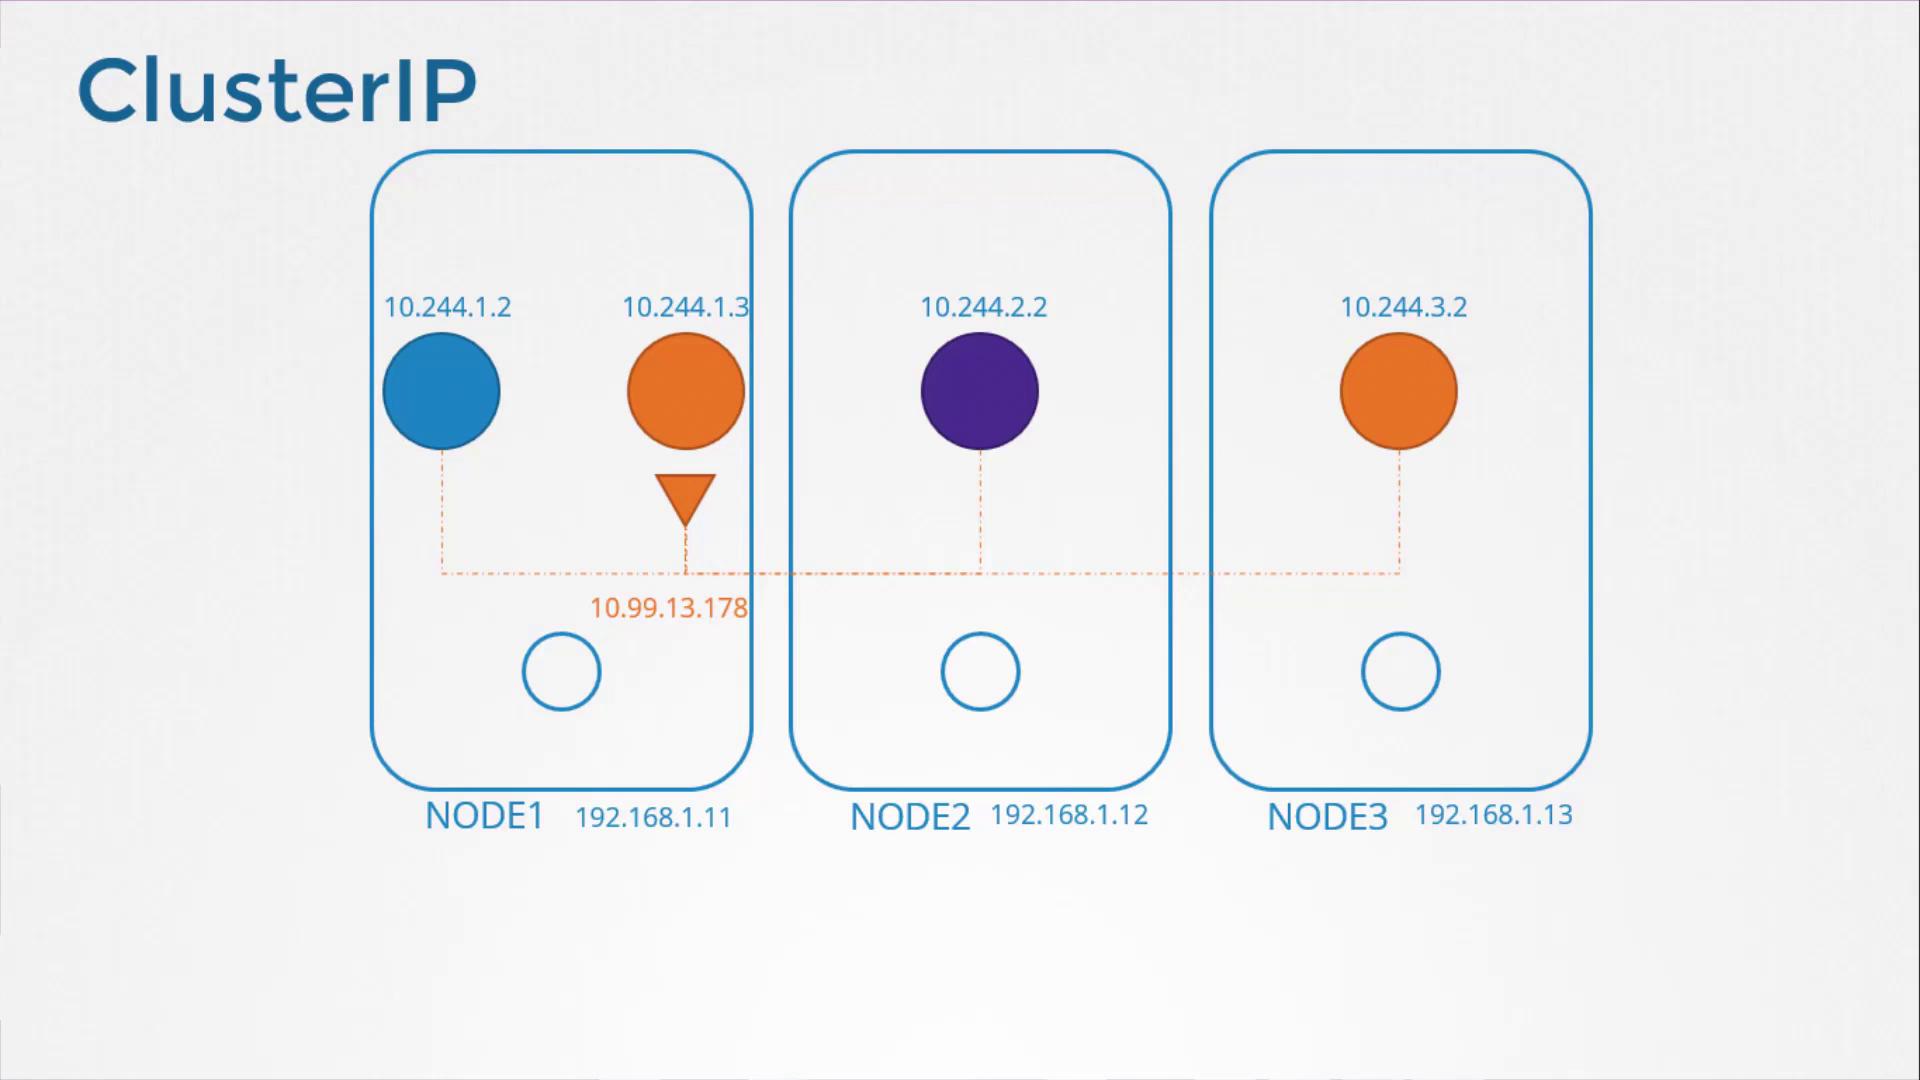
By default, when a service is created, it is accessible to all pods in the cluster, regardless of the node they run on. This default service type, called ClusterIP, is ideal for applications meant strictly for internal access. For example, if your orange pod hosts a database, a ClusterIP service ensures internal connectivity.
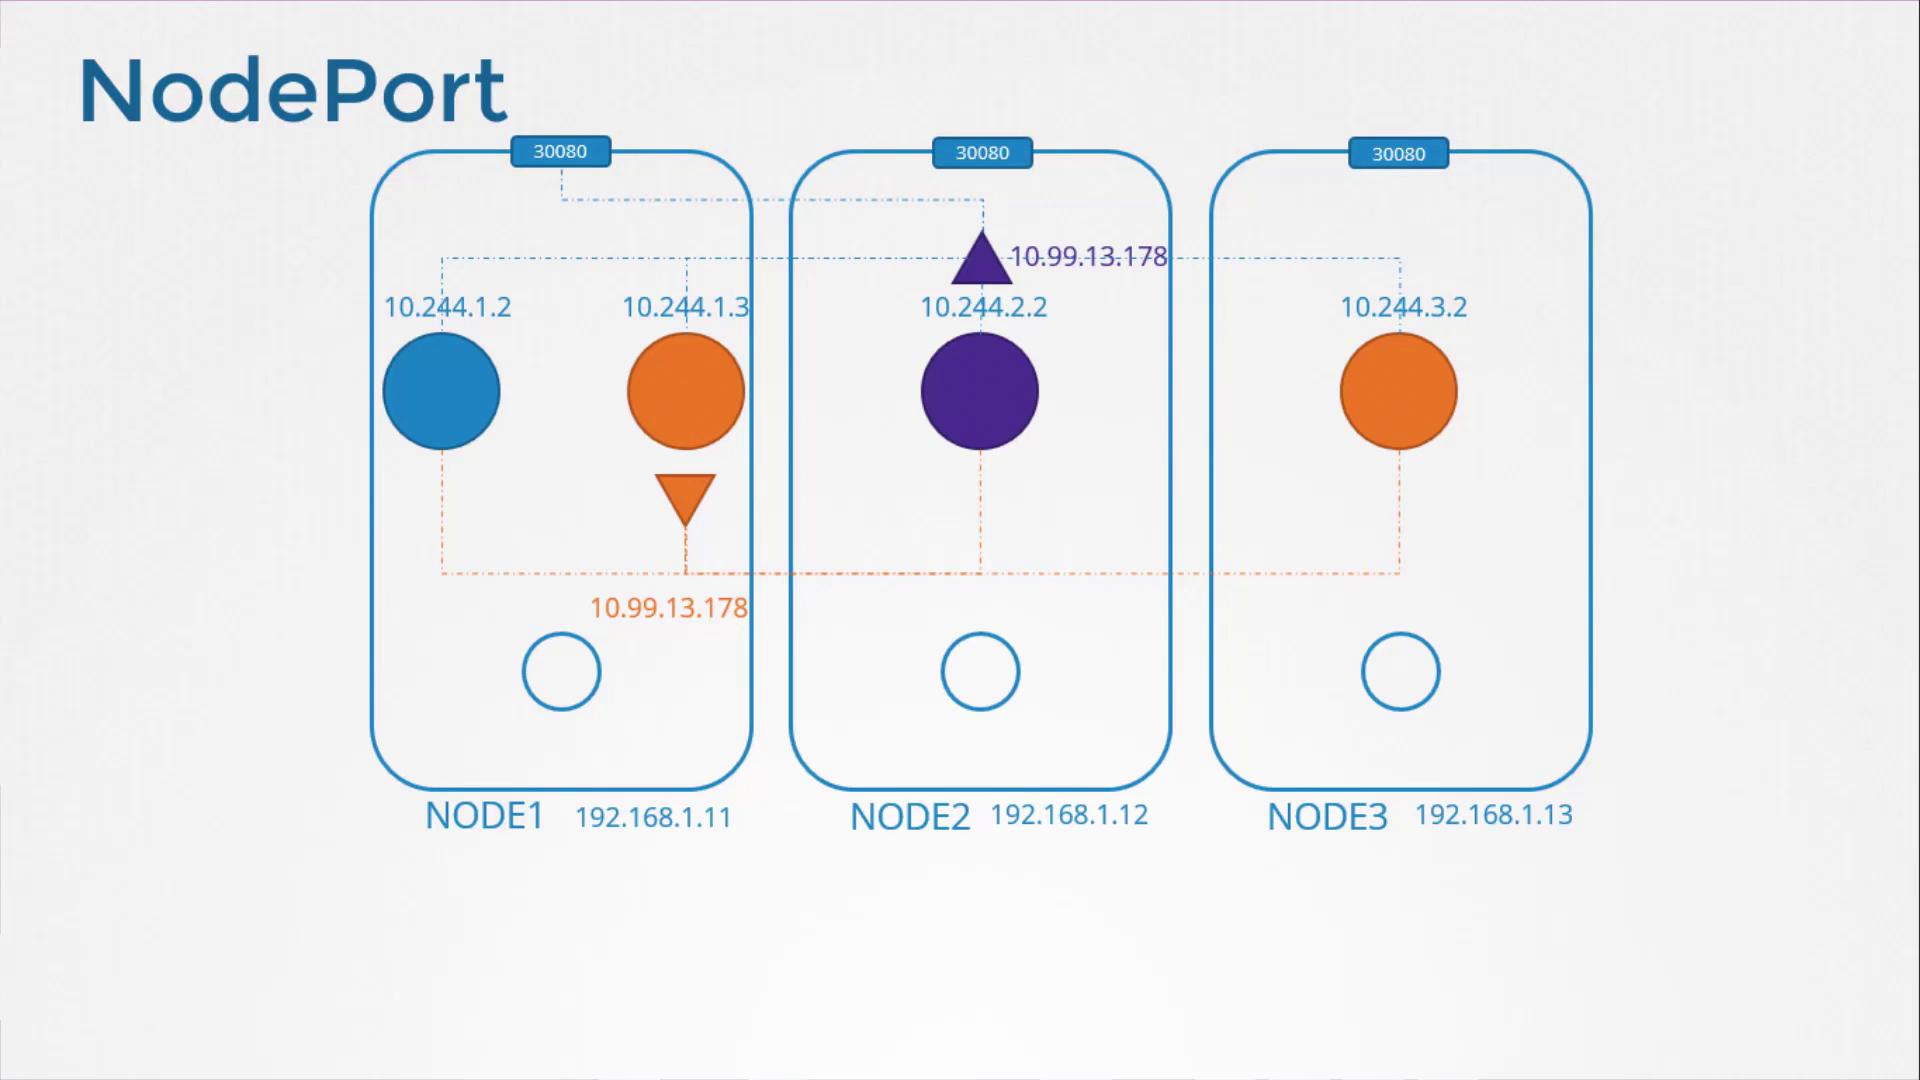
When you need a service to be accessible from outside the cluster, such as when a purple pod hosts a web application, you use a NodePort service. This service still receives an internal cluster IP for intra-cluster communication, but it also exposes the application on a specific port on every node. This allows external users or applications to reach the service without direct access to individual pod IPs.
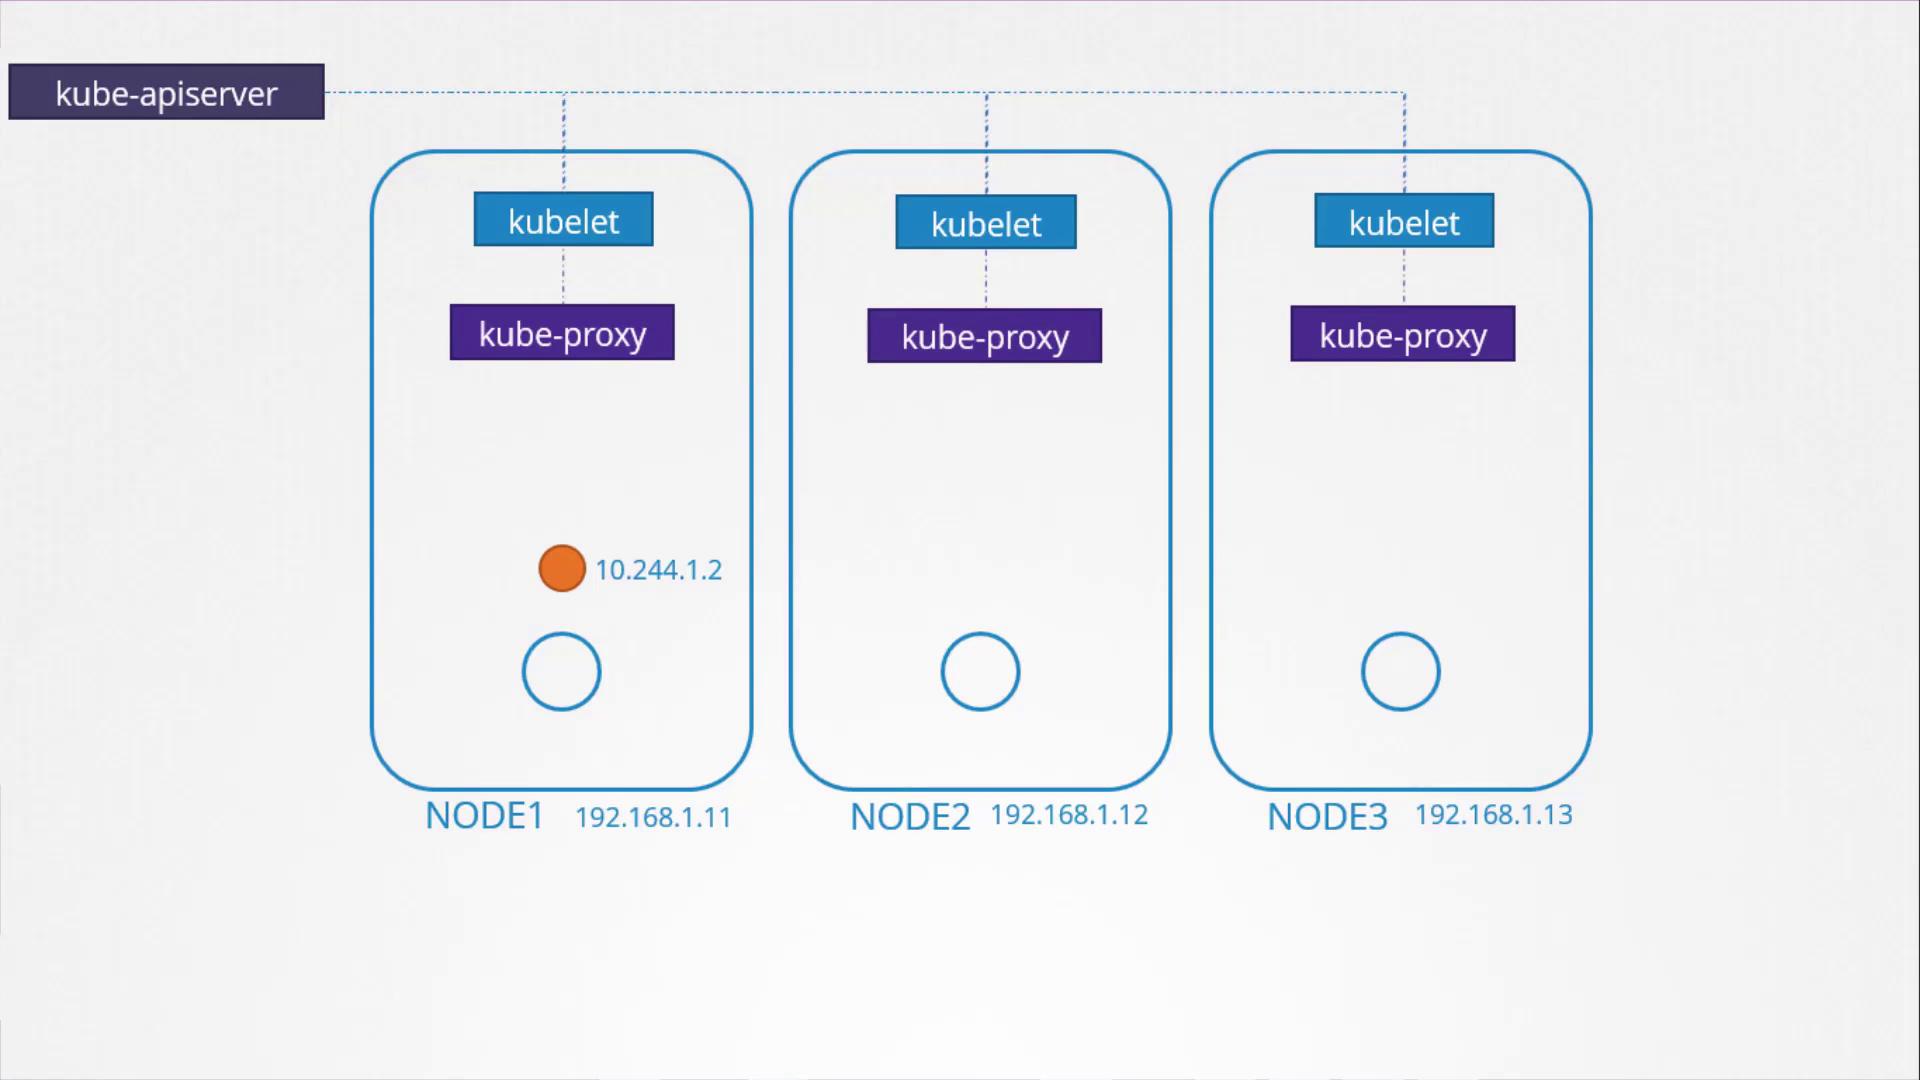
Let’s start with a clean slate. Picture a three-node Kubernetes cluster that has no pods or services deployed yet. Each node runs a Kubelet process, responsible for pod creation by communicating with the Kube API Server and invoking the CNI plugin to configure networking. In parallel, every node also runs a Kube Proxy, which monitors cluster changes via the API Server and sets up forwarding rules whenever a new service is created.
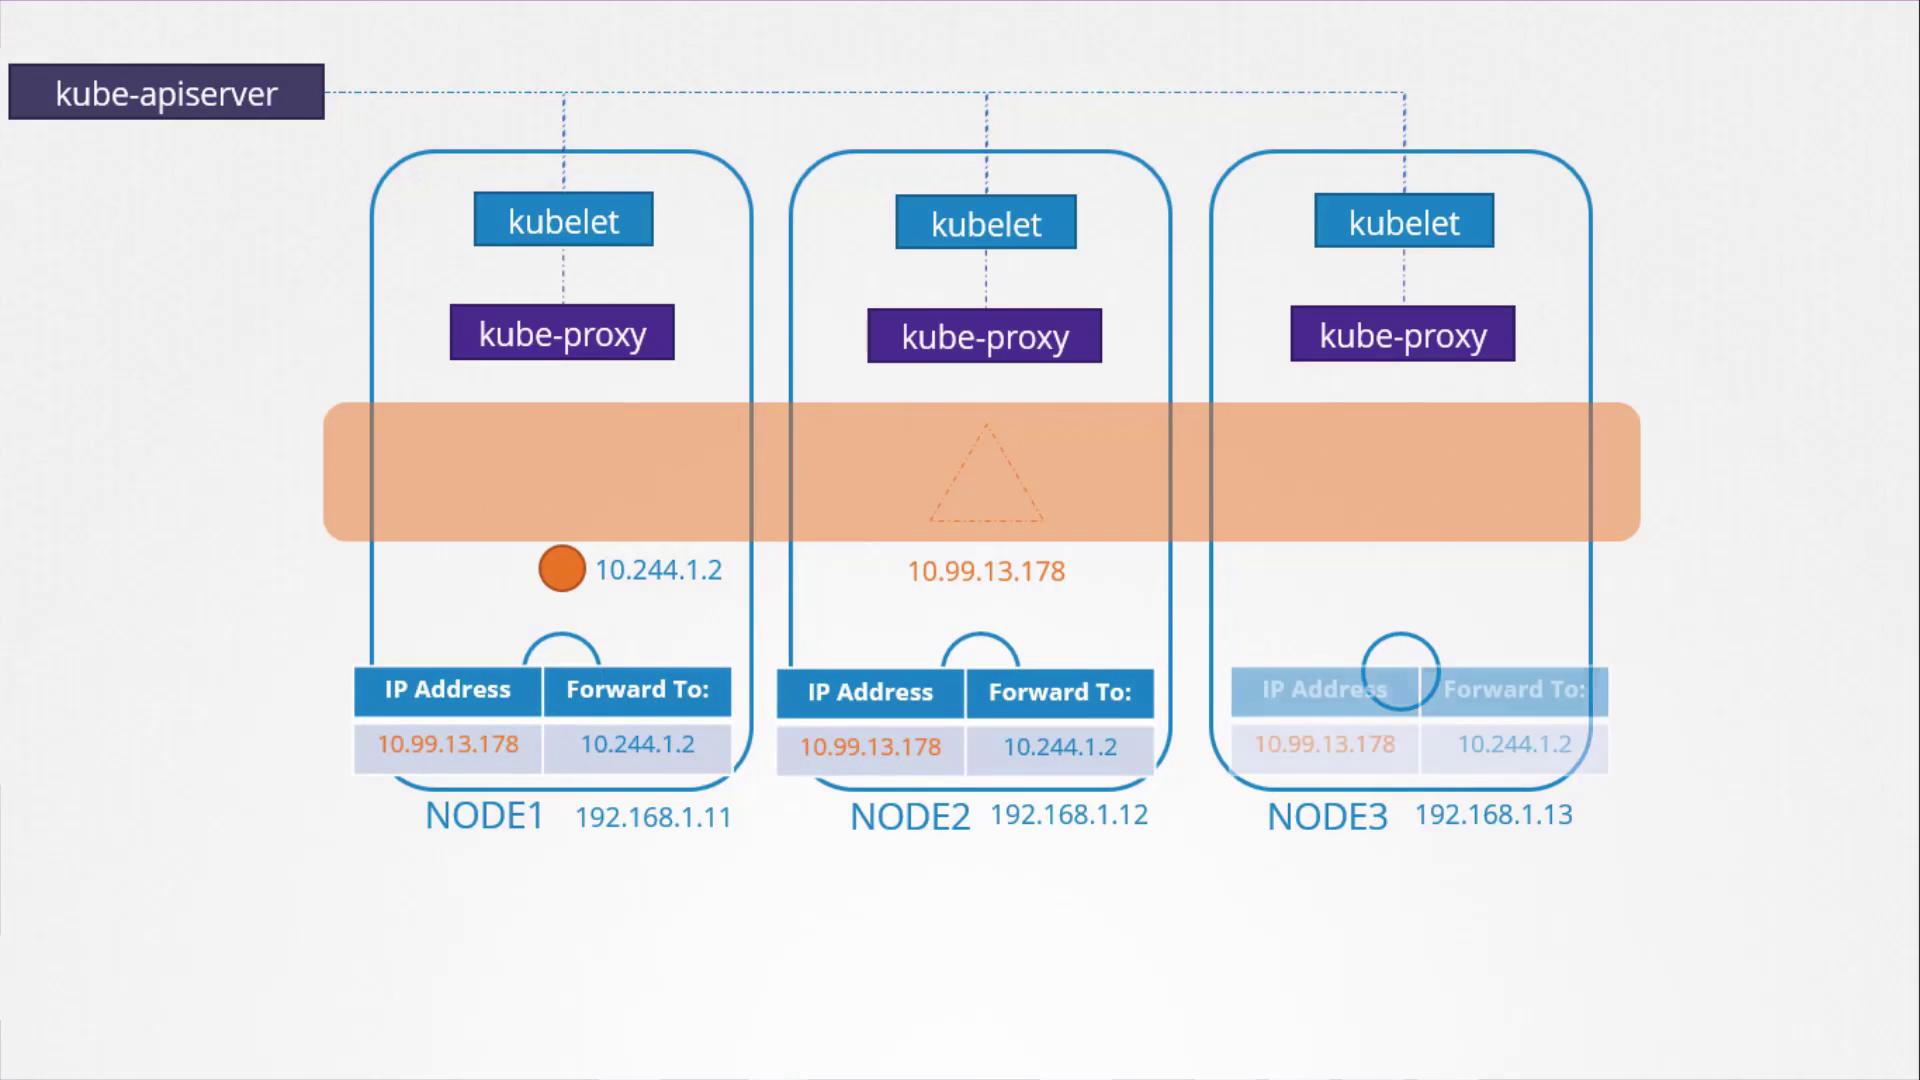
Unlike pods that have their dedicated network interfaces, services are virtual constructs spanning the entire cluster. When you create a service object, Kubernetes automatically assigns it an IP address from a predefined range (set via the Kube API Server’s —service-cluster-ip-range option). The kube-proxy on each node then configures the appropriate forwarding rules so that any traffic targeted at the service’s IP and port is correctly routed to the backend pod.
Whenever a pod sends traffic to a service IP, the kube-proxy rules step in to forward that traffic to the chosen backend pod. These rules are dynamically updated as services are created or removed. Kube Proxy supports several proxy modes, including user space, iptables, and IPVS (with iptables being the default unless specified otherwise).Here’s an example command to start the kube-proxy with a specific proxy mode:
Practical Example: Service IP Assignment and Traffic Forwarding
Consider a scenario where a pod named “db” is running on node-1 with the IP address 10.244.1.2. To expose this pod inside the cluster, you create a ClusterIP service named “db-service.” When the service is created, Kubernetes assigns it an IP address (for example, 10.103.132.104) from the designated service cluster IP range.
kubectl get pods -o wideNAME READY STATUS RESTARTS AGE IP NODEdb 1/1 Running 0 14h 10.244.1.2 node-1kubectl get serviceNAME TYPE CLUSTER-IP PORT(S) AGEdb-service ClusterIP 10.103.132.104 3306/TCP 12h
In some clusters, the default service cluster IP range might be 10.0.0.0/24, but in other setups the API Server may be configured with a different range such as —service-cluster-ip-range=10.96.0.0/12. This means that service IPs can fall anywhere between 10.96.0.0 and 10.111.255.255. Meanwhile, the pod network CIDR might be something like 10.244.0.0/16, ensuring that pod IP addresses range between 10.244.0.0 and 10.244.255.255. It is crucial that these ranges do not overlap.When the “db-service” is created, kube-proxy establishes corresponding iptables rules so that traffic arriving at the service IP on port 3306 is redirected to the pod’s IP on the same port:
This DNAT (Destination Network Address Translation) rule ensures that any traffic to the service IP (10.103.132.104) on port 3306 is redirected to the pod’s IP (10.244.1.2).Similarly, a NodePort service would have iptables rules that forward traffic arriving on a designated port on every node to the appropriate backend pods.
To check which proxy mode your kube-proxy is using, you can inspect the kube-proxy logs:
cat /var/log/kube-proxy.log
Note that the location of the kube-proxy log file may vary depending on your installation. If you do not see the expected entries, verify that the verbosity level of kube-proxy is set appropriately.
This lesson has provided a detailed overview of service networking in Kubernetes, explaining how services are assigned IP addresses, how kube-proxy forwards traffic, and the differences between ClusterIP and NodePort service types. Further details and related topics will be explored in subsequent content.Happy learning!For more information, check out the following resources: