> ## Documentation Index
> Fetch the complete documentation index at: https://notes.kodekloud.com/llms.txt
> Use this file to discover all available pages before exploring further.
# Components
> This article explains Kustomize components for defining reusable configuration logic to minimize duplication and manage optional features across multiple overlays.
In this lesson, you will learn about a powerful Kustomize feature called components. Components allow you to define reusable configuration logic that can be seamlessly integrated into multiple overlays. This approach is especially beneficial for applications that support optional features activated only in selected overlays.
For instance, if you have common configurations that apply to every overlay, you would include them in your Base configuration. However, if specific features need to be enabled only in particular overlays, duplicating the configurations in each overlay quickly becomes unscalable and error-prone. Components address this challenge by letting you define the configuration once and reuse it where needed, minimizing duplication and preventing configuration drift.
## Visual Example
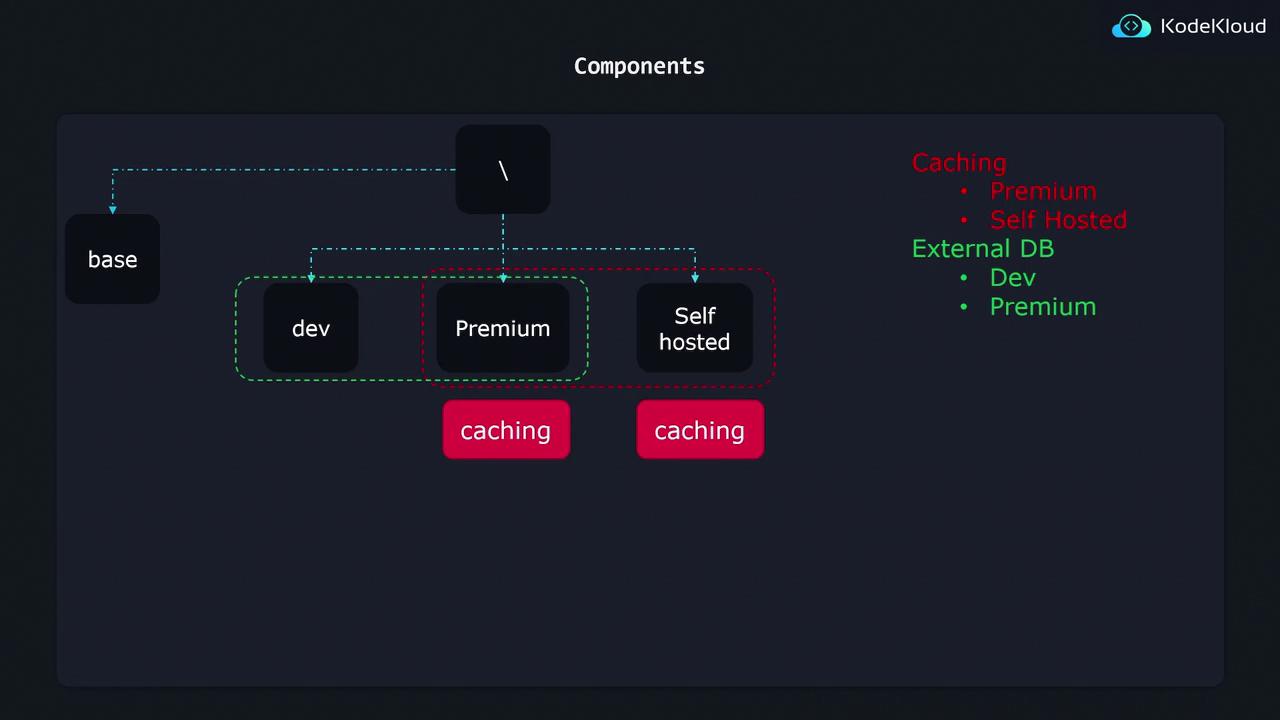
Imagine deploying an application in three variations: Development, Premium (for premium customers), and Self-Hosted (for customers who manage their own hosting). These variations correspond to three overlay folders, which all reference a shared Base configuration folder.
Suppose the application offers two optional features: caching and an external Postgres database. The caching feature, which includes configuration details for a Redis database, should only be applied to the Premium and Self-Hosted overlays. In contrast, the external database is only relevant for the Development and Premium overlays.
Placing the caching configuration in the Base folder would inadvertently activate it across all overlays, while copying it individually into the Premium and Self-Hosted overlays risks inconsistencies during future updates. Components solve this problem by encapsulating the caching configuration in a reusable block that is imported only by the overlays that require it.
The overall project hierarchy is structured so that the Base configuration is common to all overlays, while each overlay selectively includes components for features like caching or an external database.
## Organizing Your Project Structure
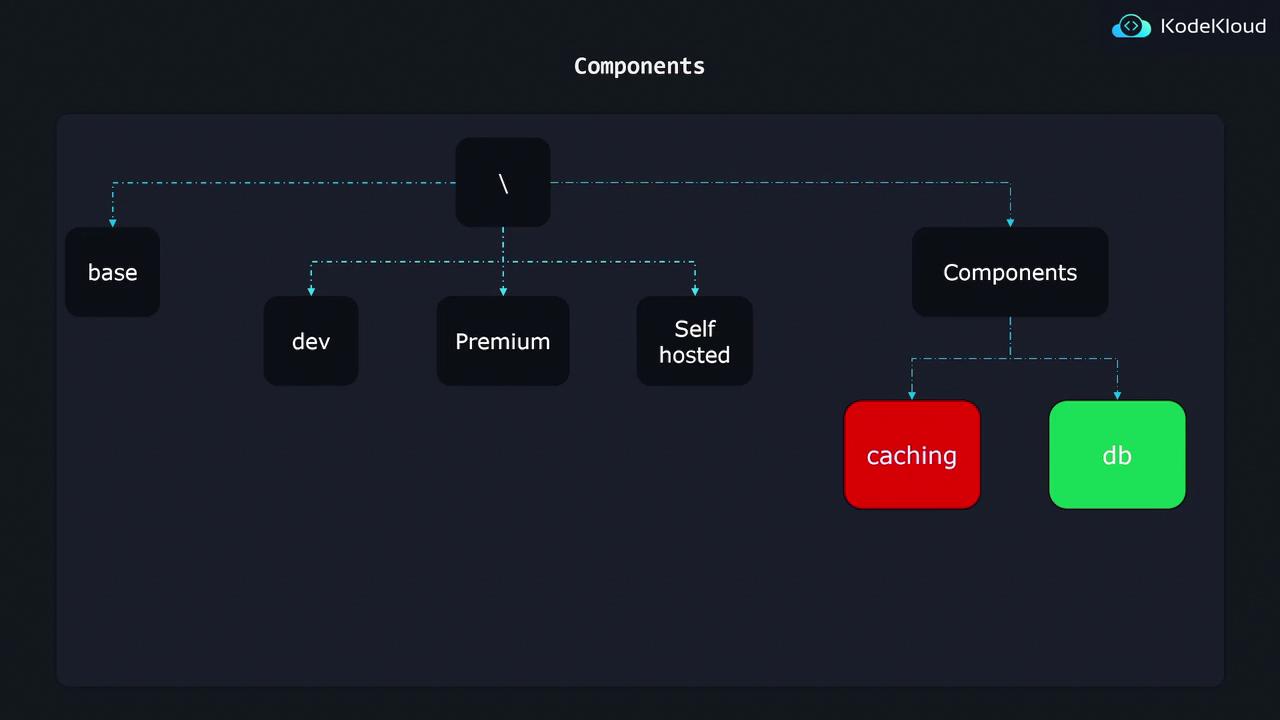
To effectively implement components, consider adding a dedicated folder for components in your project structure. A typical folder layout may resemble the following structure:
```text theme={null}
k8s/
├── base/
│ ├── kustomization.yaml
│ └── api-depl.yaml
├── components/
│ ├── caching/
│ │ ├── kustomization.yaml
│ │ ├── deployment-patch.yaml
│ │ └── redis-depl.yaml
│ └── db/
│ ├── kustomization.yaml
│ ├── deployment-patch.yaml
│ └── postgres-depl.yaml
└── overlays/
├── dev/
│ └── kustomization.yaml
├── premium/
│ ├── kustomization.yaml
│ └── standalone/
│ └── kustomization.yaml
```
In the structure above, the `components` folder houses dedicated subdirectories for each optional feature (e.g., caching and database). Each component subfolder includes all relevant Kubernetes configurations such as deployments, patches, configuration maps, and secrets. Overlays can import these components as required, ensuring that configurations remain centralized, reusable, and easy to maintain.
A well-organized project differentiates between the immutable Base configuration and the flexible environment-specific overlays. This separation allows you to add or remove optional features without disrupting the overall system configuration.
## Implementing a Component
Let's focus on the database component. Within the `db` folder, the following three files are present:
* `kustomization.yaml`
* `deployment-patch.yaml`
* `postgres-depl.yaml`
The `postgres-depl.yaml` file defines the deployment for a Postgres database, which is the sole required Kubernetes resource for the external database feature:
```yaml theme={null}
apiVersion: apps/v1
kind: Deployment
metadata:
name: postgres-deployment
spec:
replicas: 1
selector:
matchLabels:
component: postgres
template:
metadata:
labels:
component: postgres
spec:
containers:
- name: postgres
image: postgres
```
### The Component's kustomization.yaml
The `kustomization.yaml` file inside the database component is slightly different from standard configuration files. It indicates that this is a Component:
```yaml theme={null}
apiVersion: kustomize.config.k8s.io/v1alpha1
kind: Component
resources:
- postgres-depl.yaml
secretGenerator:
- name: postgres-cred
literals:
- password=postgres123
patches:
- deployment-patch.yaml
```
This file accomplishes the following:
* Imports the Postgres deployment defined in `postgres-depl.yaml`.
* Generates a secret named `postgres-cred` containing the database password.
* Applies patches from `deployment-patch.yaml` to update the base configuration (for example, by integrating an environment variable for the database password).
### The Deployment Patch
The `deployment-patch.yaml` file constitutes a strategic merge patch that updates the base API deployment configuration. Specifically, it introduces a new environment variable for the database password:
```yaml theme={null}
apiVersion: apps/v1
kind: Deployment
metadata:
name: api-deployment
spec:
template:
spec:
containers:
- name: api
env:
- name: DB_PASSWORD
valueFrom:
secretKeyRef:
name: postgres-cred
key: password
```
### Importing Components in Overlays
To activate a component in an overlay, include its reference in the overlay’s `kustomization.yaml` file. For example, the `kustomization.yaml` in the `dev` overlay might be configured as follows:
```yaml theme={null}
bases:
- ../../base
components:
- ../../components/db
```
In this configuration:
* The base configuration is imported first.
* The database component is then imported, enabling the external database feature for that overlay.
This same import pattern can be applied to any overlay needing external database functionality or caching, ensuring that optional features are defined once and consistently reused across all environments.
By leveraging components in Kustomize, you can maintain consistency and reduce redundancy by defining optional features only once. This modularity not only promotes reusability but also simplifies managing configurations across multiple overlays.