> ## Documentation Index
> Fetch the complete documentation index at: https://notes.kodekloud.com/llms.txt
> Use this file to discover all available pages before exploring further.
# Recap ReplicaSets
> This article explores Kubernetes controllers, focusing on replication controllers and ReplicaSets for managing application availability and scalability.
Hello and welcome to this Kubernetes controllers lesson. I’m Mumshad Mannambeth, and today we will explore how controllers manage your applications’ availability and scalability. Controllers are the brains behind Kubernetes—they monitor objects and respond to any change in the cluster. In this lesson, we will focus on the replication controller and its more advanced successor, the ReplicaSet.
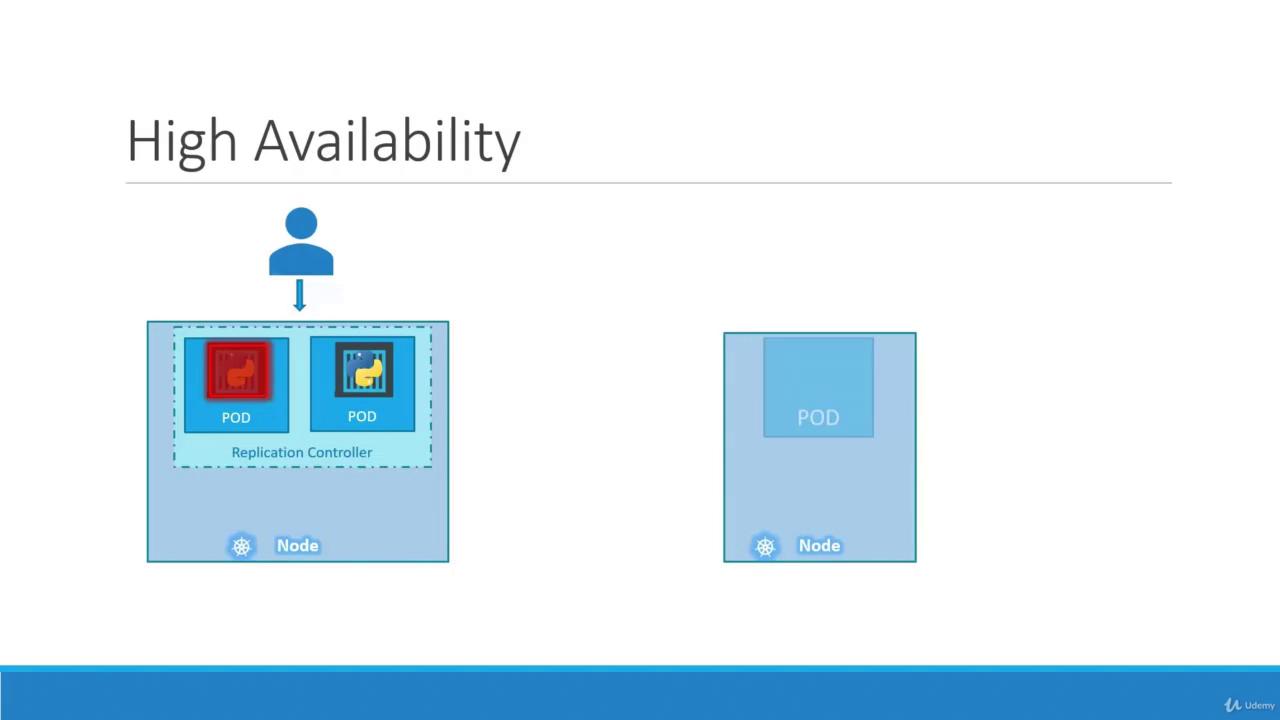
Imagine you have a single Pod running your application. If that Pod crashes, your users immediately lose access. To overcome this, you can run multiple instances (Pods) of the application. The replication controller ensures that a specified number of Pods are running at all times, providing high availability even during failures.
Even when running a single Pod, a replication controller is beneficial because it automatically replaces a failed Pod, ensuring continuous availability. For instance, if one instance fails, another is promptly created to maintain the required Pod count.
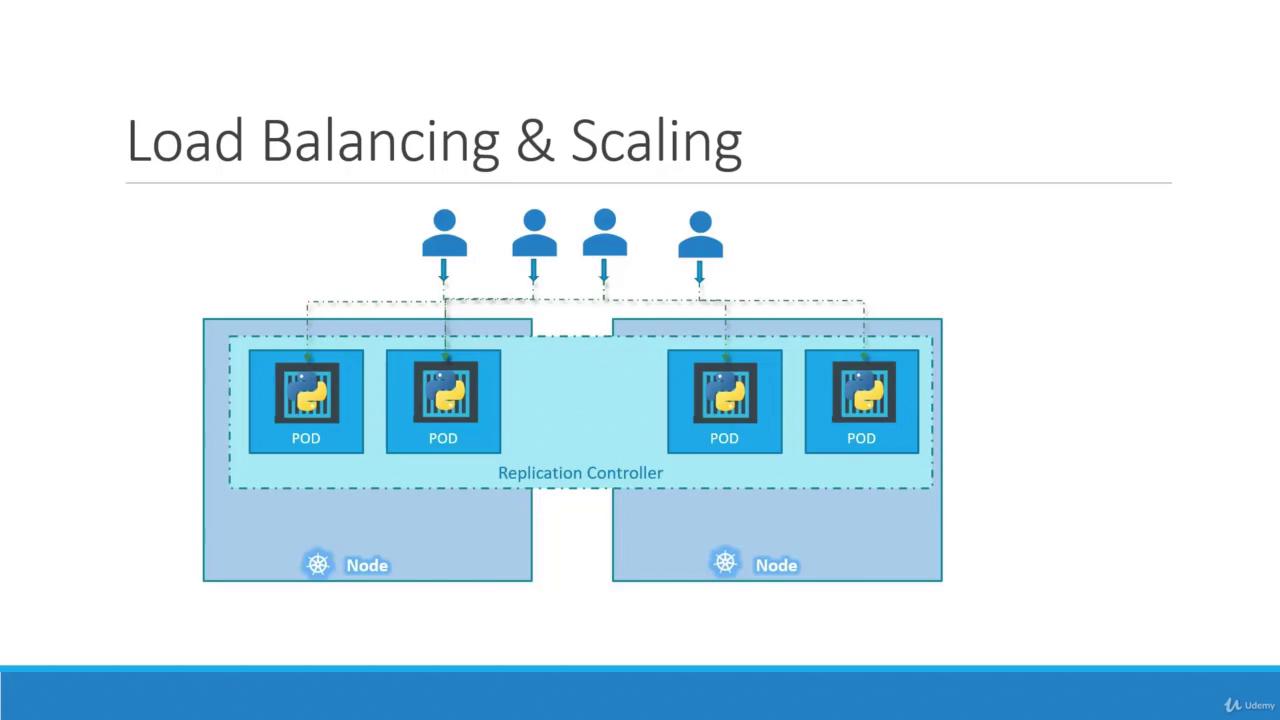
Another important use of the replication controller is load distribution. As user demand grows, additional Pods can be deployed under the controller’s management. If one node runs out of resources, Kubernetes schedules new Pods across other nodes. This efficiently balances the load and scales the application dynamically.
It’s important to understand the difference between a replication controller and a ReplicaSet. While both ensure the desired number of Pods are running, the replication controller is an older technology that is gradually being replaced by the more advanced ReplicaSet. In our examples and demos going forward, we will focus on ReplicaSets, though the core concepts apply to both.
## Creating a Replication Controller
Let’s start by creating a replication controller definition file named `rc-definition.yaml`. Every Kubernetes definition file comprises four main sections: API version, kind, metadata, and spec. For our replication controller:
* **apiVersion:** Set to `v1` because the Replication Controller is supported under this version.
* **kind:** Set to `ReplicationController`.
* **metadata:** Contains the name (`myapp-rc`) and labels (`app` and `type`) for identification.
* **spec:** Defines the desired state, including the number of replicas and a Pod template.
Move the Pod definition (excluding the API version and kind) into the `template` section. Ensure the Pod details are indented correctly under `template` to nest them properly as the replication controller's child.
Below is the combined definition:
```yaml theme={null}
# rc-definition.yaml
apiVersion: v1
kind: ReplicationController
metadata:
name: myapp-rc
labels:
app: myapp
type: front-end
spec:
replicas: 3
template:
metadata:
name: myapp-pod
labels:
app: myapp
type: front-end
spec:
containers:
- name: nginx-container
image: nginx
```
Once you’ve created the file, run the following command to create the replication controller:
```bash theme={null}
kubectl create -f rc-definition.yaml
```
You should see an output confirming that the replication controller “myapp-rc” has been created. To verify, use these commands:
```bash theme={null}
kubectl get replicationcontroller
kubectl get pods
```
The Pods created by the replication controller will have names starting with `myapp-rc`, indicating their management origin.
## Introducing ReplicaSets
The ReplicaSet is the modern, recommended approach for ensuring a specified number of Pod replicas. In a ReplicaSet definition:
* **apiVersion:** Use `apps/v1` (instead of `v1`).
* **kind:** Set to `ReplicaSet`.
* **metadata and template:** Similar to the replication controller, but with an additional required field.
* **selector:** The `matchLabels` selector identifies which Pods are managed by the ReplicaSet. This field is important because it allows the ReplicaSet to adopt existing Pods that match the provided labels.
Below is an example ReplicaSet definition:
```yaml theme={null}
# replicaset-definition.yaml
apiVersion: apps/v1
kind: ReplicaSet
metadata:
name: myapp-replicaset
labels:
app: myapp
type: front-end
spec:
replicas: 3
selector:
matchLabels:
type: front-end
template:
metadata:
name: myapp-pod
labels:
app: myapp
type: front-end
spec:
containers:
- name: nginx-container
image: nginx
```
Create the ReplicaSet using:
```bash theme={null}
kubectl create -f replicaset-definition.yaml
```
Verify its creation with:
```bash theme={null}
kubectl get replicaset
kubectl get pods
```
## Understanding Labels and Selectors
Labels are key-value pairs assigned to Kubernetes objects that enable you to group and select resources. For example, if you deploy three instances of a front-end application as Pods, you can label them accordingly and create a ReplicaSet with a matching selector. This tells the ReplicaSet which Pods to monitor. Even if the Pods already exist, the ReplicaSet will only create new ones if an existing Pod dies, ensuring that the desired number is maintained.
Below is a snippet showing matching labels in a ReplicaSet selector and the corresponding Pod metadata:
```yaml theme={null}
# In the ReplicaSet definition
selector:
matchLabels:
tier: front-end
```
```yaml theme={null}
# In the Pod metadata
metadata:
name: myapp-pod
labels:
tier: front-end
```
Ensure that the labels defined in the ReplicaSet's selector exactly match those in the Pod template. Mismatches can lead to unexpected behavior where the ReplicaSet fails to manage the intended Pods.
## Scaling a ReplicaSet
If you need to scale your ReplicaSet from 3 to 6 replicas, there are two common approaches:
1. **Update the Definition File:**\
Modify the `replicas` field in your `replicaset-definition.yaml` file to 6, then apply the change using:
```bash theme={null}
kubectl replace -f replicaset-definition.yaml
```
2. **Use the kubectl Scale Command:**\
Scale directly from the command line with one of these commands:
```bash theme={null}
kubectl scale --replicas=6 -f replicaset-definition.yaml
```
Or by specifying the ReplicaSet name:
```bash theme={null}
kubectl scale --replicas=6 replicaset/myapp-replicaset
```
Remember that when you use the scale command, the change only affects the running ReplicaSet. The original definition file will still show the previous replica count until you update it.
## Command Review
Below is a quick reference for essential Kubernetes commands used in this lesson:
| Command | Description |
| ------------------------------------- | -------------------------------------------- |
| kubectl create -f \ | Create an object from a file |
| kubectl get replicationcontroller | List all replication controllers |
| kubectl get replicaset | List all ReplicaSets |
| kubectl get pods | List all Pods |
| kubectl delete replicaset \ | Delete a ReplicaSet by name |
| kubectl replace -f \ | Update an existing object using a definition |
| kubectl scale --replicas=\ | Scale an object to the specified number |
This concludes our lesson on replication controllers and ReplicaSets. These controllers ensure that your applications remain highly available, efficiently scaled, and properly load balanced within your Kubernetes cluster.