> ## Documentation Index
> Fetch the complete documentation index at: https://notes.kodekloud.com/llms.txt
> Use this file to discover all available pages before exploring further.
# KubeConfig
> This guide explores kubeconfig files in Kubernetes, focusing on authentication and context management for kubectl to enhance workflow efficiency.
Welcome to this guide on kubeconfig files in Kubernetes. In this article, we will explore how kubeconfig files streamline authentication and context management for kubectl, enhancing your workflow by reducing repetitive command-line options.
So far, you learned how to generate a certificate for a user and how a client can use the certificate file and key to query the Kubernetes REST API. For example, assume your cluster is named "my kube playground." You can send a curl request to the Kubernetes API server with the client certificate, key, and CA certificate:
```bash theme={null}
curl https://my-kube-playground:6443/api/v1/pods \
--key admin.key \
--cert admin.crt \
--cacert ca.crt
```
The API server validates the certificate and responds with output similar to:
```json theme={null}
{
"kind": "PodList",
"apiVersion": "v1",
"metadata": {
"selfLink": "/api/v1/pods"
},
"items": []
}
```
When using kubectl, you normally pass the same connection information with the corresponding options:
```bash theme={null}
kubectl get pods \
--server my-kube-playground:6443 \
--client-key admin.key \
--client-certificate admin.crt \
--certificate-authority ca.crt
```
This command might return:
```text theme={null}
No resources found.
```
Typing these options every time can become tedious. To simplify your workflow, you can move the connection details into a configuration file known as a kubeconfig file. By default, kubectl looks for a file named `config` under the `.kube` directory in your home directory. If the kubeconfig file is in its default location, you don’t have to specify connection options for each command:
```bash theme={null}
kubectl get pods
```
Using a kubeconfig file saves you time by automatically applying connection settings, which means you no longer have to repeatedly supply options like `--client-key` and `--certificate-authority`.
## Kubeconfig Structure
The kubeconfig file is organized into three primary sections:
* **Clusters**: Define the various Kubernetes clusters you need access to. You might have separate clusters for development, testing, production, or different cloud providers.
* **Users**: Define the user accounts holding credentials (such as client certificates and keys) needed to access these clusters.
* **Contexts**: Link clusters and users together. A context specifies which user credentials should be used to access a particular cluster. For example, you could have a context called “admin\@production,” which uses the admin user’s credentials for the production cluster.
These components work together to streamline connectivity and authentication in your Kubernetes environment.
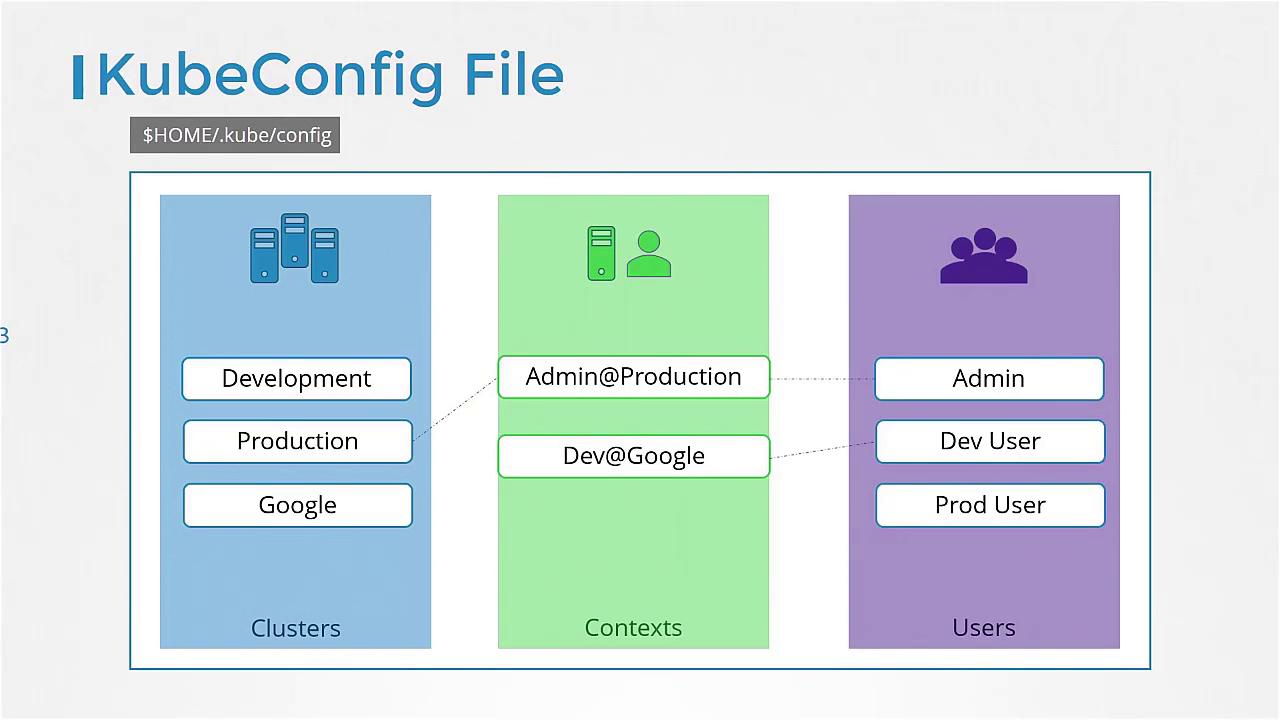
In our example, the server address and CA certificate information belong in the clusters section, while the admin user’s keys and certificates go in the users section. A context then binds these settings together. Below is a sample kubeconfig file in YAML format:
```yaml theme={null}
apiVersion: v1
kind: Config
clusters:
- name: my-kube-playground # values hidden for brevity
- name: development
- name: production
- name: google
contexts:
- name: my-kube-admin@my-kube-playground
- name: dev-user@google
- name: prod-user@production
users:
- name: my-kube-admin
- name: admin
- name: dev-user
- name: prod-user
```
Note that you do not create Kubernetes objects for these configurations. Instead, kubectl reads this file to obtain the necessary connection details.
kubectl selects a context from the kubeconfig based on the `current-context` field. For example, if you set:
```yaml theme={null}
current-context: my-kube-admin@my-kube-playground
```
kubectl will default to that context. Alternatively, you can specify a different kubeconfig file from the command line using the `--kubeconfig` flag:
```bash theme={null}
kubectl config view --kubeconfig=my-custom-config
```
### Default Kubeconfig Example
An example output of the default kubeconfig file might be:
```plaintext theme={null}
apiVersion: v1
kind: Config
current-context: kubernetes-admin@kubernetes
clusters:
- cluster:
certificate-authority-data: REDACTED
server: https://172.17.0.5:6443
name: kubernetes
contexts:
- context:
cluster: kubernetes
user: kubernetes-admin
name: kubernetes-admin@kubernetes
users:
- name: kubernetes-admin
user:
client-certificate-data: REDACTED
client-key-data: REDACTED
```
And when using a custom config file:
```plaintext theme={null}
kubectl config view --kubeconfig=my-custom-config
apiVersion: v1
kind: Config
current-context: my-kube-admin@my-kube-playground
clusters:
- name: my-kube-playground
- name: development
- name: production
contexts:
- name: my-kube-admin@my-kube-playground
- name: prod-user@production
users:
- name: my-kube-admin
- name: prod-user
```
### Switching Contexts
To switch your current context—for example, changing from the my-kube-admin account on the playground cluster to the prod-user account on the production cluster—use the `kubectl config use-context` command:
```bash theme={null}
kubectl config use-context prod-user@production
```
After running this command, your `current-context` in the kubeconfig file updates to `prod-user@production`. You can verify the change by viewing the configuration:
```yaml theme={null}
apiVersion: v1
kind: Config
current-context: prod-user@production
clusters:
- name: my-kube-playground
- name: development
- name: production
contexts:
- name: my-kube-admin@my-kube-playground
- name: prod-user@production
users:
- name: my-kube-admin
- name: prod-user
```
Additional variations of the `kubectl config` command let you update or delete entries within the kubeconfig file as needed.
## Configuring Namespaces
Each Kubernetes cluster can span multiple namespaces. You can designate a default namespace within a context so that switching contexts automatically sets the working namespace. For example, here is a configuration for the production cluster that sets "finance" as the default namespace:
```yaml theme={null}
apiVersion: v1
kind: Config
clusters:
- name: production
cluster:
certificate-authority: ca.crt
server: https://172.17.0.51:6443
contexts:
- name: admin@production
context:
cluster: production
user: admin
namespace: finance
users:
- name: admin
user:
client-certificate: admin.crt
client-key: admin.key
```
When you switch to the `admin@production` context, kubectl will automatically use the `finance` namespace.
## Working with Certificates in Kubeconfig
The kubeconfig file typically references certificate file paths. For clarity and robustness, it is best practice to use the full path to each certificate. Alternatively, you can embed the certificate data directly into the file by base64-encoding the certificate. For instance, instead of defining:
```yaml theme={null}
apiVersion: v1
kind: Config
clusters:
- name: production
cluster:
certificate-authority: /etc/kubernetes/pki/ca.crt
```
you can embed the certificate data:
```yaml theme={null}
apiVersion: v1
kind: Config
clusters:
- name: production
cluster:
certificate-authority-data: LS0tLS1CRUdJTiBDRVJU...
```
If you encounter certificate data in base64 format and need to decode it, use the following command:
```bash theme={null}
echo "LS0t...bnJ" | base64 --decode
```
This command will output the certificate in its standard PEM format:
```text theme={null}
-----BEGIN CERTIFICATE-----
MIICDCCAuCAQAoA...AIBDwAw...-----END CERTIFICATE-----
```
Always ensure that certificate and key files are stored securely and access to the kubeconfig file is restricted to trusted users.
## Summary
In this article, we covered how kubeconfig files simplify connection management for Kubernetes by consolidating user credentials, cluster details, and context settings into a single file. Use this knowledge to streamline your kubectl commands and manage multiple Kubernetes environments effectively.
Next, apply these concepts by creating and troubleshooting your kubeconfig files to enhance your Kubernetes workflow.
For further reading, check out the following resources:
| Resource Type | Description | Link |
| ------------------------ | ------------------------------------ | ------------------------------------------------------------------------------------- |
| Kubernetes Concepts | Overview of Kubernetes functionality | [Kubernetes Basics](https://kubernetes.io/docs/concepts/overview/what-is-kubernetes/) |
| Kubernetes Documentation | Complete documentation and guides | [Kubernetes Documentation](https://kubernetes.io/docs/) |
| Docker Hub | Container images and registry | [Docker Hub](https://hub.docker.com/) |
| Terraform Registry | Infrastructure as Code modules | [Terraform Registry](https://registry.terraform.io/) |