> ## Documentation Index
> Fetch the complete documentation index at: https://notes.kodekloud.com/llms.txt
> Use this file to discover all available pages before exploring further.
# KubeConfig
> This guide explains KubeConfig files in Kubernetes and how they facilitate secure communication with the Kubernetes API server.
Welcome to this guide on KubeConfig files. In this article, we explain how KubeConfig files work in Kubernetes and demonstrate how they simplify secure communication with the Kubernetes API server.
In earlier segments, we covered generating a certificate for a user and how a client uses certificate and key files to query the Kubernetes REST API for a list of pods. In our example, the cluster is named "my-kube-playground". To query the API server using curl, include the client key, client certificate, and CA certificate as options. For instance:
```bash theme={null}
curl https://my-kube-playground:6443/api/v1/pods \
--key admin.key \
--cert admin.crt \
--cacert ca.crt
```
The API server validates these credentials and returns a response similar to the following:
```json theme={null}
{
"kind": "PodList",
"apiVersion": "v1",
"metadata": {
"selfLink": "/api/v1/pods"
},
"items": []
}
```
When using the kubectl command-line tool, you can also supply the certificate and key information as options, eliminating the need to specify them with every command:
```bash theme={null}
kubectl get pods \
--server my-kube-playground:6443 \
--client-key admin.key \
--client-certificate admin.crt \
--certificate-authority ca.crt
```
This command will output:
```text theme={null}
No resources found.
```
Typing these options repeatedly can be cumbersome. Instead, you can consolidate this information into a configuration file called a kubeconfig file. Place the file at the default location (\$HOME/.kube/config) or specify a custom file using the --kubeconfig option. For example, a kubeconfig file might contain:
```text theme={null}
--server my-kube-playground:6443
--client-key admin.key
--client-certificate admin.crt
--certificate-authority ca.crt
kubectl get pods
No resources found.
```
Once the kubeconfig file is stored at \$HOME/.kube/config, kubectl automatically loads it, so you no longer need to specify all the certificate file paths with each command.
The kubeconfig file follows a defined format and is organized into three main sections:
* **Clusters**: Represent the Kubernetes clusters you need access to (e.g., development, testing, production).
* **Users**: Define the credentials that can interact with those clusters (e.g., admin, dev-user, prod-user).
* **Contexts**: Combine clusters and users to specify which user accesses which cluster. For example, the context "admin\@production" designates that the admin account accesses the production cluster.
Below is an illustrative diagram that shows the structure of a KubeConfig file:
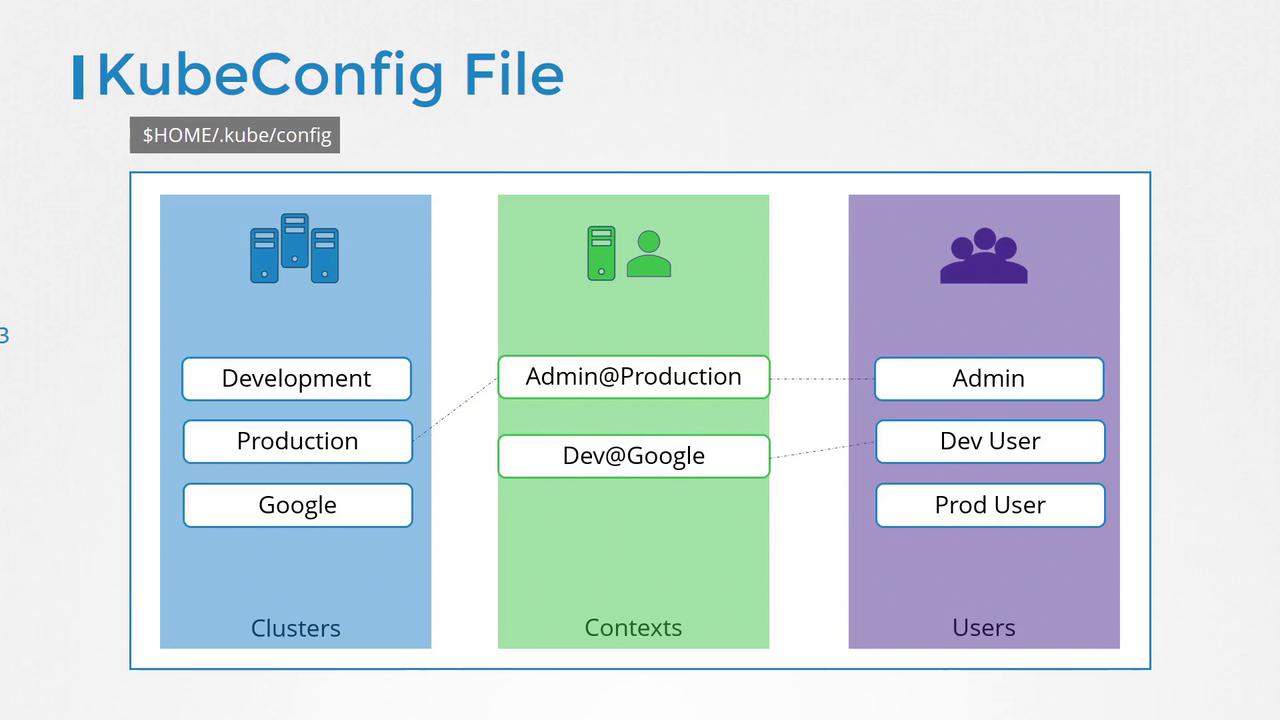
Let's examine a real kubeconfig file in YAML format. Notice it includes the API version set to v1 and the kind set to Config. Clusters, contexts, and users are each specified as an array element, allowing you to store multiple configurations in one file:
```yaml theme={null}
apiVersion: v1
kind: Config
clusters:
- name: my-kube-playground # (values hidden…)
- name: development
- name: production
- name: google
contexts:
- name: my-kube-admin@my-kube-playground
- name: dev-user@google
- name: prod-user@production
users:
- name: my-kube-admin
- name: admin
- name: dev-user
- name: prod-user
```
Once you have configured this file, you don’t need to create any Kubernetes objects—the kubectl tool reads the file and uses the defined configuration automatically. To set a default context, simply update the current-context field. For instance, to default to the context "dev-user\@google", include the following line:
```yaml theme={null}
current-context: dev-user@google
```
You can view your active configuration with:
```bash theme={null}
kubectl config view
```
This command outputs the clusters, contexts, and users along with the current context. If the kubeconfig file is at the default location, it is automatically picked up by kubectl. If you prefer using a custom configuration file, you can specify it as shown below:
```bash theme={null}
kubectl config view --kubeconfig=my-custom-config
```
Below is a sample output from a custom kubeconfig file:
```yaml theme={null}
apiVersion: v1
kind: Config
current-context: my-kube-admin@my-kube-playground
clusters:
- name: my-kube-playground
- name: development
- name: production
contexts:
- name: my-kube-admin@my-kube-playground
- name: prod-user@production
users:
- name: my-kube-admin
- name: prod-user
```
To change your active context, run the following command. For example, to switch from "my-kube-admin\@my-kube-playground" to "prod-user\@production":
```bash theme={null}
kubectl config use-context prod-user@production
```
After executing this command, your kubeconfig file's current-context is updated accordingly:
```yaml theme={null}
apiVersion: v1
kind: Config
current-context: prod-user@production
clusters:
- name: my-kube-playground
- name: development
- name: production
contexts:
- name: my-kube-admin@my-kube-playground
- name: prod-user@production
users:
- name: my-kube-admin
- name: prod-user
```
Another useful feature of kubeconfig files is the ability to set a default namespace within a context. Since a cluster can manage multiple namespaces, specifying a default namespace allows you to bypass using the --namespace flag with every command.
Consider the following configuration without a namespace:
```yaml theme={null}
apiVersion: v1
kind: Config
clusters:
- name: production
cluster:
certificate-authority: ca.crt
server: https://172.17.0.51:6443
contexts:
- name: admin@production
context:
cluster: production
user: admin
users:
- name: admin
user:
client-certificate: admin.crt
client-key: admin.key
```
By adding the namespace field to the context, kubectl automatically switches to the specified namespace ("finance" in this example):
```yaml theme={null}
apiVersion: v1
kind: Config
clusters:
- name: production
cluster:
certificate-authority: ca.crt
server: https://172.17.0.51:6443
contexts:
- name: admin@production
context:
cluster: production
user: admin
namespace: finance
users:
- name: admin
user:
client-certificate: admin.crt
client-key: admin.key
```
For improved security and portability, it is recommended to use the full file paths for certificate files. Alternatively, you can embed the actual certificate content (in base64 format) using the certificate-authority-data field.
For example, you can include the certificate data directly in the kubeconfig file like so:
```yaml theme={null}
apiVersion: v1
kind: Config
clusters:
- name: production
cluster:
certificate-authority: /etc/kubernetes/pki/ca.crt
certificate-authority-data: LS0tLS1CRUdJTiBDRVJU...
```
If you encounter a certificate in base64 encoded format, you can decode it as required, ensuring flexibility in managing your credentials.
That’s the end of this guide. For further practice, explore the practice exercises section to work with KubeConfig files and troubleshoot common issues. Happy learning!