> ## Documentation Index
> Fetch the complete documentation index at: https://notes.kodekloud.com/llms.txt
> Use this file to discover all available pages before exploring further.

# Demo Building CLI Tools

> Shows how to build small CLI tools in Python, Go, and C++ with runnable examples including a project generator, Vue demo, CSV to JSON converter, and a password generator

In this lesson we build several small, focused CLI utilities to show how quickly useful command-line tools can be scaffolded in different languages. The examples alternate between Python, Go, and C++ to demonstrate differences in ergonomics, deployment, and performance. Each example includes a runnable implementation, usage examples, and notes on why you might pick one language over another for a particular task.

Table of contents:

* Python: Project structure generator
* Vue demo: the generated app
* Go: CSV → JSON converter
* C++: Password generator (macOS)
* Why CLI utilities are useful
* Links and references

***

## 1) Python — Project Structure Generator

Goal: create a small Python CLI script, `project_generator.py`, that generates boilerplate project folders in a `dist/` directory. This generator keeps things simple and file-system focused — no external dependencies required.

Supported project types:

* `html` — generates `index.html`, `style.css`, and `scripts.js`
* `vue` — generates a minimal Vue-style app (simple `index.html`, `style.css`, `app.js`)

Example usage:

```bash theme={null}
# Create HTML project
python3 project_generator.py html my-html-site

# Create Vue project
python3 project_generator.py vue my-vue-app

# Show help
python3 project_generator.py --help
```

How it works (concise implementation):

```python theme={null}
#!/usr/bin/env python3
import argparse
from pathlib import Path
import sys

TEMPLATES = {
    "html": {
        "index.html": """<!doctype html>
<html lang="en">
<head>
  <meta charset="utf-8">
  <meta name="viewport" content="width=device-width,initial-scale=1">
  <title>My HTML Project</title>
  <link rel="stylesheet" href="style.css">
</head>
<body>
  <header><h1>Welcome to My HTML Project</h1></header>
  <main>
    <section class="hero">
      <h2>Hello, World!</h2>
      <p>This is a simple HTML boilerplate project.</p>
      <button id="demo-btn">Click Me</button>
    </section>
    <section class="content">
      <h3>About This Project</h3>
      <p>This project includes HTML, CSS, and JavaScript files to get you started.</p>
    </section>
  </main>
  <footer><p>&copy; 2024 My HTML Project. All rights reserved.</p></footer>
  <script src="scripts.js"></script>
</body>
</html>
""",
        "style.css": """/* Basic styles for demo */
body { font-family: system-ui, -apple-system, "Segoe UI", Roboto, sans-serif; margin:0; padding:0; }
header { background:#0ea5e9; color:white; padding:1rem; text-align:center; }
.hero { padding:2rem; text-align:center; }
button { padding:0.5rem 1rem; border-radius:4px; }
""",
        "scripts.js": """document.getElementById('demo-btn')?.addEventListener('click', () => {
  alert('Hello from your boilerplate!');
});
"""
    },
    "vue": {
        "index.html": """<!doctype html>
<html lang="en">
<head>
  <meta charset="utf-8">
  <meta name="viewport" content="width=device-width,initial-scale=1">
  <title>My Vue.js App</title>
  <link rel="stylesheet" href="style.css">
</head>
<body>
  <div id="app">
    <h1>My Vue.js App</h1>
    <div id="counter">
      <p>Count: <span id="count">0</span></p>
      <button id="inc">Increment</button>
      <button id="dec">Decrement</button>
      <button id="reset">Reset</button>
    </div>
    <div id="todo">
      <h2>Simple Todo</h2>
      <input id="todo-input" placeholder="New todo">
      <button id="add">Add</button>
      <ul id="todos"></ul>
    </div>
  </div>
  <script src="app.js"></script>
</body>
</html>
""",
        "style.css": "/* Minimal Vue demo styles */\nbody{font-family:system-ui;padding:1rem}\n",
        "app.js": """// Minimal vanilla JS demo for Vue-like behavior
let count = 0;
const countEl = document.getElementById('count');
document.getElementById('inc').addEventListener('click', () => countEl.textContent = ++count);
document.getElementById('dec').addEventListener('click', () => countEl.textContent = --count);
document.getElementById('reset').addEventListener('click', () => { count = 0; countEl.textContent = count; });

const todos = [];
const todosEl = document.getElementById('todos');
document.getElementById('add').addEventListener('click', () => {
  const input = document.getElementById('todo-input');
  if (!input.value) return;
  todos.push(input.value);
  const li = document.createElement('li');
  li.textContent = input.value;
  const btn = document.createElement('button');
  btn.textContent = 'Remove';
  btn.addEventListener('click', () => li.remove());
  li.appendChild(btn);
  todosEl.appendChild(li);
  input.value = '';
});
"""
    }
}

def create_project(kind: str, name: str, outdir: Path):
    target = outdir / name
    if target.exists():
        print(f"Error: {target} already exists.", file=sys.stderr)
        sys.exit(1)
    target.mkdir(parents=True)
    for fname, content in TEMPLATES[kind].items():
        (target / fname).write_text(content, encoding="utf-8")
    print(f"Successfully created '{kind}' project: {target}")

def main():
    parser = argparse.ArgumentParser(description="Generate project boilerplates")
    parser.add_argument("project_type", choices=TEMPLATES.keys())
    parser.add_argument("project_name")
    parser.add_argument("--dist", default="dist", help="Output folder")
    args = parser.parse_args()

    outdir = Path(args.dist)
    outdir.mkdir(exist_ok=True)
    create_project(args.project_type, args.project_name, outdir)

if __name__ == "__main__":
    main()
```

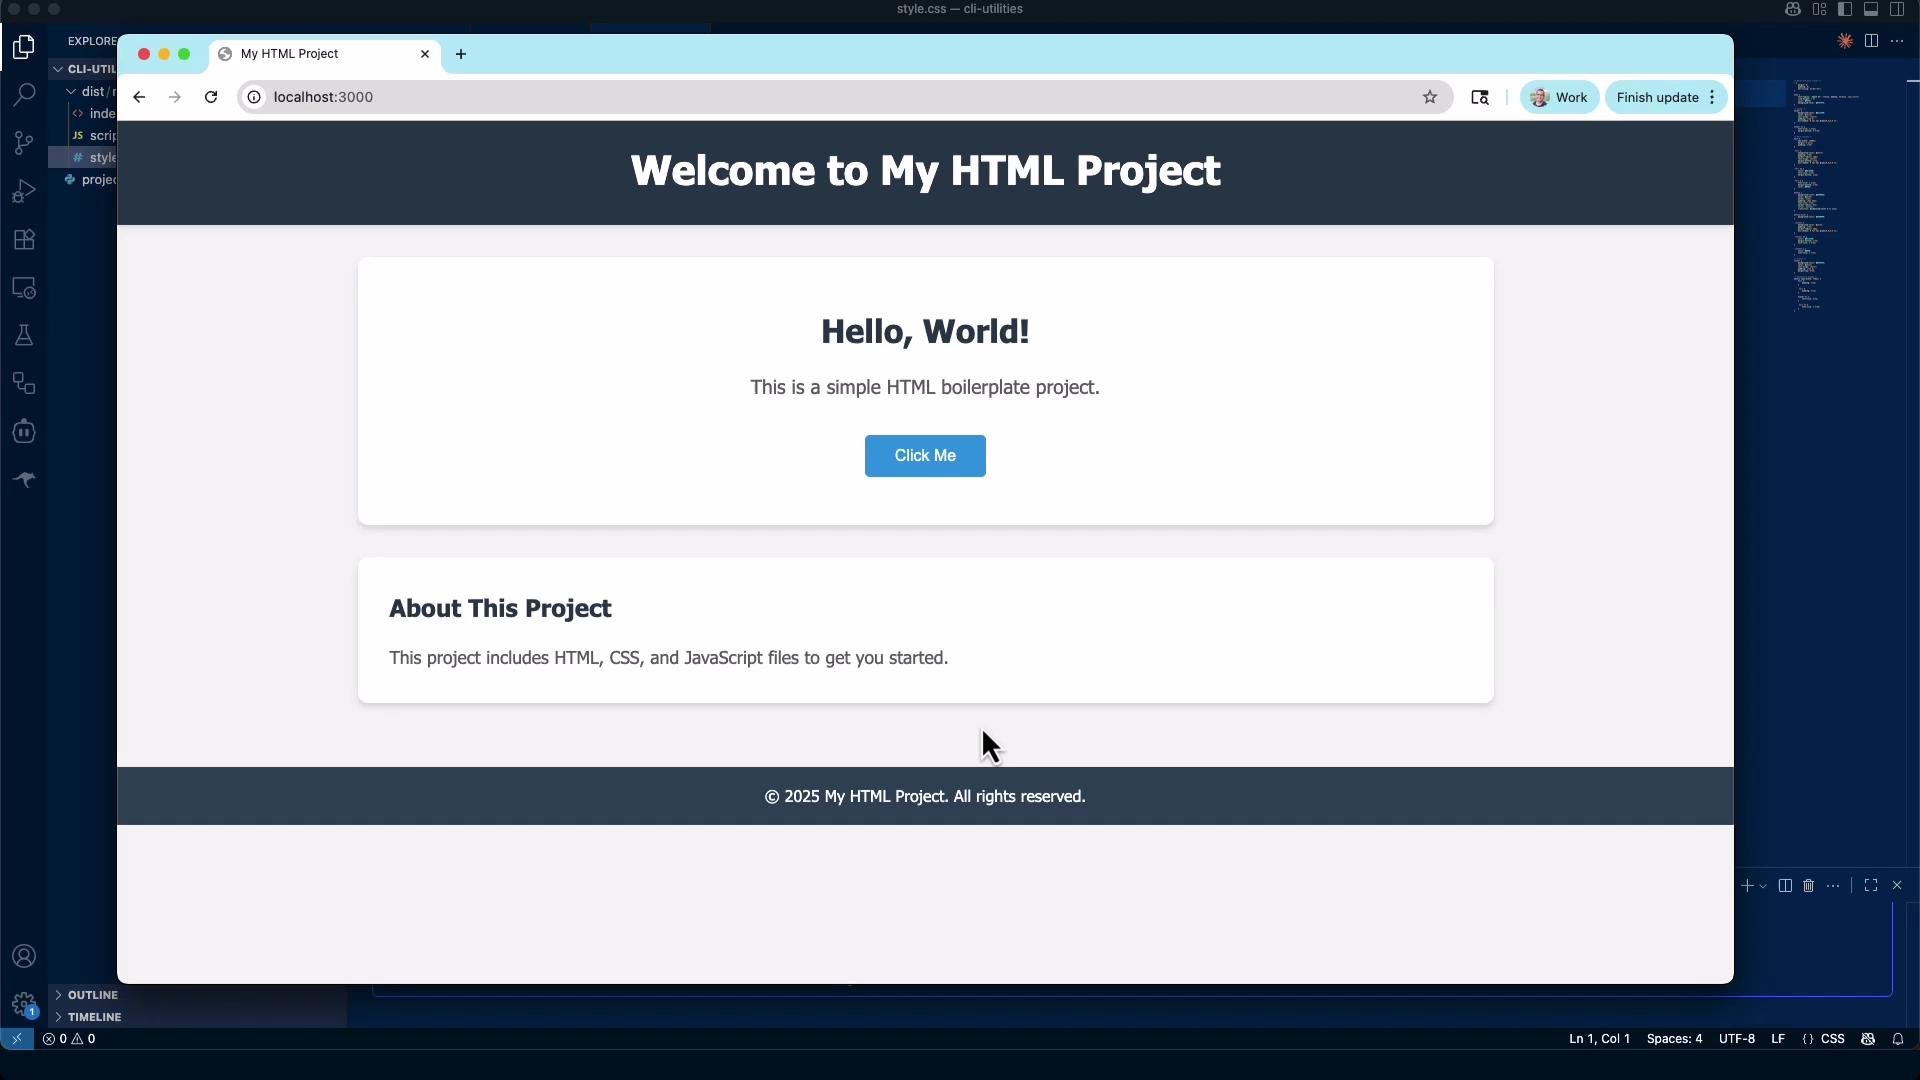
What you get: running the HTML generator creates a small styled page with a hero section and a button wired to `scripts.js`. This is a simple, editable starting point suitable for demos or rapid prototyping.

<Frame>
  <img src="https://mintcdn.com/kodekloud-c4ac6d9a/4gvfMR9MneljS-Uy/images/Claude-Code-For-Beginners/Advanced-Features/Demo-Building-CLI-Tools/html-welcome-hello-world-card-editor.jpg?fit=max&auto=format&n=4gvfMR9MneljS-Uy&q=85&s=bb8902d78fd15474b255972b29b2af58" alt="A browser screenshot showing a &#x22;Welcome to My HTML Project&#x22; page with a large &#x22;Hello, World!&#x22; card, a &#x22;Click Me&#x22; button, and an &#x22;About This Project&#x22; section. The page is displayed over a code editor workspace in the background." width="1920" height="1080" data-path="images/Claude-Code-For-Beginners/Advanced-Features/Demo-Building-CLI-Tools/html-welcome-hello-world-card-editor.jpg" />
</Frame>

Test the generator’s help and argument validation:

```bash theme={null}
python3 project_generator.py --help
# usage: project_generator.py [-h] {html,vue} project_name
```

Invalid choices are reported by argparse:

```bash theme={null}
python3 project_generator.py invalid test-project
# project_generator.py: error: argument project_type: invalid choice: 'invalid' (choose from 'html', 'vue')
```
<Callout icon="lightbulb" color="#1CB2FE">
  Prefer running generators from a virtual environment or a controlled project directory to avoid accidentally writing files in the wrong place.
</Callout>

***

## 2) Vue demo (the generated app)

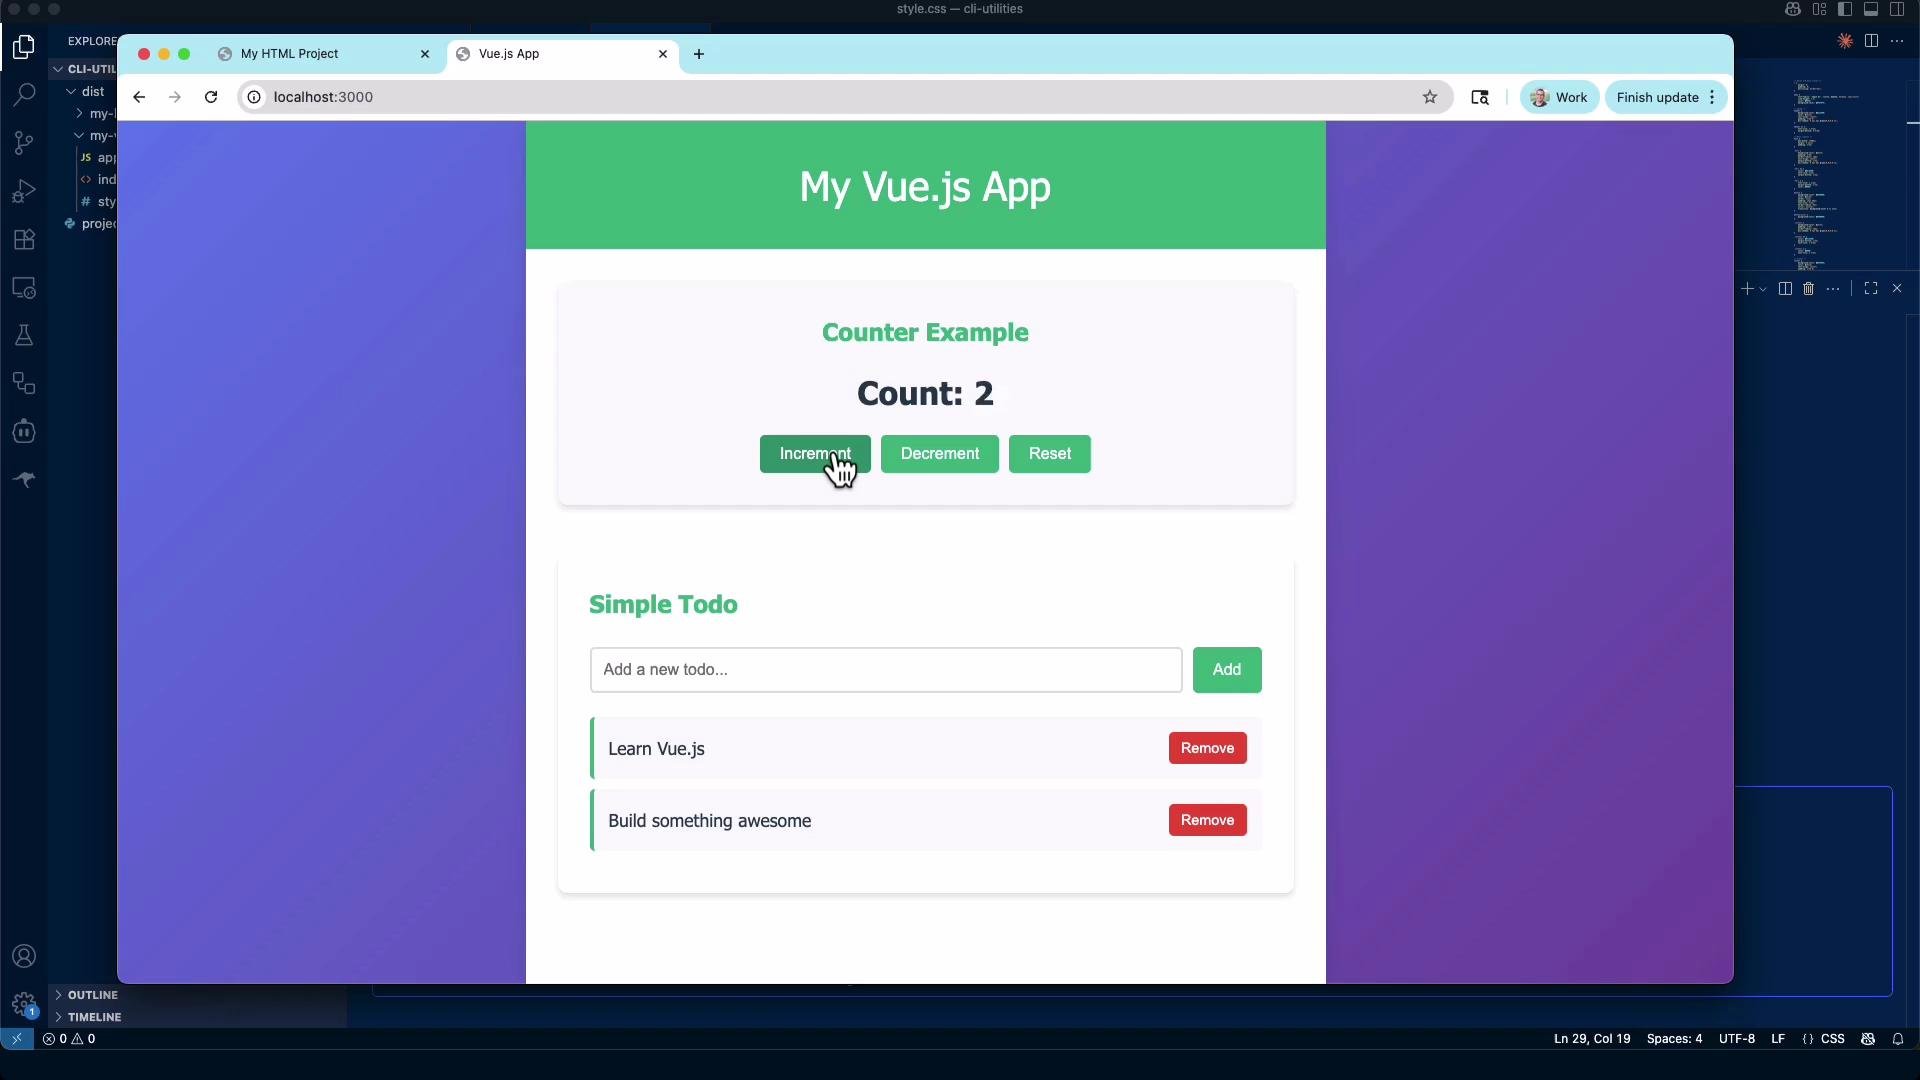
The Vue-style generator produces a minimal client-side demo: a counter and a tiny todo list implemented in plain JavaScript. The intent is demonstration, not a full Vue build pipeline — you can later migrate the generated files to a modern Vue project if you want to add components, bundling, or state management.

Test and extend:

* Open `dist/<project>/index.html` in a browser to interact with the demo.
* Edit `app.js` to add features, then port into a Vue CLI / Vite setup if you need a build toolchain.

<Frame>
  <img src="https://mintcdn.com/kodekloud-c4ac6d9a/4gvfMR9MneljS-Uy/images/Claude-Code-For-Beginners/Advanced-Features/Demo-Building-CLI-Tools/vuejs-counter-todo-app.jpg?fit=max&auto=format&n=4gvfMR9MneljS-Uy&q=85&s=4e3ce5009f751277659fcb7f977bd3f4" alt="A browser screenshot of a &#x22;My Vue.js App&#x22; page showing a &#x22;Counter Example&#x22; (Count: 2) with Increment/Decrement/Reset buttons and a &#x22;Simple Todo&#x22; section containing an input, Add button, and two todo items each with Remove buttons." width="1920" height="1080" data-path="images/Claude-Code-For-Beginners/Advanced-Features/Demo-Building-CLI-Tools/vuejs-counter-todo-app.jpg" />
</Frame>

***

## 3) Go — CSV to JSON CLI

Goal: implement a small Go CLI (example name `csv-to-json` or `main.go`) that reads `data/contacts.csv` and outputs JSON to stdout. Add a `-limit` flag to restrict the number of returned records. If `-limit` is omitted, return all records.

Usage:

```bash theme={null}
# All records
go run main.go

# Limit to first 5 records
go run main.go -limit=5

# Specify an alternative CSV file
go run main.go -file=other.csv -limit=10
```

Concise `main.go` example:

```go theme={null}
package main

import (
	"encoding/csv"
	"encoding/json"
	"flag"
	"fmt"
	"io"
	"os"
	"strconv"
)

type Contact struct {
	ID        int    `json:"id"`
	FirstName string `json:"first_name"`
	LastName  string `json:"last_name"`
	JobTitle  string `json:"job_title"`
	Email     string `json:"email"`
}

func main() {
	limit := flag.Int("limit", 0, "limit number of records (0 = all)")
	csvPath := flag.String("file", "data/contacts.csv", "path to CSV file")
	flag.Parse()

	f, err := os.Open(*csvPath)
	if err != nil {
		fmt.Fprintf(os.Stderr, "Error opening CSV file: %v\n", err)
		os.Exit(1)
	}
	defer f.Close()

	r := csv.NewReader(f)
	// Read header
	headers, err := r.Read()
	if err != nil {
		fmt.Fprintf(os.Stderr, "Error reading header: %v\n", err)
		os.Exit(1)
	}
	_ = headers // header names are known in this format

	var contacts []Contact
	for {
		if *limit > 0 && len(contacts) >= *limit {
			break
		}
		record, err := r.Read()
		if err == io.EOF {
			break
		}
		if err != nil {
			fmt.Fprintf(os.Stderr, "Error reading record: %v\n", err)
			os.Exit(1)
		}
		id, _ := strconv.Atoi(record[0])
		contacts = append(contacts, Contact{
			ID:        id,
			FirstName: record[1],
			LastName:  record[2],
			JobTitle:  record[3],
			Email:     record[4],
		})
	}

	enc := json.NewEncoder(os.Stdout)
	enc.SetIndent("", "  ")
	if err := enc.Encode(contacts); err != nil {
		fmt.Fprintf(os.Stderr, "Error encoding JSON: %v\n", err)
		os.Exit(1)
	}
}
```

Notes:

* This example assumes a CSV header `id,first_name,last_name,job_title,email`.
* Flags: `-limit` to cap results and `-file` to point to another CSV.
* The program pretty-prints JSON to stdout so you can pipe or redirect it easily.

Example commands:

```bash theme={null}
# Show first 3 records
go run main.go -limit=3

# All records (may be many) — pipe through `head` if you want a preview
go run main.go | head -n 20
```

Why Go for small CLIs:

* Single static binary output (deployable without runtime)
* Fast build times and simple dependency model
* Strong standard library for encoding/IO tasks

***

## 4) C++ — Password generator CLI (macOS)

Goal: build `passgen`, a small C++ CLI that emits secure-looking passwords. Options:

* `-l`, `--length` (default 16)
* `-c`, `--count` (how many passwords to print)
* `--no-symbols` (omit symbol characters)
* `--help`

Important security note: this example seeds a PRNG using `std::random_device` and uses `std::mt19937`. `std::mt19937` is fast and suitable for many tasks, but it is not cryptographically secure. For production-grade passwords, use an OS-provided CSPRNG (e.g., `arc4random_buf` on BSD/macOS or `getrandom` on Linux) or a dedicated crypto library.

<Callout icon="warning" color="#FF6B6B">
  This example uses std::mt19937 seeded with std::random\_device. For production-grade cryptographic passwords, use an OS-provided CSPRNG or a cryptographic library (std::mt19937 is not cryptographically secure).
</Callout>

Compact `passgen.cpp` (POSIX/macOS-friendly):

```c++ theme={null}
#include <algorithm>
#include <cstdlib>
#include <getopt.h>
#include <iostream>
#include <random>
#include <string>
#include <vector>

std::string build_charset(bool include_symbols) {
    std::string lower = "abcdefghijklmnopqrstuvwxyz";
    std::string upper = "ABCDEFGHIJKLMNOPQRSTUVWXYZ";
    std::string digits = "0123456789";
    std::string symbols = "!@#$%^&*()-_=+[]{};:,.<>/?";
    std::string charset = lower + upper + digits;
    if (include_symbols) charset += symbols;
    return charset;
}

std::string generate_password(std::mt19937 &rng, const std::string &charset, int length) {
    std::uniform_int_distribution<> dist(0, (int)charset.size()-1);
    std::string out;
    out.reserve(length);
    for (int i = 0; i < length; ++i) {
        out.push_back(charset[dist(rng)]);
    }
    return out;
}

int main(int argc, char **argv) {
    int length = 16, count = 1;
    bool include_symbols = true;

    static struct option long_options[] = {
        {"length", required_argument, nullptr, 'l'},
        {"count", required_argument, nullptr, 'c'},
        {"no-symbols", no_argument, nullptr, 1},
        {"help", no_argument, nullptr, 'h'},
        {nullptr, 0, nullptr, 0}
    };

    int opt;
    while ((opt = getopt_long(argc, argv, "l:c:h", long_options, nullptr)) != -1) {
        switch (opt) {
            case 'l': length = std::stoi(optarg); break;
            case 'c': count = std::stoi(optarg); break;
            case 'h': std::cout << "Usage: passgen [--length N] [--count N] [--no-symbols]\n"; return 0;
            case 1: include_symbols = false; break;
            default: break;
        }
    }

    std::random_device rd;
    std::mt19937 rng(rd());
    std::string charset = build_charset(include_symbols);

    for (int i = 0; i < count; ++i) {
        std::cout << generate_password(rng, charset, length) << "\n";
    }
    return 0;
}
```

Makefile (macOS clang++):

```makefile theme={null}
CXX = clang++
CXXFLAGS = -std=c++17 -O2 -Wall -Wextra
TARGET = passgen
SOURCE = passgen.cpp

$(TARGET): $(SOURCE)
	$(CXX) $(CXXFLAGS) -o $(TARGET) $(SOURCE)

clean:
	rm -f $(TARGET)
```

Usage:

```bash theme={null}
# Compile
make

# Default 16-character password
./passgen

# Generate 3 passwords with 32 characters each
./passgen -l 32 -c 3

# Generate password without symbols
./passgen --no-symbols

# Show help
./passgen --help
```

***

## Quick comparison: when to use which language

| Resource Type | Best for                                           | Example in this lesson                               |
| ------------: | -------------------------------------------------- | ---------------------------------------------------- |
|        Python | Fast scripting, file generation, glue code         | Project structure generator (`project_generator.py`) |
|            Go | Single-binary CLIs, concurrency, I/O tools         | CSV → JSON converter (`main.go`)                     |
|           C++ | Low-level control, performance-sensitive utilities | Password generator (`passgen.cpp`)                   |

***

## Why CLI utilities are useful

1. Automation: batch process files, convert formats, and apply transformations programmatically.
2. CI/CD integration: use micro-utilities for formatting, validation, conversion (CSV → JSON), and other pipeline tasks.
3. Portability: compiled tools (Go/C++) can be easily distributed as single binaries; scripts (Python) are quick to iterate on.

This lesson demonstrates that small, well-scoped CLIs can be created quickly and evolve into production-grade tools with additions like testing, logging, packaging, and secure random sources.

If you want any example expanded — for example, unit tests for the Python generator, a packaged Go binary with module setup, or a C++ version that uses OS CSPRNG APIs — tell me which one and I’ll add the details.

## Links and references

* [Python argparse documentation](https://docs.python.org/3/library/argparse.html)
* [Go encoding/csv and encoding/json docs](https://pkg.go.dev/encoding/csv), [https://pkg.go.dev/encoding/json](https://pkg.go.dev/encoding/json)
* [C++ random library reference](https://en.cppreference.com/w/cpp/numeric/random)
* [Kubernetes Basics (example external link)](https://kubernetes.io/docs/concepts/overview/what-is-kubernetes/)

<CardGroup>
  <Card title="Watch Video" icon="video" cta="Learn more" href="https://learn.kodekloud.com/user/courses/claude-code-for-beginners/module/a295c914-f61e-47bb-8adc-7a3145745aa6/lesson/4a2e1647-e97b-4912-8098-f73fac76dd78" />
</CardGroup>