> ## Documentation Index
> Fetch the complete documentation index at: https://notes.kodekloud.com/llms.txt
> Use this file to discover all available pages before exploring further.
# Demo CICD Pipeline Setup
> Guide to building a GitHub Actions CI CD pipeline that runs tests and deploys a Flask Wi‑Fi QR code generator to an Ubuntu EC2 server over SSH
In this lesson we'll build a simple CI/CD pipeline for a Flask application that generates Wi‑Fi QR codes. The pipeline uses GitHub Actions to run tests and deploy the app to an Ubuntu EC2 instance over SSH whenever changes are merged into `main`.
Goals
* Validate code with automated tests (pytest) on PRs and pushes.
* On merge to `main`, deploy the latest code to an Ubuntu EC2 server via SSH.
* Keep deployment credentials in GitHub Actions Secrets and automate the server-side deployment with a reusable `deploy.sh` script and a systemd service.
This guide shows a practical, production-focused example: local development → CI tests in GitHub Actions → SSH deploy to an Ubuntu EC2 instance. Adjust versions and service names to match your environment.
## Overview
* Application: Flask web app that constructs a Wi‑Fi QR payload and returns a generated QR image.
* CI/CD: GitHub Actions runs tests and, on merge to `main`, SSHes into the EC2 server to pull the latest code and restart services.
* Server setup: `deploy.sh` handles package installation, virtual environment setup, nginx configuration, and creation of a systemd service unit.
## Quick file/resource map
| Resource | Purpose | Example path / name |
| ------------------: | ----------------------------------------------- | ----------------------------------------------- |
| Flask app | Generate Wi‑Fi QR payloads and render QR images | `app.py` |
| Deploy script | Server-side initial setup & one-time tasks | `deploy.sh` |
| GH Actions workflow | Run tests and trigger remote deploy | `.github/workflows/deploy.yml` |
| systemd unit | Run Flask app under virtualenv | `/etc/systemd/system/wifi-qr-generator.service` |
| nginx site config | Reverse proxy to the Flask app | `/etc/nginx/sites-available/wifi-qr-generator` |
## Application (app.py)
Below is a consolidated, production-friendly core of the Flask application used in the demo. This includes safe escaping for Wi‑Fi QR payload fields and a minimal route that returns a base64-encoded QR image suitable for embedding in templates.
```python theme={null}
# app.py
from flask import Flask, render_template, request, jsonify
import io
import base64
import qrcode
import os
app = Flask(__name__)
def escape_wifi_text(s: str) -> str:
"""
Escape special characters per Wi‑Fi QR standard: backslash, semicolon, comma, colon, and quotes.
"""
if s is None:
return ""
s = s.replace("\\", "\\\\")
s = s.replace(";", r"\;").replace(",", r"\,").replace(":", r"\:")
s = s.replace("'", r"\'").replace('"', r'\"')
return s
def build_wifi_payload(ssid: str, password: str, auth: str, hidden: bool) -> str:
"""
Build the Wi‑Fi QR payload:
WIFI:T:;S:;P:;H:;;
When auth is "nopass" omit the P: field.
"""
auth_map = {"WPA/WPA2/WPA3": "WPA", "WEP": "WEP", "None (open)": "nopass"}
t = auth_map.get(auth, "WPA")
ssid_e = escape_wifi_text(ssid or "")
pwd_e = escape_wifi_text(password or "")
hidden_str = "true" if hidden else "false"
if t == "nopass":
payload = f"WIFI:T:{t};S:{ssid_e};H:{hidden_str};;"
else:
payload = f"WIFI:T:{t};S:{ssid_e};P:{pwd_e};H:{hidden_str};;"
return payload
def qr_image_base64(data: str, box_size: int = 10, border: int = 4) -> str:
qr = qrcode.QRCode(box_size=box_size, border=border)
qr.add_data(data)
qr.make(fit=True)
img = qr.make_image(fill_color="black", back_color="white")
buffer = io.BytesIO()
img.save(buffer, format="PNG")
encoded = base64.b64encode(buffer.getvalue()).decode("ascii")
return f"data:image/png;base64,{encoded}"
@app.route("/", methods=["GET"])
def index():
# Render a simple form (templates/index.html)
return render_template("index.html")
@app.route("/generate", methods=["POST"])
def generate():
ssid = request.form.get("ssid", "")
password = request.form.get("password", "")
auth = request.form.get("auth", "WPA/WPA2/WPA3")
hidden = request.form.get("hidden", "false") == "true"
payload = build_wifi_payload(ssid, password, auth, hidden)
img_b64 = qr_image_base64(payload)
return jsonify({"payload": payload, "image": img_b64})
if __name__ == "__main__":
# Use FLASK_ENV for backward compatibility with older setups, but prefer explicit config.
debug_mode = os.getenv("FLASK_ENV") == "development" or os.getenv("FLASK_DEBUG") == "1"
app.run(debug=debug_mode, host="0.0.0.0", port=5001)
```
Note: In modern Flask versions, `FLASK_ENV` may be deprecated. Prefer configuring environment variables or a config object (e.g., `FLASK_DEBUG`) for new projects.
## What we want from CI/CD
* Run tests (pytest) for pull requests and on push.
* On merge to `main`, connect to the EC2 server via SSH to:
* Pull the latest code
* Create/activate a virtualenv and (re)install dependencies
* Restart the systemd service and reload nginx
* Store the EC2 host, user, and private key in repository Secrets in GitHub.
## GitHub Actions workflow (example)
This workflow runs tests and, when merged to `main`, deploys via SSH by executing a remote script block.
```yaml theme={null}
# .github/workflows/deploy.yml (excerpt)
name: CI/CD Deploy
on:
push:
branches: [ main ]
pull_request:
branches: [ main ]
jobs:
test:
runs-on: ubuntu-latest
steps:
- uses: actions/checkout@v4
- name: Set up Python
uses: actions/setup-python@v4
with:
python-version: '3.11'
- name: Install dependencies and run tests
run: |
python -m pip install --upgrade pip
pip install -r requirements.txt
pytest
deploy:
needs: test
runs-on: ubuntu-latest
if: github.ref == 'refs/heads/main'
steps:
- uses: actions/checkout@v4
- name: Set up Python
uses: actions/setup-python@v4
with:
python-version: '3.11'
- name: Run tests
run: |
python -m pip install --upgrade pip
pip install -r requirements.txt
pytest
- name: Setup SSH key
run: |
mkdir -p ~/.ssh
printf '%s\n' "${{ secrets.EC2_SSH_KEY }}" > ~/.ssh/deploy_key
chmod 600 ~/.ssh/deploy_key
ssh-keyscan -H ${{ secrets.EC2_HOST }} >> ~/.ssh/known_hosts
- name: Test SSH connection
run: |
ssh -i ~/.ssh/deploy_key -o StrictHostKeyChecking=no -o ConnectTimeout=10 \
${{ secrets.EC2_USER }}@${{ secrets.EC2_HOST }} "echo 'SSH connection successful'"
- name: Deploy to EC2
run: |
ssh -i ~/.ssh/deploy_key -o StrictHostKeyChecking=no \
${{ secrets.EC2_USER }}@${{ secrets.EC2_HOST }} << 'EOF'
cd /opt/wifi-qr-generator
git fetch origin
git reset --hard origin/main
if [ ! -d "venv" ]; then
python3 -m venv venv
fi
source venv/bin/activate
pip install --upgrade pip
pip install -r requirements.txt
sudo systemctl restart wifi-qr-generator
sudo systemctl reload nginx
sudo systemctl is-active --quiet wifi-qr-generator && echo "Service is running" || echo "Service failed to start"
EOF
```
## The server-side deploy script (deploy.sh)
`deploy.sh` is intended for initial server bootstrap and can also be used for manual re-deploys. Below is an improved, annotated excerpt that you can place in your repo and run once on the EC2 instance during initial setup.
```bash theme={null}
#!/bin/bash
set -euo pipefail
APP_DIR="/opt/wifi-qr-generator"
REPO_URL="https://github.com/YOUR_USERNAME/WIFI-QR-Code-Generator.git"
SERVICE_NAME="wifi-qr-generator"
USER="${SUDO_USER:-$(whoami)}"
echo "Starting deployment of WiFi QR Generator..."
sudo apt update
sudo apt upgrade -y
sudo apt install -y python3 python3-pip python3-venv nginx git
# Create app directory and ensure ownership
sudo mkdir -p "$APP_DIR"
sudo chown "$USER:$USER" "$APP_DIR"
if [ -d "$APP_DIR/.git" ]; then
echo "Repository exists, pulling latest changes..."
cd "$APP_DIR"
git fetch origin
git reset --hard origin/main
else
echo "Cloning repository..."
git clone "$REPO_URL" "$APP_DIR"
cd "$APP_DIR"
fi
python3 -m venv venv
source venv/bin/activate
pip install --upgrade pip
pip install -r requirements.txt
# Example nginx config copy (ensure your repo includes nginx.conf file)
if [ -f "nginx.conf" ]; then
sudo cp nginx.conf /etc/nginx/sites-available/$SERVICE_NAME
sudo ln -sf /etc/nginx/sites-available/$SERVICE_NAME /etc/nginx/sites-enabled/$SERVICE_NAME
fi
# Create a systemd service file if not present (make sure the unit file is included in repo or create it)
if [ ! -f "/etc/systemd/system/$SERVICE_NAME.service" ]; then
echo "Please add a systemd unit file at /etc/systemd/system/$SERVICE_NAME.service or include it in the repository."
fi
sudo systemctl daemon-reload
sudo systemctl enable --now $SERVICE_NAME
sudo systemctl enable --now nginx
echo "Deployment completed successfully!"
echo "Your application should be accessible at http://YOUR_EC2_PUBLIC_IP"
echo "To view logs: sudo journalctl -u $SERVICE_NAME -f"
```
## Production systemd unit (example)
Ensure the service runs using the virtualenv's Python interpreter and restarts automatically.
```ini theme={null}
# /etc/systemd/system/wifi-qr-generator.service (example)
[Unit]
Description=WiFi QR Generator Flask App
After=network.target
[Service]
User=ubuntu
WorkingDirectory=/opt/wifi-qr-generator
Environment=PATH=/opt/wifi-qr-generator/venv/bin
Environment=FLASK_APP=app.py
Environment=FLASK_ENV=production
ExecStart=/opt/wifi-qr-generator/venv/bin/python app.py
Restart=always
RestartSec=3
StandardOutput=journal
StandardError=journal
[Install]
WantedBy=multi-user.target
```
Note: `FLASK_ENV` is used here for clarity in the demo, but in new Flask releases prefer using `FLASK_DEBUG` or explicit configuration within your application.
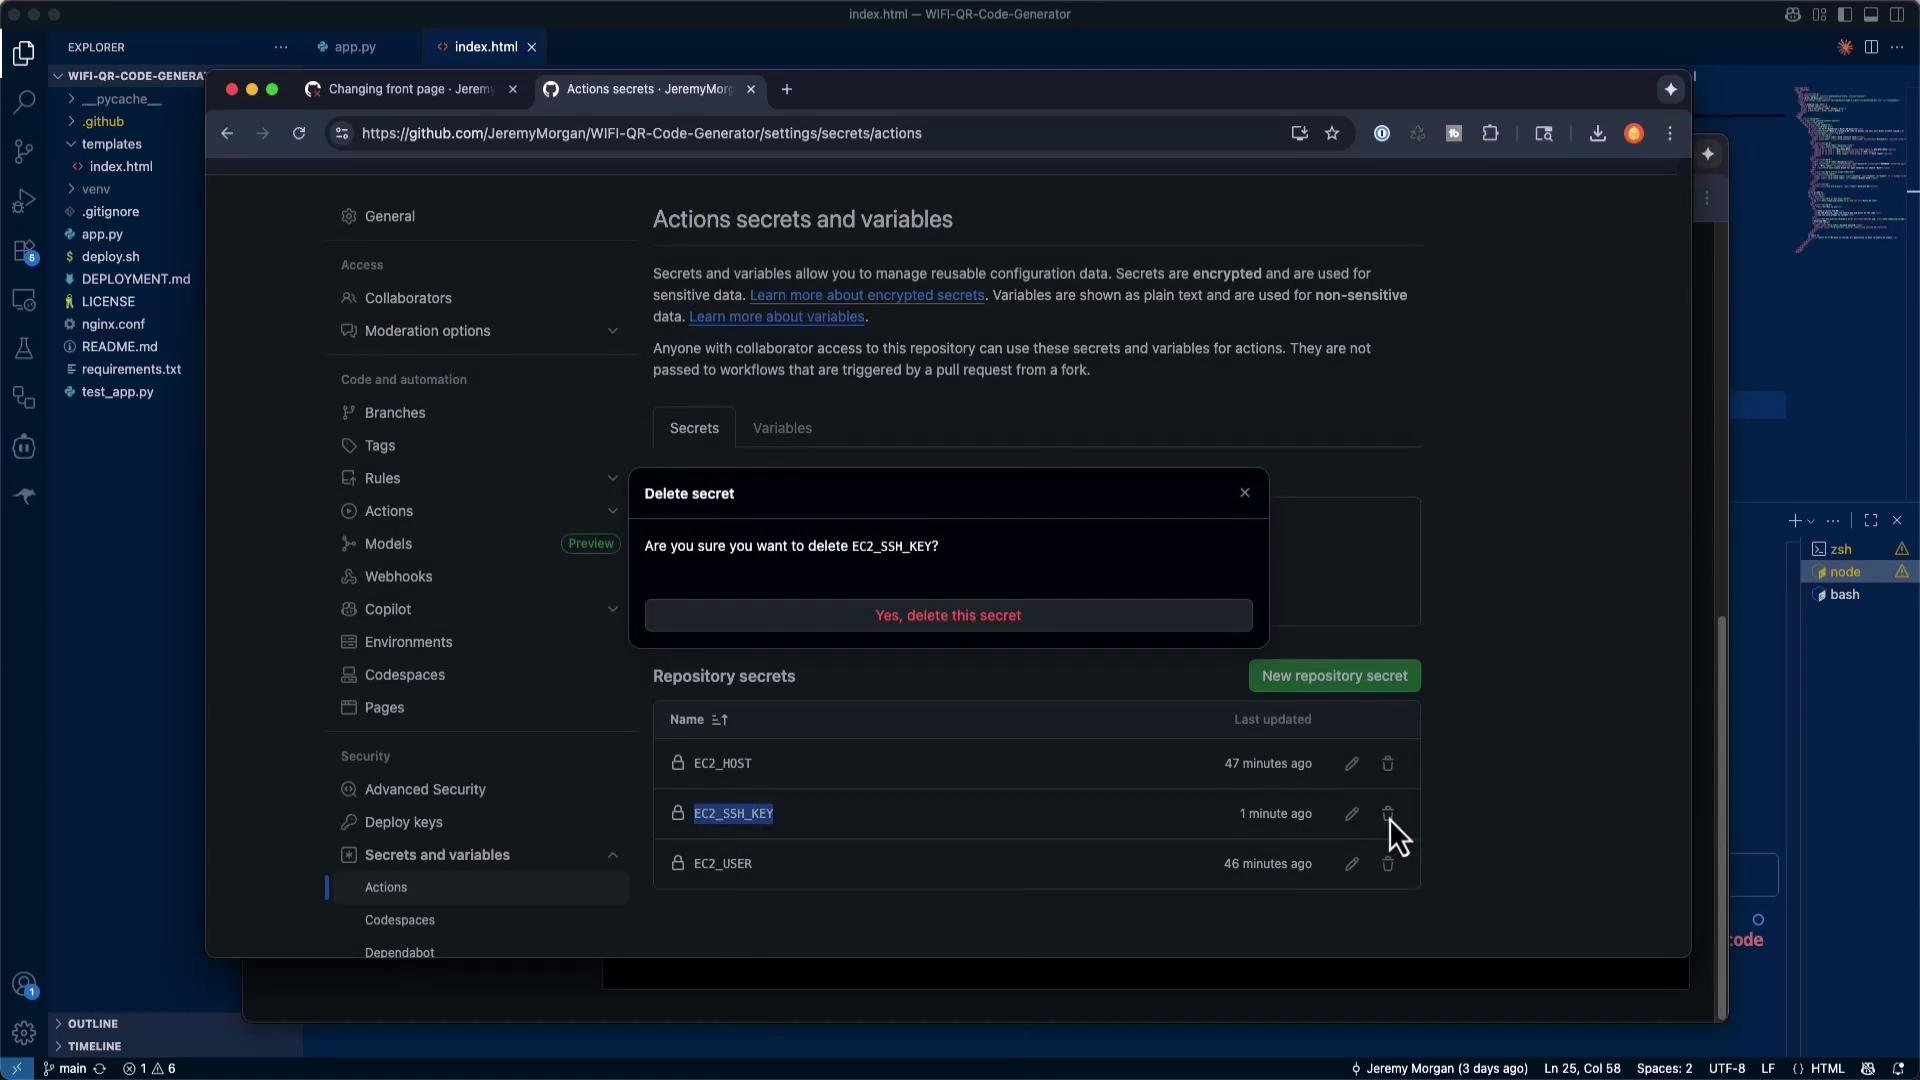
## GitHub repository secrets (required)
Add these under Settings > Secrets and variables > Actions:
| Secret name | Value |
| ------------- | --------------------------------------------------- |
| EC2\_HOST | EC2 public IP (no protocol) |
| EC2\_USER | e.g., ubuntu |
| EC2\_SSH\_KEY | full private key (PEM/ED25519) content, unencrypted |
Never commit private keys or other secrets to the repository. Use GitHub Actions secrets. For CI/CD, use a dedicated deployment key (no passphrase) rather than your personal key.
## Troubleshooting SSH authentication
Common failures:
* ssh: this private key is passphrase protected
* ssh: handshake failed: unable to authenticate
Recommended fixes:
Option A — Create a dedicated deploy key (recommended)
```bash theme={null}
ssh-keygen -t ed25519 -f ~/.ssh/ec2-deploy-key -N "" -C "github-actions-deploy"
ssh-copy-id -i ~/.ssh/ec2-deploy-key.pub ubuntu@your-ec2-ip
# Copy the private key into the EC2_SSH_KEY secret:
cat ~/.ssh/ec2-deploy-key
```
Option B — Remove passphrase from an existing key (not ideal)
```bash theme={null}
ssh-keygen -p -f ~/.ssh/your-existing-key
# Press Enter to set an empty passphrase, then copy the private key into EC2_SSH_KEY.
```
Verify:
* EC2\_SSH\_KEY contains the BEGIN/END lines and the full private key.
* EC2 instance has the matching public key in `~/.ssh/authorized_keys` for the deploy user.
* EC2 security group allows inbound SSH (port 22) from your expected sources.
* Test manually:
```bash theme={null}
ssh -i ~/.ssh/ec2-deploy-key ubuntu@your-ec2-ip "echo 'test successful'"
```
Include the "Test SSH connection" step in your workflow to fail fast and make debugging easier.
## Iterative troubleshooting (demo summary)
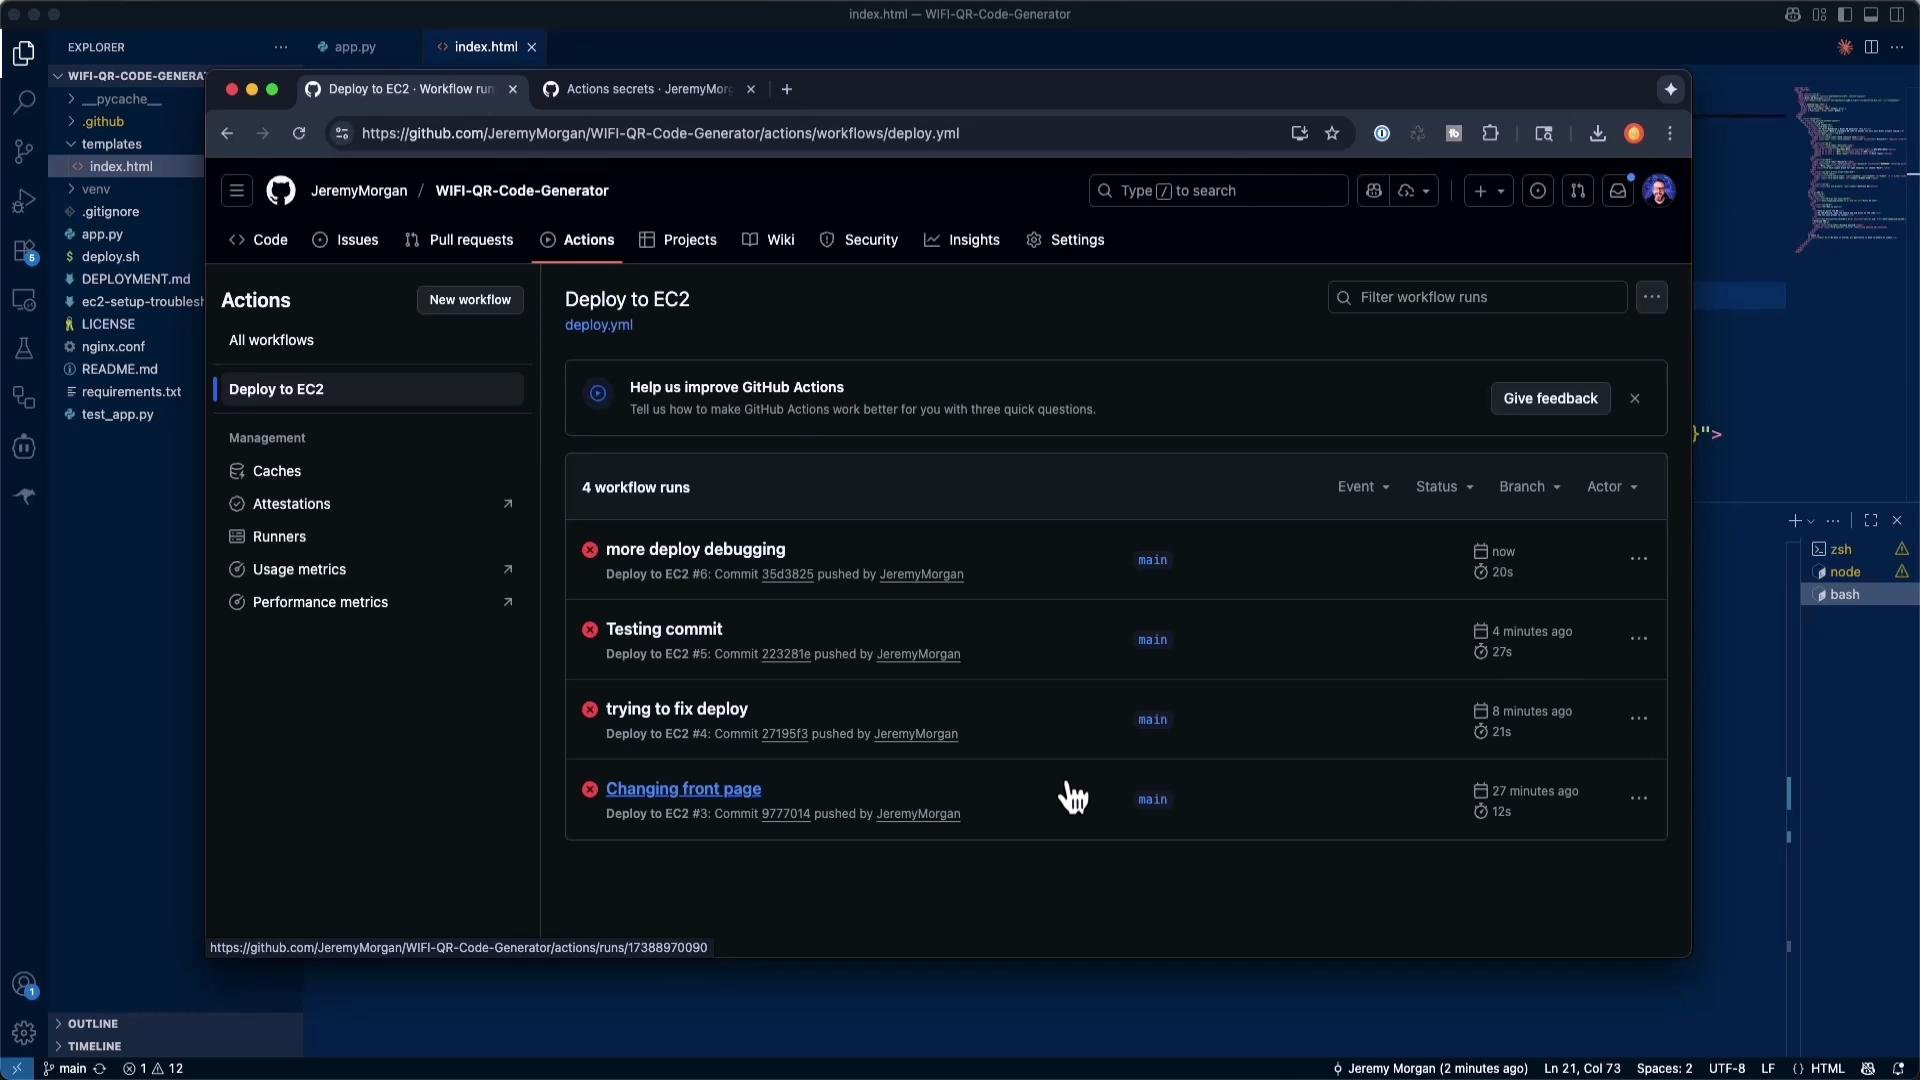
* Initial automated runs failed due to passphrase-protected or incorrectly provisioned keys.
* The author generated an ed25519 keypair, added the public key to the EC2 user's `authorized_keys`, placed the private key into GitHub Secrets, and added a quick SSH test step to the workflow.
* After an initial manual setup on the server (`git clone` and `./deploy.sh` once), the automated workflow could reliably deploy subsequent changes.
 ## Success verification
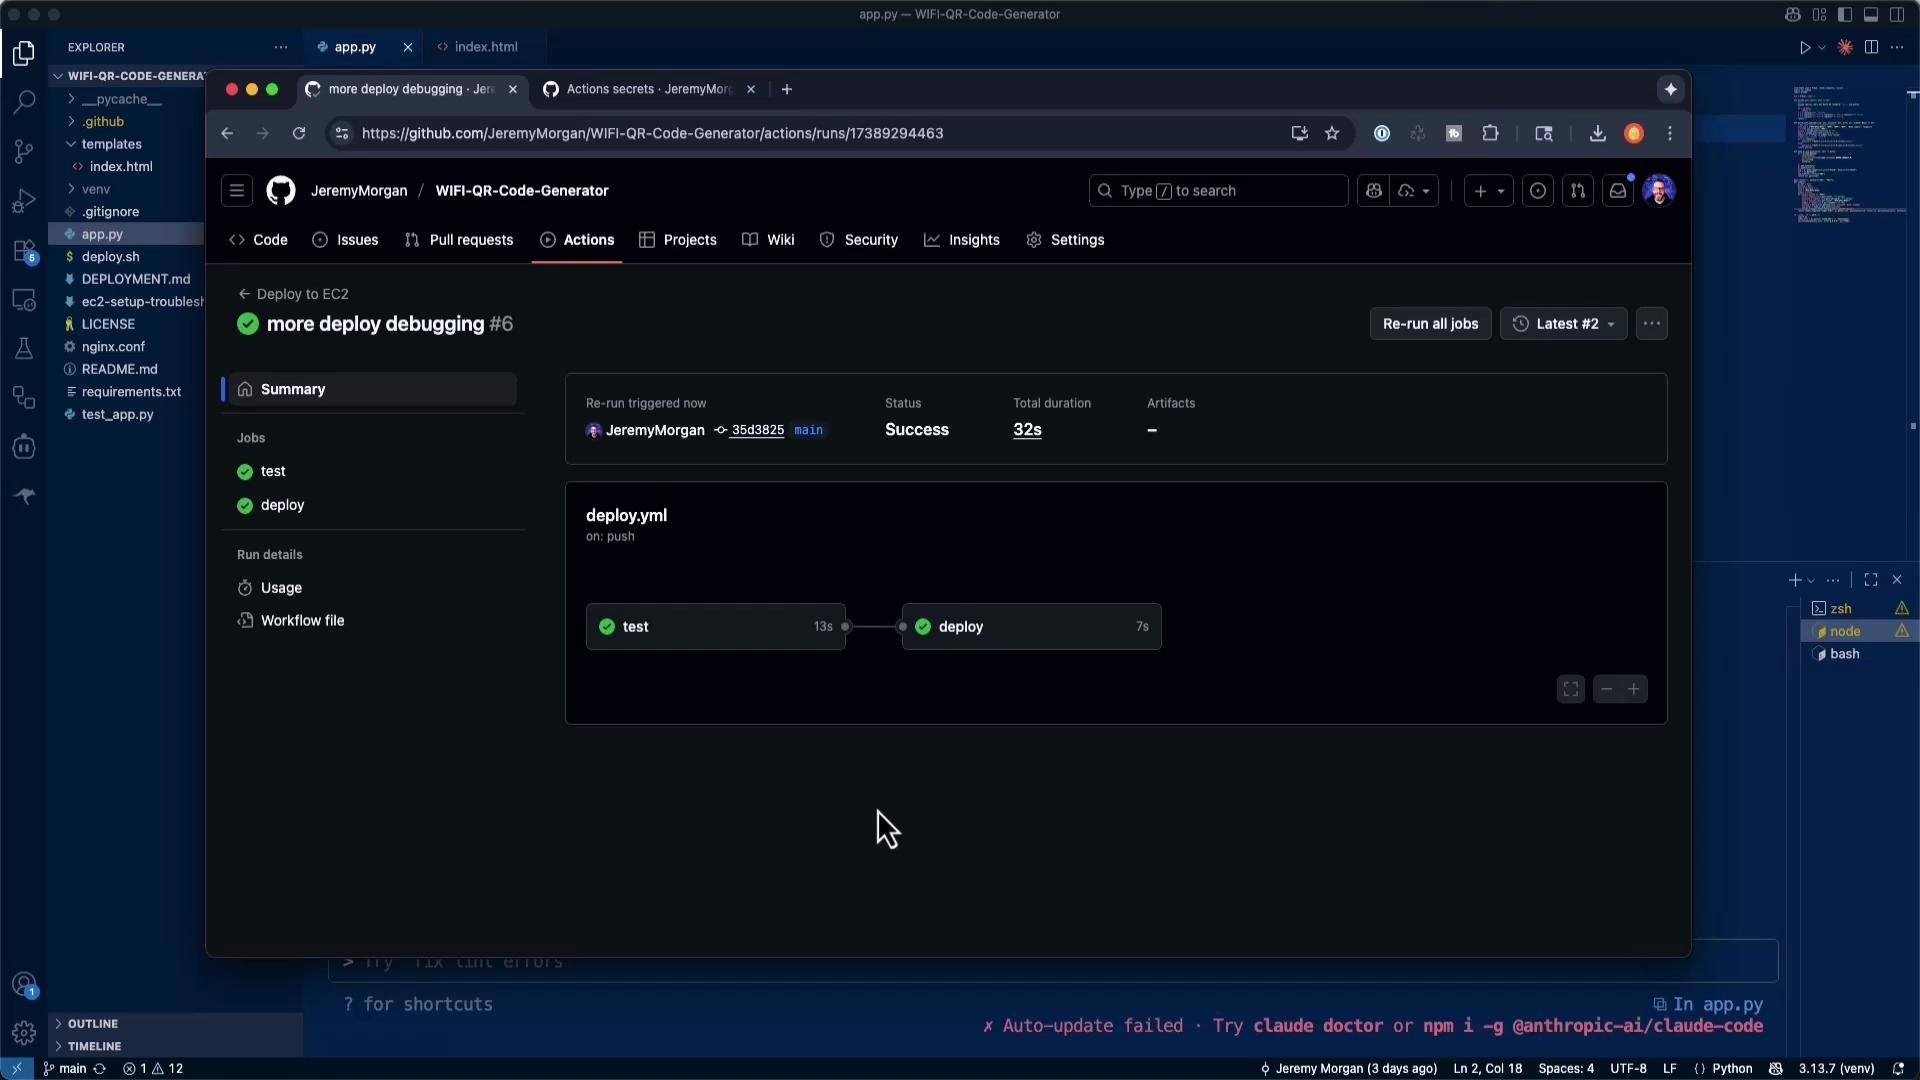
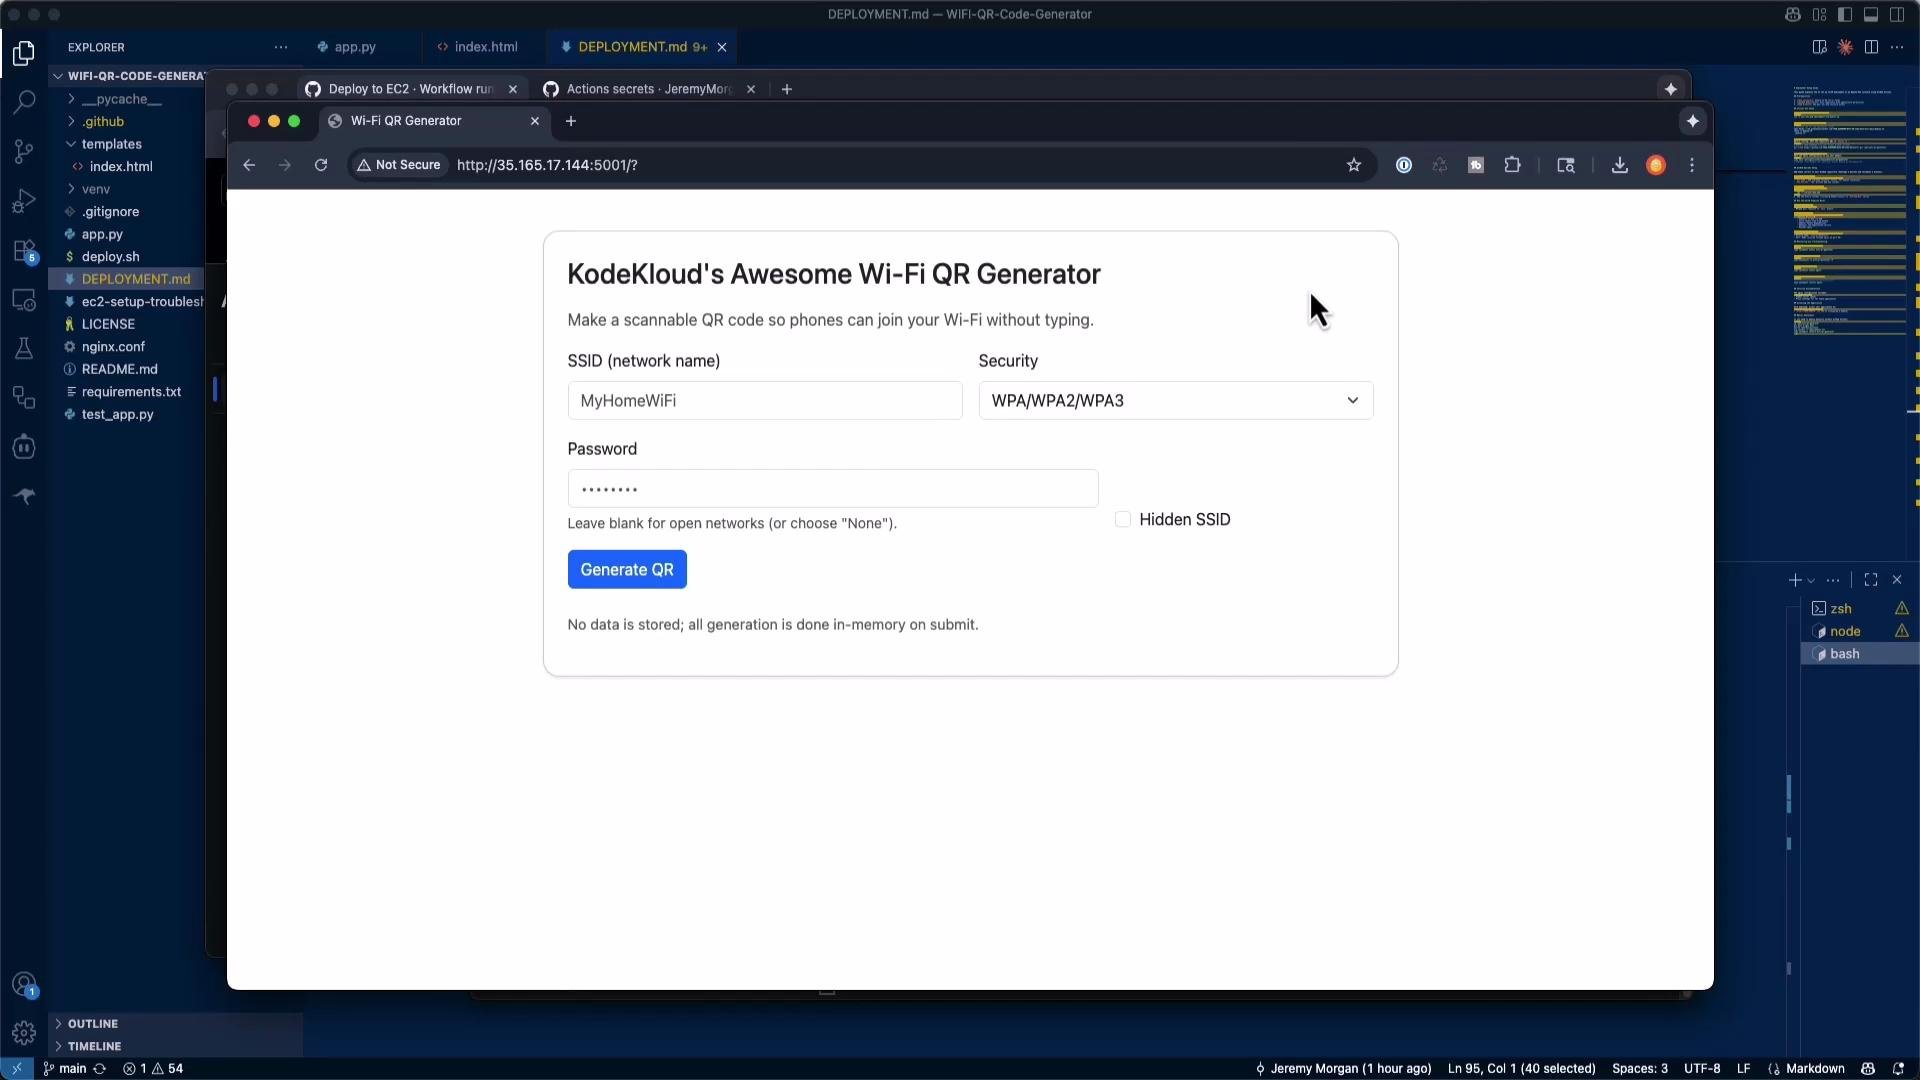
Once the SSH keys and initial server setup were correct, GitHub Actions successfully ran tests and deployed the app. The repository's templates were updated (e.g., the site title), and the EC2-hosted site reflected those changes.
## Success verification
Once the SSH keys and initial server setup were correct, GitHub Actions successfully ran tests and deployed the app. The repository's templates were updated (e.g., the site title), and the EC2-hosted site reflected those changes.
 ## Key lessons and best practices
* Be explicit about the target environment (Ubuntu EC2, GitHub Actions) when scaffolding CI/CD.
* Always store secrets in GitHub Actions Secrets; never commit them to source control.
* Use a dedicated, passphrase-free deploy key for automation and rotate keys periodically.
* Perform a one-time manual server initialization (clone and run `deploy.sh`) so automated runs can assume the repository layout.
* Add an early “Test SSH connection” step to fail fast during debugging.
* Understand the deployment pieces (SSH keys, service units, nginx, venv) to diagnose failures quickly.
## Helpful references
* [GitHub Actions documentation](https://docs.github.com/actions)
* [Flask documentation](https://flask.palletsprojects.com/)
* [systemd service unit docs](https://www.freedesktop.org/wiki/Software/systemd/)
* [SSH key management](https://www.ssh.com/academy/ssh/keygen)
## Reference commands
SSH to EC2:
```bash theme={null}
ssh -i ~/.ssh/ec2-deploy-key ubuntu@your-ec2-public-ip
```
Initial EC2 manual setup (run once if preferred):
```bash theme={null}
sudo mkdir -p /opt/wifi-qr-generator
sudo chown ubuntu:ubuntu /opt/wifi-qr-generator
sudo git clone https://github.com/YOUR_USERNAME/WIFI-QR-Code-Generator.git /opt/wifi-qr-generator
cd /opt/wifi-qr-generator
chmod +x deploy.sh
./deploy.sh
```
Wrap up
This guide demonstrates how to scaffold a CI/CD pipeline using GitHub Actions and a simple server-side deploy process for an Ubuntu EC2 instance. The assistant-generated pipeline and scripts provide a solid starting point, but expect to iterate on keys, permissions, and service configuration to reach a stable, secure deployment.
Thank you for following along — after this setup, merging to `main` will run tests and automatically deploy the updated Flask application to your EC2 instance.
## Key lessons and best practices
* Be explicit about the target environment (Ubuntu EC2, GitHub Actions) when scaffolding CI/CD.
* Always store secrets in GitHub Actions Secrets; never commit them to source control.
* Use a dedicated, passphrase-free deploy key for automation and rotate keys periodically.
* Perform a one-time manual server initialization (clone and run `deploy.sh`) so automated runs can assume the repository layout.
* Add an early “Test SSH connection” step to fail fast during debugging.
* Understand the deployment pieces (SSH keys, service units, nginx, venv) to diagnose failures quickly.
## Helpful references
* [GitHub Actions documentation](https://docs.github.com/actions)
* [Flask documentation](https://flask.palletsprojects.com/)
* [systemd service unit docs](https://www.freedesktop.org/wiki/Software/systemd/)
* [SSH key management](https://www.ssh.com/academy/ssh/keygen)
## Reference commands
SSH to EC2:
```bash theme={null}
ssh -i ~/.ssh/ec2-deploy-key ubuntu@your-ec2-public-ip
```
Initial EC2 manual setup (run once if preferred):
```bash theme={null}
sudo mkdir -p /opt/wifi-qr-generator
sudo chown ubuntu:ubuntu /opt/wifi-qr-generator
sudo git clone https://github.com/YOUR_USERNAME/WIFI-QR-Code-Generator.git /opt/wifi-qr-generator
cd /opt/wifi-qr-generator
chmod +x deploy.sh
./deploy.sh
```
Wrap up
This guide demonstrates how to scaffold a CI/CD pipeline using GitHub Actions and a simple server-side deploy process for an Ubuntu EC2 instance. The assistant-generated pipeline and scripts provide a solid starting point, but expect to iterate on keys, permissions, and service configuration to reach a stable, secure deployment.
Thank you for following along — after this setup, merging to `main` will run tests and automatically deploy the updated Flask application to your EC2 instance.