> ## Documentation Index
> Fetch the complete documentation index at: https://notes.kodekloud.com/llms.txt
> Use this file to discover all available pages before exploring further.
# Amazon EC2
> Step-by-step guide to launching an Amazon EC2 instance and connecting via SSH, including AMI selection, instance type, key pairs, security groups, storage, and lifecycle actions.
This guide walks through launching a basic Amazon EC2 instance and connecting to it via SSH. It covers selecting an AMI, picking an instance type, configuring key pairs and security groups, checking instance details, and connecting from your workstation.
Start by opening the AWS Console and searching for "EC2". Make sure you are working in the desired AWS region — resources are region-specific. This demo uses US East (N. Virginia), but the same steps apply in any region.
1. Launch the EC2 instance
2. Configure authentication (key pair)
3. Configure networking and security groups
4. Review storage and launch
5. Verify instance details and metrics
6. SSH into the instance
7. Stop or terminate to avoid charges
Select "Launch instance" to start the instance-creation wizard.
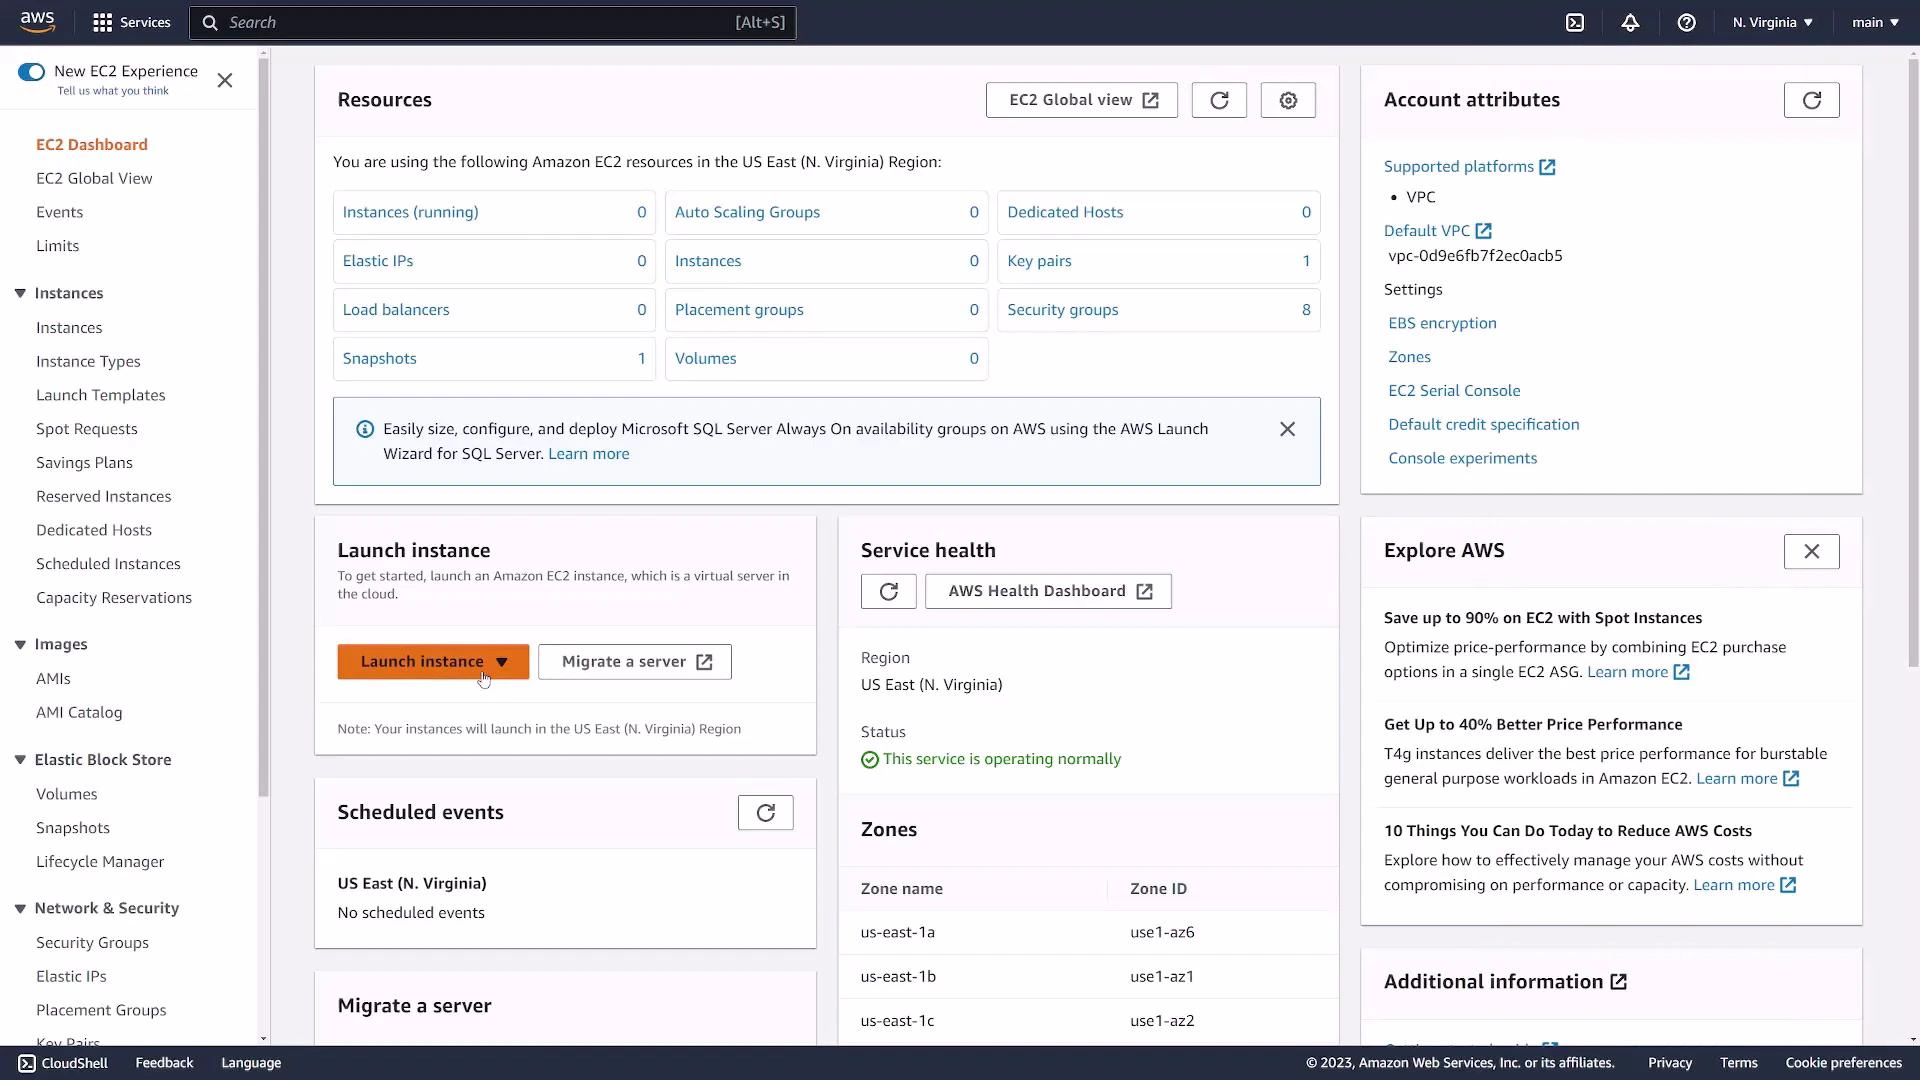 You can also start from the Instances page using the "Launch instances" button. The wizard leads you through each configuration step.
## 1. Name and choose an AMI
Give the instance a friendly name tag (for example: "web-server") so it’s easy to identify later.
Choose an AMI (Amazon Machine Image) to define the operating system and any preinstalled software. AMIs can be:
* Amazon-provided (official images)
* Community-provided
* Marketplace images
For this demo we choose an Ubuntu AMI (Ubuntu 22.04 LTS, 64-bit x86). Remember AMI IDs vary by region — verify the AMI details before launching.
You can also start from the Instances page using the "Launch instances" button. The wizard leads you through each configuration step.
## 1. Name and choose an AMI
Give the instance a friendly name tag (for example: "web-server") so it’s easy to identify later.
Choose an AMI (Amazon Machine Image) to define the operating system and any preinstalled software. AMIs can be:
* Amazon-provided (official images)
* Community-provided
* Marketplace images
For this demo we choose an Ubuntu AMI (Ubuntu 22.04 LTS, 64-bit x86). Remember AMI IDs vary by region — verify the AMI details before launching.
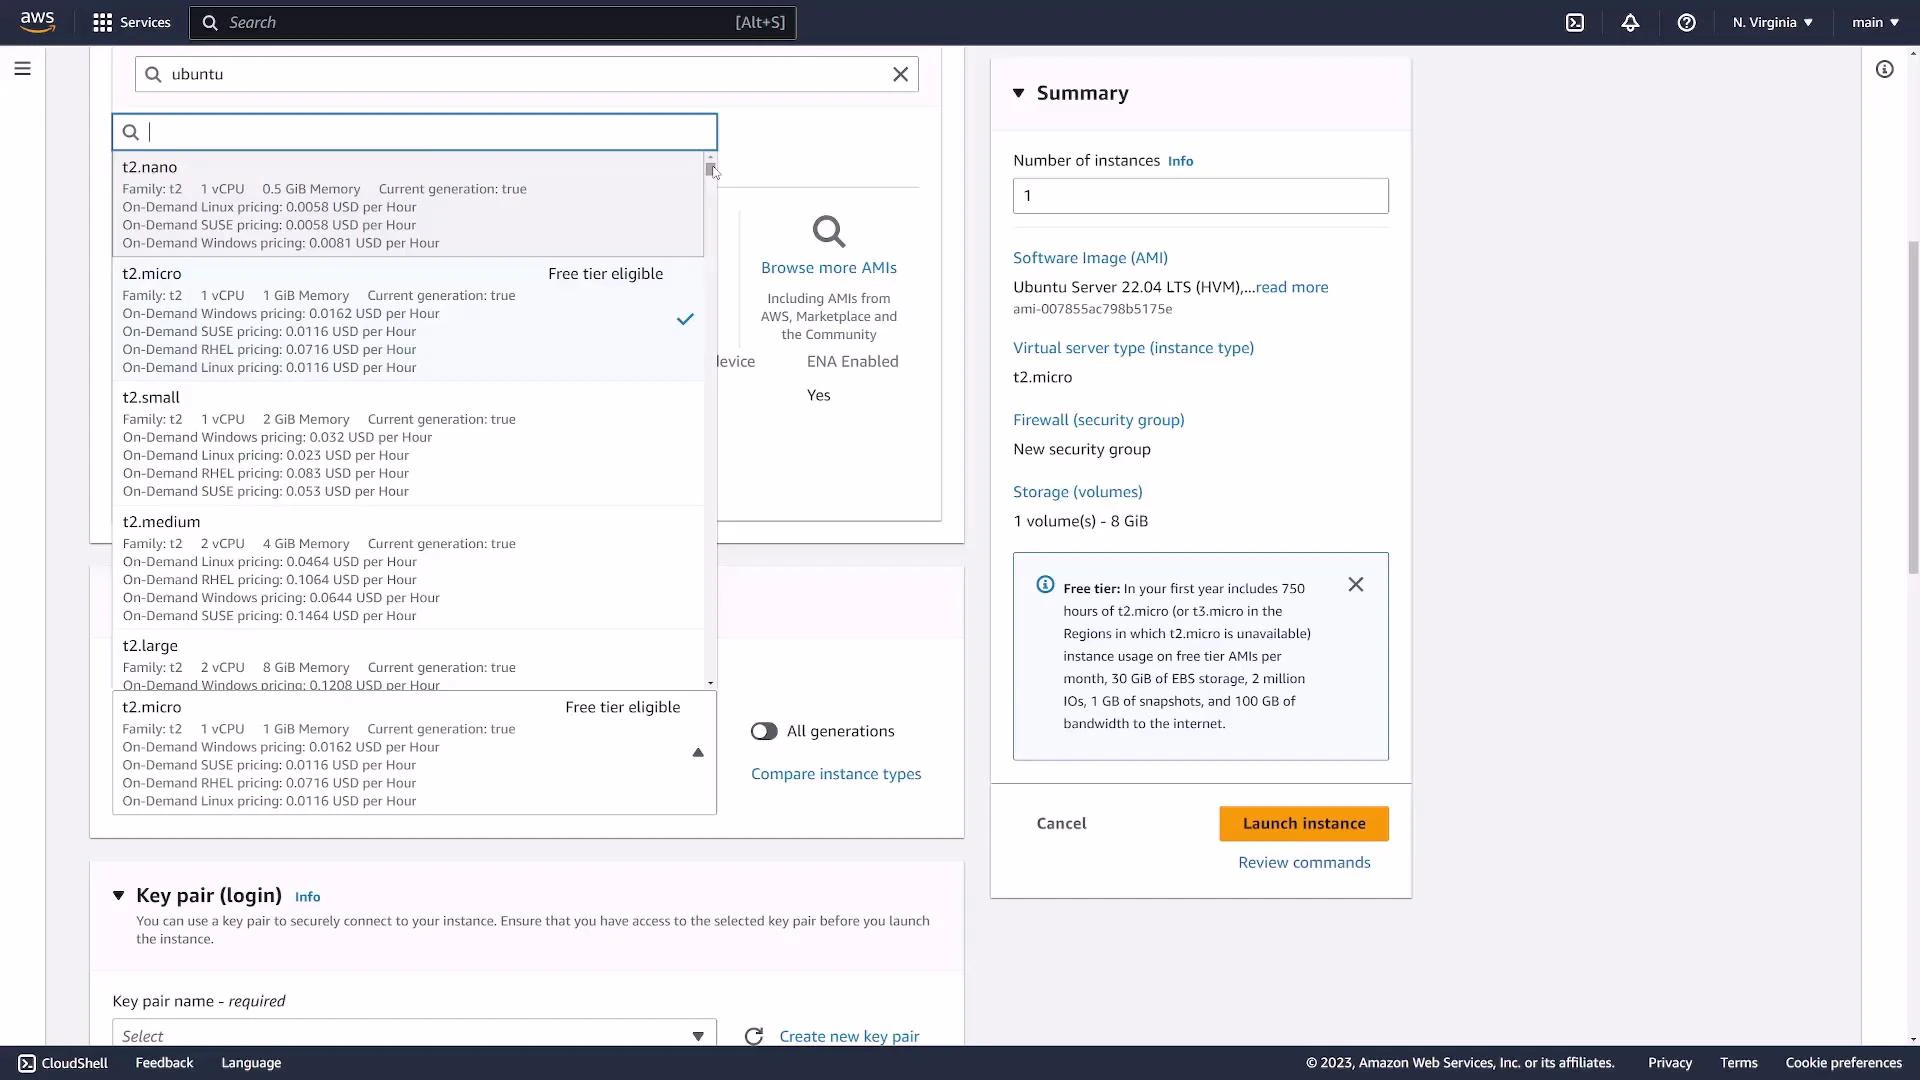 ## 2. Select an instance type
Pick an instance type to define vCPU, memory, and network performance. For simple demos or free-tier usage, `t2.micro` or `t3.micro` (1 vCPU, 1 GiB RAM) are common choices.
## 3. Configure key pair (SSH authentication)
Configure a key pair for SSH access. Key pairs are the recommended, secure method for authenticating to EC2 instances.
* If you already have a key pair, select it.
* Otherwise, create a new key pair and download the private key file (`.pem`). For this demo we created `ec2-demo.pem`.
## 2. Select an instance type
Pick an instance type to define vCPU, memory, and network performance. For simple demos or free-tier usage, `t2.micro` or `t3.micro` (1 vCPU, 1 GiB RAM) are common choices.
## 3. Configure key pair (SSH authentication)
Configure a key pair for SSH access. Key pairs are the recommended, secure method for authenticating to EC2 instances.
* If you already have a key pair, select it.
* Otherwise, create a new key pair and download the private key file (`.pem`). For this demo we created `ec2-demo.pem`.
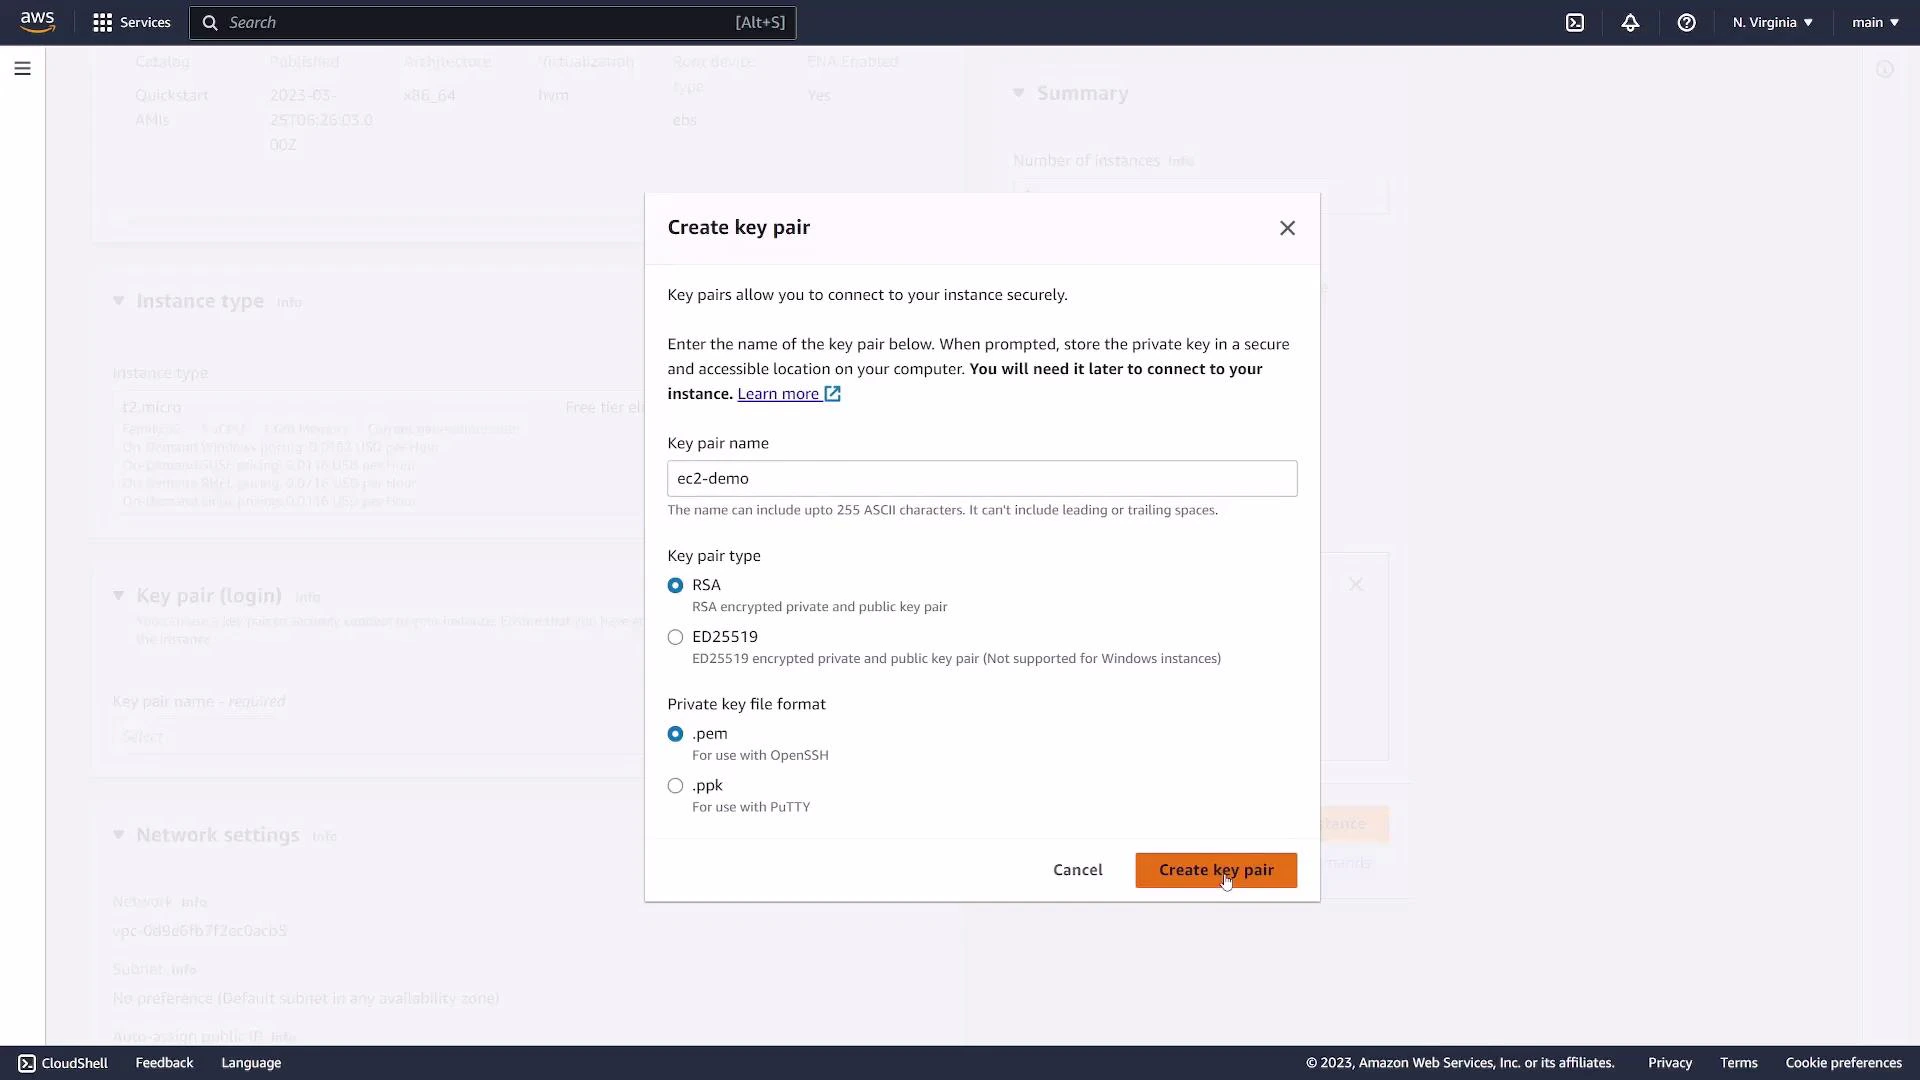 Keep your private key file secure. After downloading, restrict permissions (for example: `chmod 400 ec2-demo.pem`) so SSH will accept the key.
## 4. Networking and security groups
Choose the VPC and subnet (default VPC is common for simple setups). Configure security groups to control inbound/outbound traffic. Security groups act as a stateful firewall.
Common rules for a public web server:
* SSH: TCP 22 (restrict source to your IP if possible)
* HTTP: TCP 80 (0.0.0.0/0 for public access)
* HTTPS: TCP 443 (0.0.0.0/0 for public access)
For this demo we created a security group that allows SSH. Prefer restricting SSH to your client IP (for example `203.0.113.5/32`) rather than opening to the whole Internet.
Keep your private key file secure. After downloading, restrict permissions (for example: `chmod 400 ec2-demo.pem`) so SSH will accept the key.
## 4. Networking and security groups
Choose the VPC and subnet (default VPC is common for simple setups). Configure security groups to control inbound/outbound traffic. Security groups act as a stateful firewall.
Common rules for a public web server:
* SSH: TCP 22 (restrict source to your IP if possible)
* HTTP: TCP 80 (0.0.0.0/0 for public access)
* HTTPS: TCP 443 (0.0.0.0/0 for public access)
For this demo we created a security group that allows SSH. Prefer restricting SSH to your client IP (for example `203.0.113.5/32`) rather than opening to the whole Internet.
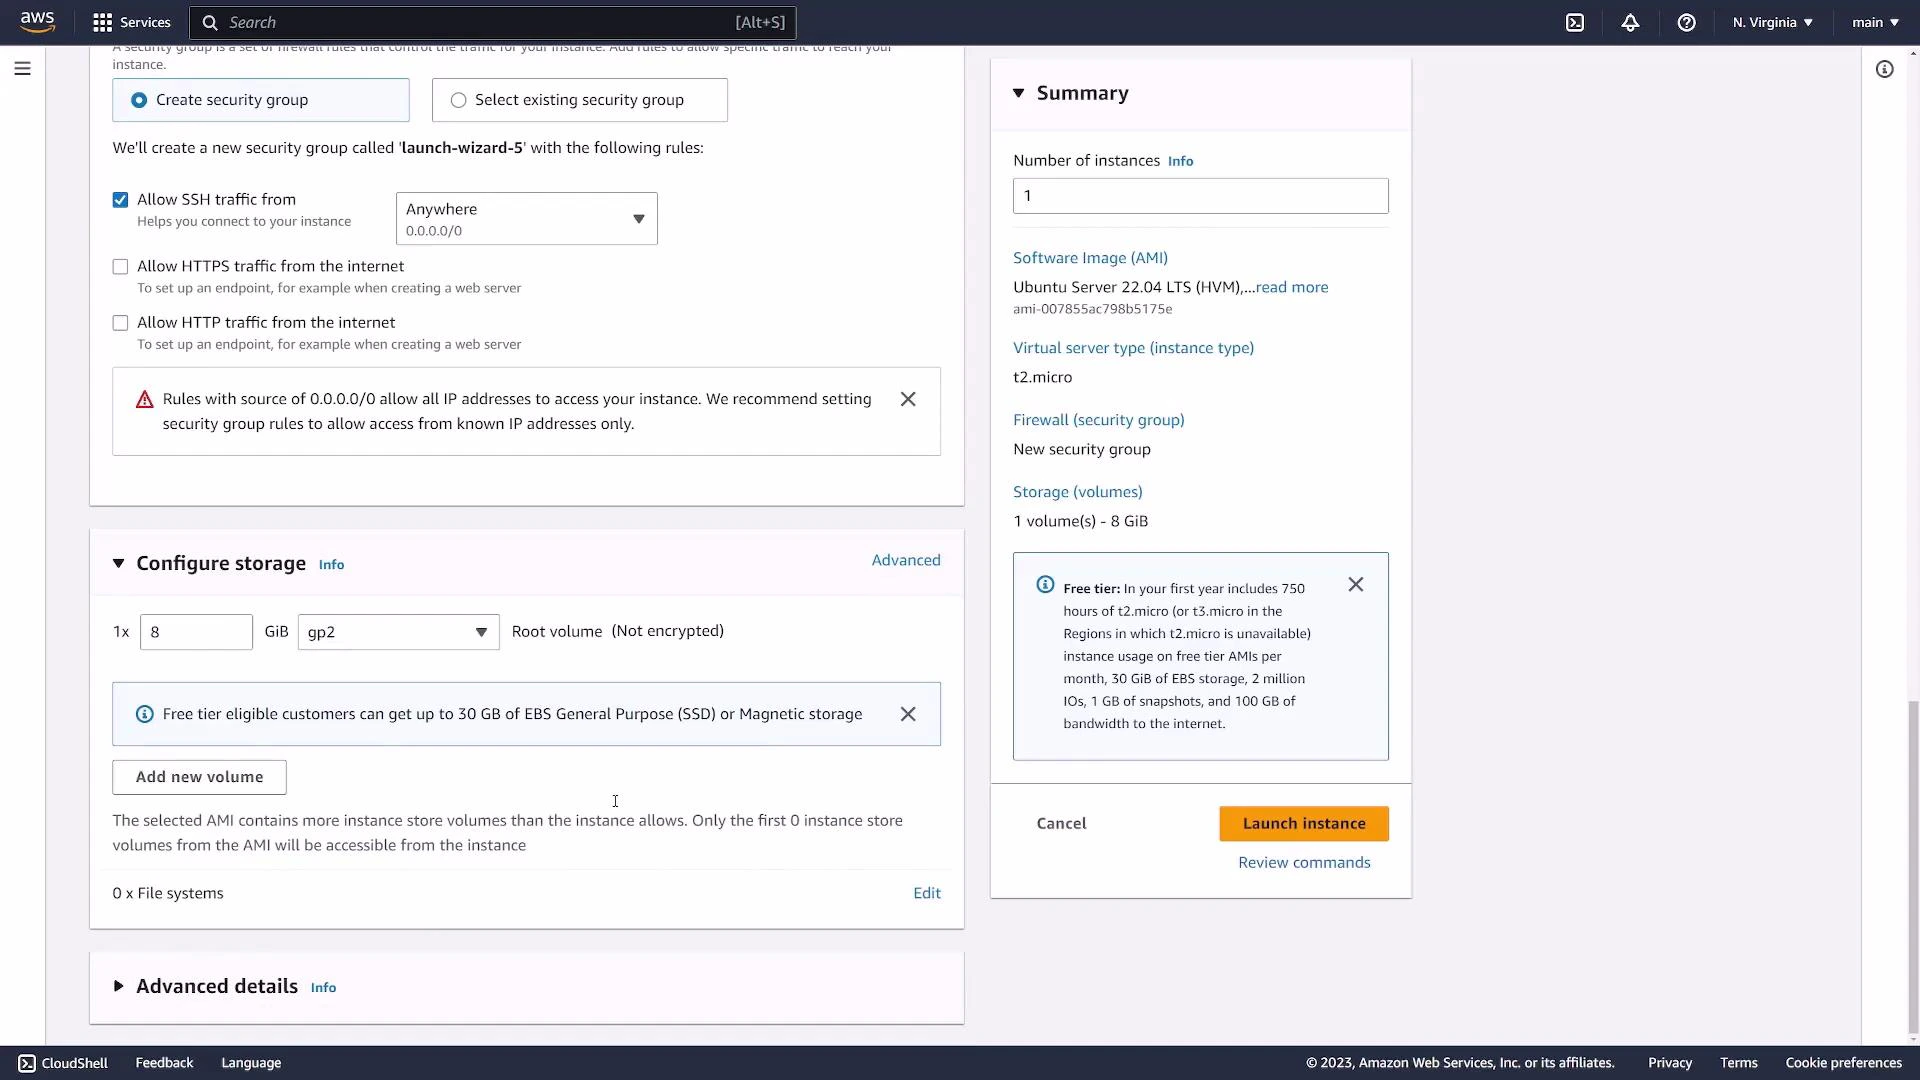 Allowing SSH from `0.0.0.0/0` exposes your instance to the entire Internet. Restrict SSH to your IP whenever possible.
## 5. Storage options
By default a root EBS volume (for example 8 GiB) is attached. Defaults are typically safe for demos; you can adjust size, volume type (gp2/gp3), and encryption as needed.
Allowing SSH from `0.0.0.0/0` exposes your instance to the entire Internet. Restrict SSH to your IP whenever possible.
## 5. Storage options
By default a root EBS volume (for example 8 GiB) is attached. Defaults are typically safe for demos; you can adjust size, volume type (gp2/gp3), and encryption as needed.
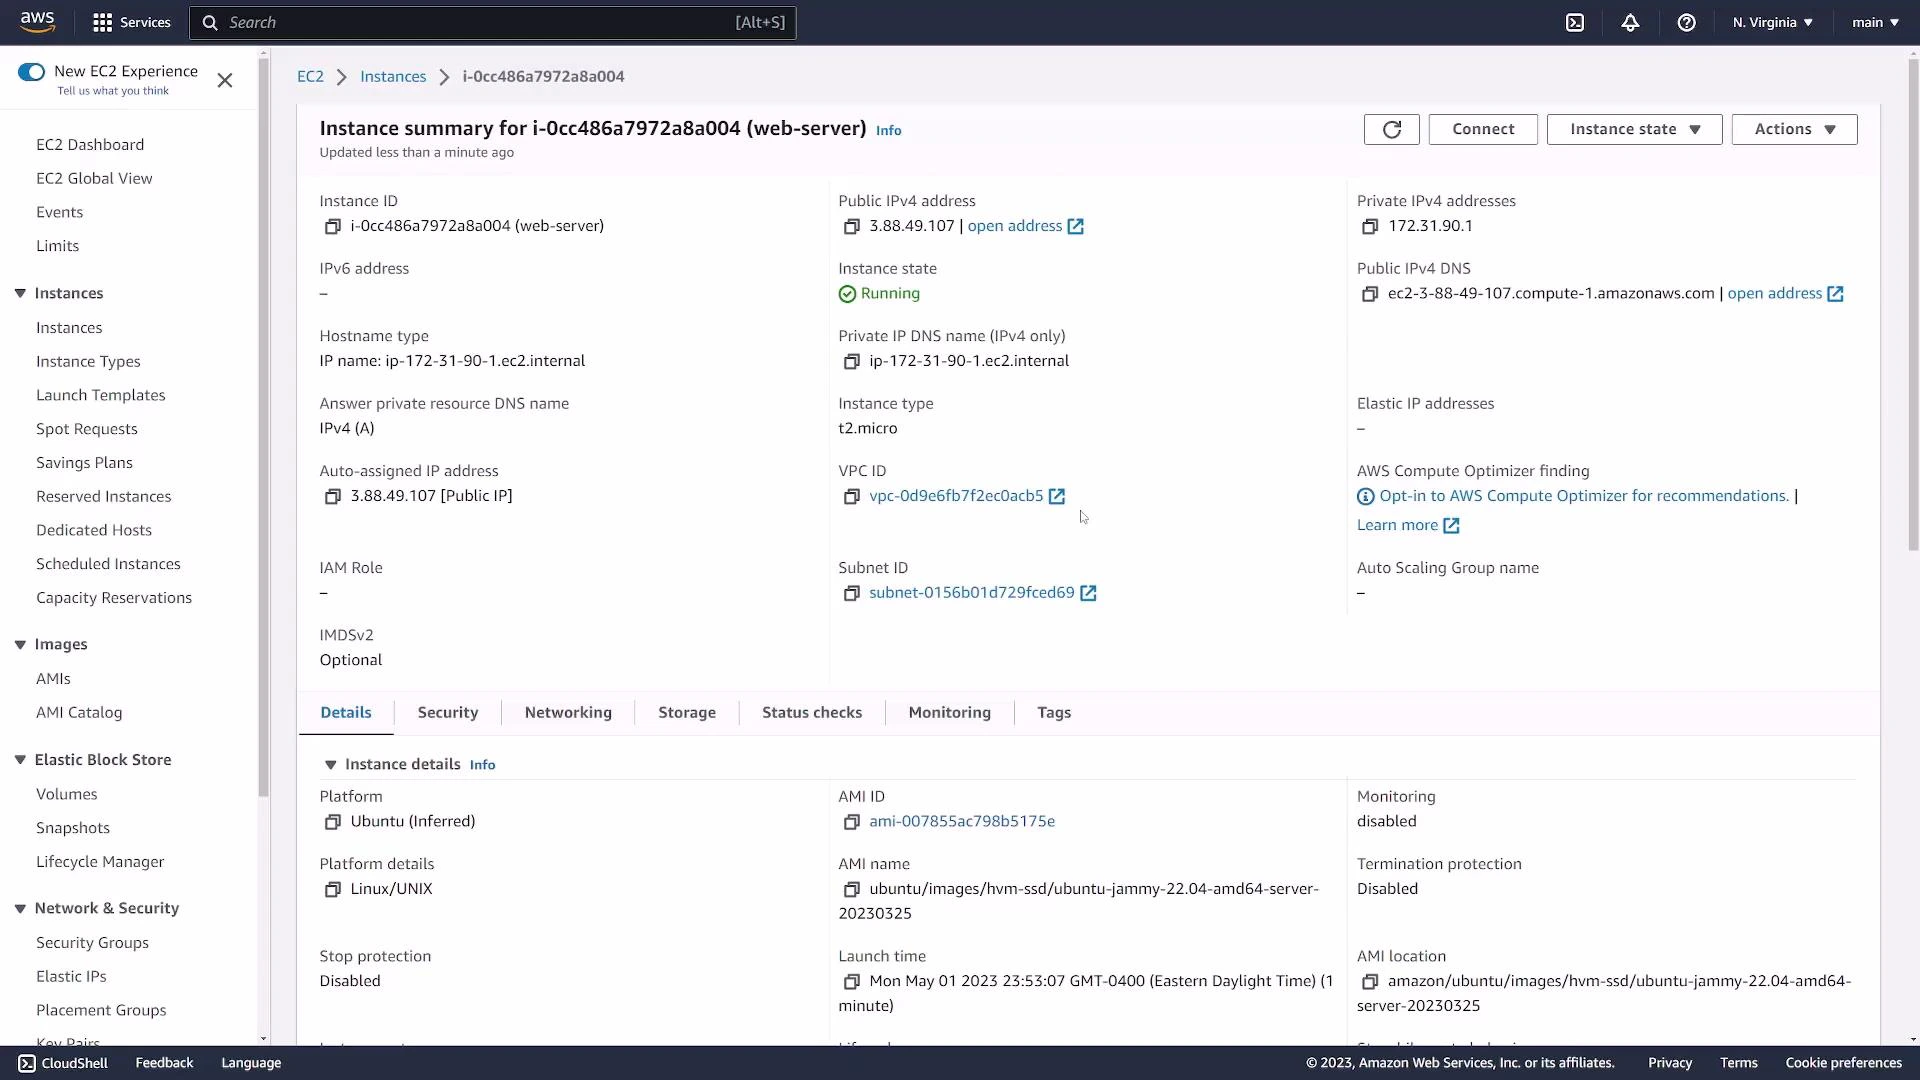 Launch the instance when ready. The Instances page shows the new instance in a "pending" state while it boots, then "running" when ready.
## 6. View instance details and settings
Click the instance ID to see fields such as:
* Instance ID
* Public IPv4 address / Public DNS
* Private IPv4 address
* AMI used
* Key pair name
* Attached security group(s)
A quick table for commonly checked fields:
| Field | Why it matters | Example |
| --------------- | ---------------------------------------------------- | ----------------------------------------- |
| Instance ID | Unique identifier for the EC2 instance | `i-0cc486a7972a8a004` |
| Public IPv4 | Use for SSH or public access (if in a public subnet) | `3.88.49.107` |
| Public DNS | Alternate way to connect (resolves to the public IP) | `ec2-3-88-49-107.compute-1.amazonaws.com` |
| Key pair | Shows which key is allowed for SSH auth | `ec2-demo` |
| Security groups | Controls inbound/outbound traffic | `launch-wizard-5 (sg-01c42ae4a41e45f7e)` |
Under the Security tab you can inspect inbound and outbound rules. Security groups are stateful — return traffic is automatically allowed.
Launch the instance when ready. The Instances page shows the new instance in a "pending" state while it boots, then "running" when ready.
## 6. View instance details and settings
Click the instance ID to see fields such as:
* Instance ID
* Public IPv4 address / Public DNS
* Private IPv4 address
* AMI used
* Key pair name
* Attached security group(s)
A quick table for commonly checked fields:
| Field | Why it matters | Example |
| --------------- | ---------------------------------------------------- | ----------------------------------------- |
| Instance ID | Unique identifier for the EC2 instance | `i-0cc486a7972a8a004` |
| Public IPv4 | Use for SSH or public access (if in a public subnet) | `3.88.49.107` |
| Public DNS | Alternate way to connect (resolves to the public IP) | `ec2-3-88-49-107.compute-1.amazonaws.com` |
| Key pair | Shows which key is allowed for SSH auth | `ec2-demo` |
| Security groups | Controls inbound/outbound traffic | `launch-wizard-5 (sg-01c42ae4a41e45f7e)` |
Under the Security tab you can inspect inbound and outbound rules. Security groups are stateful — return traffic is automatically allowed.
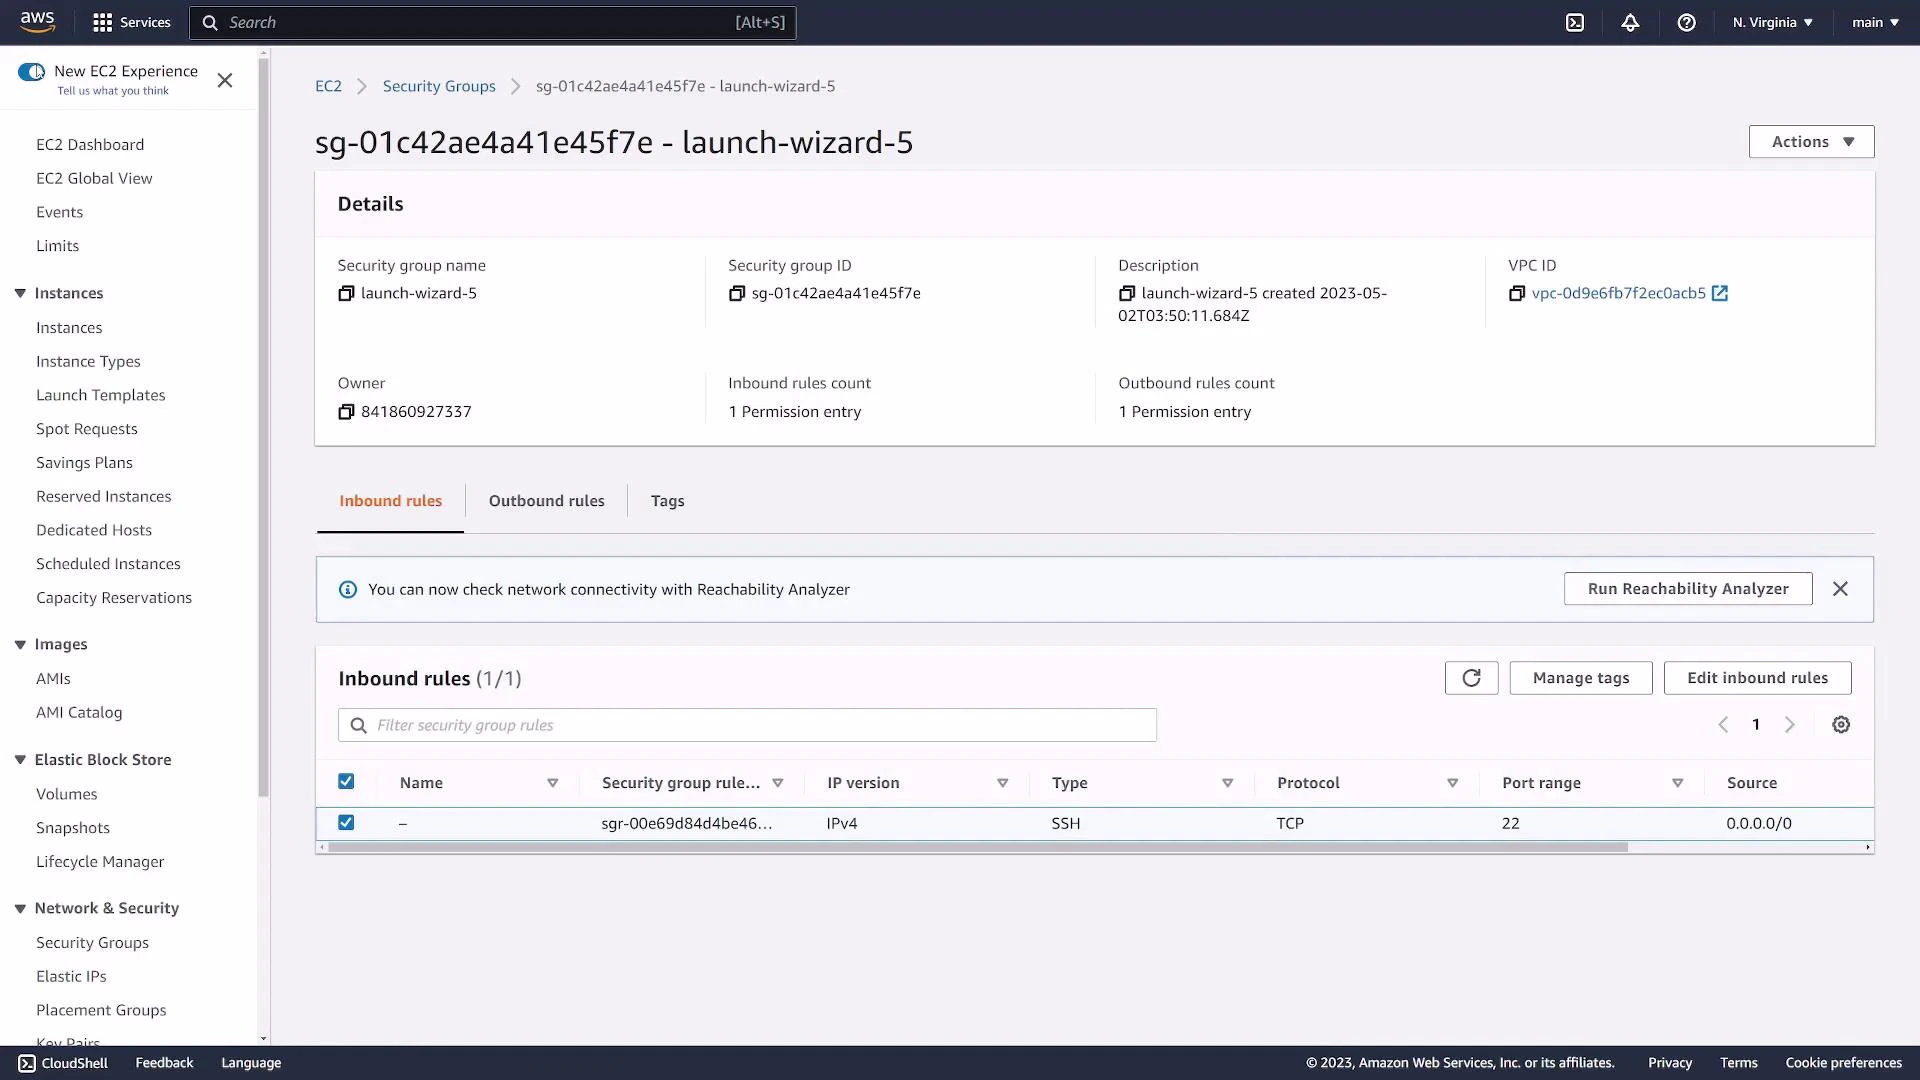 The Networking tab shows attached network interfaces, private/public IPs, and any Elastic IPs.
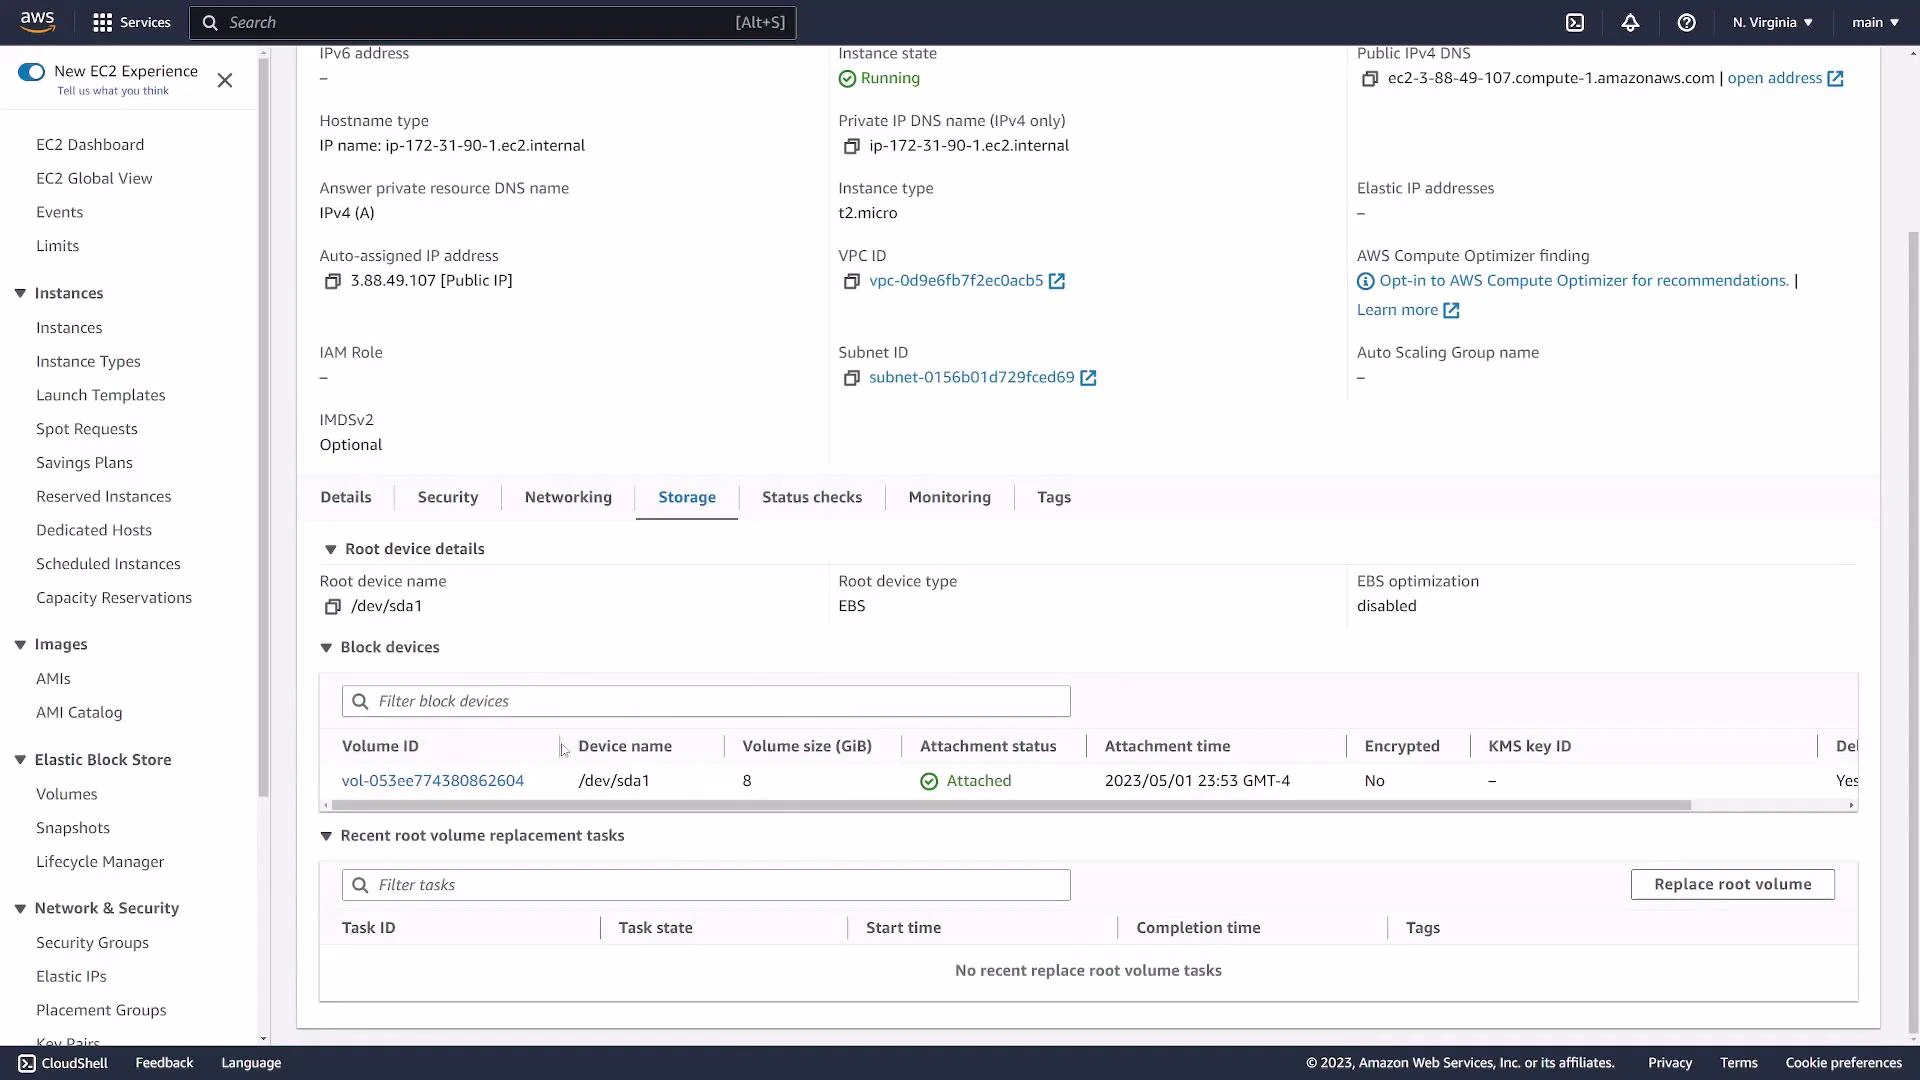 The Monitoring tab displays CloudWatch metrics (CPU, network, disk, status checks). Small or newly launched instances may show "No data available" until metrics are populated.
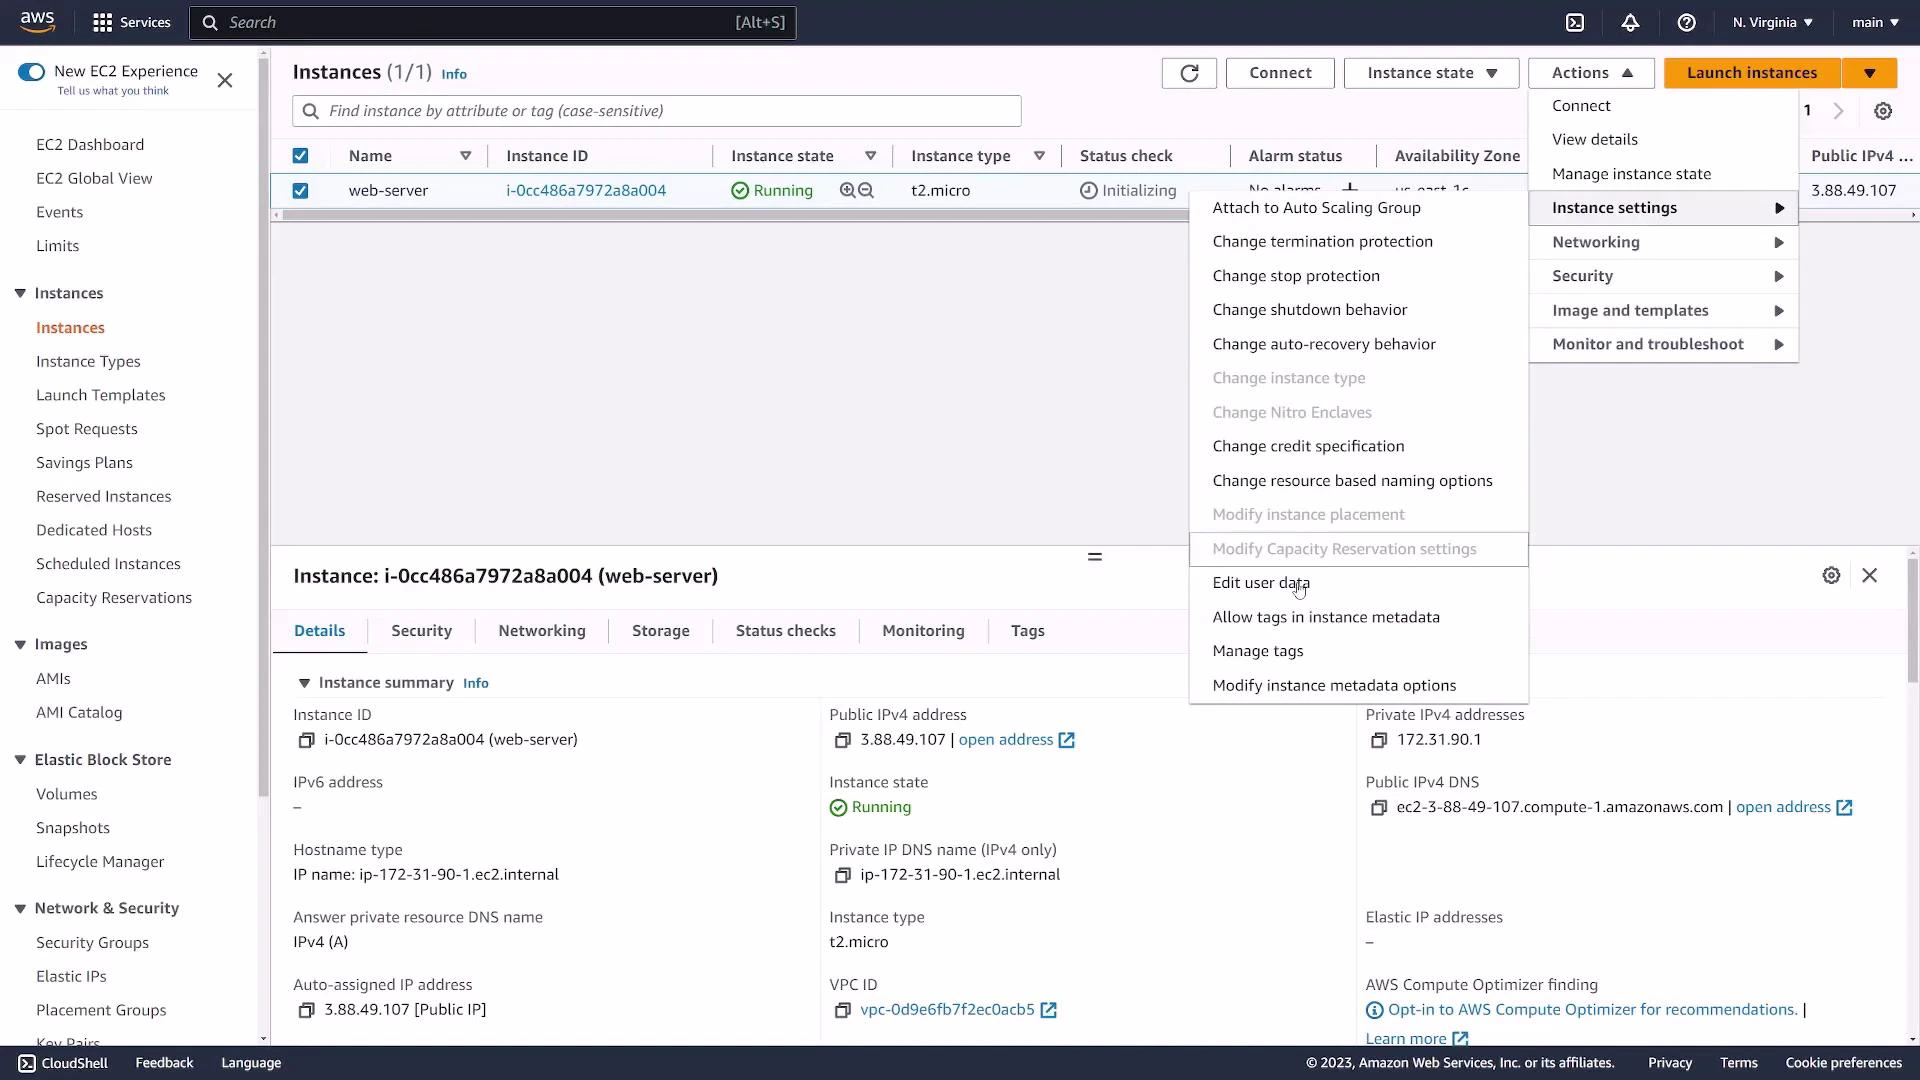
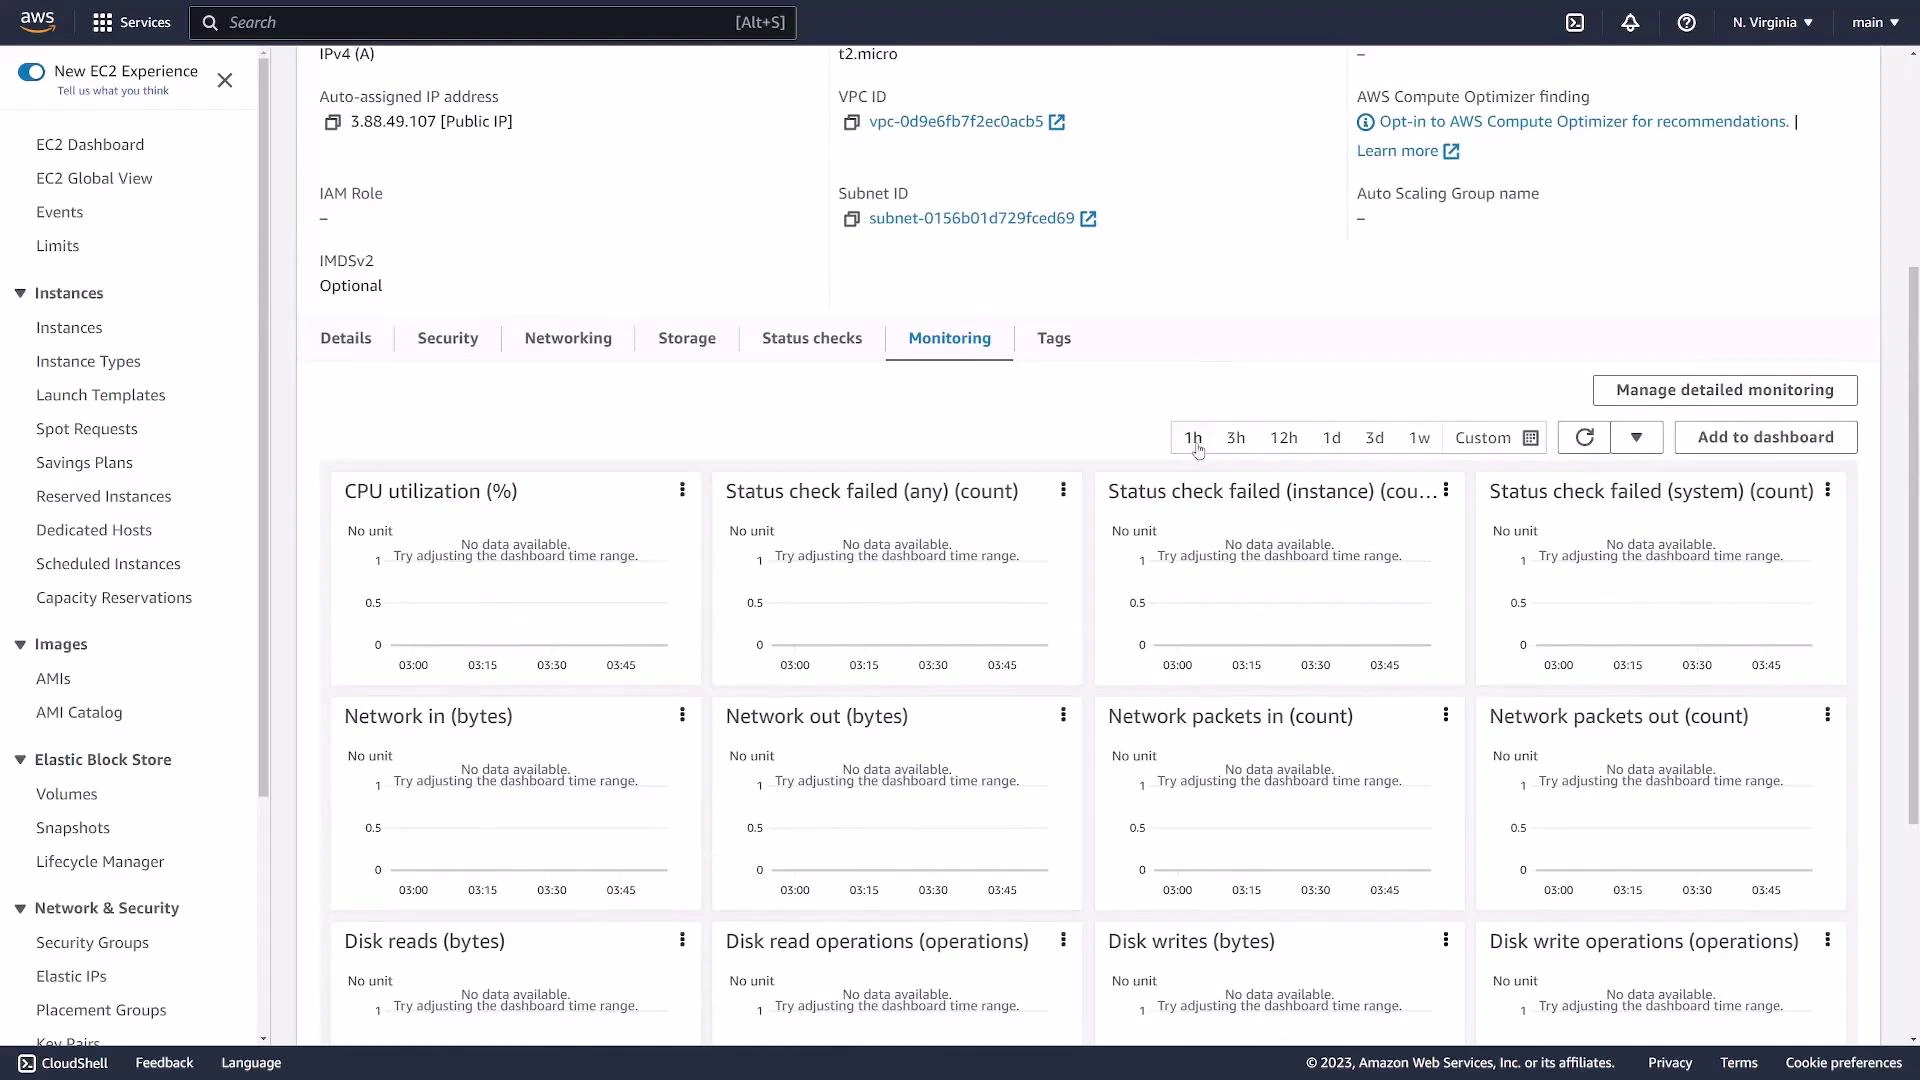 You can use the Actions menu from the Instances list to change networking, adjust security groups, or manage instance state (Stop, Reboot, Terminate).
 ## 7. Connect via SSH
Requirements:
* The private key file you downloaded (for example `ec2-demo.pem`)
* The instance Public IPv4 or Public DNS
* Correct username for the AMI (common defaults: `ubuntu` for Ubuntu, `ec2-user` for Amazon Linux, `centos` for CentOS)
Example connection steps from your terminal:
```bash theme={null}
# Restrict key permissions so SSH accepts the key
chmod 400 ec2-demo.pem
# Replace PUBLIC_IP with the instance public IPv4 or use the public DNS
ssh -i ec2-demo.pem ubuntu@PUBLIC_IP
```
On first connection SSH will ask to confirm the host key — type `yes`. A successful login will show a prompt such as:
```text theme={null}
ubuntu@ip-172-31-90-1:~$
```
Simple commands to run after connecting:
```bash theme={null}
# List files in home
ls -la
# Check disk space
df -h
# Update package lists (Ubuntu)
sudo apt update
```
If SSH fails, check:
* Security group inbound rules (SSH allowed from your IP).
* The username matches the AMI (e.g., `ubuntu`, `ec2-user`).
* The private key file has restrictive permissions (`chmod 400 ec2-demo.pem`).
## 8. Stop, reboot, or terminate
When finished, manage instance lifecycle via the Actions menu:
* Stop: Graceful shutdown; you can start it later.
* Reboot: Restart the instance.
* Terminate: Permanently delete the instance and (usually) its attached root EBS volume, depending on the DeleteOnTermination setting.
Terminate or stop unused instances to avoid unexpected charges.
## Links and references
* [Amazon EC2 overview](https://learn.kodekloud.com/user/courses/amazon-elastic-compute-cloud-ec2)
* [EC2 key pairs documentation](https://docs.aws.amazon.com/AWSEC2/latest/UserGuide/ec2-key-pairs.html)
* [EC2 AMIs](https://docs.aws.amazon.com/AWSEC2/latest/UserGuide/AMIs.html)
* [EBS volumes](https://docs.aws.amazon.com/AWSEC2/latest/UserGuide/EBSEncryption.html)
* [AWS CloudWatch](https://learn.kodekloud.com/user/courses/aws-cloudwatch)
Follow these steps to quickly launch and access an EC2 instance; for production environments apply hardened security group rules, use IAM roles, and enable monitoring and backups.
## 7. Connect via SSH
Requirements:
* The private key file you downloaded (for example `ec2-demo.pem`)
* The instance Public IPv4 or Public DNS
* Correct username for the AMI (common defaults: `ubuntu` for Ubuntu, `ec2-user` for Amazon Linux, `centos` for CentOS)
Example connection steps from your terminal:
```bash theme={null}
# Restrict key permissions so SSH accepts the key
chmod 400 ec2-demo.pem
# Replace PUBLIC_IP with the instance public IPv4 or use the public DNS
ssh -i ec2-demo.pem ubuntu@PUBLIC_IP
```
On first connection SSH will ask to confirm the host key — type `yes`. A successful login will show a prompt such as:
```text theme={null}
ubuntu@ip-172-31-90-1:~$
```
Simple commands to run after connecting:
```bash theme={null}
# List files in home
ls -la
# Check disk space
df -h
# Update package lists (Ubuntu)
sudo apt update
```
If SSH fails, check:
* Security group inbound rules (SSH allowed from your IP).
* The username matches the AMI (e.g., `ubuntu`, `ec2-user`).
* The private key file has restrictive permissions (`chmod 400 ec2-demo.pem`).
## 8. Stop, reboot, or terminate
When finished, manage instance lifecycle via the Actions menu:
* Stop: Graceful shutdown; you can start it later.
* Reboot: Restart the instance.
* Terminate: Permanently delete the instance and (usually) its attached root EBS volume, depending on the DeleteOnTermination setting.
Terminate or stop unused instances to avoid unexpected charges.
## Links and references
* [Amazon EC2 overview](https://learn.kodekloud.com/user/courses/amazon-elastic-compute-cloud-ec2)
* [EC2 key pairs documentation](https://docs.aws.amazon.com/AWSEC2/latest/UserGuide/ec2-key-pairs.html)
* [EC2 AMIs](https://docs.aws.amazon.com/AWSEC2/latest/UserGuide/AMIs.html)
* [EBS volumes](https://docs.aws.amazon.com/AWSEC2/latest/UserGuide/EBSEncryption.html)
* [AWS CloudWatch](https://learn.kodekloud.com/user/courses/aws-cloudwatch)
Follow these steps to quickly launch and access an EC2 instance; for production environments apply hardened security group rules, use IAM roles, and enable monitoring and backups.