> ## Documentation Index
> Fetch the complete documentation index at: https://notes.kodekloud.com/llms.txt
> Use this file to discover all available pages before exploring further.
# Demo Automating with Agent Mode
> This walkthrough explores using Agent Mode in Cursor AI to automate a Python project, including data processing, test generation, and documentation.
In this walkthrough, we’ll explore how to use **Agent Mode** in Cursor AI to automate a full Python project—from reading customer data to generating tests and documentation—in minutes. You’ll learn how to:
* Enable and configure **Autocompletion** safely.
* Define an allowlist/denylist for automated commands.
* Generate code, tests, and docs with a single instruction set.
* Run and verify the output locally using a Python virtual environment.
## Prerequisites
* Cursor AI with **Agent Mode** enabled
* Python 3.8 or higher installed
* A CSV file named `customers.csv` containing customer data
## 1. Enable Autocompletion Mode
First, open **Cursor Settings** and turn on **Autocompletion mode**. Read the disclaimer carefully before proceeding.
Enabling Autocompletion mode may increase the risk of prompt injection. Only proceed if you trust the source of your prompts.
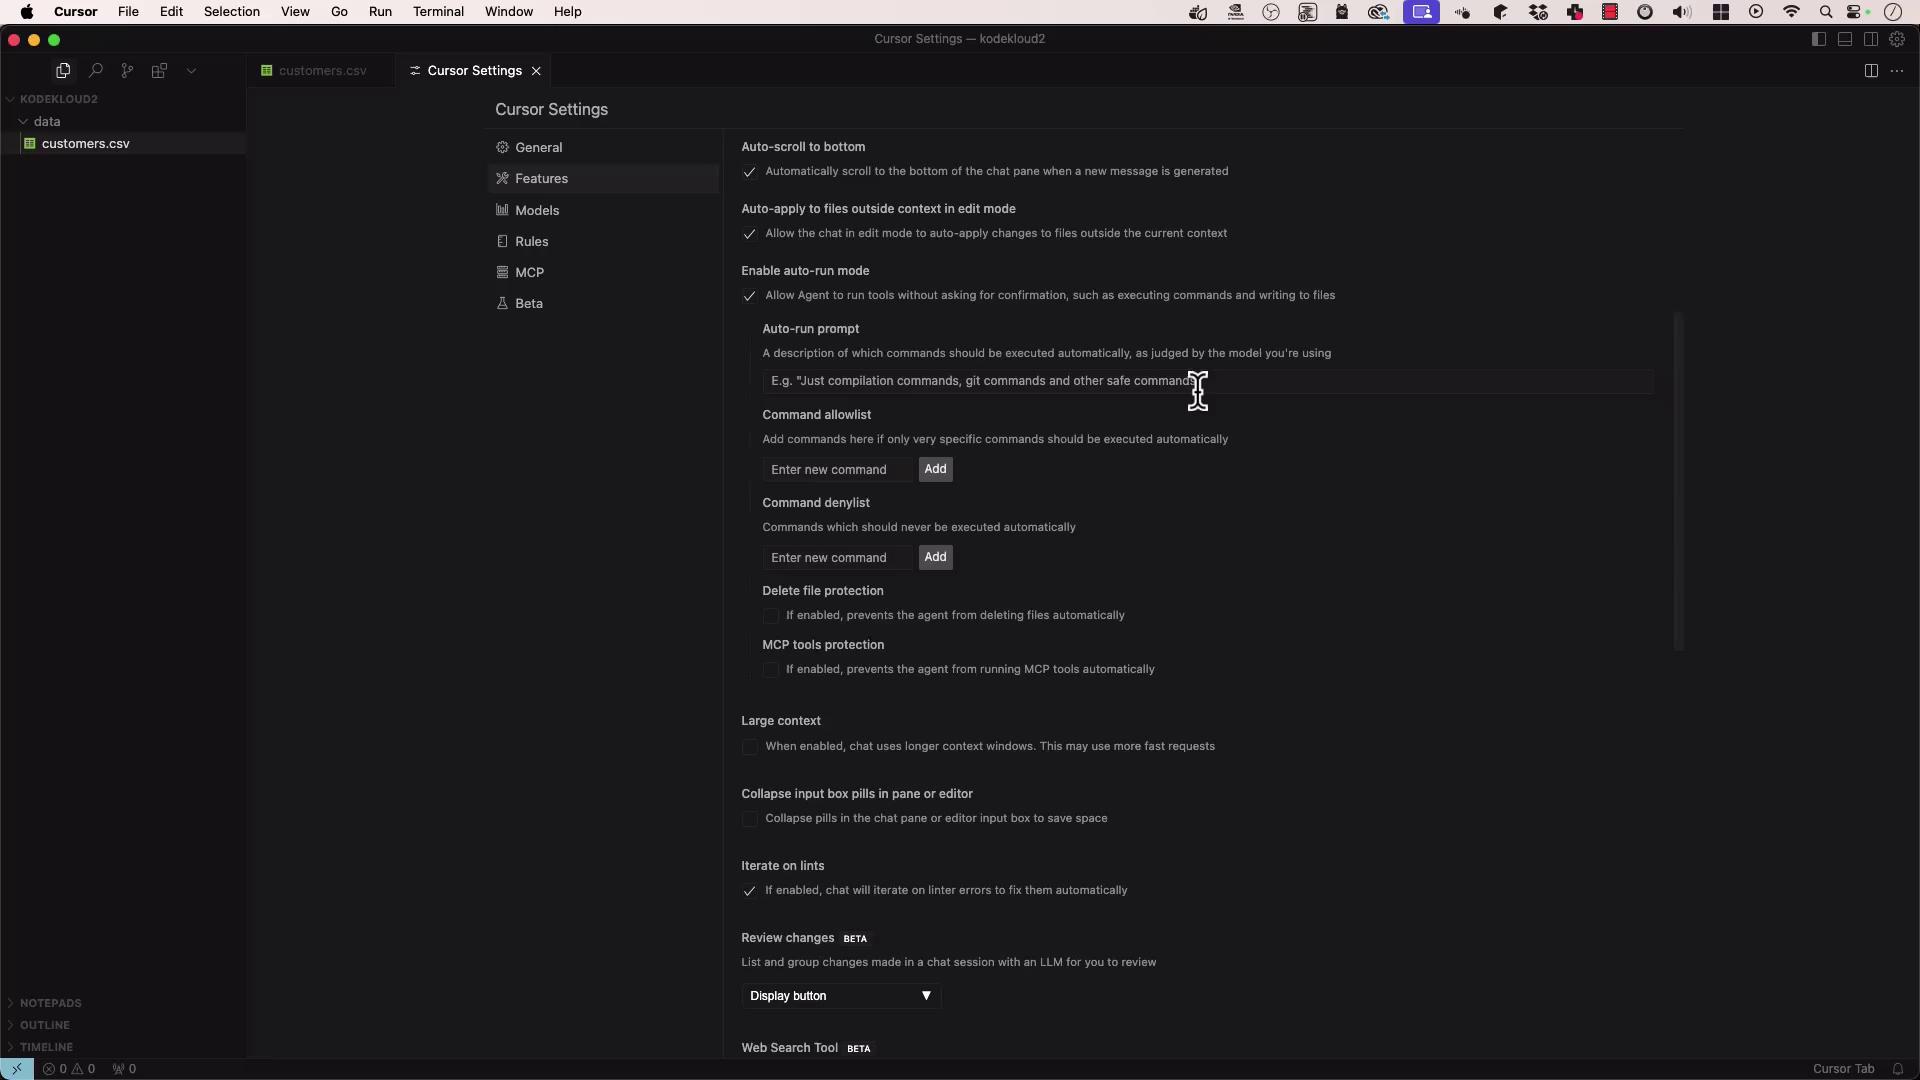
### Configure Autocompletion Settings
| Setting | Description |
| ----------------- | ------------------------------------------------------------------------- |
| Auto Run Prompt | Natural-language instructions the agent will execute automatically. |
| Command Allowlist | List commands the agent is permitted to run (e.g., `pip install pytest`). |
| Command Denylist | Block undesired commands (e.g., `rm -rf /`). |
| File Protection | Prevent deletion or modification of critical files. |
| MCP Tools | Disable resource-intensive operations to control cloud costs. |
Save these settings and switch to **Agent** mode.
## 2. Attach Data and Select Model
1. Upload `customers.csv` (large CSV with customer records).
2. Choose whether to include the full context or let the agent use intelligent compression.
3. Select your model (e.g., `gpt-4o-cloud`).
## 3. Provide an Instruction List
Ask the agent to perform these steps:
1. Create `process_customers.py` to read `customers.csv`.
2. Extract first and last names → write to `namevalues.csv`.
3. Extract phone numbers → write to `phone.txt`.
4. Install `pytest`.
5. Generate a `pytest` test suite validating the script.
Click **Generate**. The agent will:
* Read the first 200 lines of `customers.csv`.
* Produce `process_customers.py` with data-processing logic.
* Create unit tests in `test_process_customers.py`.
* Display all proposed code changes for your approval.
Once you **Accept**, the files appear in your workspace.
## 4. Set Up Your Local Environment
Open a terminal and create a Python virtual environment:
```bash theme={null}
# Create and activate venv
python -m venv venv
source venv/bin/activate
# Install pytest
pip install pytest
```
## 5. Run the Data Processing Script
Execute the generated script:
```bash theme={null}
python process_customers.py
```
The script writes output files `namevalues.csv` and `phone.txt` without printing to the console. Verify with:
```bash theme={null}
head -n 5 namevalues.csv
head -n 5 phone.txt
```
## 6. Inspect Output Samples
```bash theme={null}
# namevalues.csv
first_name,last_name
Joye,Lonnon
Charyl,Wanka
Merrel,Palumbo
Dannel,Tarplee
# phone.txt
619-459-1773
916-472-7327
215-772-7423
723-375-1649
217-778-2922
```
## 7. Run and Auto-Fix Tests
```bash theme={null}
pytest test_process_customers.py -v
```
If any tests fail, Agent Mode will update the tests and re-run them automatically until they pass.
## 8. Generate `requirements.txt` and `README.md`
Ask the agent to scaffold these files:
**requirements.txt**
```text theme={null}
pytest>=8.0
```
**README.md**
````markdown theme={null}
## Setup
1. Clone the repository.
2. Create a virtual environment:
```bash
python -m venv venv
```text
3. Activate:
- macOS/Linux: `source venv/bin/activate`
- Windows: `venv\Scripts\activate`
4. Install dependencies:
```bash
pip install -r requirements.txt
```text
## Usage
```bash
python process_customers.py
```text
Reads `customers.csv`, writes names to `namevalues.csv` and phones to `phone.txt`.
## Testing
```bash
pytest -v
```text
````
***
```python theme={null}
import csv
def process_customer_data(input_file, name_output_file, phone_output_file):
"""
Process customer data from a CSV file and extract names and phone numbers.
Args:
input_file (str): Path to the input CSV file.
name_output_file (str): Path to the output CSV file for names.
phone_output_file (str): Path to the output TXT file for phone numbers.
"""
with open(input_file, newline='') as csvfile:
reader = csv.DictReader(csvfile)
names, phones = [], []
for row in reader:
first = row.get('first_name', '').strip()
last = row.get('last_name', '').strip()
phone = row.get('phone_number', '').strip()
if first or last:
names.append((first, last))
if phone:
phones.append(phone)
with open(name_output_file, 'w', newline='') as namefile:
writer = csv.writer(namefile)
writer.writerow(['first_name', 'last_name'])
writer.writerows(names)
with open(phone_output_file, 'w') as phonefile:
for phone in phones:
phonefile.write(phone + '\n')
if __name__ == '__main__':
process_customer_data('customers.csv', 'namevalues.csv', 'phone.txt')
```
***
## Links and References
* [Python venv documentation](https://docs.python.org/3/library/venv.html)
* [pytest documentation](https://docs.pytest.org/en/stable/)
* [Python csv module](https://docs.python.org/3/library/csv.html)