> ## Documentation Index
> Fetch the complete documentation index at: https://notes.kodekloud.com/llms.txt
> Use this file to discover all available pages before exploring further.

# Demo Data Factory

> This article provides a step-by-step guide to create an Azure Data Factory pipeline for copying a CSV file from Blob Storage to Data Lake.

In this step-by-step guide, you will create an Azure Data Factory instance and build a simple pipeline to copy a CSV file (`biostats.csv`) from Azure Blob Storage into Azure Data Lake Storage Gen2.

## Prerequisites

* Active Azure subscription
* Existing Azure Synapse Analytics workspace with Data Lake Storage Gen2
* Storage account (e.g., **PHVNewStorage**) containing a `sampledata` container

For more details, refer to the [Azure Data Factory documentation](https://learn.microsoft.com/azure/data-factory/).

## 1. Create an Azure Data Factory

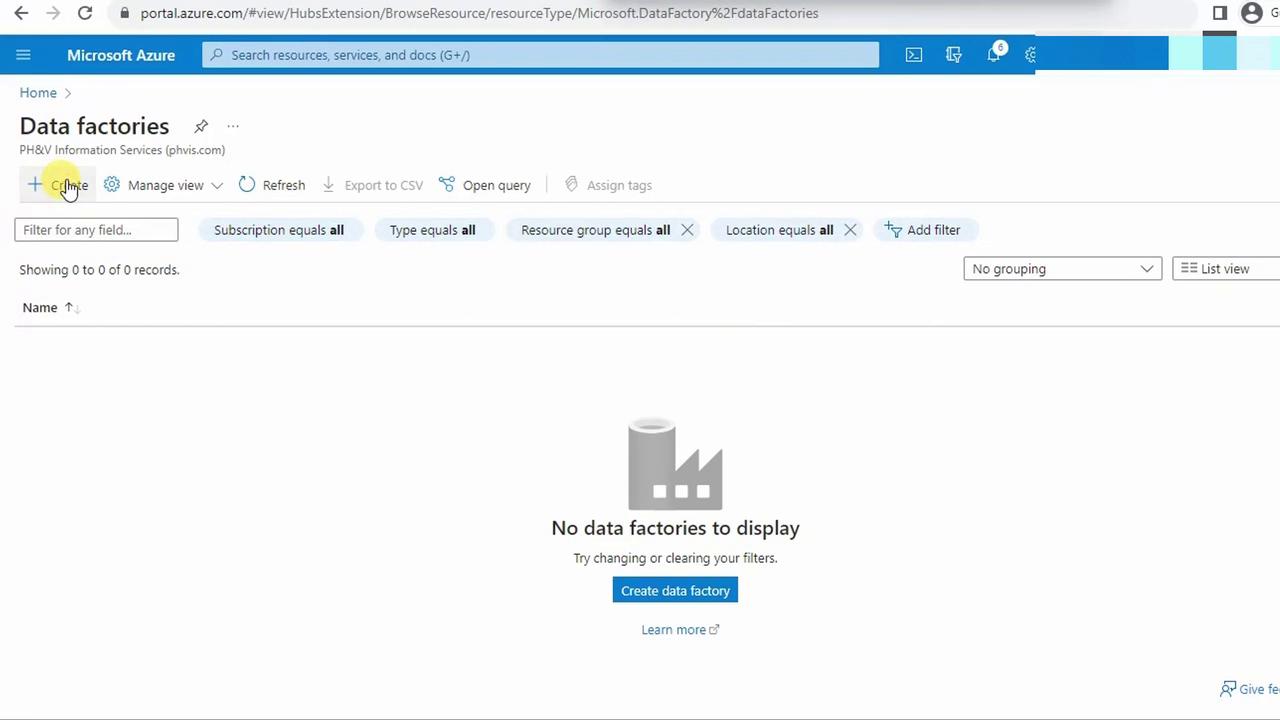
1. Sign in to the Azure Portal and navigate to **Data Factories**. Click **+ Create**.
<Frame>
  ![The image shows a Microsoft Azure portal page for "Data factories," indicating that there are no data factories to display. There is an option to create a new data factory.](https://kodekloud.com/kk-media/image/upload/v1752872846/notes-assets/images/DP-900-Microsoft-Azure-Data-Fundamentals-Demo-Data-Factory/azure-portal-data-factories-no-data.jpg)
</Frame>

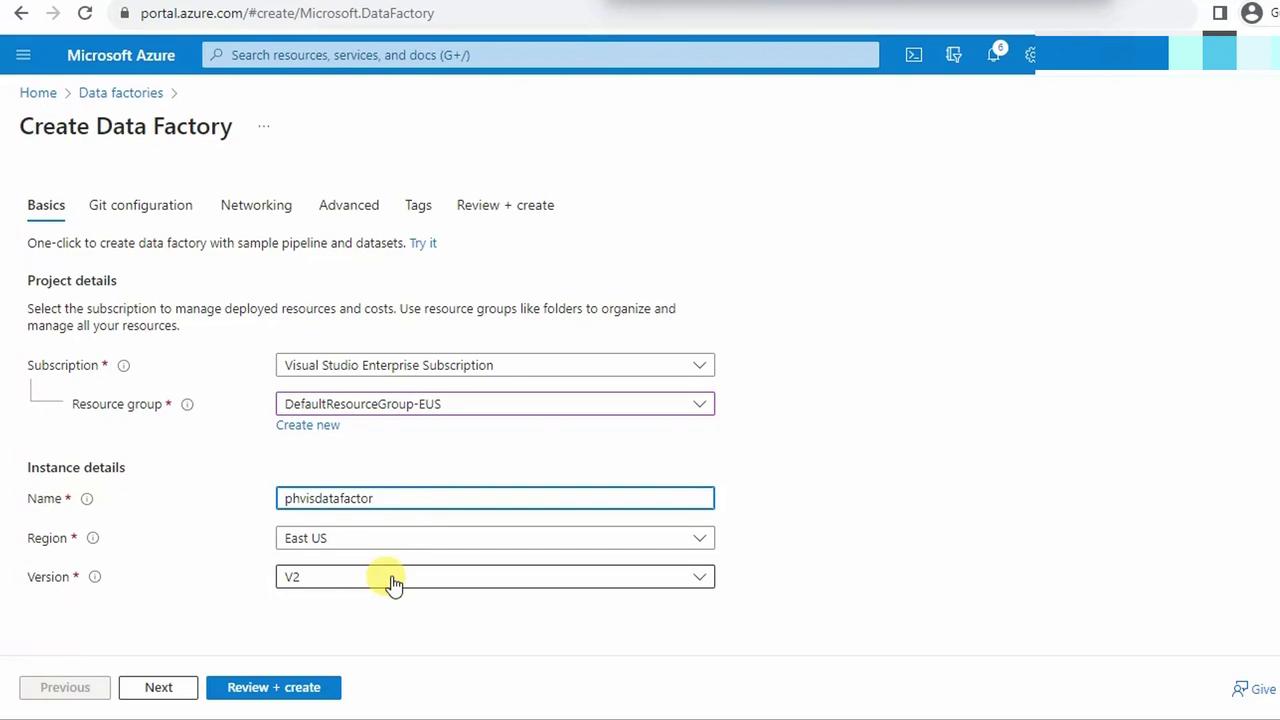
2. On the **Create Data Factory** blade, configure:
   * Subscription
   * Resource group
   * Instance name
   * Region
   * Version (defaults to V2)
<Frame>
  ![The image shows a Microsoft Azure portal interface for creating a Data Factory, with fields for subscription, resource group, instance name, region, and version.](https://kodekloud.com/kk-media/image/upload/v1752872847/notes-assets/images/DP-900-Microsoft-Azure-Data-Fundamentals-Demo-Data-Factory/azure-portal-data-factory-interface.jpg)
</Frame>

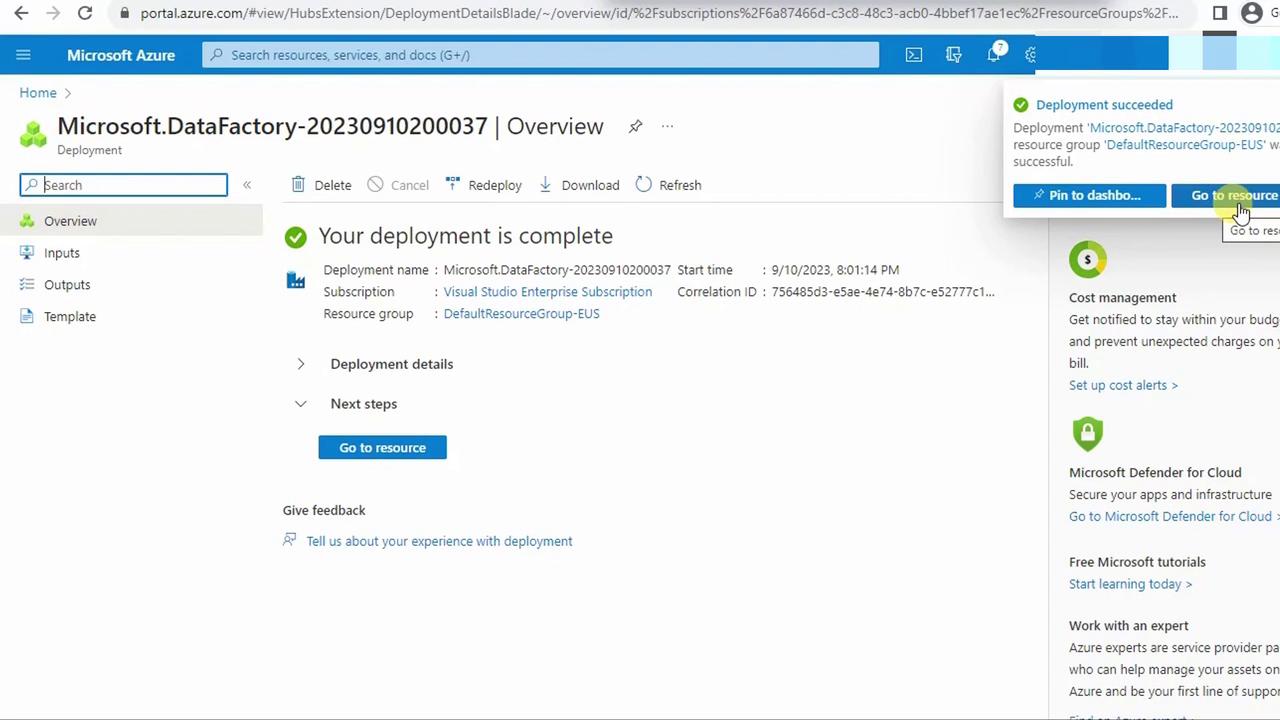
3. Click **Review + create**, then **Create**. Wait for deployment to finish.
<Frame>
  ![The image shows a Microsoft Azure portal page indicating that a deployment named "Microsoft.DataFactory-20230910200037" has been successfully completed. It includes deployment details and options to go to the resource or pin it to the dashboard.](https://kodekloud.com/kk-media/image/upload/v1752872849/notes-assets/images/DP-900-Microsoft-Azure-Data-Fundamentals-Demo-Data-Factory/azure-portal-deployment-success-details.jpg)
</Frame>

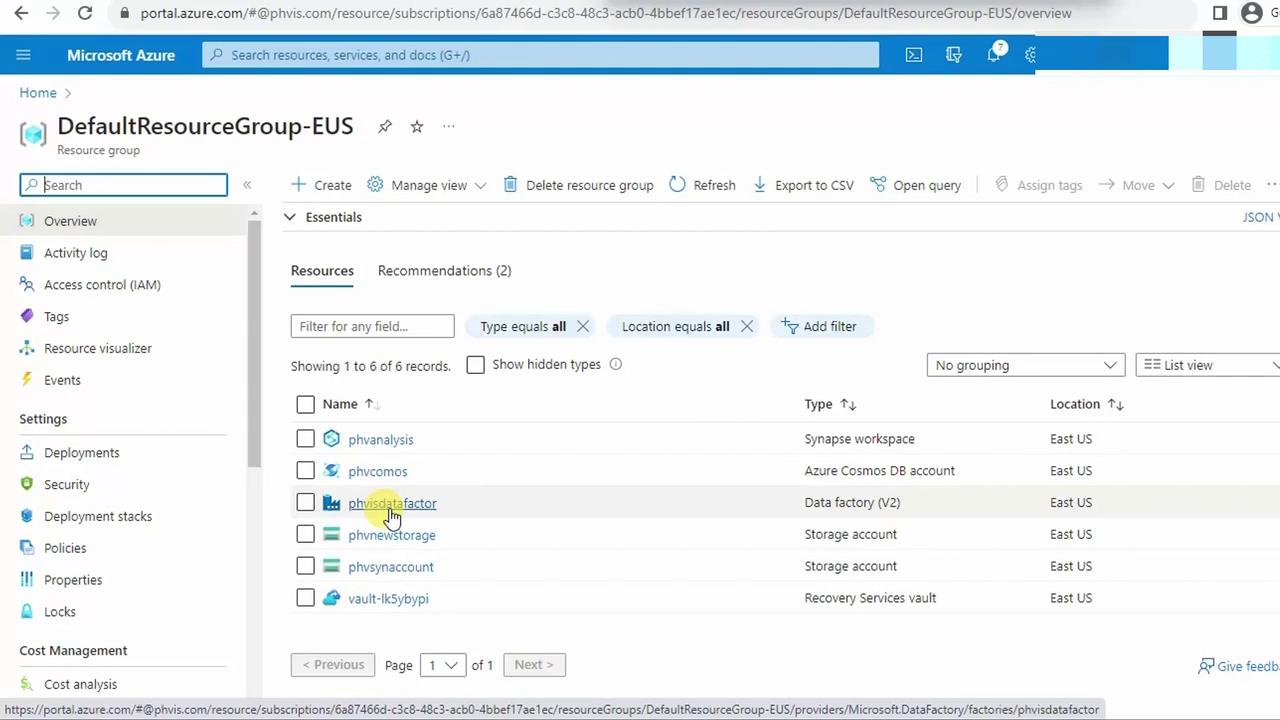
4. In your resource group, locate the new Data Factory. Refresh if necessary.
<Frame>
  ![The image shows a Microsoft Azure portal interface displaying a resource group named "DefaultResourceGroup-EUS" with a list of resources, including their names, types, and locations.](https://kodekloud.com/kk-media/image/upload/v1752872850/notes-assets/images/DP-900-Microsoft-Azure-Data-Fundamentals-Demo-Data-Factory/azure-portal-default-resource-group-resources.jpg)
</Frame>

5. Select the Data Factory to open its overview page.

## 2. Launch Azure Data Factory Studio

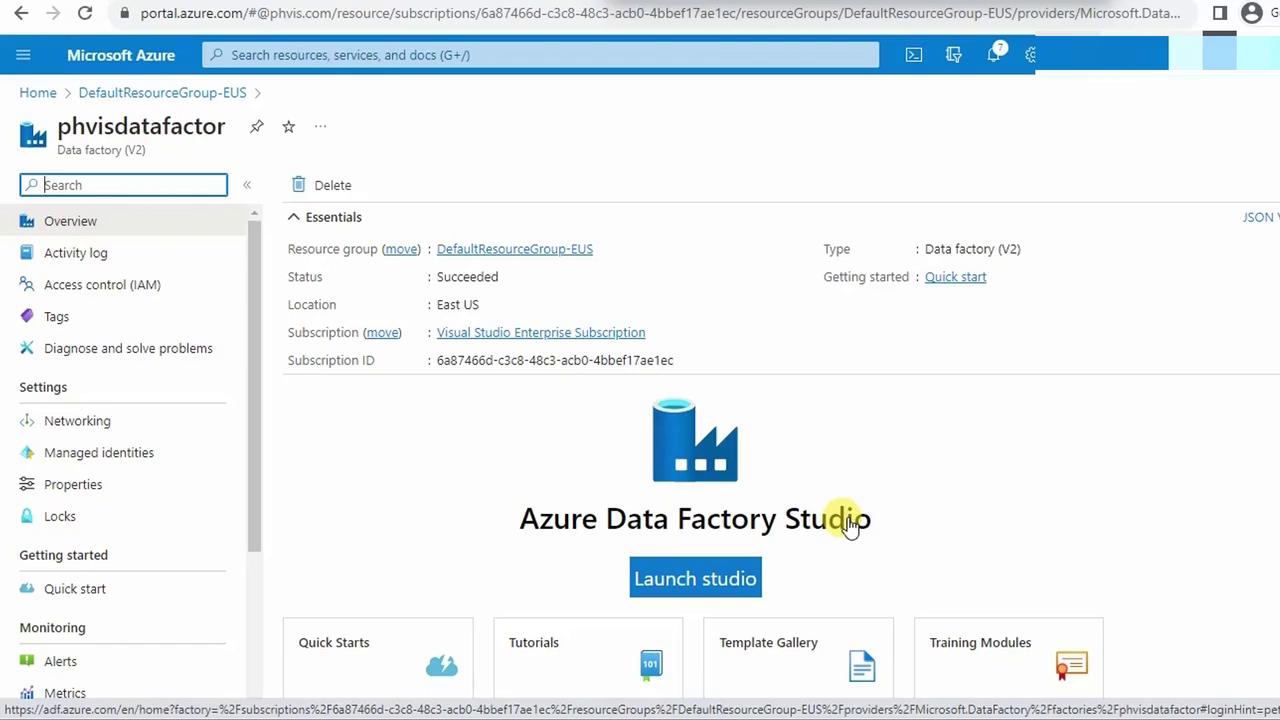
Azure Data Factory Studio is the integrated web UI for designing and monitoring pipelines.

1. On the Data Factory overview page, click **Launch Studio**.
<Frame>
  ![The image shows a Microsoft Azure portal interface for a Data Factory resource, with options to launch Azure Data Factory Studio and access various features like tutorials and templates.](https://kodekloud.com/kk-media/image/upload/v1752872852/notes-assets/images/DP-900-Microsoft-Azure-Data-Fundamentals-Demo-Data-Factory/azure-portal-data-factory-interface-2.jpg)
</Frame>

2. A new browser tab opens with the Studio workspace.

## 3. Set Up Source and Destination Storage

We will copy `biostats.csv` from the **PHVNewStorage** account's `sampledata` container into your Data Lake Gen2 storage.

<Callout icon="lightbulb" color="#1CB2FE">
  Ensure you have the **Storage Blob Data Contributor** role on both the source and destination storage accounts.
</Callout>

## 4. Build the Copy Data Pipeline

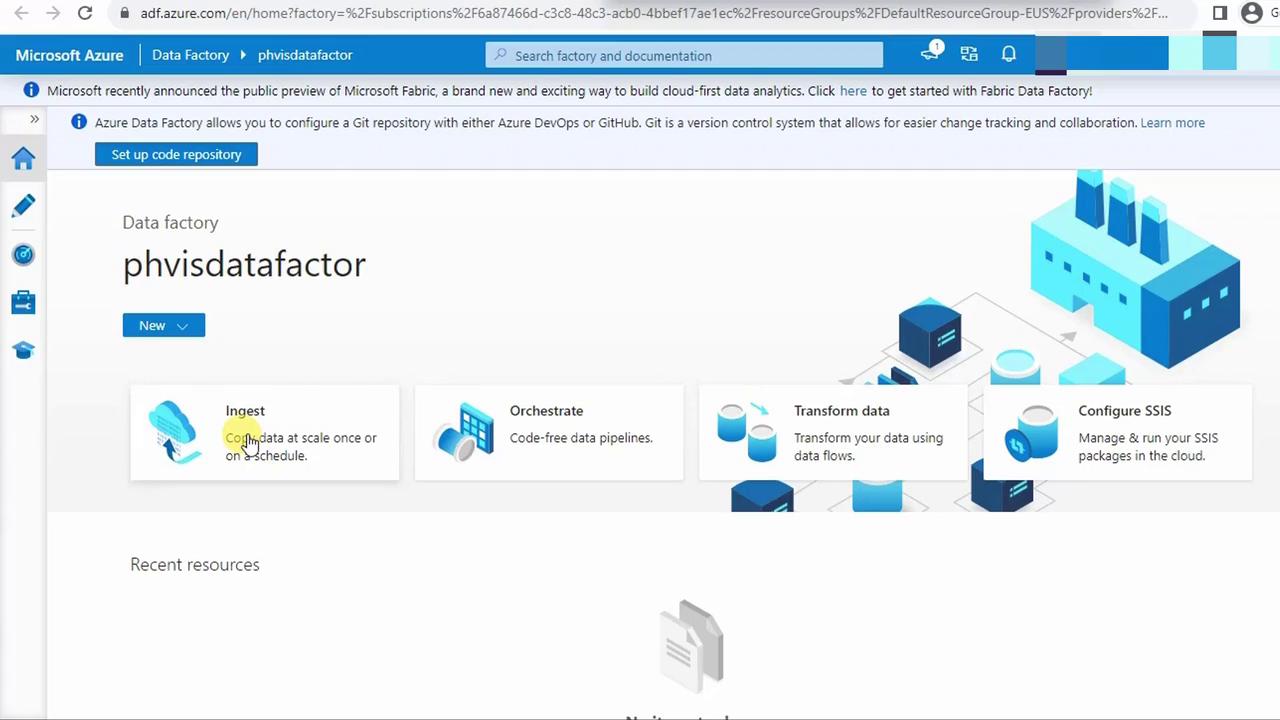
1. In Studio, select **Ingest** from the left menu, then click **Copy Data**.
<Frame>
  ![The image shows the Azure Data Factory interface with options for ingesting, orchestrating, transforming data, and configuring SSIS. It includes a navigation bar and a section for recent resources.](https://kodekloud.com/kk-media/image/upload/v1752872855/notes-assets/images/DP-900-Microsoft-Azure-Data-Fundamentals-Demo-Data-Factory/azure-data-factory-interface-options.jpg)
</Frame>

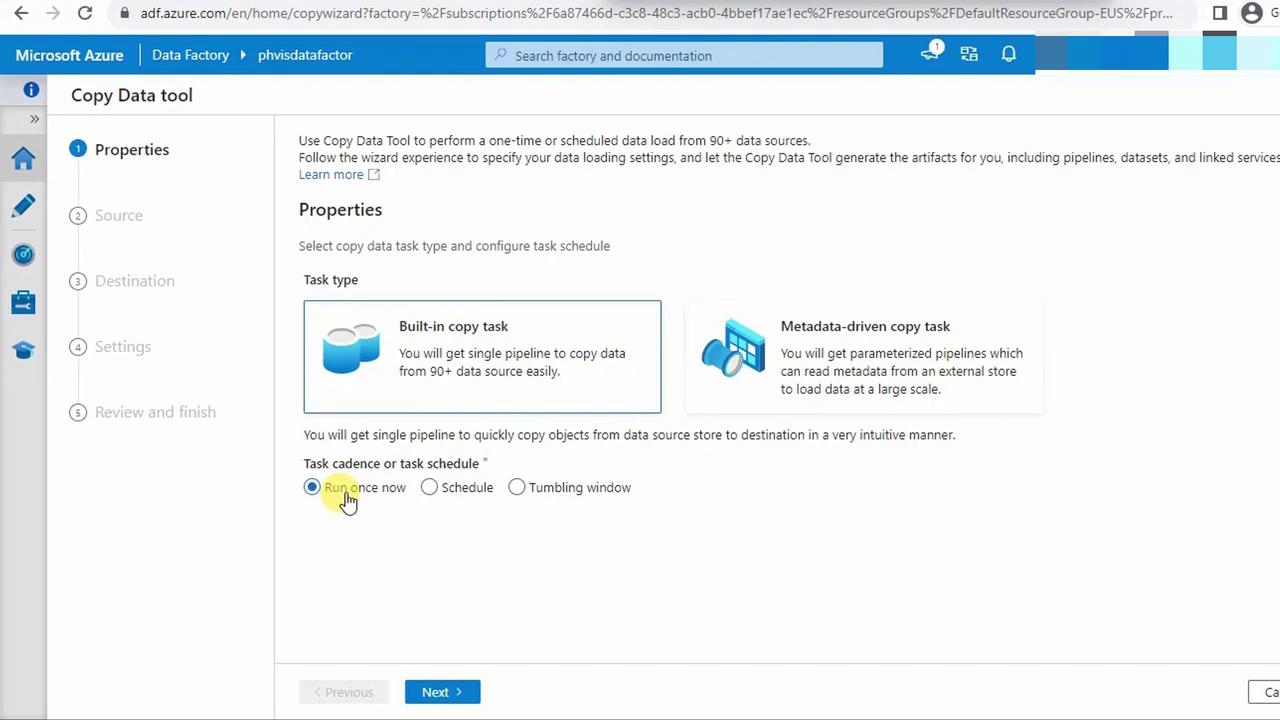
2. Choose **Built-in copy task**, set **Run once now**, and click **Next**.
<Frame>
  ![The image shows a Microsoft Azure Data Factory interface for the "Copy Data Tool," where users can select task types and configure task schedules for data copying. Options include "Built-in copy task" and "Metadata-driven copy task," with a task schedule set to "Run once now."](https://kodekloud.com/kk-media/image/upload/v1752872857/notes-assets/images/DP-900-Microsoft-Azure-Data-Fundamentals-Demo-Data-Factory/azure-data-factory-copy-data-tool.jpg)
</Frame>

### 4.1 Configure Source

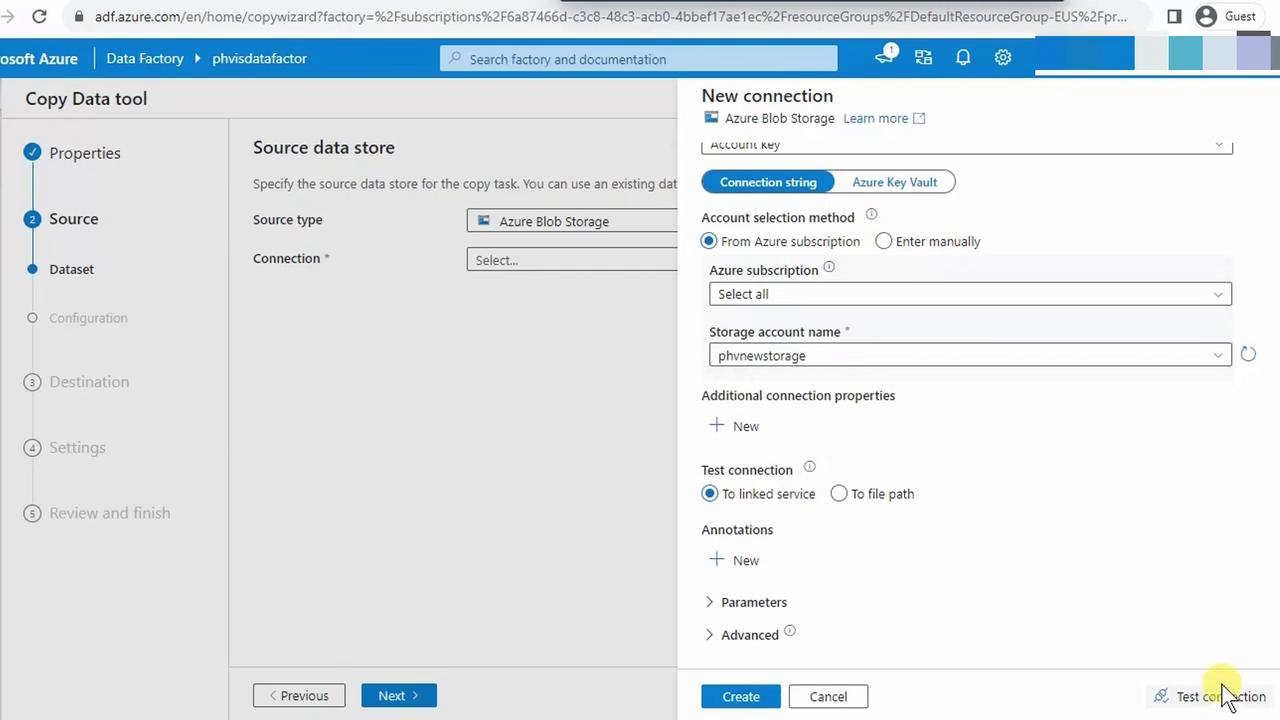
1. Under **Source data store**, select **Azure Blob Storage**.
2. Click **New** to create a linked service. Name it (e.g., `csvhome`), choose your subscription, and select **PHVNewStorage**. Test then save.
<Frame>
  ![The image shows a Microsoft Azure interface for setting up a new connection in the Copy Data tool, specifically configuring Azure Blob Storage as the source data store. Options for account selection and connection testing are visible.](https://kodekloud.com/kk-media/image/upload/v1752872858/notes-assets/images/DP-900-Microsoft-Azure-Data-Fundamentals-Demo-Data-Factory/azure-blob-storage-connection-setup.jpg)
</Frame>

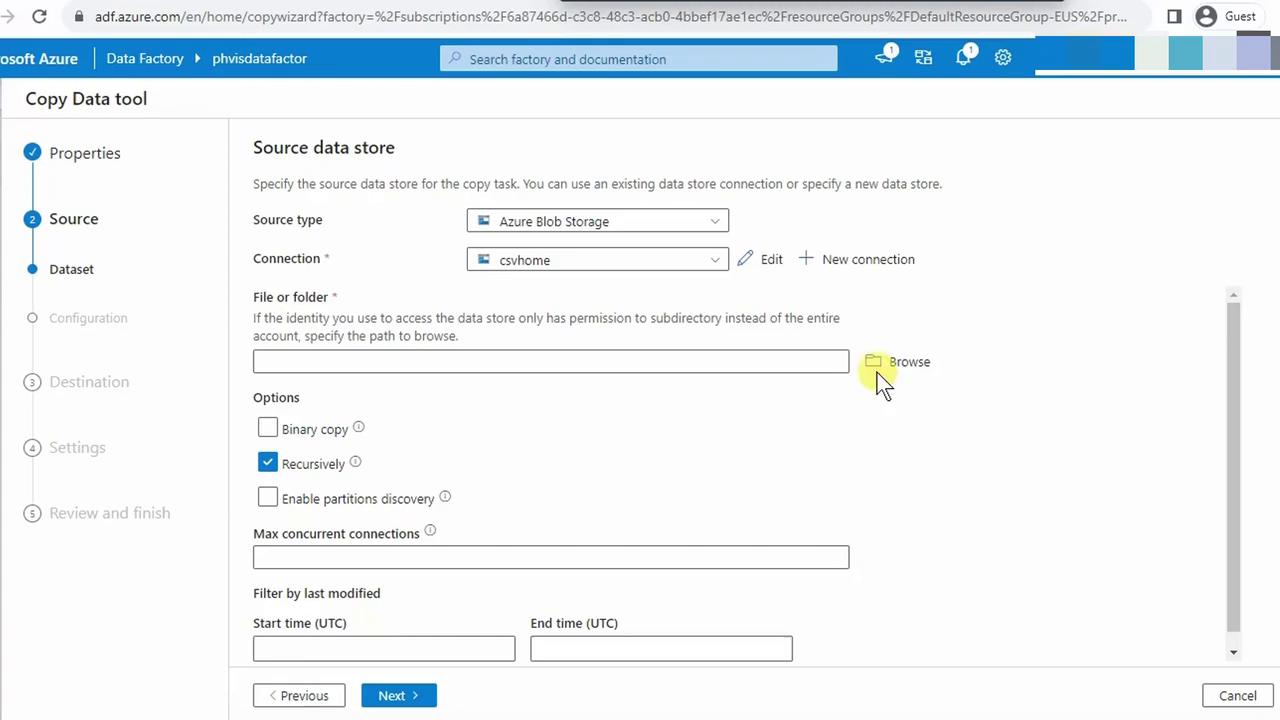
3. Click **Browse**, expand containers, and select `sampledata`.
<Frame>
  ![The image shows a screenshot of the "Copy Data tool" in Microsoft Azure Data Factory, specifically the "Source data store" configuration page. It includes options for selecting the source type, connection, and file or folder, along with additional settings like binary copy and recursion.](https://kodekloud.com/kk-media/image/upload/v1752872859/notes-assets/images/DP-900-Microsoft-Azure-Data-Fundamentals-Demo-Data-Factory/azure-data-factory-copy-data-tool-2.jpg)
</Frame>

4. Enable **Recursion** to include subfolders. Click **Next**.

### 4.2 Upload or Verify Your CSV

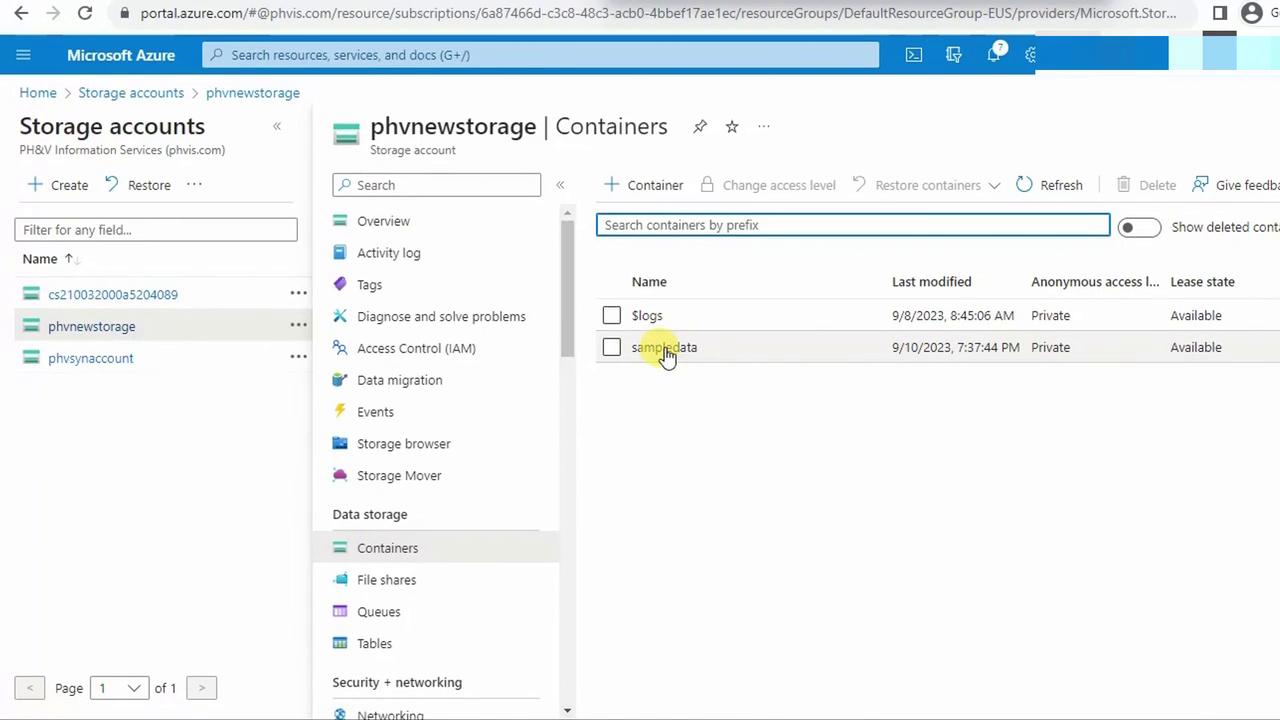
1. In the Azure Portal, open **Storage Accounts** > **PHVNewStorage** > **Containers** > **sampledata**.
<Frame>
  ![The image shows a Microsoft Azure portal interface displaying storage account details, specifically the "Containers" section with two containers listed: "\$logs" and "sampledata."](https://kodekloud.com/kk-media/image/upload/v1752872860/notes-assets/images/DP-900-Microsoft-Azure-Data-Fundamentals-Demo-Data-Factory/azure-portal-storage-containers-details.jpg)
</Frame>

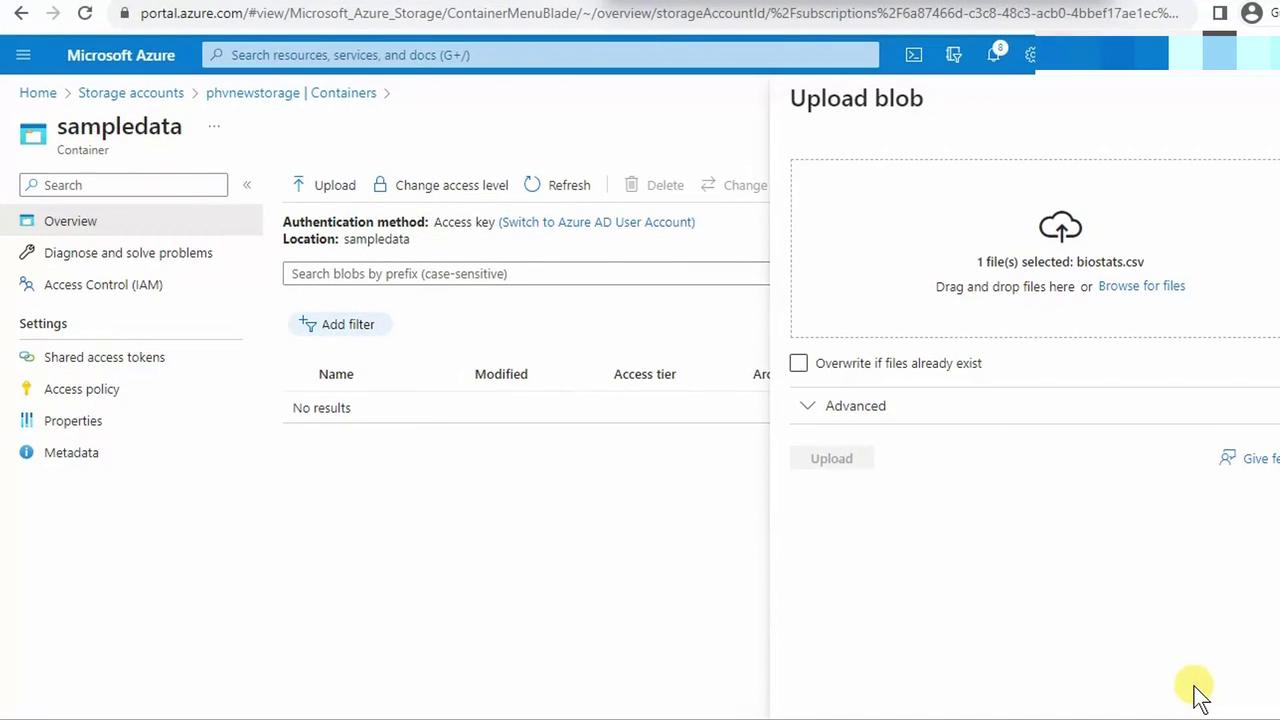
2. Remove old files, then upload `biostats.csv`.
<Frame>
  ![The image shows a Microsoft Azure portal interface for uploading a blob to a storage container named "sampledata." A file named "biostats.csv" is selected for upload.](https://kodekloud.com/kk-media/image/upload/v1752872861/notes-assets/images/DP-900-Microsoft-Azure-Data-Fundamentals-Demo-Data-Factory/azure-portal-upload-blob-sampledata.jpg)
</Frame>

3. Return to Studio and click **Next**.

### 4.3 Define Source File Format

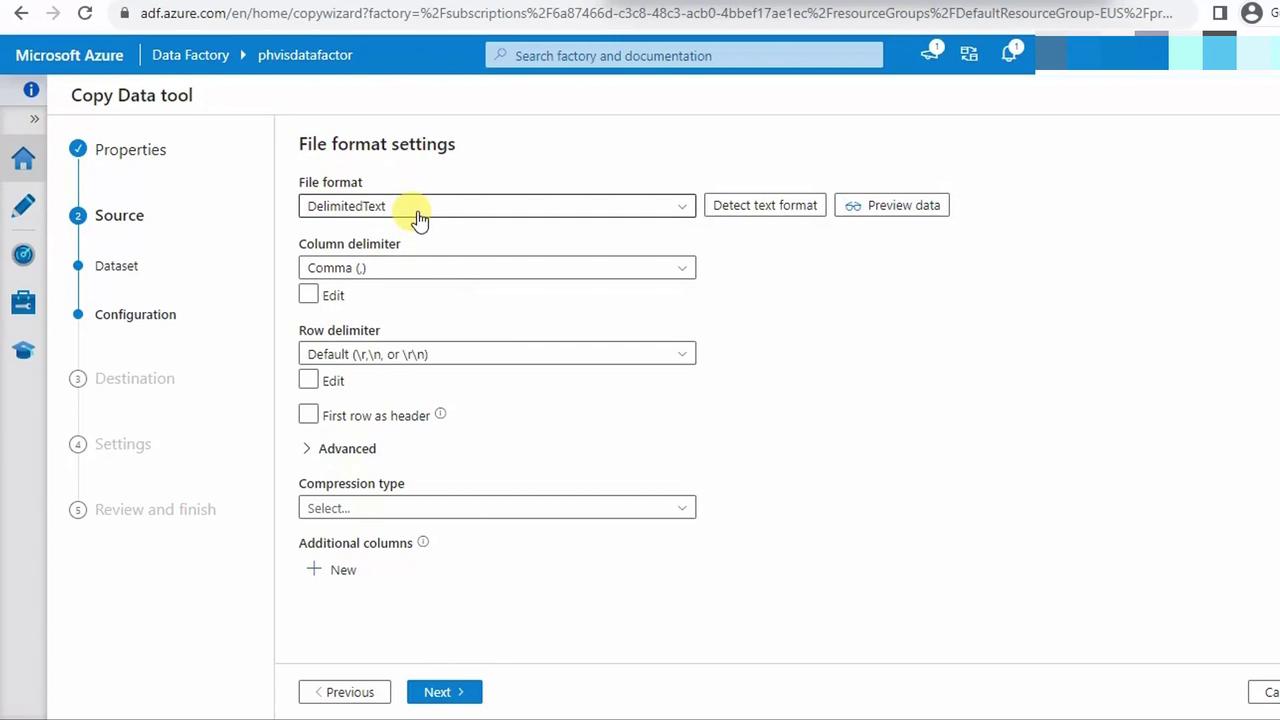
* Select **DelimitedText** with comma (`,`) as the column delimiter. Keep default settings.
<Frame>
  ![The image shows a Microsoft Azure Data Factory interface, specifically the "Copy Data tool" with "File format settings" options for configuring data import, including file format, column delimiter, and row delimiter.](https://kodekloud.com/kk-media/image/upload/v1752872862/notes-assets/images/DP-900-Microsoft-Azure-Data-Fundamentals-Demo-Data-Factory/azure-data-factory-copy-data-tool-4.jpg)
</Frame>

Click **Next**.

### 4.4 Configure Destination

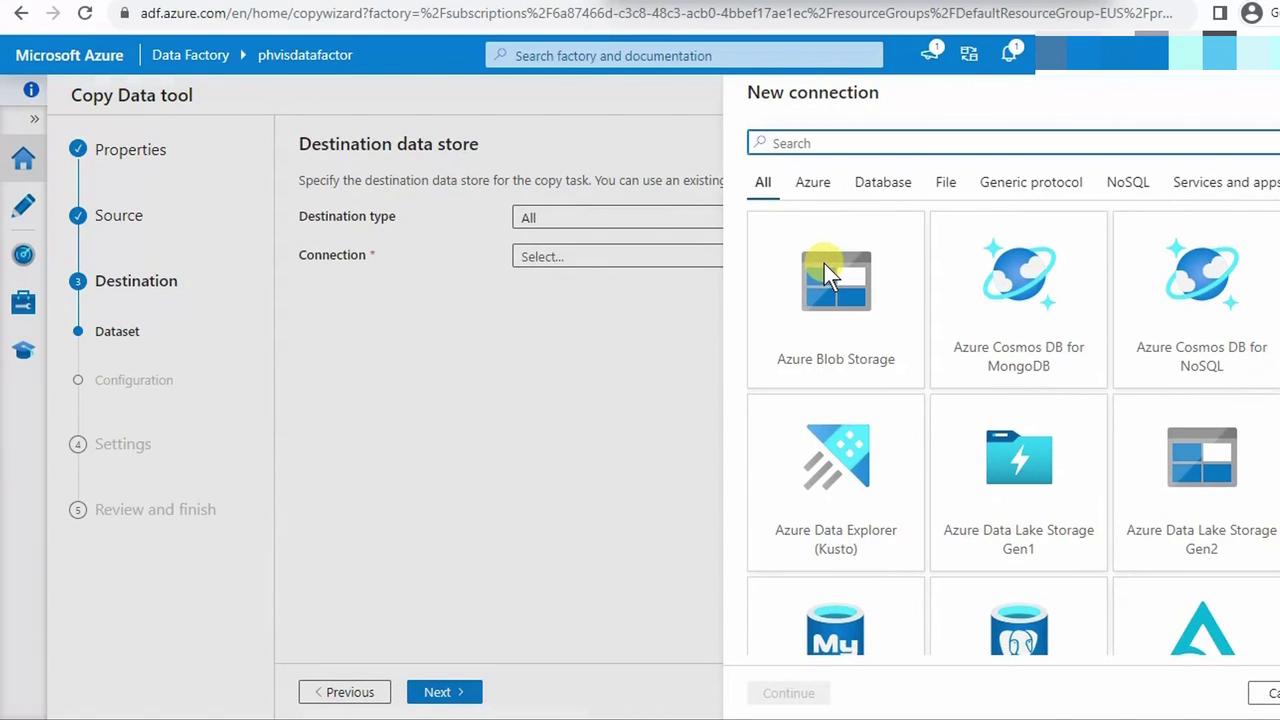
1. For **Destination data store**, pick **Azure Blob Storage** (Data Lake Gen2 uses the Blob API).
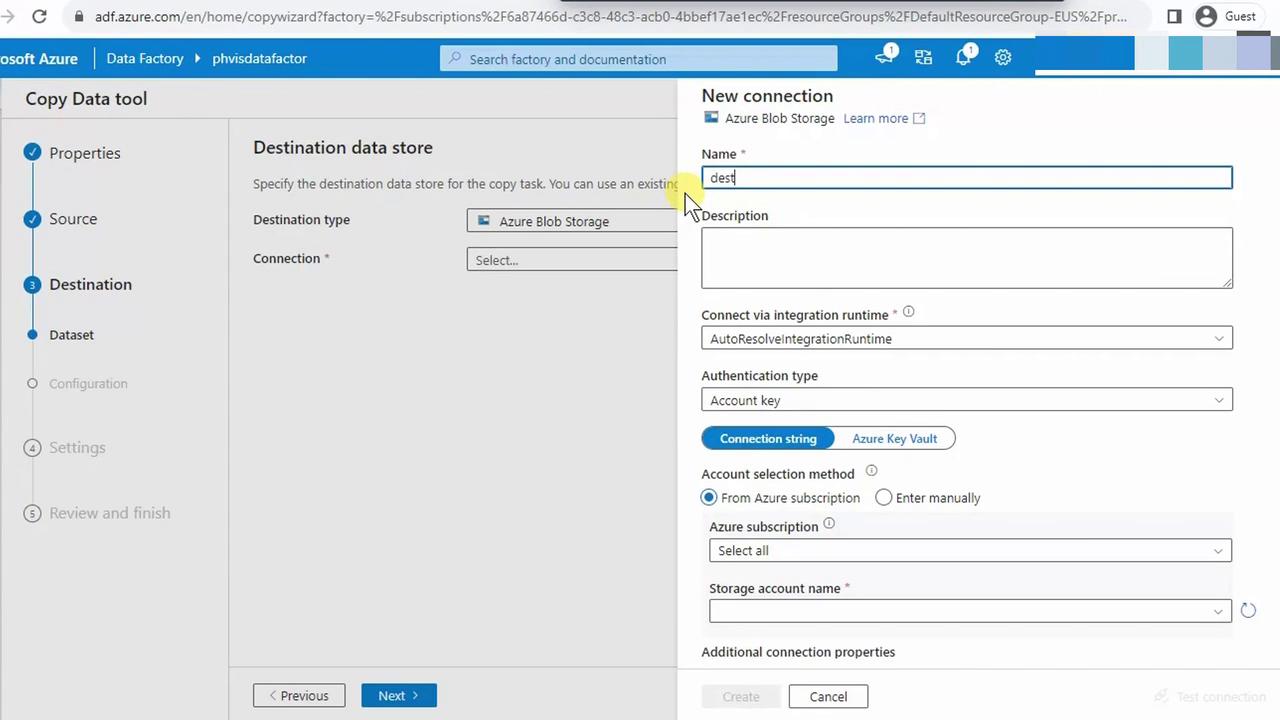
2. Create a new linked service: name it (e.g., `destination`), select your Data Lake account (e.g., **phvsinaccount**), and save.
<Frame>
  ![The image shows a Microsoft Azure Data Factory interface, specifically the "Copy Data tool" where a user is selecting a destination data store for a new connection, with options like Azure Blob Storage and Azure Cosmos DB.](https://kodekloud.com/kk-media/image/upload/v1752872863/notes-assets/images/DP-900-Microsoft-Azure-Data-Fundamentals-Demo-Data-Factory/azure-data-factory-copy-data-tool-5.jpg)
</Frame>

<Frame>
  ![The image shows a screenshot of the Azure Data Factory interface, specifically the "Copy Data tool" where a new connection to Azure Blob Storage is being configured.](https://kodekloud.com/kk-media/image/upload/v1752872864/notes-assets/images/DP-900-Microsoft-Azure-Data-Fundamentals-Demo-Data-Factory/azure-data-factory-copy-data-tool-6.jpg)
</Frame>

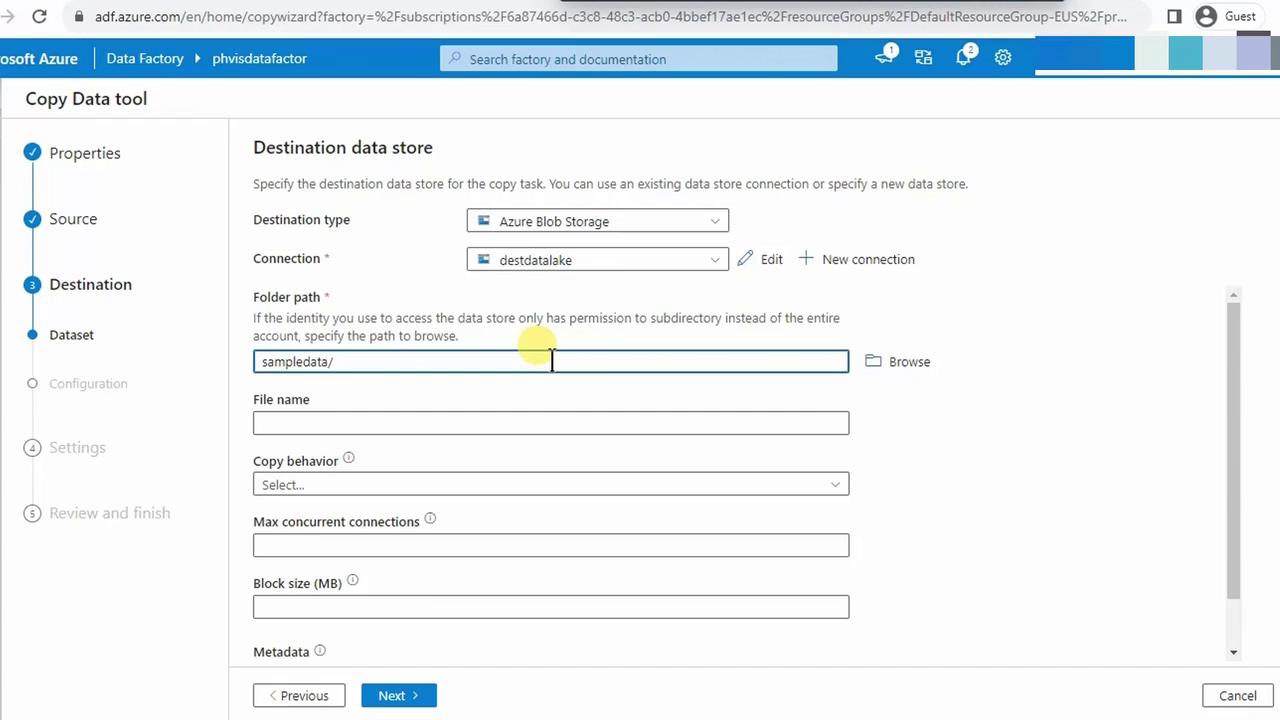
3. Browse to the `sampledata` folder path.
4. Leave **File name** blank, choose **Preserve hierarchy**, and accept defaults.
<Frame>
  ![The image shows a screenshot of the Microsoft Azure Data Factory interface, specifically the "Copy Data tool" where the user is configuring the destination data store settings for a data copy task.](https://kodekloud.com/kk-media/image/upload/v1752872866/notes-assets/images/DP-900-Microsoft-Azure-Data-Fundamentals-Demo-Data-Factory/azure-data-factory-copy-data-tool-7.jpg)
</Frame>

Click **Next**.

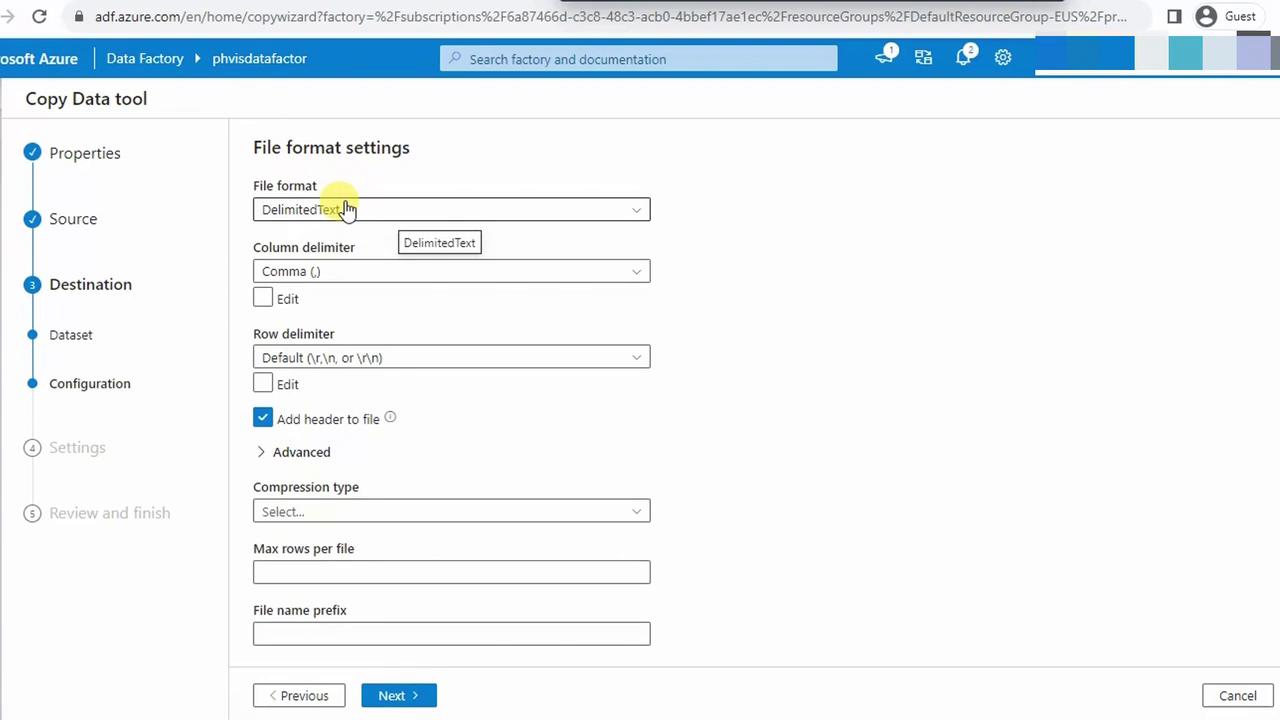
### 4.5 Review Output File Format

Keep the default delimited settings (comma, no header row changes).
<Frame>
  ![The image shows a screenshot of the "Copy Data tool" in Microsoft Azure, specifically the "File format settings" section where options for file format, column delimiter, and row delimiter are being configured.](https://kodekloud.com/kk-media/image/upload/v1752872867/notes-assets/images/DP-900-Microsoft-Azure-Data-Fundamentals-Demo-Data-Factory/azure-copy-data-tool-file-format-settings.jpg)
</Frame>

Click **Next**.

### 4.6 Finalize and Run Pipeline

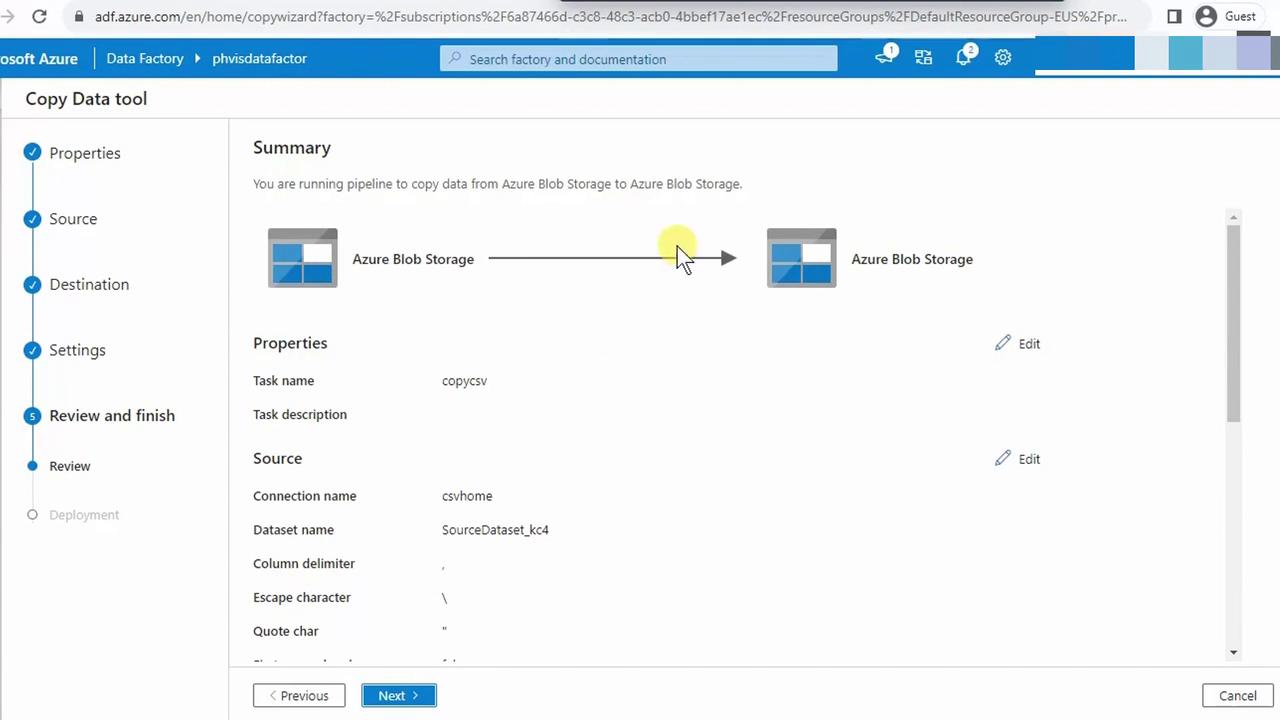
1. Assign a name (e.g., **Copy\_CSV**) and optional description.
2. Accept default fault tolerance and logging.
3. Review the summary and click **Finish**.
<Frame>
  ![The image shows a screenshot of the Azure Data Factory interface, specifically the "Copy Data tool" where a pipeline is set up to copy data from one Azure Blob Storage to another. It includes details like task name, source, and properties.](https://kodekloud.com/kk-media/image/upload/v1752872868/notes-assets/images/DP-900-Microsoft-Azure-Data-Fundamentals-Demo-Data-Factory/azure-data-factory-copy-data-tool-8.jpg)
</Frame>

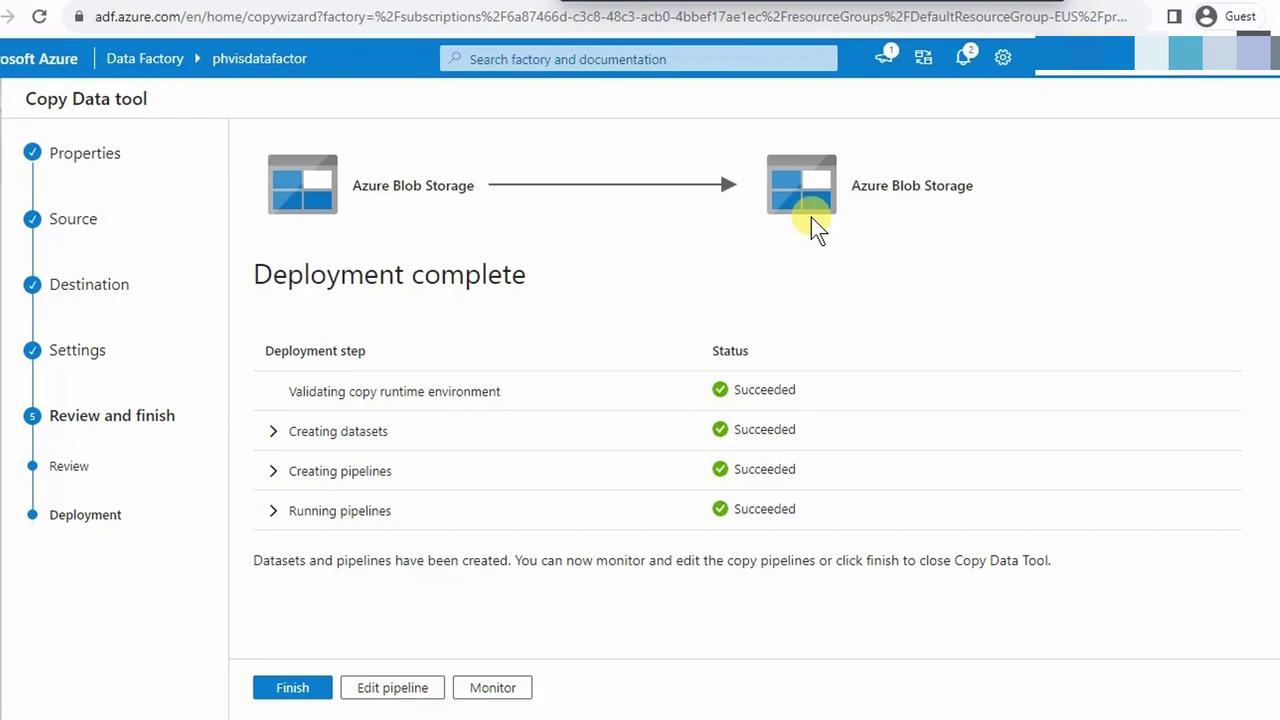
4. The pipeline will validate and execute automatically. Monitor the status; all activities should show **Succeeded**.
<Frame>
  ![The image shows a Microsoft Azure interface indicating that a data deployment process using the Copy Data tool has been completed successfully, with all steps marked as succeeded.](https://kodekloud.com/kk-media/image/upload/v1752872869/notes-assets/images/DP-900-Microsoft-Azure-Data-Fundamentals-Demo-Data-Factory/azure-copy-data-deployment-success.jpg)
</Frame>

## 5. Verify in the Data Lake

In the Azure Portal, navigate to your Data Lake storage account and confirm that `biostats.csv` appears under the `sampledata` folder.

***

By following these steps, you've successfully implemented an Azure Data Factory pipeline to transfer CSV data from Blob Storage to Data Lake Storage Gen2.

## References

* [Azure Data Factory documentation](https://learn.microsoft.com/azure/data-factory/)
* [Azure Blob Storage overview](https://learn.microsoft.com/azure/storage/blobs/data-lake-storage-introduction/)
* [Manage security in Azure Blob Storage](https://learn.microsoft.com/azure/storage/blobs/secure-access-blobs)

<CardGroup>
  <Card title="Watch Video" icon="video" cta="Learn more" href="https://learn.kodekloud.com/user/courses/dp-900-microsoft-azure-data-fundamentals/module/a4f1a604-4743-4a3a-81ac-8210d6f9bb96/lesson/6ac7818d-96c4-4b92-9fb1-2735d9a1eb94" />
</CardGroup>
