> ## Documentation Index
> Fetch the complete documentation index at: https://notes.kodekloud.com/llms.txt
> Use this file to discover all available pages before exploring further.

# Demo Files Shares

> This article provides a step-by-step guide to configuring an Azure File Share, including creation, performance adjustment, quota management, and access control.

In this lesson, we’ll walk through configuring an Azure File Share step by step. Whether you need a small 5 TiB share or a large 100 TiB volume, you’ll see how to create the share, adjust performance tiers, manage quotas, and set up directories.

***

## 1. Access the File Shares Blade

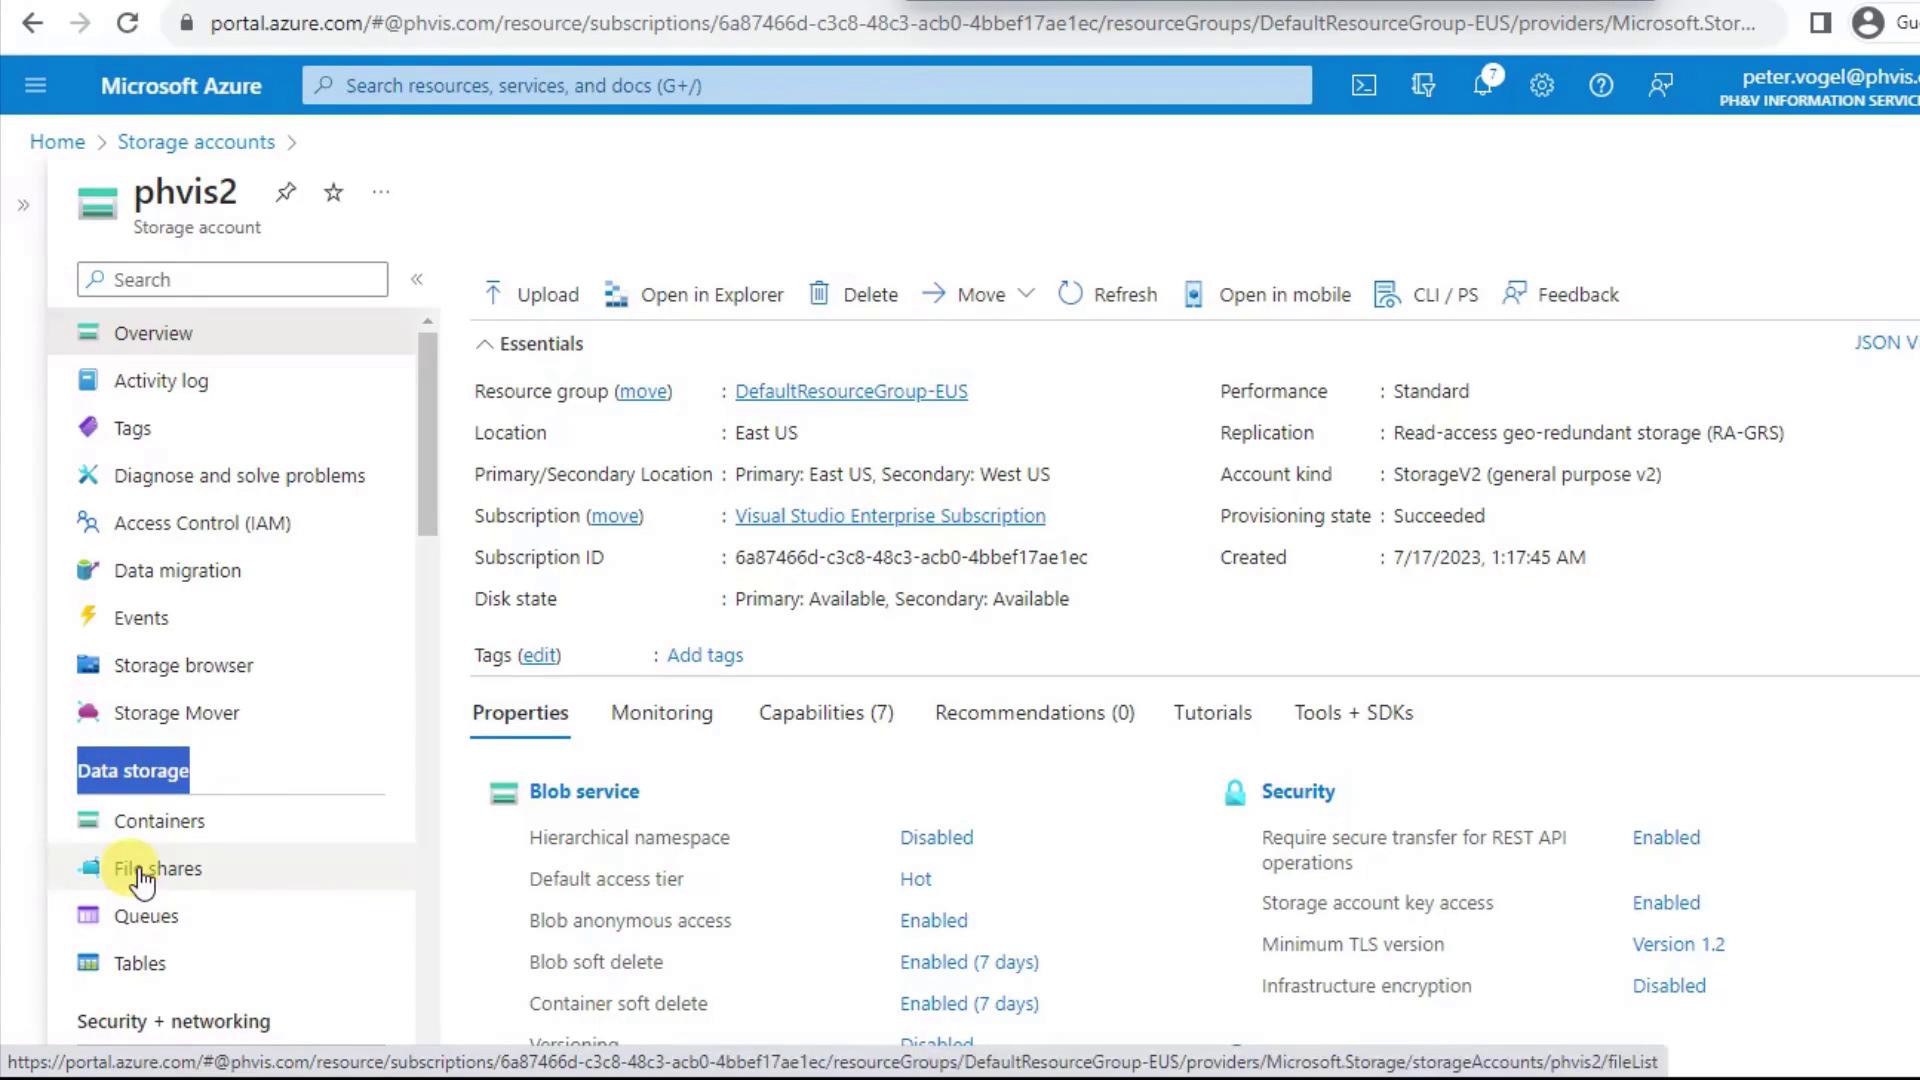
First, go to the storage account you created earlier (e.g., **PHVIS2**). In the left-hand menu under **Data Storage**, select **File Shares** to view and manage your shares.
<Frame>
  ![The image shows a Microsoft Azure portal interface displaying details of a storage account named "phvis2." It includes information about the resource group, location, performance, replication, and security settings.](https://kodekloud.com/kk-media/image/upload/v1752872984/notes-assets/images/DP-900-Microsoft-Azure-Data-Fundamentals-Demo-Files-Shares/azure-portal-storage-account-phvis2.jpg)
</Frame>

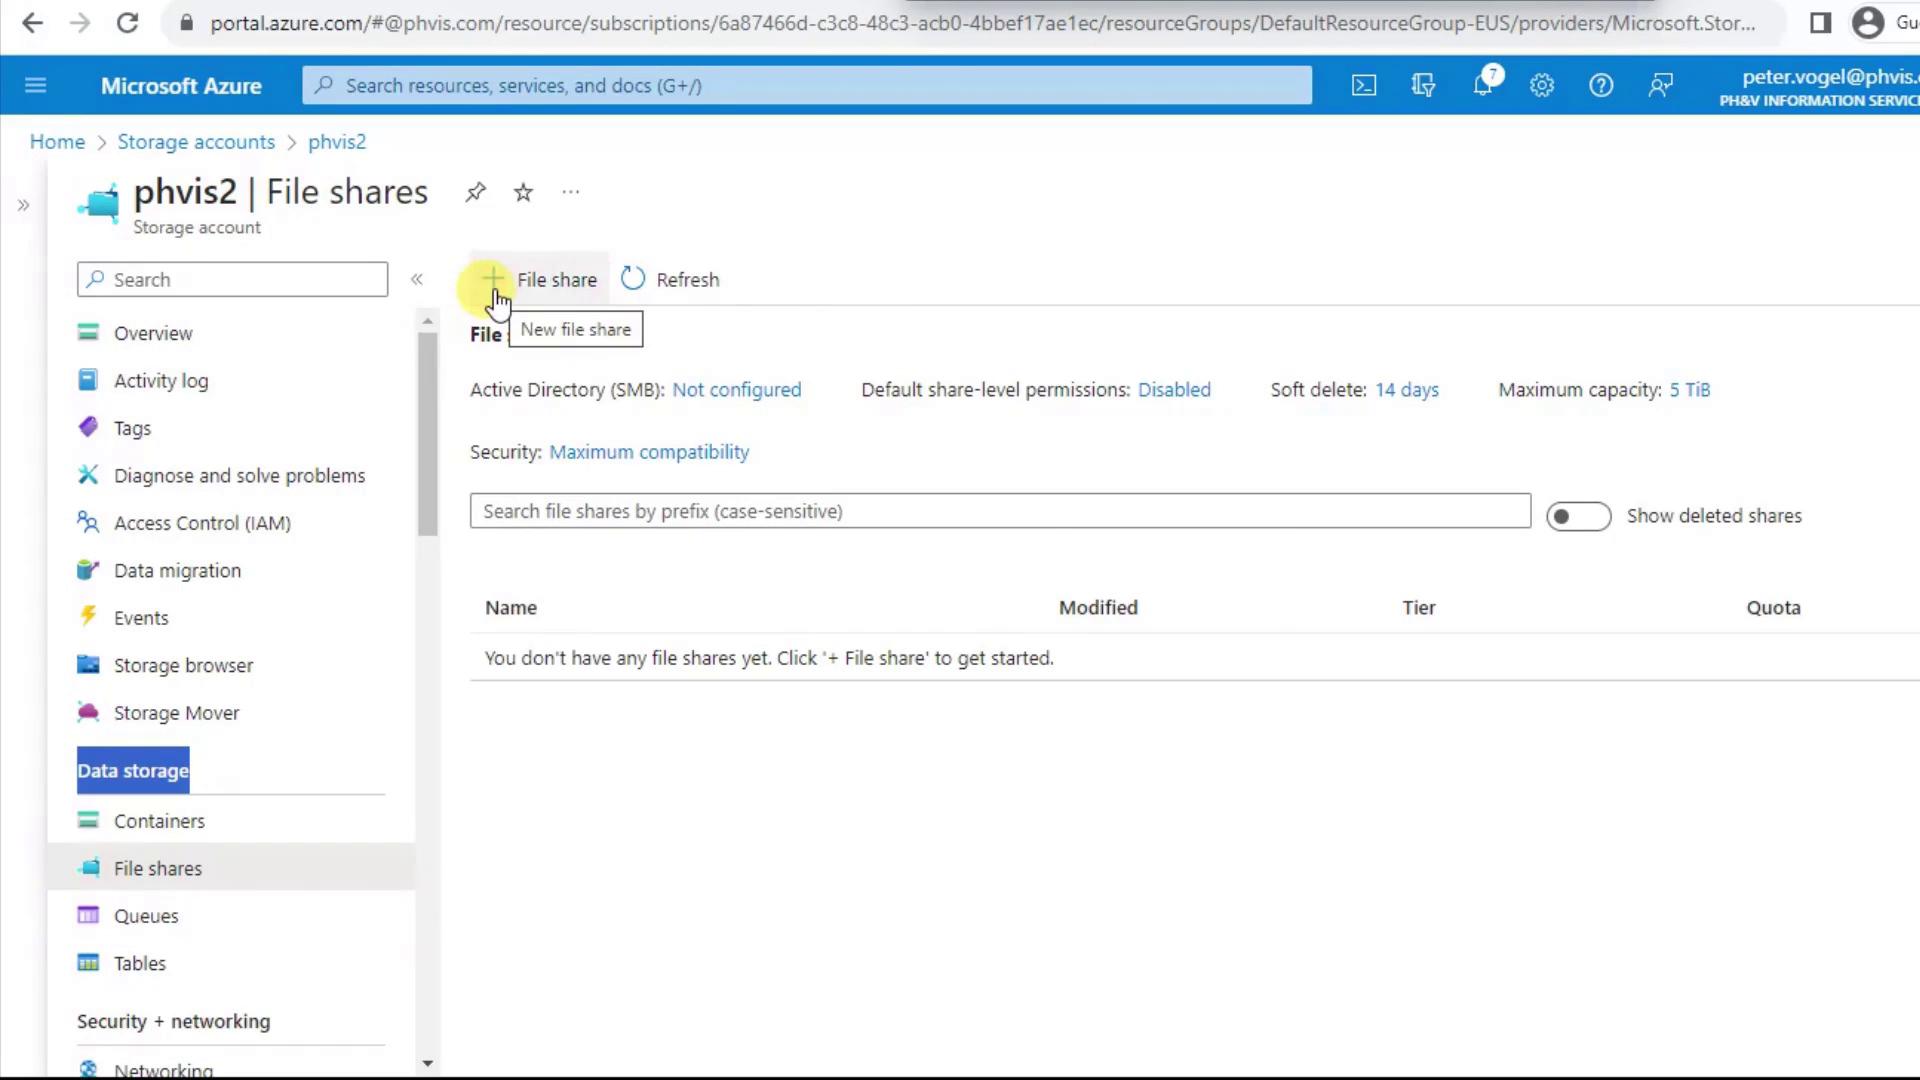
Here you’ll find all existing shares. Click the **+** icon at the top-left to create a new one.
<Frame>
  ![The image shows a Microsoft Azure portal interface for managing file shares in a storage account. It displays options for creating a new file share and various settings related to Active Directory, security, and storage capacity.](https://kodekloud.com/kk-media/image/upload/v1752872986/notes-assets/images/DP-900-Microsoft-Azure-Data-Fundamentals-Demo-Files-Shares/azure-portal-file-shares-management.jpg)
</Frame>

***

## 2. Create a New File Share

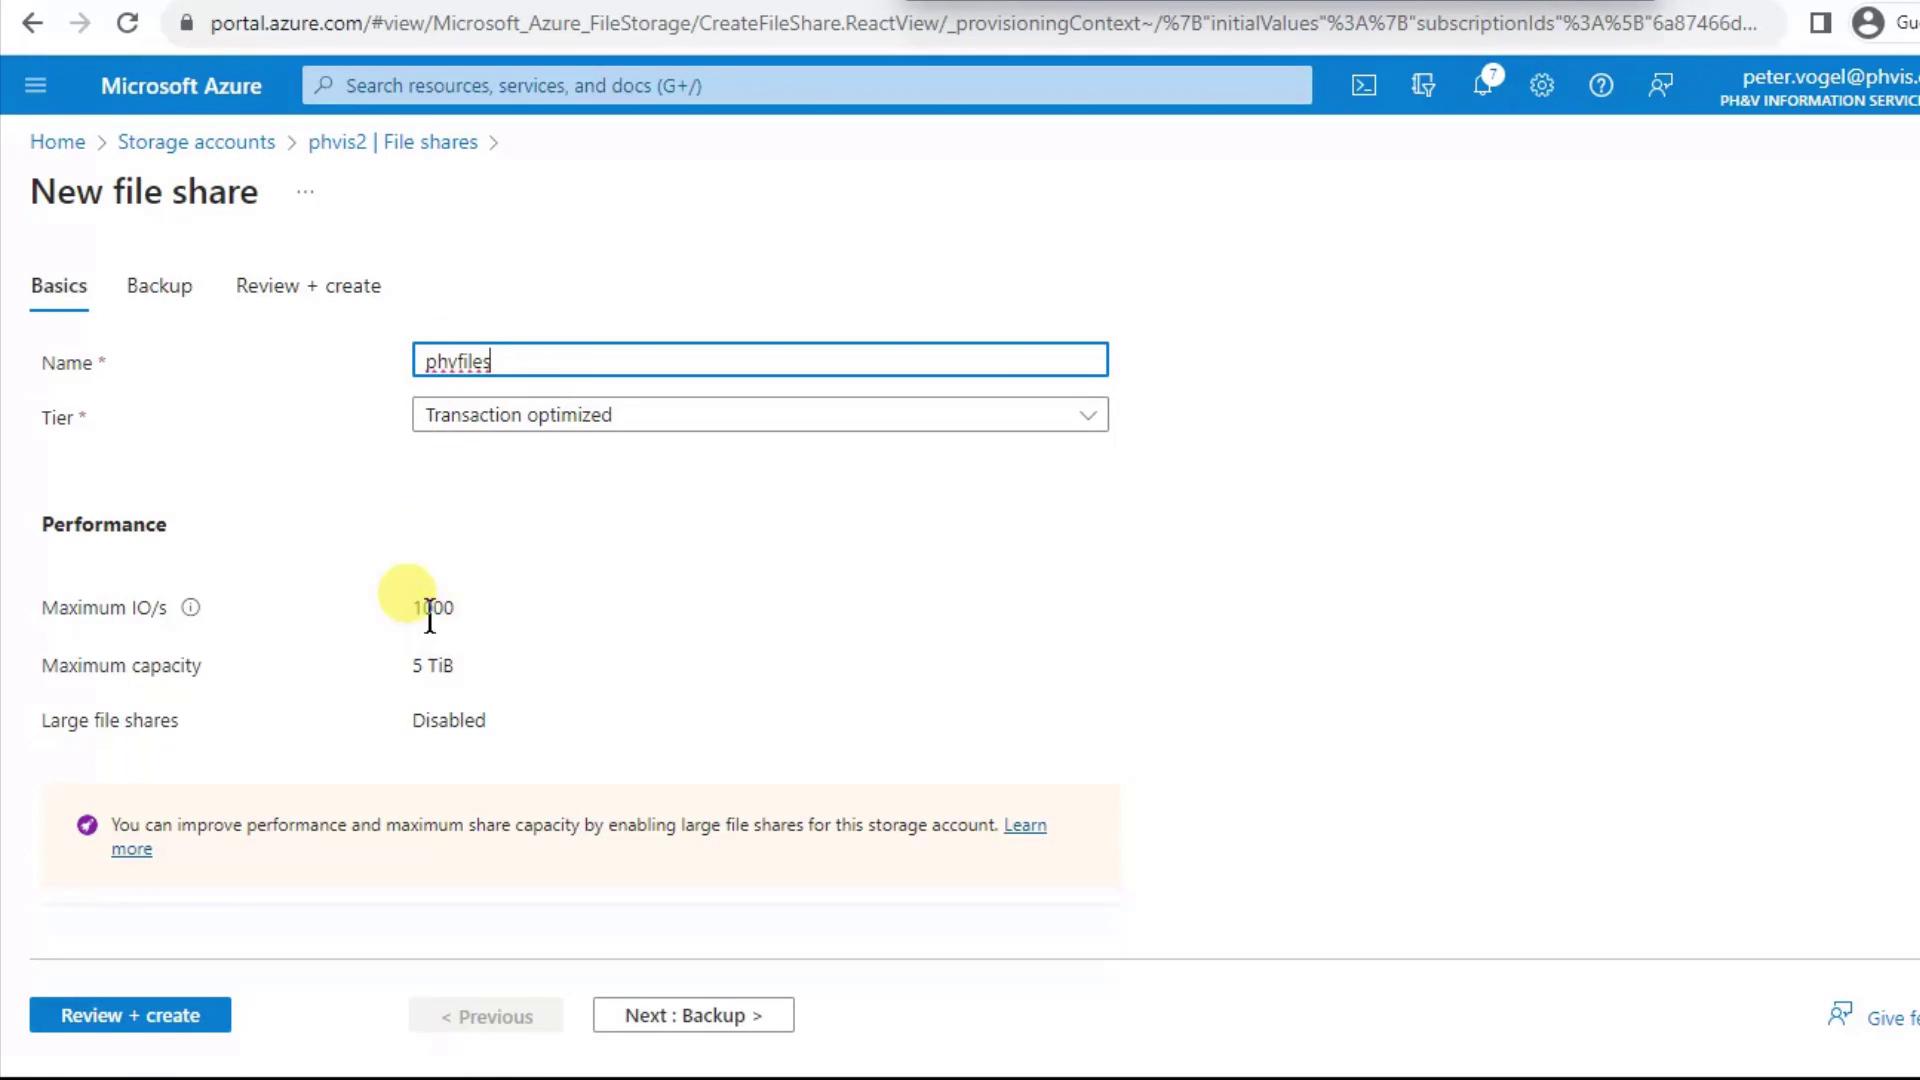
Click **+ File Share** to open the creation pane. Since you’re scoped to the storage account, your subscription and resource group are already selected.

1. Enter a lowercase, space-free **Name** (e.g., `phvfiles`).
2. Review the default **Performance** (Transaction Optimized, 1,000 IOPS) and **Max size** (5 TiB).
<Frame>
  ![The image shows a Microsoft Azure portal interface for creating a new file share, with options for naming, tier selection, and performance settings.](https://kodekloud.com/kk-media/image/upload/v1752872987/notes-assets/images/DP-900-Microsoft-Azure-Data-Fundamentals-Demo-Files-Shares/azure-portal-file-share-creation.jpg)
</Frame>

<Callout icon="lightbulb" color="#1CB2FE">
  If you expect to exceed 5 TiB, you can enable large file shares (up to 100 TiB) either at the storage account level or per share after creation.
</Callout>

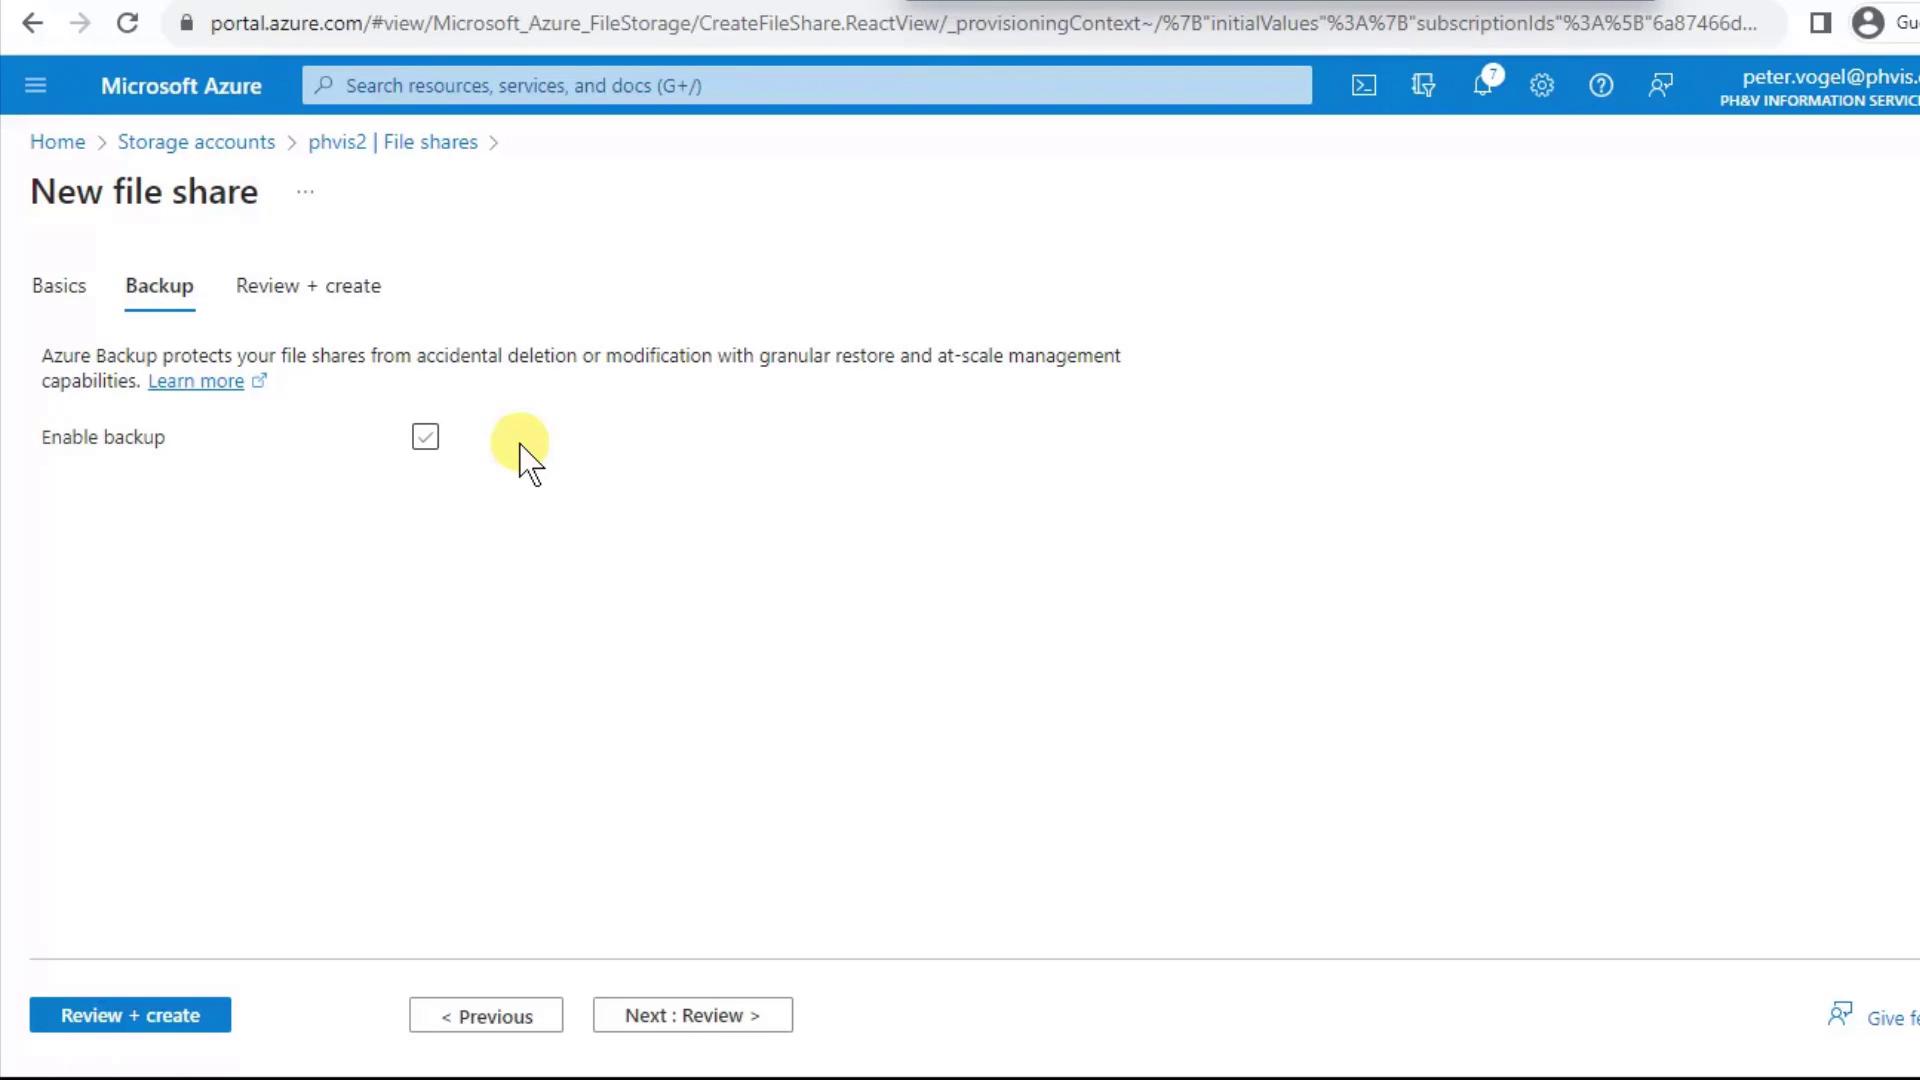
On the **Backup** tab, disable backup if you want to avoid extra costs and speed up creation. Backing up a brand-new share can introduce delay.
<Frame>
  ![The image shows a Microsoft Azure interface for creating a new file share, with an option to enable backup checked.](https://kodekloud.com/kk-media/image/upload/v1752872988/notes-assets/images/DP-900-Microsoft-Azure-Data-Fundamentals-Demo-Files-Shares/azure-file-share-create-backup-enabled.jpg)
</Frame>

Once ready, click **Review + create** and then **Create**. The new share appears almost immediately—close the notification to continue.

***

## 3. Adjust Tier and Quota

After creation, you can fine-tune performance, capacity, and retention:

**Change Tier**\
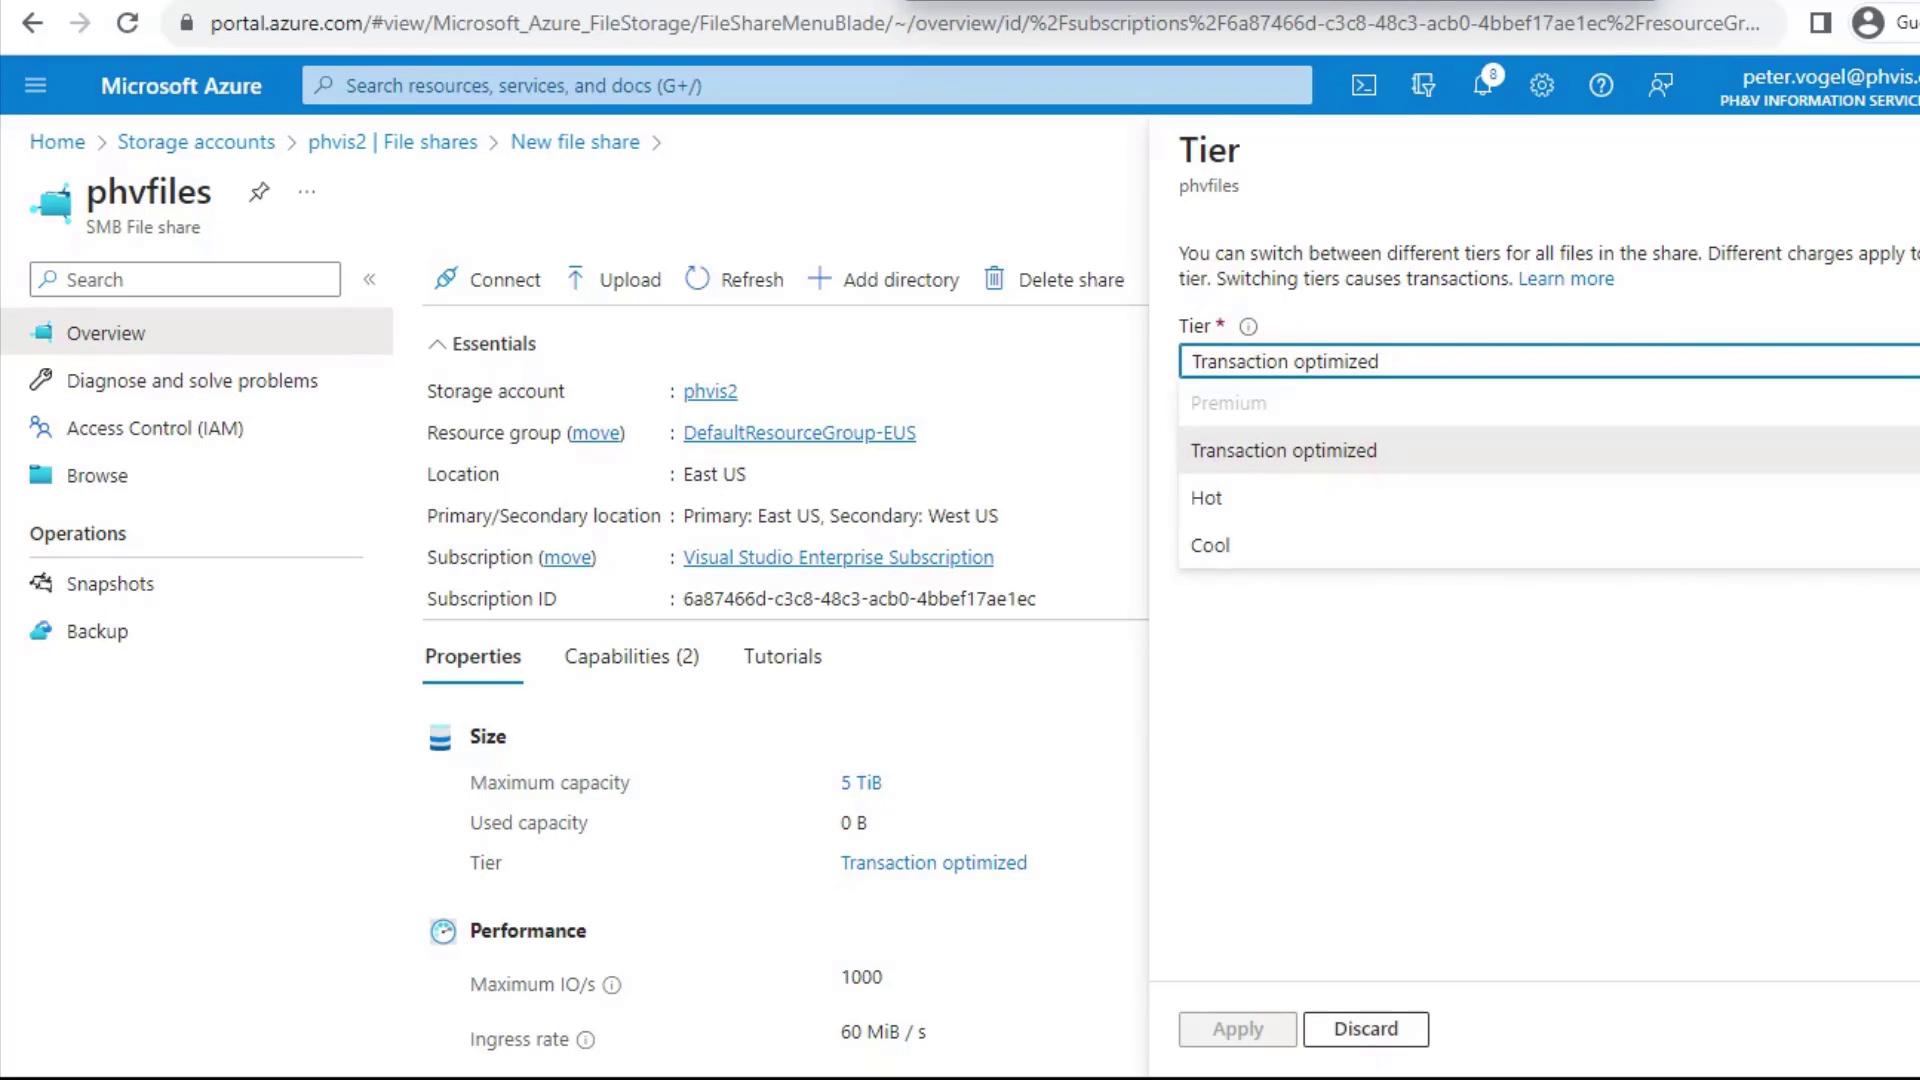
Click **Change tier** to pick the right performance level for your workload:

| Tier Name             | Best For                                | Characteristics                       |
| --------------------- | --------------------------------------- | ------------------------------------- |
| Transaction Optimized | Balanced read/write workloads           | \~1,000 IOPS, moderate cost           |
| Hot                   | Frequent file sharing & Azure File Sync | Higher throughput, higher cost        |
| Cool                  | Infrequently accessed files             | Lower storage cost, lower performance |
<Frame>
  ![The image shows the tier-change options for a file share named "phvfiles" in the Azure portal, listing Transaction Optimized, Hot, and Cool tiers.](https://kodekloud.com/kk-media/image/upload/v1752872989/notes-assets/images/DP-900-Microsoft-Azure-Data-Fundamentals-Demo-Files-Shares/azure-portal-file-share-phvfiles.jpg)
</Frame>

**Edit Quota**\
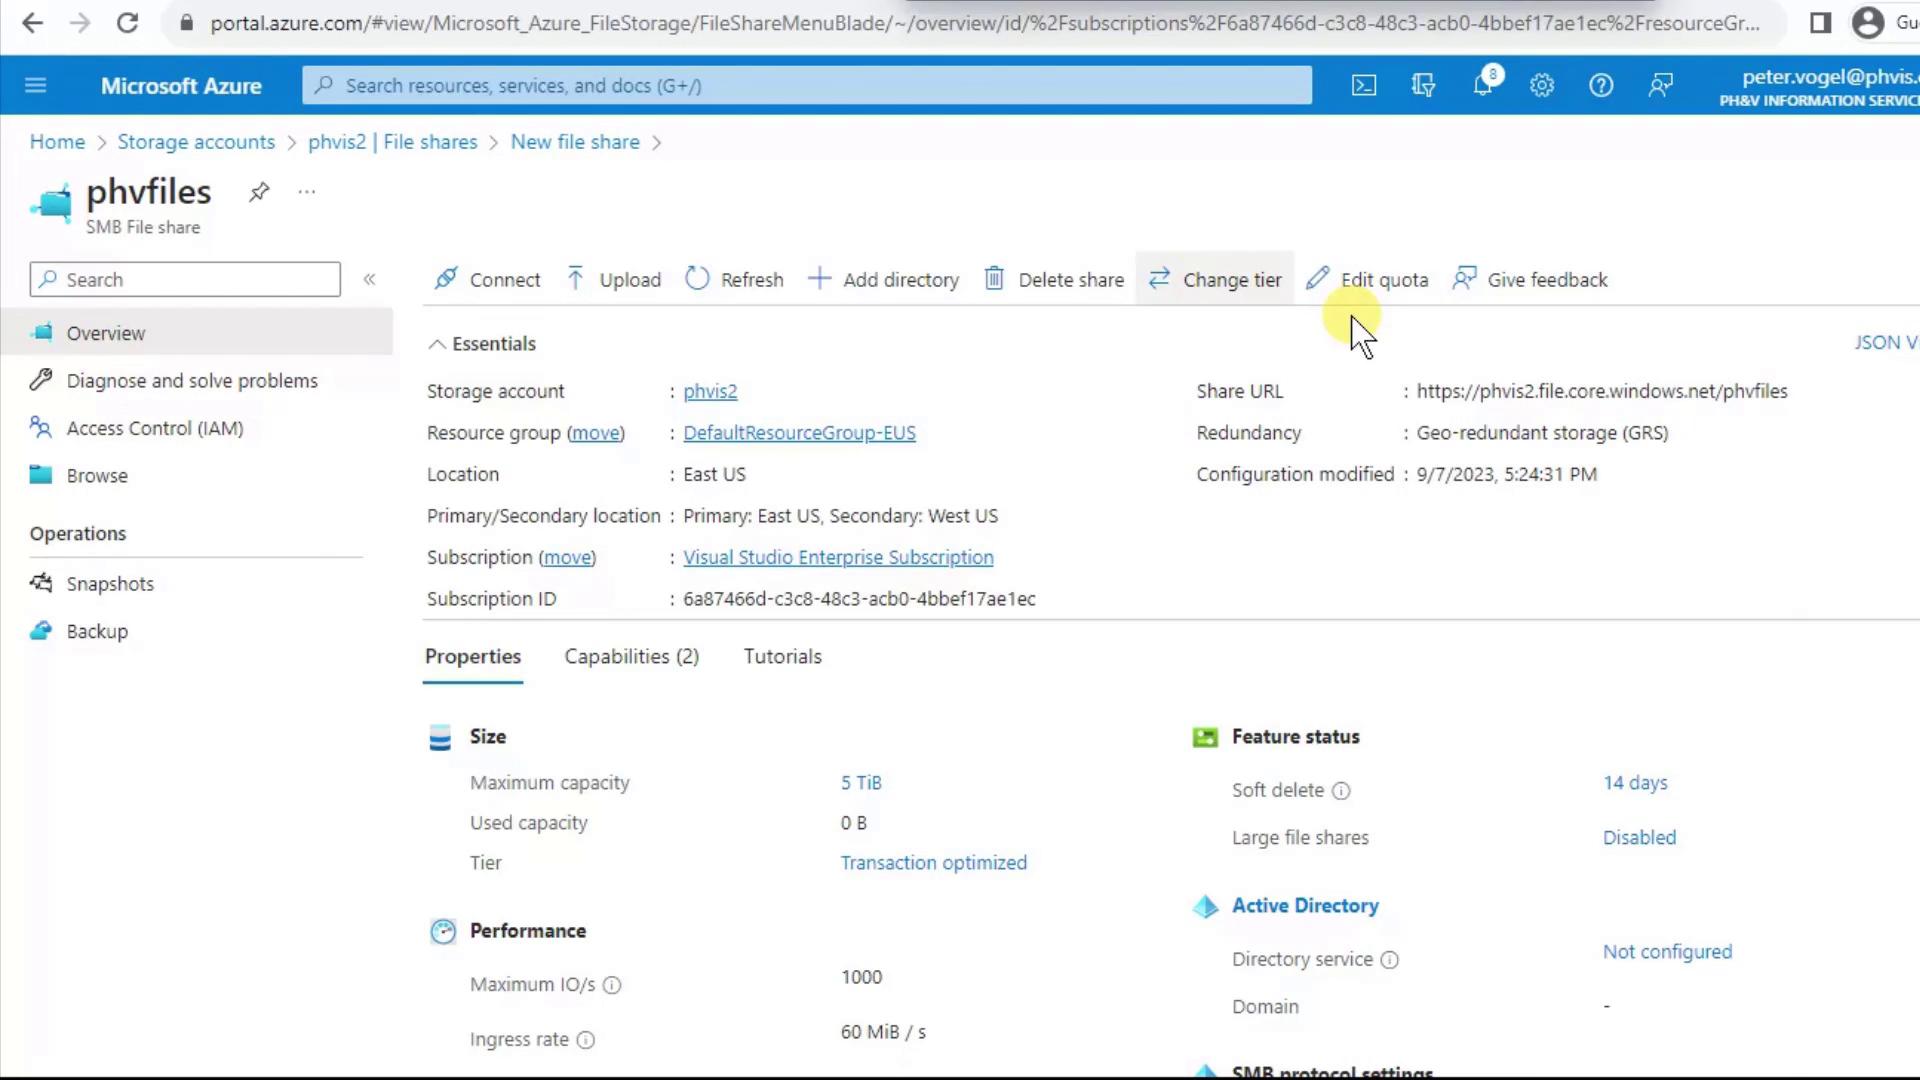
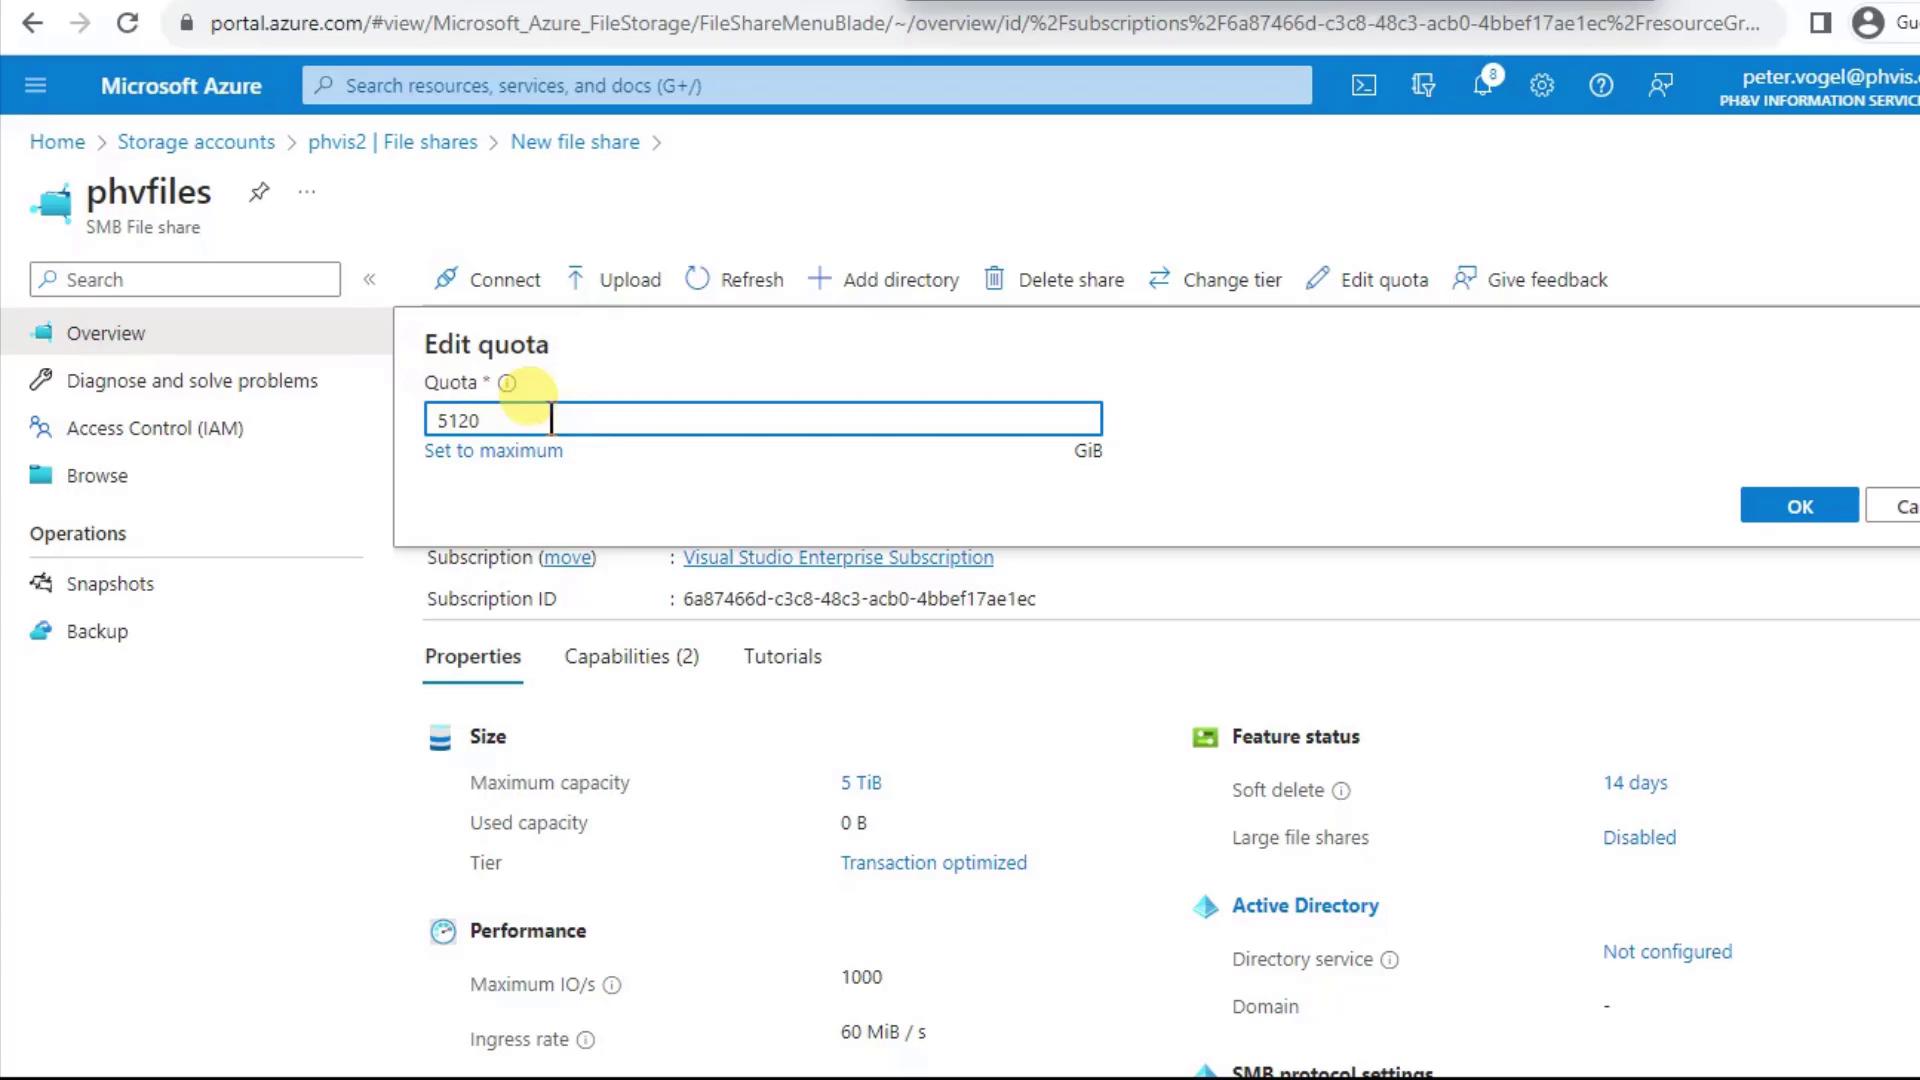
Open **Properties** (or click the share name) to view size, usage, and quota settings. By default, it’s 5,120 GiB (5 TiB).
<Frame>
  ![The image shows a Microsoft Azure portal interface displaying details of a file share named "phvfiles," including storage account information, location, subscription details, and properties like size and performance.](https://kodekloud.com/kk-media/image/upload/v1752872990/notes-assets/images/DP-900-Microsoft-Azure-Data-Fundamentals-Demo-Files-Shares/azure-portal-file-share-details.jpg)
</Frame>

Click **Edit quota**, enter a new limit in GiB, and save.
<Frame>
  ![The image shows an "Edit quota" dialog box in the Azure portal for a file share, letting the user set a storage quota in GiB.](https://kodekloud.com/kk-media/image/upload/v1752872991/notes-assets/images/DP-900-Microsoft-Azure-Data-Fundamentals-Demo-Files-Shares/azure-portal-file-share-edit-quota.jpg)
</Frame>

<Callout icon="lightbulb" color="#1CB2FE">
  **Soft Delete** is enabled by default (14 days). Deleted files are recoverable within that period but still incur storage costs.
</Callout>

<Callout icon="triangle-alert" color="#FF6B6B">
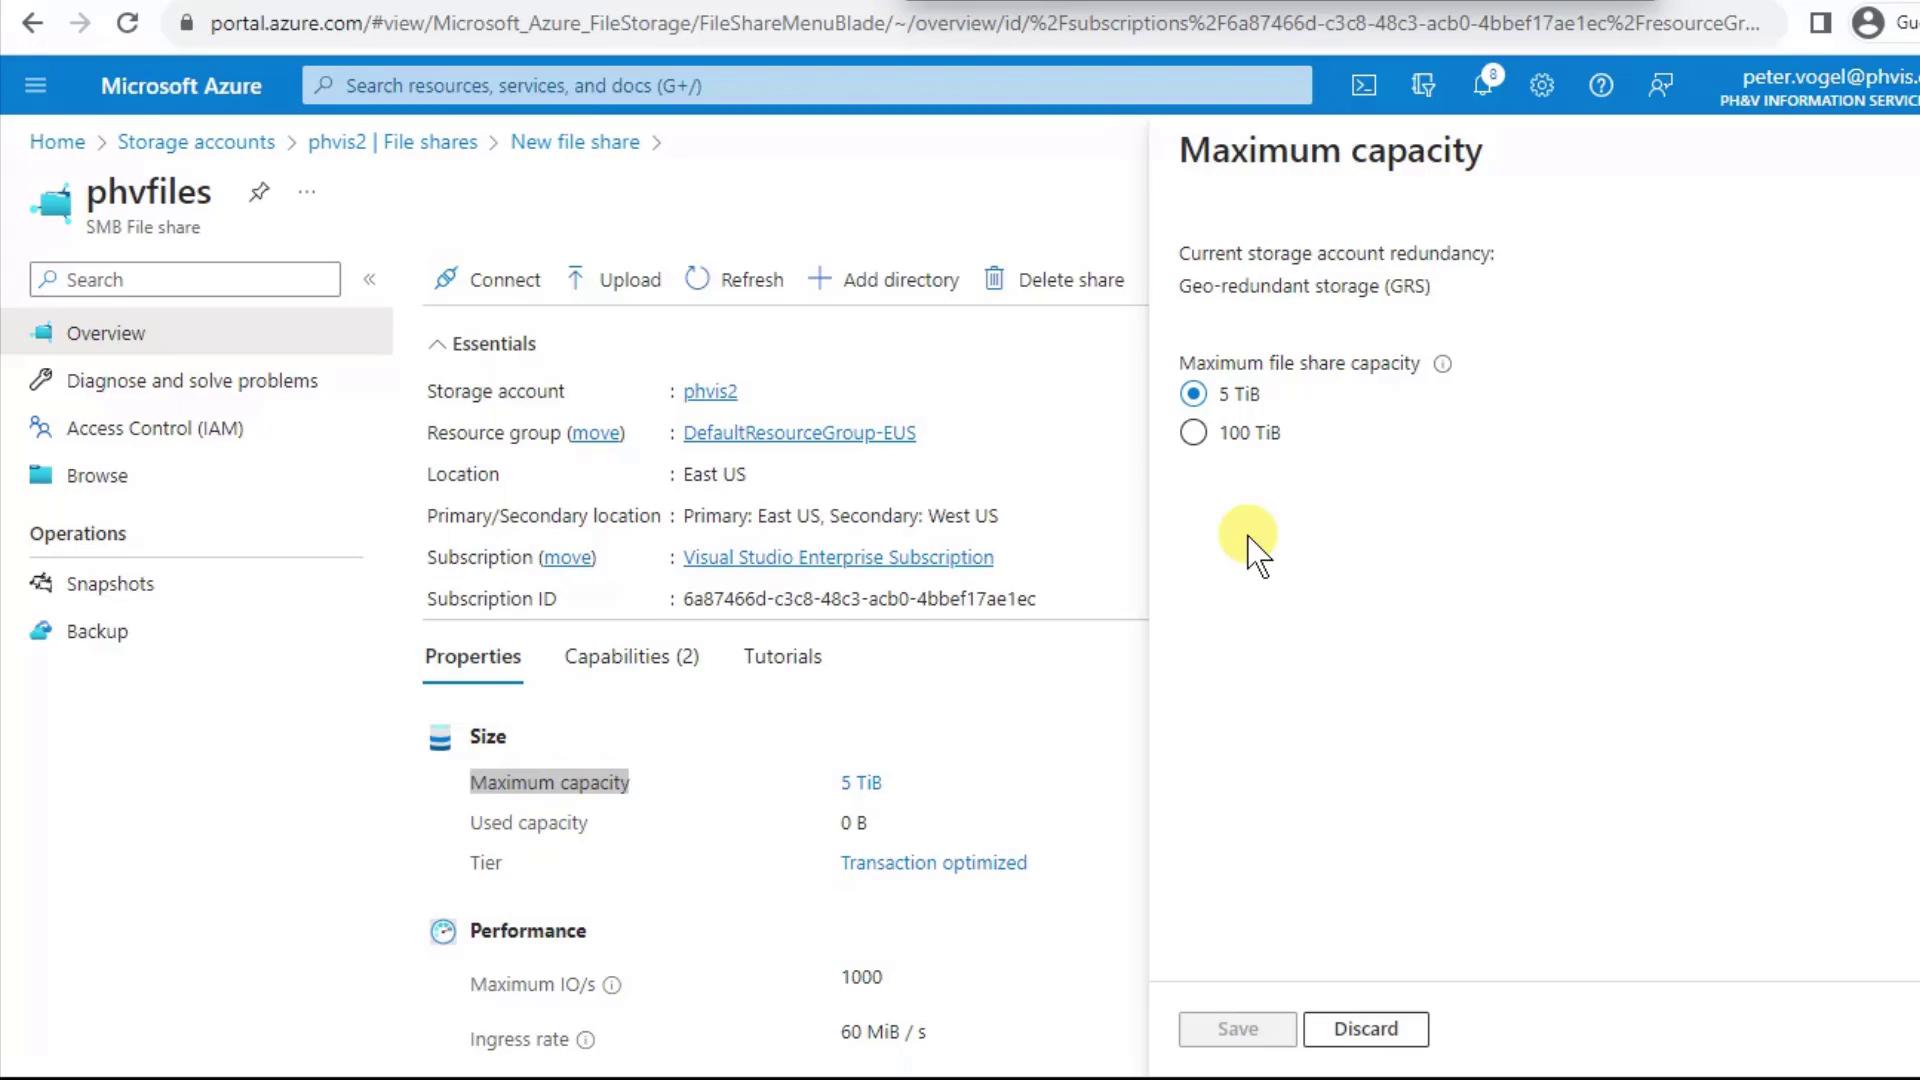
  Large file shares (100 TiB) do not support geo-redundancy. Plan accordingly if you need cross-region replication.
</Callout>

You can also upgrade specific shares to 100 TiB without enabling large file shares at the account level.
<Frame>
  ![The image shows capacity options for a file share named "phvfiles," allowing either 5 TiB or 100 TiB maximum share sizes.](https://kodekloud.com/kk-media/image/upload/v1752872992/notes-assets/images/DP-900-Microsoft-Azure-Data-Fundamentals-Demo-Files-Shares/azure-portal-file-share-management.jpg)
</Frame>

***

## 4. Organize Data with Directories

With your share in place, you can add folders and files directly from the portal.

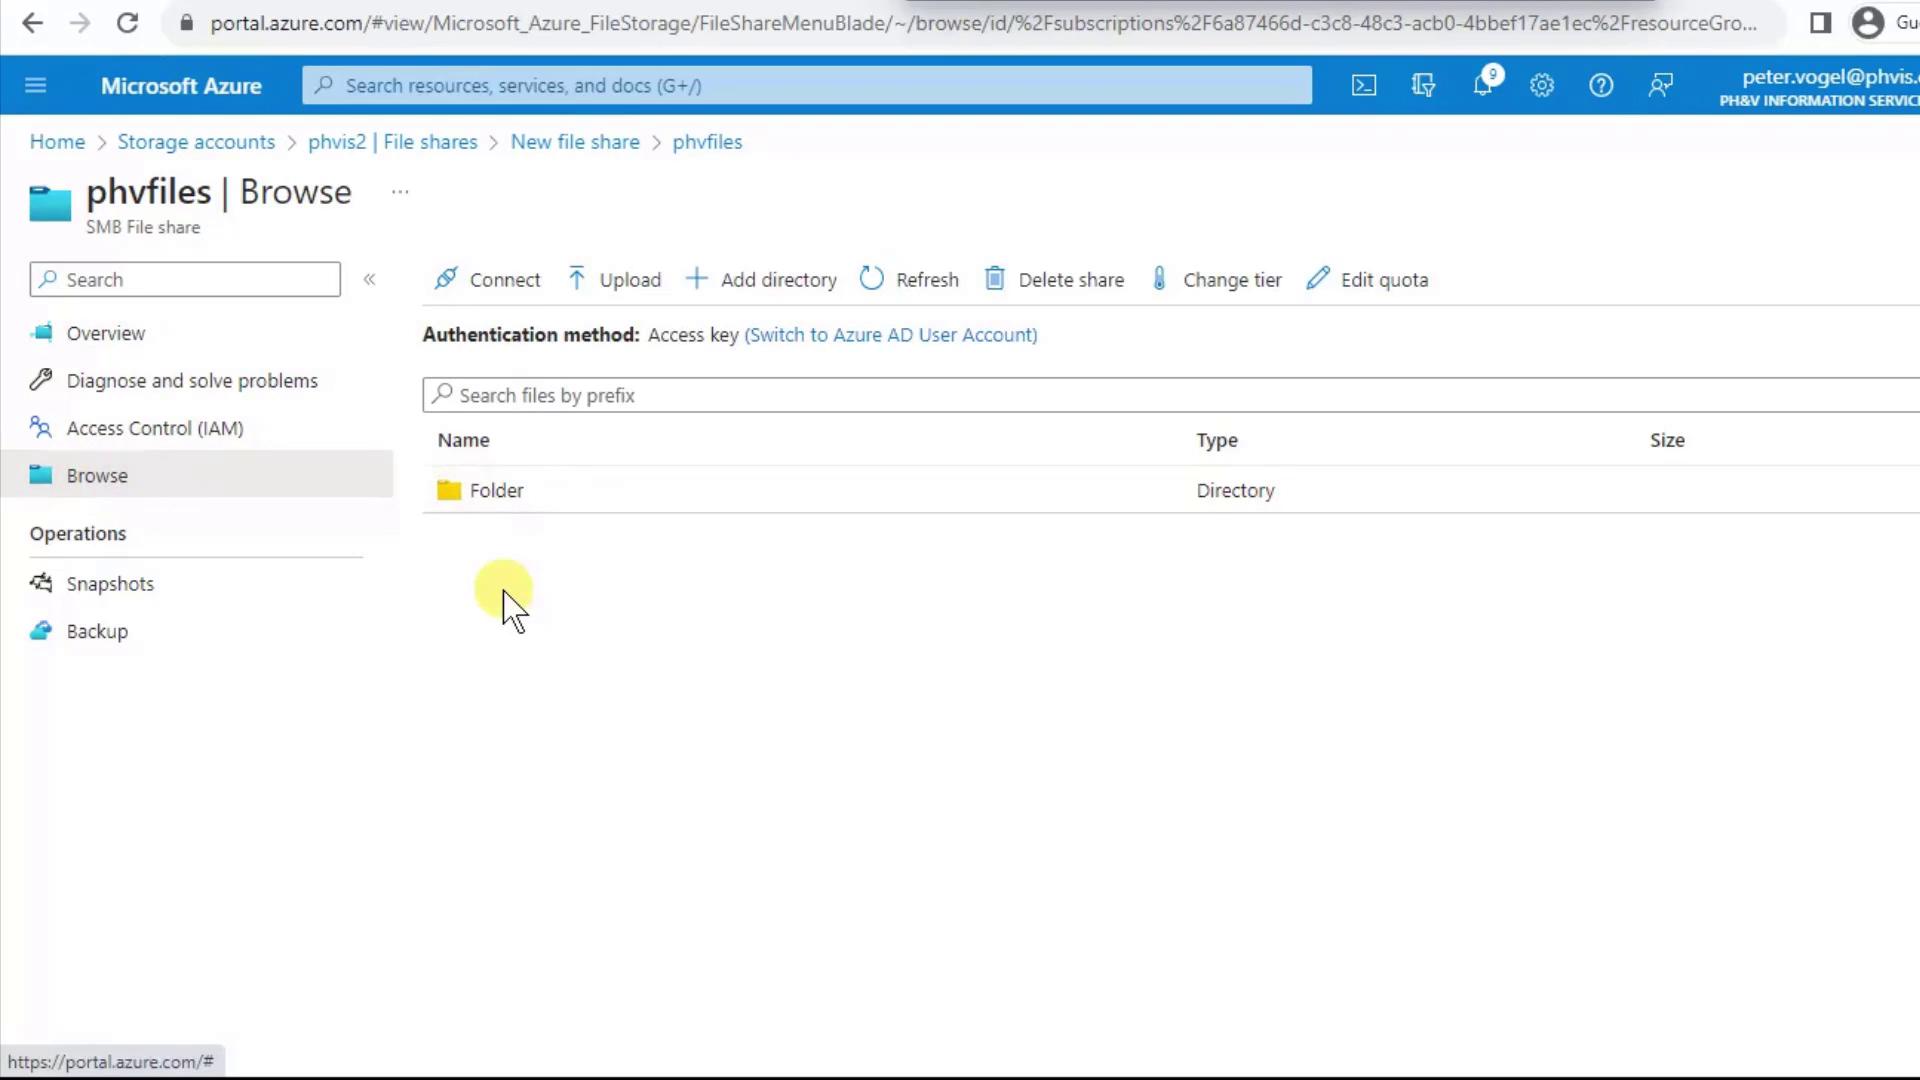
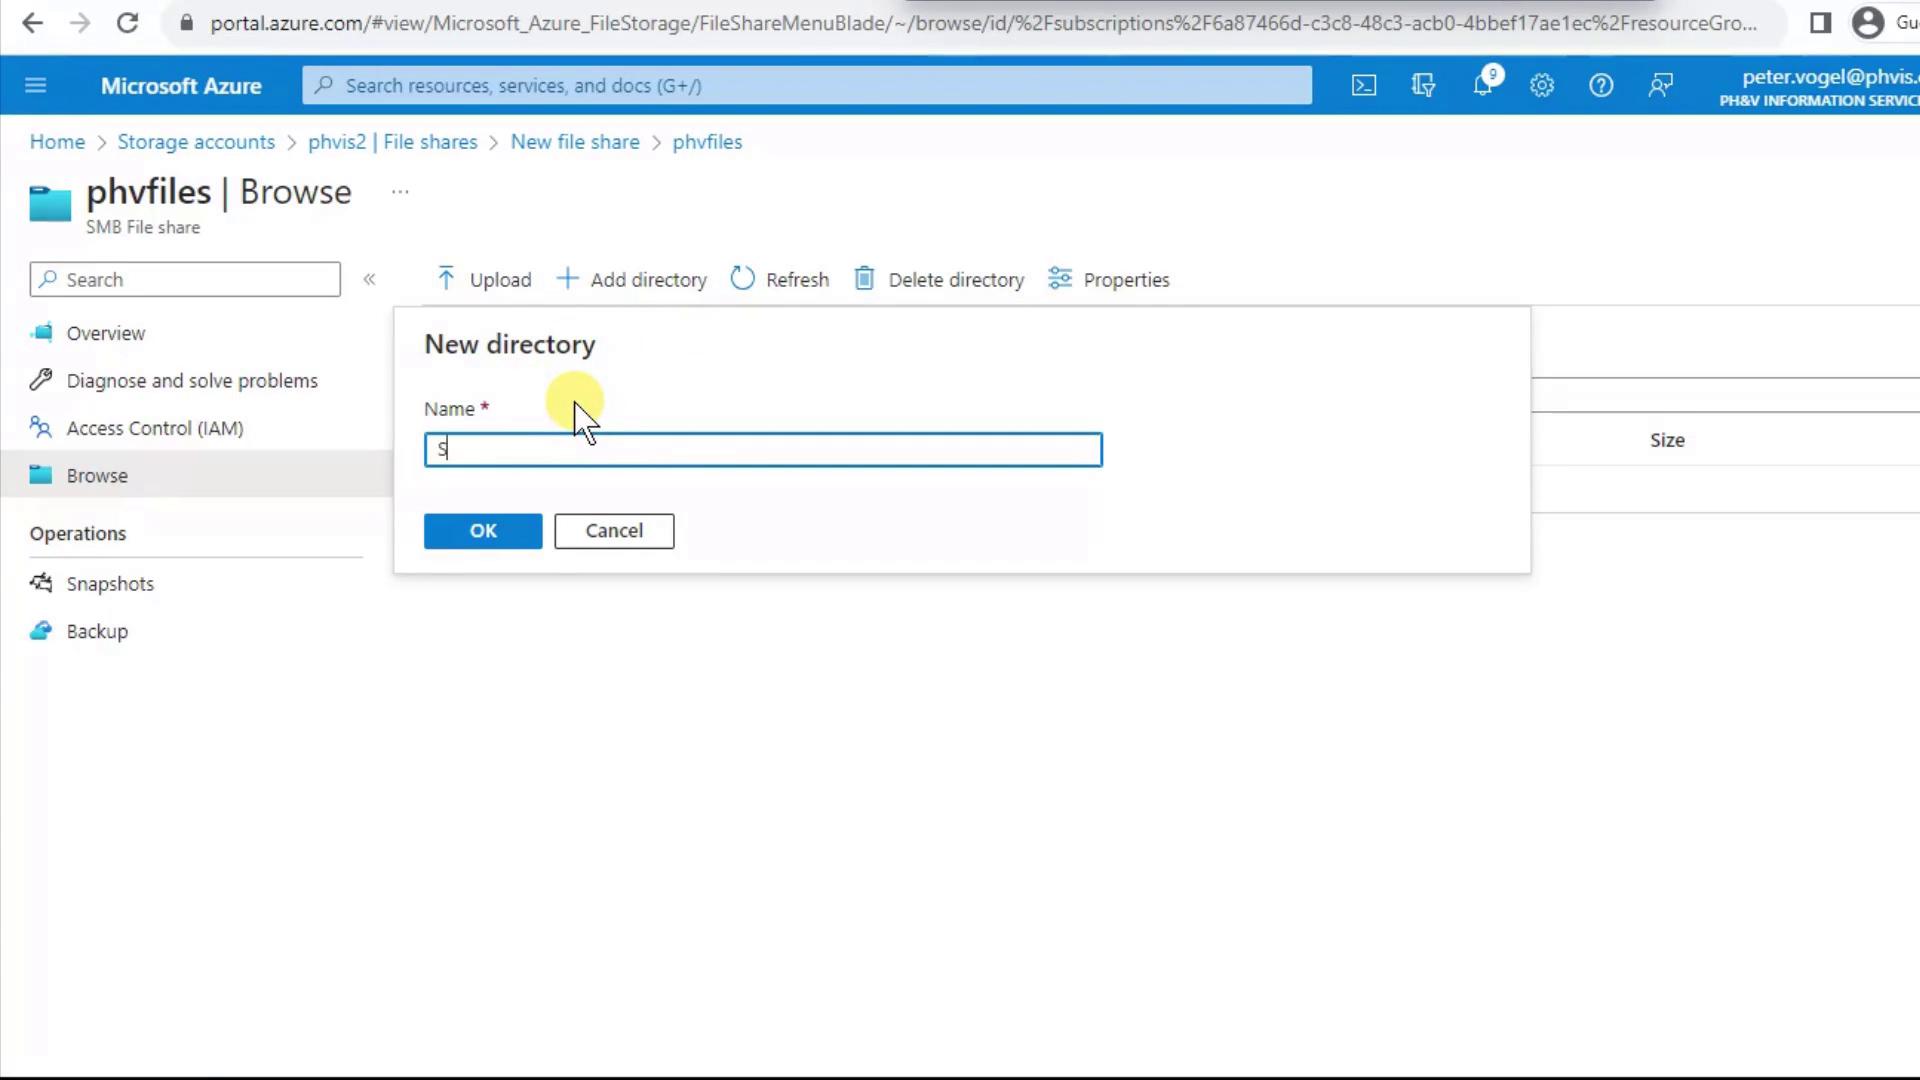
1. Click **Add Directory**, enter a name (e.g., `Folder`), and confirm.
2. Browse into `Folder` and repeat **Add Directory** to create subfolders. Azure Files supports uppercase, lowercase, spaces, and most SMB-compatible characters.
<Frame>
  ![The image shows a Microsoft Azure portal interface displaying a file share named "phvfiles" with a directory labeled "Folder." Various options like connect, upload, and add directory are available.](https://kodekloud.com/kk-media/image/upload/v1752872993/notes-assets/images/DP-900-Microsoft-Azure-Data-Fundamentals-Demo-Files-Shares/azure-portal-file-share-folder-interface.jpg)
</Frame>

<Frame>
  ![The image shows a Microsoft Azure portal interface where a user is creating a new directory named "s" within a file share.](https://kodekloud.com/kk-media/image/upload/v1752872994/notes-assets/images/DP-900-Microsoft-Azure-Data-Fundamentals-Demo-Files-Shares/azure-portal-new-directory-file-share.jpg)
</Frame>

To upload files, select **Upload**, choose your items, and decide whether to overwrite existing files. Click **Upload** to transfer data.

***

## 5. Manage Access Control (IAM)

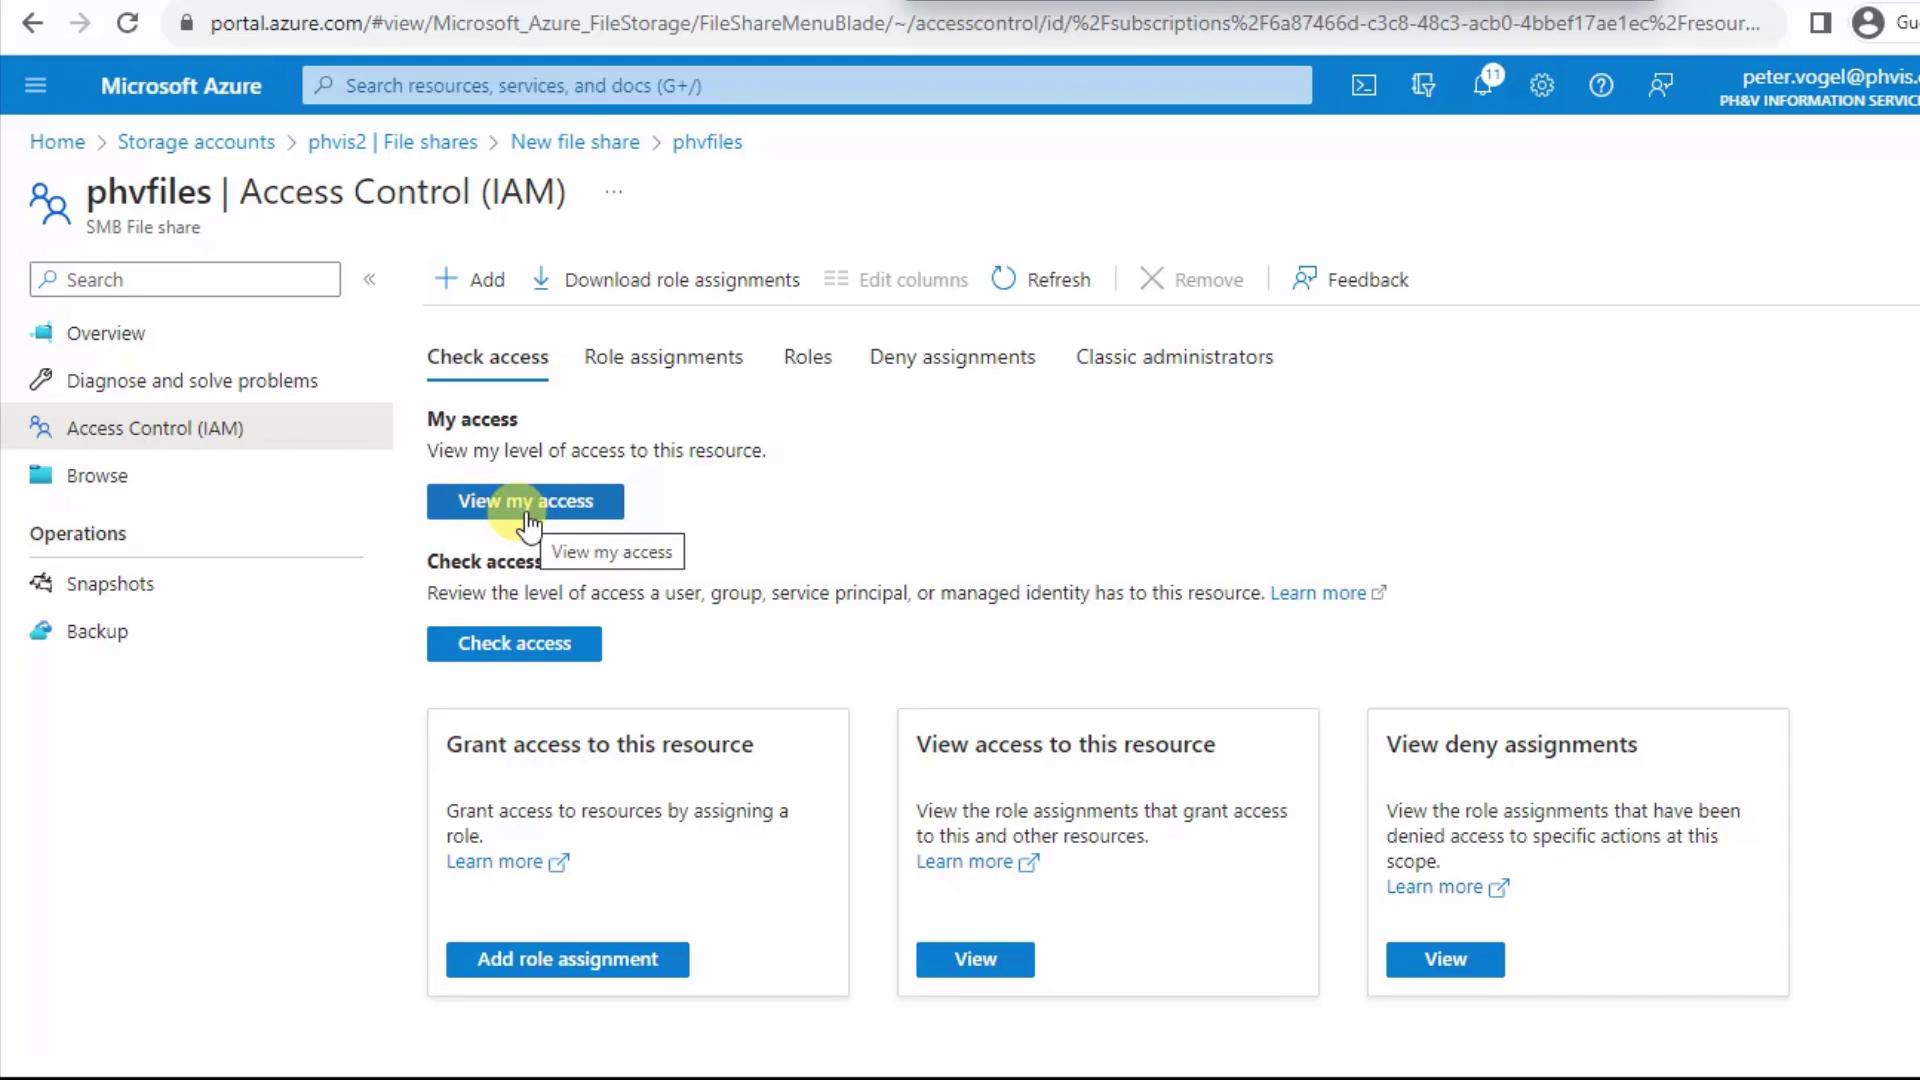
Control who can view and modify your file share via **Access Control (IAM)** in the left menu:

* **Check Access** shows the effective permissions for any user or service principal.
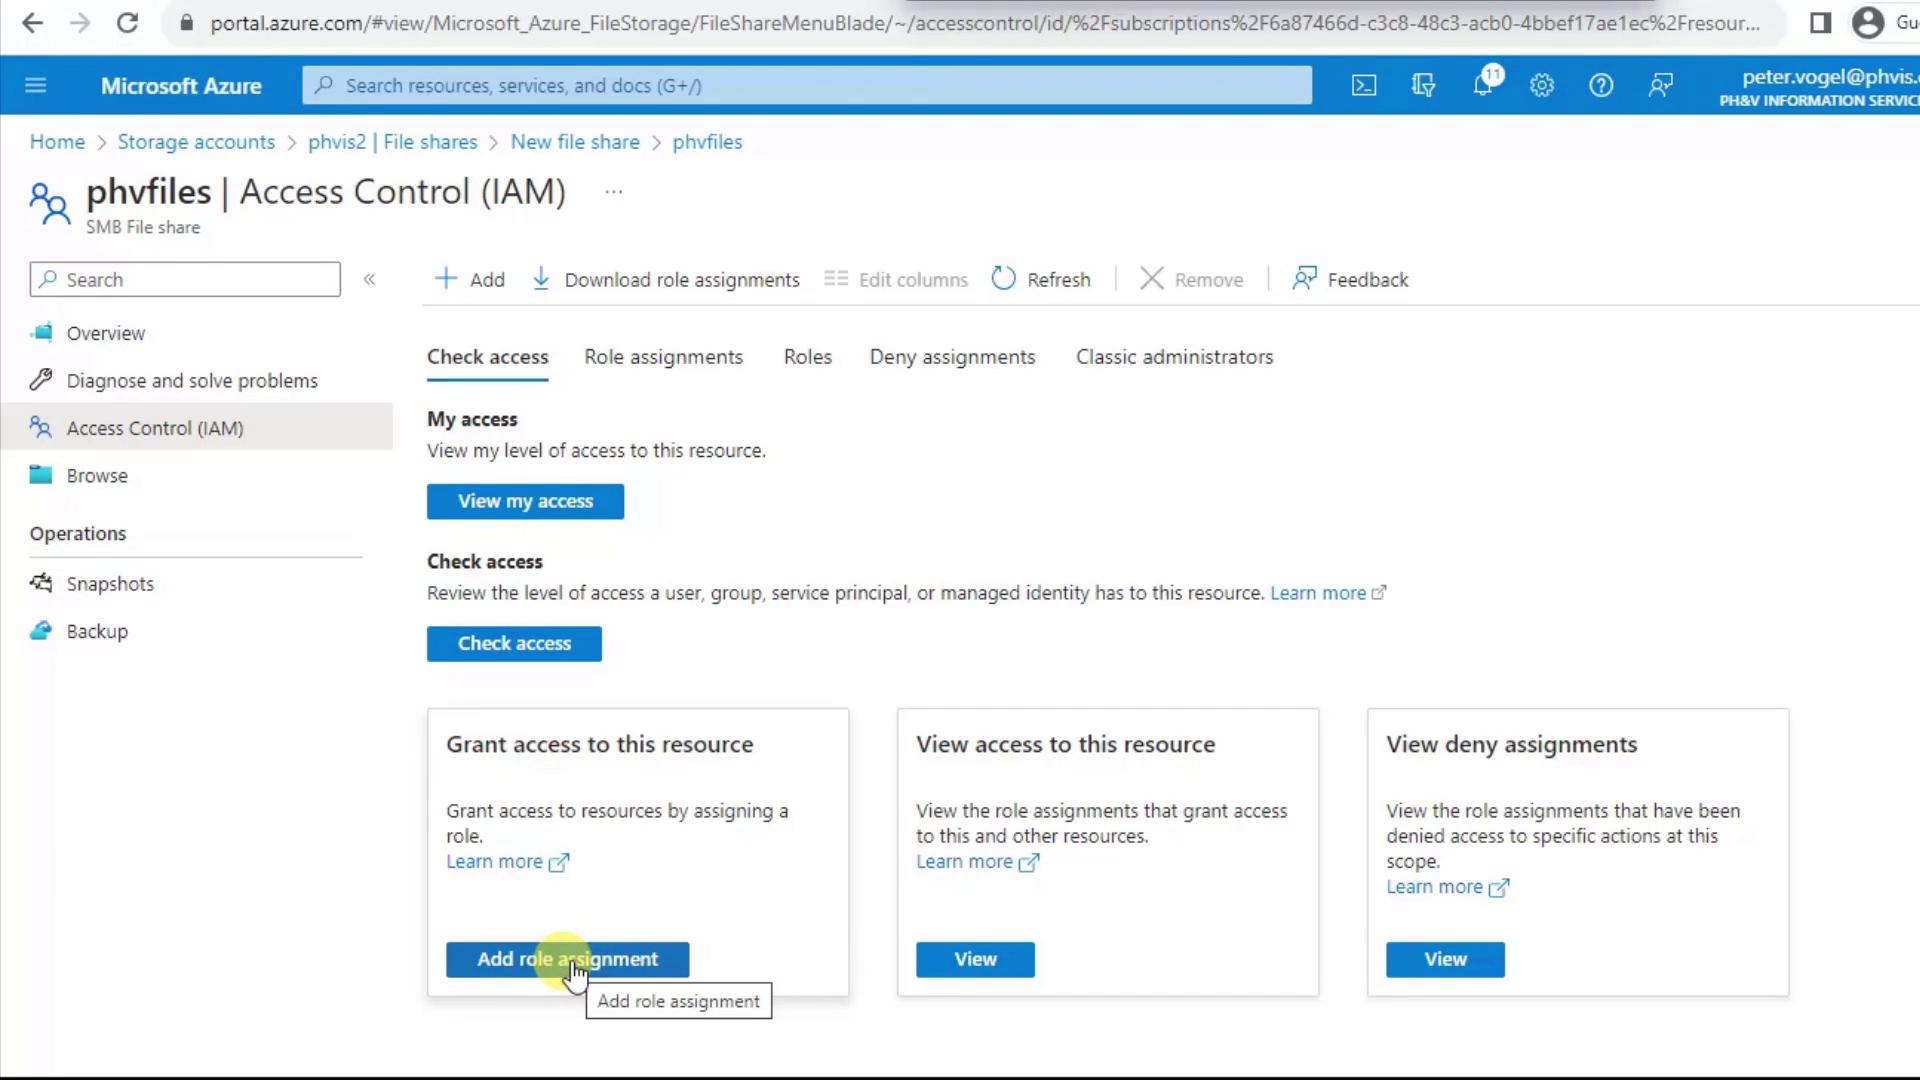
* **Add role assignment** lets you grant built-in roles (e.g., Storage File Data SMB Share Contributor) at the share level.
<Frame>
  ![The image shows the Access Control (IAM) pane for a file share in the Azure portal, with options to check and manage permissions and assignments.](https://kodekloud.com/kk-media/image/upload/v1752872995/notes-assets/images/DP-900-Microsoft-Azure-Data-Fundamentals-Demo-Files-Shares/azure-portal-access-control-file-share.jpg)
</Frame>

<Frame>
  ![The image shows a list of role assignments for a file share in the Azure portal's Access Control (IAM) section, where you can add or remove roles.](https://kodekloud.com/kk-media/image/upload/v1752872997/notes-assets/images/DP-900-Microsoft-Azure-Data-Fundamentals-Demo-Files-Shares/azure-portal-access-control-file-shares.jpg)
</Frame>

***

That completes the setup of your Azure File Share. You can now mount it on Windows, Linux, or macOS clients, integrate with Azure File Sync, or manage it via REST API and SDKs.

***

## Links and References

* [Azure Files documentation](https://learn.microsoft.com/azure/storage/files/storage-files-introduction)
* [Azure Backup for file shares](https://learn.microsoft.com/azure/backup/backup-azure-files)
* [Azure Storage performance and scalability](https://learn.microsoft.com/azure/storage/common/storage-performance-scalability)

<CardGroup>
  <Card title="Watch Video" icon="video" cta="Learn more" href="https://learn.kodekloud.com/user/courses/dp-900-microsoft-azure-data-fundamentals/module/e229086c-adc3-444d-a6da-f77b41067675/lesson/babf0115-ec87-4c6d-aa22-d09723e67952" />
</CardGroup>
