> ## Documentation Index
> Fetch the complete documentation index at: https://notes.kodekloud.com/llms.txt
> Use this file to discover all available pages before exploring further.
# Demo Falco UI Helm
> Deploy Falco with Falco Sidekick and optional web UI via Helm to collect, forward and search Kubernetes security alerts and integrate notifications like Slack
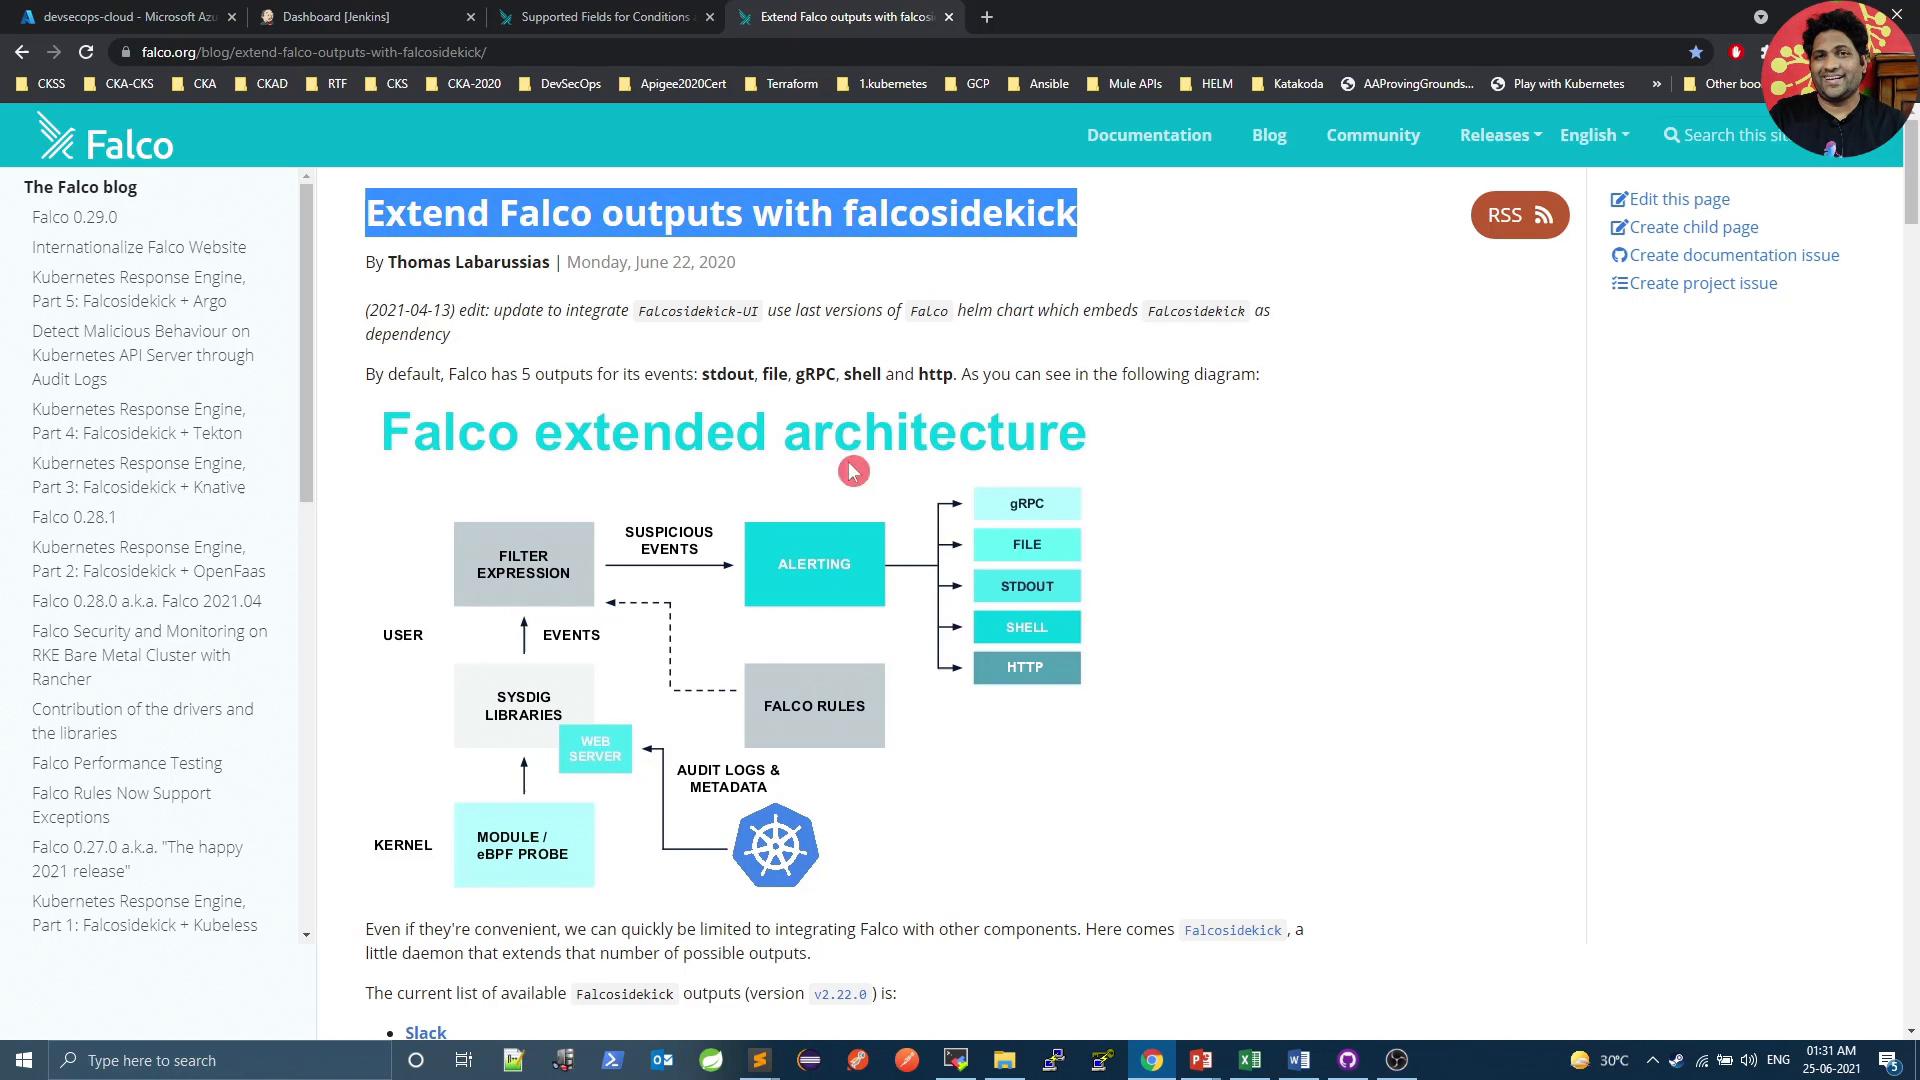
In this lesson you'll learn how to deploy Falco with Falco Sidekick and its optional web UI using Helm. Falco Sidekick receives Falco events and forwards them to external systems (Slack, Teams, Datadog, etc.) while also providing a searchable UI to inspect alerts by severity, rule, namespace, pod, and other fields.
Repository and reference:
* Falco Sidekick GitHub: [https://github.com/falcosecurity/falcosidekick](https://github.com/falcosecurity/falcosidekick)
* Falco charts: [https://falcosecurity.github.io/charts](https://falcosecurity.github.io/charts)
* Helm documentation: [https://helm.sh/docs/](https://helm.sh/docs/)
* Kubernetes basics: [https://kubernetes.io/docs/concepts/overview/what-is-kubernetes/](https://kubernetes.io/docs/concepts/overview/what-is-kubernetes/)
 Overview
* Falco Sidekick acts as a bridge: it consumes Falco alerts (via stdout, file, gRPC, syslog, HTTP) and forwards them to multiple outputs.
* The optional Falco Sidekick web UI displays recent events and supports filtering and search for rapid investigation.
* Helm is used to install Falco, Falco Sidekick, and the UI into a Kubernetes cluster.
Helm charts package Kubernetes manifests and default configuration. Installing the Falco chart with `falcosidekick.enabled=true` deploys Sidekick alongside Falco agents. Use the Sidekick web UI for interactive event exploration.
Quick Install (namespace, repo, install with UI)
```bash theme={null}
# Create a dedicated namespace for Falco
kubectl create namespace falco
# Add the Falco Helm charts repository
helm repo add falcosecurity https://falcosecurity.github.io/charts
helm repo update
# Install Falco with Falco Sidekick and the web UI enabled
helm install falco falcosecurity/falco \
--set falcosidekick.enabled=true \
--set falcosidekick.webui.enabled=true \
-n falco
```
Optional: If you want Slack notifications, include your Slack webhook URL during install:
```bash theme={null}
helm install falco falcosecurity/falco \
--set falcosidekick.enabled=true \
--set falcosidekick.webui.enabled=true \
--set falcosidekick.config.slack.webhookurl="https://hooks.slack.com/services/XXXX" \
-n falco
```
Helm & RPM/YUM Analogy
* Helm charts are packages containing Kubernetes manifests and default configuration (ConfigMaps, Deployments, Services, Ingress, etc.).
* Helm CLI is the Kubernetes package manager that installs chart "releases" into your cluster.
* Think of Helm charts like RPM packages and Helm like YUM: YUM resolves dependencies and installs RPMs; Helm resolves chart requirements and deploys resources.
| Concept | Analogy | Example CLI |
| - | - | - |
| Package | RPM / Helm chart | `rpm -i pkg.rpm` / `helm install` |
| Package manager | YUM / Helm | `yum install git` / `helm install falco` |
| Repository | RPM repo / Helm repo | `yum repo` / `helm repo add` |
Helm installation (example script)
```bash theme={null}
export VERIFY_CHECKSUM=false
curl https://raw.githubusercontent.com/helm/helm/master/scripts/get-helm-3 | bash
helm version
```
Example output after installing Helm (your version may differ):
```console theme={null}
Downloading https://get.helm.sh/helm-v3.6.1-linux-amd64.tar.gz
Preparing to install helm into /usr/local/bin
helm installed into /usr/local/bin/helm
$ helm version
version.BuildInfo{Version:"v3.6.1", GitCommit:"61d8e8c4a6f95540c15c6a65f36a6dd0a45e7a2f", GitTreeState:"clean", GoVersion:"go1.16.5"}
```
Helm v3 removed Tiller and runs client-side, directly interacting with the Kubernetes API. Ensure your kubeconfig and cluster permissions are correct before installing charts.
Installing Falco + Falco Sidekick + Web UI (step-by-step)
1. Create the `falco` namespace and add the Falco Helm repo (see the quick install above).
2. Install the Falco chart enabling Falco Sidekick and the web UI:
```bash theme={null}
helm install falco falcosecurity/falco \
--set falcosidekick.enabled=true \
--set falcosidekick.webui.enabled=true \
-n falco
```
Sample install output (trimmed):
```console theme={null}
NAME: falco
LAST DEPLOYED: Thu Jun 24 20:06:38 2021
NAMESPACE: falco
STATUS: deployed
REVISION: 1
NOTES:
Falco agents are spinning up on each node in your cluster. After a few
seconds, they are going to start monitoring your containers looking for
security issues.
```
Verify installation
```bash theme={null}
helm repo list
kubectl -n falco get all
```
Example `kubectl -n falco get all` output (trimmed)
```console theme={null}
NAME READY STATUS RESTARTS AGE
pod/falco-2j6g4 1/1 Running 0 105s
pod/falco-falcosidekick-fb6f8b856-6m9d6 1/1 Running 0 105s
pod/falco-falcosidekick-ui-7c5fc8dd54-bd8w7 1/1 Running 0 105s
NAME TYPE CLUSTER-IP EXTERNAL-IP PORT(S) AGE
service/falco-falcosidekick ClusterIP 10.103.58.170 2801/TCP 105s
service/falco-falcosidekick-ui NodePort 10.96.238.199 2802:30576/TCP 105s
```
Expose the UI (optional)
* By default the Falco Sidekick UI service is `ClusterIP`. To access it externally from a browser, change the service to `NodePort`.
Edit the service:
```bash theme={null}
kubectl -n falco edit svc falco-falcosidekick-ui
```
Change the spec to:
```yaml theme={null}
spec:
type: NodePort
```
After saving, check the assigned NodePort in the service listing (e.g., `2802:30576/TCP`).
Exposing the Falco UI via NodePort or LoadBalancer can expose event data externally. Protect access with network controls, authentication, or by using an internal ingress. Do not expose sensitive operational logs publicly.
Accessing the UI
* Use the node IP (or node DNS) and the assigned NodePort, then open the UI path in your browser:
* Example: `http://:30576/UI` (replace `` and port with your environment values)
* The UI shows recent Falco alerts and provides filters: rule, severity, namespace, pod, container, and timestamp.
Example Falco event snippets shown in the UI
* Terminal shell spawned in container:
```text theme={null}
2021-06-24 20:10:05
20:10:05.471512220: Notice A shell was spawned in a container with an attached terminal (user=root user_loginuid=-1 k8s.ns=default k8s.pod=n1 container=a615790552fd shell=sh parent=runc cmdline=sh terminal=34817 container_id=a615790552fd image=nginx)
proc.name sh proc.tty 34817 user.name root k8s.pod.name n1 proc.cmdline sh proc.pname runc user.loginuid -1 container.id a615790552fd evt.time 1624565405471512300 container.image.repository nginx
```
* Privileged container started:
```text theme={null}
20:07:08.592506000: Notice Privileged container started (user= user_loginuid=0 command=container:6457d51f290b k8s.ns=kube-system k8s.pod=weave-net-dfccn container=6457d51f290b image=weaveworks/weave-kube:2.8.1)
k8s.ns=kube-system k8s.pod=weave-net-dfccn container.id 6457d51f290b container.image.tag 2.8.1 evt.time 1624565228592506000 k8s.pod.name weave-net-dfccn proc.cmdline container:6457d51f290b container.image.repository weaveworks/weave-kube
```
These UI entries mirror the detailed Falco log fields, but with search and filtering capabilities that accelerate incident investigation.
Commands summary
| Command | Purpose |
| - | - |
| `kubectl create namespace falco` | Create the namespace for Falco components |
| `helm repo add falcosecurity https://falcosecurity.github.io/charts` | Add the Falco Helm charts repo |
| `helm install falco falcosecurity/falco --set falcosidekick.enabled=true --set falcosidekick.webui.enabled=true -n falco` | Install Falco, Sidekick, and UI |
| `kubectl -n falco get all` | Verify pods, services, and deployments |
| `kubectl -n falco edit svc falco-falcosidekick-ui` | Change service type to NodePort to expose UI externally |
Next steps & recommendations
* If you want Slack notifications, reinstall or upgrade the chart with your Slack webhook:
```bash theme={null}
helm upgrade --install falco falcosecurity/falco \
--set falcosidekick.enabled=true \
--set falcosidekick.webui.enabled=true \
--set falcosidekick.config.slack.webhookurl="https://hooks.slack.com/services/XXXX" \
-n falco
```
* Secure the UI: use an internal-only service, restrict access with network policies, or place the UI behind an authenticated ingress.
* Explore additional Falco Sidekick outputs (Teams, Datadog, PagerDuty, Elasticsearch) via the Sidekick configuration documented in the Falco Sidekick repo.
That's it — deploy Falco with Sidekick and the UI using Helm to get searchable alerting and flexible notifications for your Kubernetes workloads.
This documentation is built and hosted on [Mintlify](https://mintlify.com), a developer documentation platform.
Overview
* Falco Sidekick acts as a bridge: it consumes Falco alerts (via stdout, file, gRPC, syslog, HTTP) and forwards them to multiple outputs.
* The optional Falco Sidekick web UI displays recent events and supports filtering and search for rapid investigation.
* Helm is used to install Falco, Falco Sidekick, and the UI into a Kubernetes cluster.
Helm charts package Kubernetes manifests and default configuration. Installing the Falco chart with `falcosidekick.enabled=true` deploys Sidekick alongside Falco agents. Use the Sidekick web UI for interactive event exploration.
Quick Install (namespace, repo, install with UI)
```bash theme={null}
# Create a dedicated namespace for Falco
kubectl create namespace falco
# Add the Falco Helm charts repository
helm repo add falcosecurity https://falcosecurity.github.io/charts
helm repo update
# Install Falco with Falco Sidekick and the web UI enabled
helm install falco falcosecurity/falco \
--set falcosidekick.enabled=true \
--set falcosidekick.webui.enabled=true \
-n falco
```
Optional: If you want Slack notifications, include your Slack webhook URL during install:
```bash theme={null}
helm install falco falcosecurity/falco \
--set falcosidekick.enabled=true \
--set falcosidekick.webui.enabled=true \
--set falcosidekick.config.slack.webhookurl="https://hooks.slack.com/services/XXXX" \
-n falco
```
Helm & RPM/YUM Analogy
* Helm charts are packages containing Kubernetes manifests and default configuration (ConfigMaps, Deployments, Services, Ingress, etc.).
* Helm CLI is the Kubernetes package manager that installs chart "releases" into your cluster.
* Think of Helm charts like RPM packages and Helm like YUM: YUM resolves dependencies and installs RPMs; Helm resolves chart requirements and deploys resources.
| Concept | Analogy | Example CLI |
| - | - | - |
| Package | RPM / Helm chart | `rpm -i pkg.rpm` / `helm install` |
| Package manager | YUM / Helm | `yum install git` / `helm install falco` |
| Repository | RPM repo / Helm repo | `yum repo` / `helm repo add` |
Helm installation (example script)
```bash theme={null}
export VERIFY_CHECKSUM=false
curl https://raw.githubusercontent.com/helm/helm/master/scripts/get-helm-3 | bash
helm version
```
Example output after installing Helm (your version may differ):
```console theme={null}
Downloading https://get.helm.sh/helm-v3.6.1-linux-amd64.tar.gz
Preparing to install helm into /usr/local/bin
helm installed into /usr/local/bin/helm
$ helm version
version.BuildInfo{Version:"v3.6.1", GitCommit:"61d8e8c4a6f95540c15c6a65f36a6dd0a45e7a2f", GitTreeState:"clean", GoVersion:"go1.16.5"}
```
Helm v3 removed Tiller and runs client-side, directly interacting with the Kubernetes API. Ensure your kubeconfig and cluster permissions are correct before installing charts.
Installing Falco + Falco Sidekick + Web UI (step-by-step)
1. Create the `falco` namespace and add the Falco Helm repo (see the quick install above).
2. Install the Falco chart enabling Falco Sidekick and the web UI:
```bash theme={null}
helm install falco falcosecurity/falco \
--set falcosidekick.enabled=true \
--set falcosidekick.webui.enabled=true \
-n falco
```
Sample install output (trimmed):
```console theme={null}
NAME: falco
LAST DEPLOYED: Thu Jun 24 20:06:38 2021
NAMESPACE: falco
STATUS: deployed
REVISION: 1
NOTES:
Falco agents are spinning up on each node in your cluster. After a few
seconds, they are going to start monitoring your containers looking for
security issues.
```
Verify installation
```bash theme={null}
helm repo list
kubectl -n falco get all
```
Example `kubectl -n falco get all` output (trimmed)
```console theme={null}
NAME READY STATUS RESTARTS AGE
pod/falco-2j6g4 1/1 Running 0 105s
pod/falco-falcosidekick-fb6f8b856-6m9d6 1/1 Running 0 105s
pod/falco-falcosidekick-ui-7c5fc8dd54-bd8w7 1/1 Running 0 105s
NAME TYPE CLUSTER-IP EXTERNAL-IP PORT(S) AGE
service/falco-falcosidekick ClusterIP 10.103.58.170 2801/TCP 105s
service/falco-falcosidekick-ui NodePort 10.96.238.199 2802:30576/TCP 105s
```
Expose the UI (optional)
* By default the Falco Sidekick UI service is `ClusterIP`. To access it externally from a browser, change the service to `NodePort`.
Edit the service:
```bash theme={null}
kubectl -n falco edit svc falco-falcosidekick-ui
```
Change the spec to:
```yaml theme={null}
spec:
type: NodePort
```
After saving, check the assigned NodePort in the service listing (e.g., `2802:30576/TCP`).
Exposing the Falco UI via NodePort or LoadBalancer can expose event data externally. Protect access with network controls, authentication, or by using an internal ingress. Do not expose sensitive operational logs publicly.
Accessing the UI
* Use the node IP (or node DNS) and the assigned NodePort, then open the UI path in your browser:
* Example: `http://:30576/UI` (replace `` and port with your environment values)
* The UI shows recent Falco alerts and provides filters: rule, severity, namespace, pod, container, and timestamp.
Example Falco event snippets shown in the UI
* Terminal shell spawned in container:
```text theme={null}
2021-06-24 20:10:05
20:10:05.471512220: Notice A shell was spawned in a container with an attached terminal (user=root user_loginuid=-1 k8s.ns=default k8s.pod=n1 container=a615790552fd shell=sh parent=runc cmdline=sh terminal=34817 container_id=a615790552fd image=nginx)
proc.name sh proc.tty 34817 user.name root k8s.pod.name n1 proc.cmdline sh proc.pname runc user.loginuid -1 container.id a615790552fd evt.time 1624565405471512300 container.image.repository nginx
```
* Privileged container started:
```text theme={null}
20:07:08.592506000: Notice Privileged container started (user= user_loginuid=0 command=container:6457d51f290b k8s.ns=kube-system k8s.pod=weave-net-dfccn container=6457d51f290b image=weaveworks/weave-kube:2.8.1)
k8s.ns=kube-system k8s.pod=weave-net-dfccn container.id 6457d51f290b container.image.tag 2.8.1 evt.time 1624565228592506000 k8s.pod.name weave-net-dfccn proc.cmdline container:6457d51f290b container.image.repository weaveworks/weave-kube
```
These UI entries mirror the detailed Falco log fields, but with search and filtering capabilities that accelerate incident investigation.
Commands summary
| Command | Purpose |
| - | - |
| `kubectl create namespace falco` | Create the namespace for Falco components |
| `helm repo add falcosecurity https://falcosecurity.github.io/charts` | Add the Falco Helm charts repo |
| `helm install falco falcosecurity/falco --set falcosidekick.enabled=true --set falcosidekick.webui.enabled=true -n falco` | Install Falco, Sidekick, and UI |
| `kubectl -n falco get all` | Verify pods, services, and deployments |
| `kubectl -n falco edit svc falco-falcosidekick-ui` | Change service type to NodePort to expose UI externally |
Next steps & recommendations
* If you want Slack notifications, reinstall or upgrade the chart with your Slack webhook:
```bash theme={null}
helm upgrade --install falco falcosecurity/falco \
--set falcosidekick.enabled=true \
--set falcosidekick.webui.enabled=true \
--set falcosidekick.config.slack.webhookurl="https://hooks.slack.com/services/XXXX" \
-n falco
```
* Secure the UI: use an internal-only service, restrict access with network policies, or place the UI behind an authenticated ingress.
* Explore additional Falco Sidekick outputs (Teams, Datadog, PagerDuty, Elasticsearch) via the Sidekick configuration documented in the Falco Sidekick repo.
That's it — deploy Falco with Sidekick and the UI using Helm to get searchable alerting and flexible notifications for your Kubernetes workloads.
This documentation is built and hosted on [Mintlify](https://mintlify.com), a developer documentation platform.