Docker - SWARM | SERVICES | STACKS - Hands-on
CICD Integration
Demo Docker Registry
Hello, and welcome to this article! In this guide, we explain how to set up and use a local Docker Registry server. Instead of relying on Docker Hub to download images, you can host your own private registry within your organization to enhance security, maintain compliance, and efficiently manage in-house images.
Docker Hub serves as a publicly hosted registry server, but by deploying your own internal registry, you gain greater control over your image storage. One of the simplest methods to enable this is by using the official Docker Registry image available on Docker Hub. This registry implements Docker Registry 2.0, which supports storing and distributing Docker images along with various available tags.
Deploying the Local Registry Server
To deploy your local registry server, start by pulling the official registry image and running it as a container. Use the command below to launch the registry server in detached mode, with port 5000 published to your host:
docker run -d -p 5000:5000 --restart always --name registry registry:2
After starting the container, verify its running status with:
docker ps
If the image is not already cached, pull it using the following command:
docker pull registry:2
Pushing a Docker Image to the Local Registry
Next, let's push an image to the local registry. For demonstration, we will push the "hello-world" image. Begin by pulling the image from Docker Hub:
docker pull hello-world
Tag the image so that it points to your local registry at localhost:5000
:
docker tag hello-world localhost:5000/hello-world
Push the tagged image to your registry with:
docker push localhost:5000/hello-world
Once pushed, you can list your Docker images locally to verify that both the original and tagged images are present:
docker images
Verifying Image Storage Inside the Registry
The Docker Registry server stores pushed images under /var/lib/registry
by default. To inspect the stored images, open a shell inside the registry container:
docker exec -it registry /bin/sh
Inside the container, navigate to the registry storage directory:
ls /var/lib/registry
You should see a folder (typically named docker
). Continue navigating deeper:
ls /var/lib/registry/docker/registry/
This should display a directory named v2
. Look inside this directory:
ls /var/lib/registry/docker/registry/v2/repositories/
You will find a folder corresponding to the "hello-world" repository along with additional subdirectories (such as _layers
, _manifests
, _uploads
) that store all the image data. Exit the container shell when you are finished inspecting.
Pulling an Image from the Local Registry
To demonstrate pulling an image from your local registry, start by removing the local copies of the Hello World image using:
docker rmi hello-world
docker rmi localhost:5000/hello-world
Now, pull the image from your local registry:
docker pull localhost:5000/hello-world
After the image downloads, verify its presence by listing your Docker images:
docker images
Deploying a Docker Registry Frontend
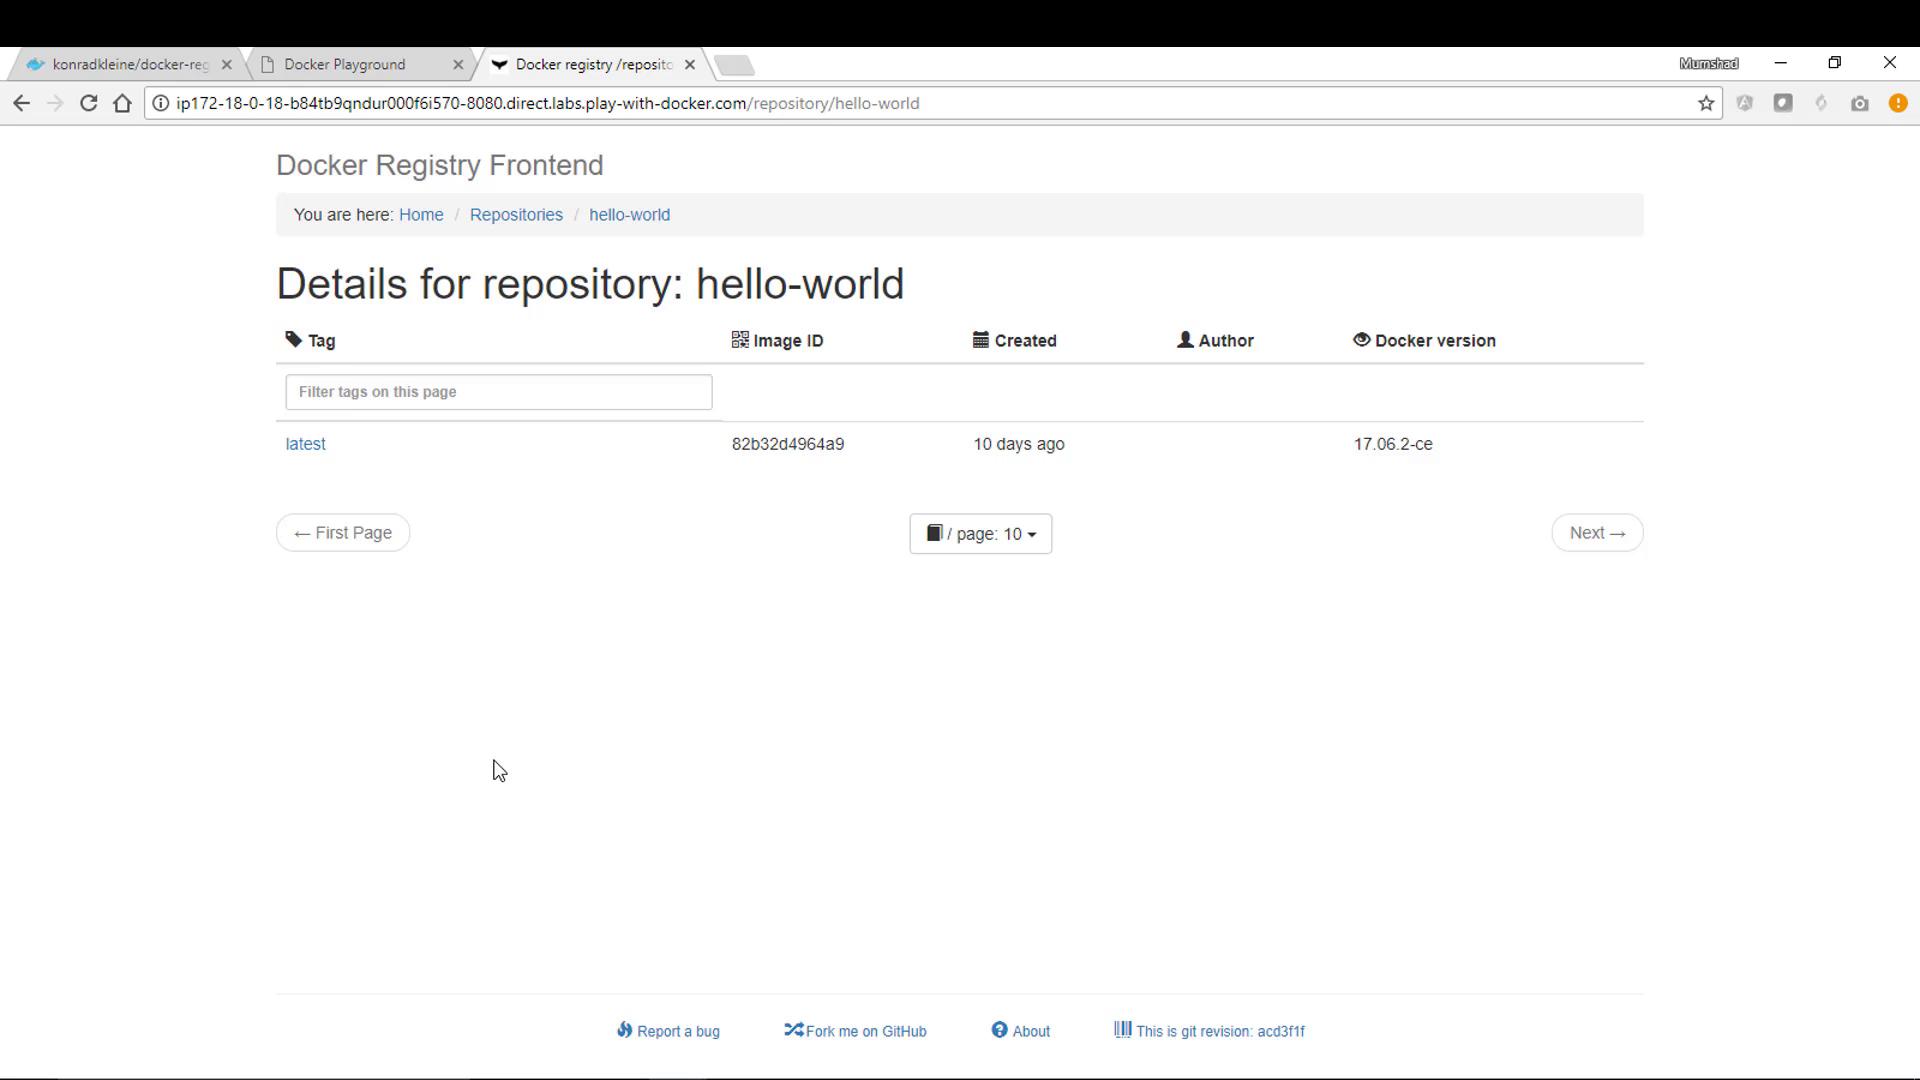
A practical way to manage your registry’s repositories is by utilizing a registry frontend. One popular option is the Docker Registry Frontend developed by Konrad Kleine. This lightweight web application allows you to view and manage images stored in your registry through an intuitive interface.
To run the registry frontend, execute the following command. Be sure to specify the registry’s hostname and port number within the environment variables. Since your registry is running on the same machine on port 5000, set these accordingly. The command also links the frontend container to the registry container, allowing communication via the container name:
docker run -d \
-e ENV_DOCKER_REGISTRY_HOST=registry \
-e ENV_DOCKER_REGISTRY_PORT=5000 \
-p 8080:80 \
--link registry:registry \
konradkleine/docker-registry-frontend:v2
This command runs the frontend in detached mode while mapping its internal port 80 to port 8080 on your host. You can confirm that both the registry and the registry frontend containers are running by using:
docker ps
The frontend container, connected via the alias “registry”, communicates with your local registry server on port 5000.
Testing the Frontend and Pushing Additional Images
For a hands-on experience, consider using Play with Docker, which provides an interactive way to run these commands in a pre-provisioned Docker environment. Once the frontend container is running, navigate to the host URL on port 8080. The registry frontend will display a list of repositories stored in your local registry, including the "hello-world" repository.
You can also experiment with pushing another image to your registry. For example, retag the registry frontend image itself and push it:
Tag the image to point to your local registry:
docker tag konradkleine/docker-registry-frontend:v2 localhost:5000/konradkleine/docker-registry-frontend:v2
Push the tagged image:
docker push localhost:5000/konradkleine/docker-registry-frontend:v2
Refresh your browser displaying the frontend; the new repository will appear, allowing you to click through and view detailed information about the pushed images.
Conclusion
In this article, we covered the following steps:
- Deploy a private Docker Registry server using the official Docker image.
- Tag and push a Docker image (e.g., hello-world) to the local registry.
- Inspect the stored data inside the registry container.
- Pull images from your local registry.
- Deploy a registry frontend web application to easily browse and manage your images.
This setup provides a secure and controlled environment for hosting internal images, making it easier to manage and deploy container images within your organization.
Note
If you are experimenting with these commands in a production-like environment, ensure your registry is secured with proper authentication and TLS for encrypted communication.
Happy Docker playing!
Watch Video
Watch video content