> ## Documentation Index
> Fetch the complete documentation index at: https://notes.kodekloud.com/llms.txt
> Use this file to discover all available pages before exploring further.
# Demo Getting Started with Confluent for Free
> Guide to creating a free Confluent Cloud account, provisioning a Kafka cluster, creating topics, and producing and inspecting sample event data.
Welcome. This guide shows how to create a free Confluent Cloud account, provision a Kafka cluster, create a topic, and produce sample data. Follow the ordered steps below — each step includes the relevant Confluent Console actions and screenshots to help you visualize the process.
Confluent provides a free trial (typically a \$400 credit for 30 days) that you can use to create and test clusters, connectors, and other managed services. This is ideal for learning and development.
Prerequisites
* A web browser and a Google account (recommended) or another supported sign-in method.
* A valid email. Depending on region, Confluent may request a credit/debit card for verification.
Step-by-step walkthrough
1. Open Confluent Cloud
* Visit the Confluent Cloud landing page: [https://www.confluent.io/confluent-cloud/](https://www.confluent.io/confluent-cloud/).
* Click Start for Free to begin registration.
2. Choose Cloud vs Self-managed
* On the signup screen select the Cloud option (default) for this walkthrough.
* Sign in with Google or another supported provider.
* Provide required details (name, email, country). If prompted for payment information, complete the verification steps.
Confluent may place a small authorization hold (often around \$1) to validate your payment method. This is typically an authorization only and not a permanent charge. You won’t be billed as long as you stay within the free-trial credit limits.
3. Confluent Cloud console overview
* After signup and verification, you’ll land in the Confluent Cloud console.
* The left navigation includes Environment, Data Portal, Stream Governance, Connectors, and Clusters — these are the main areas you’ll use.
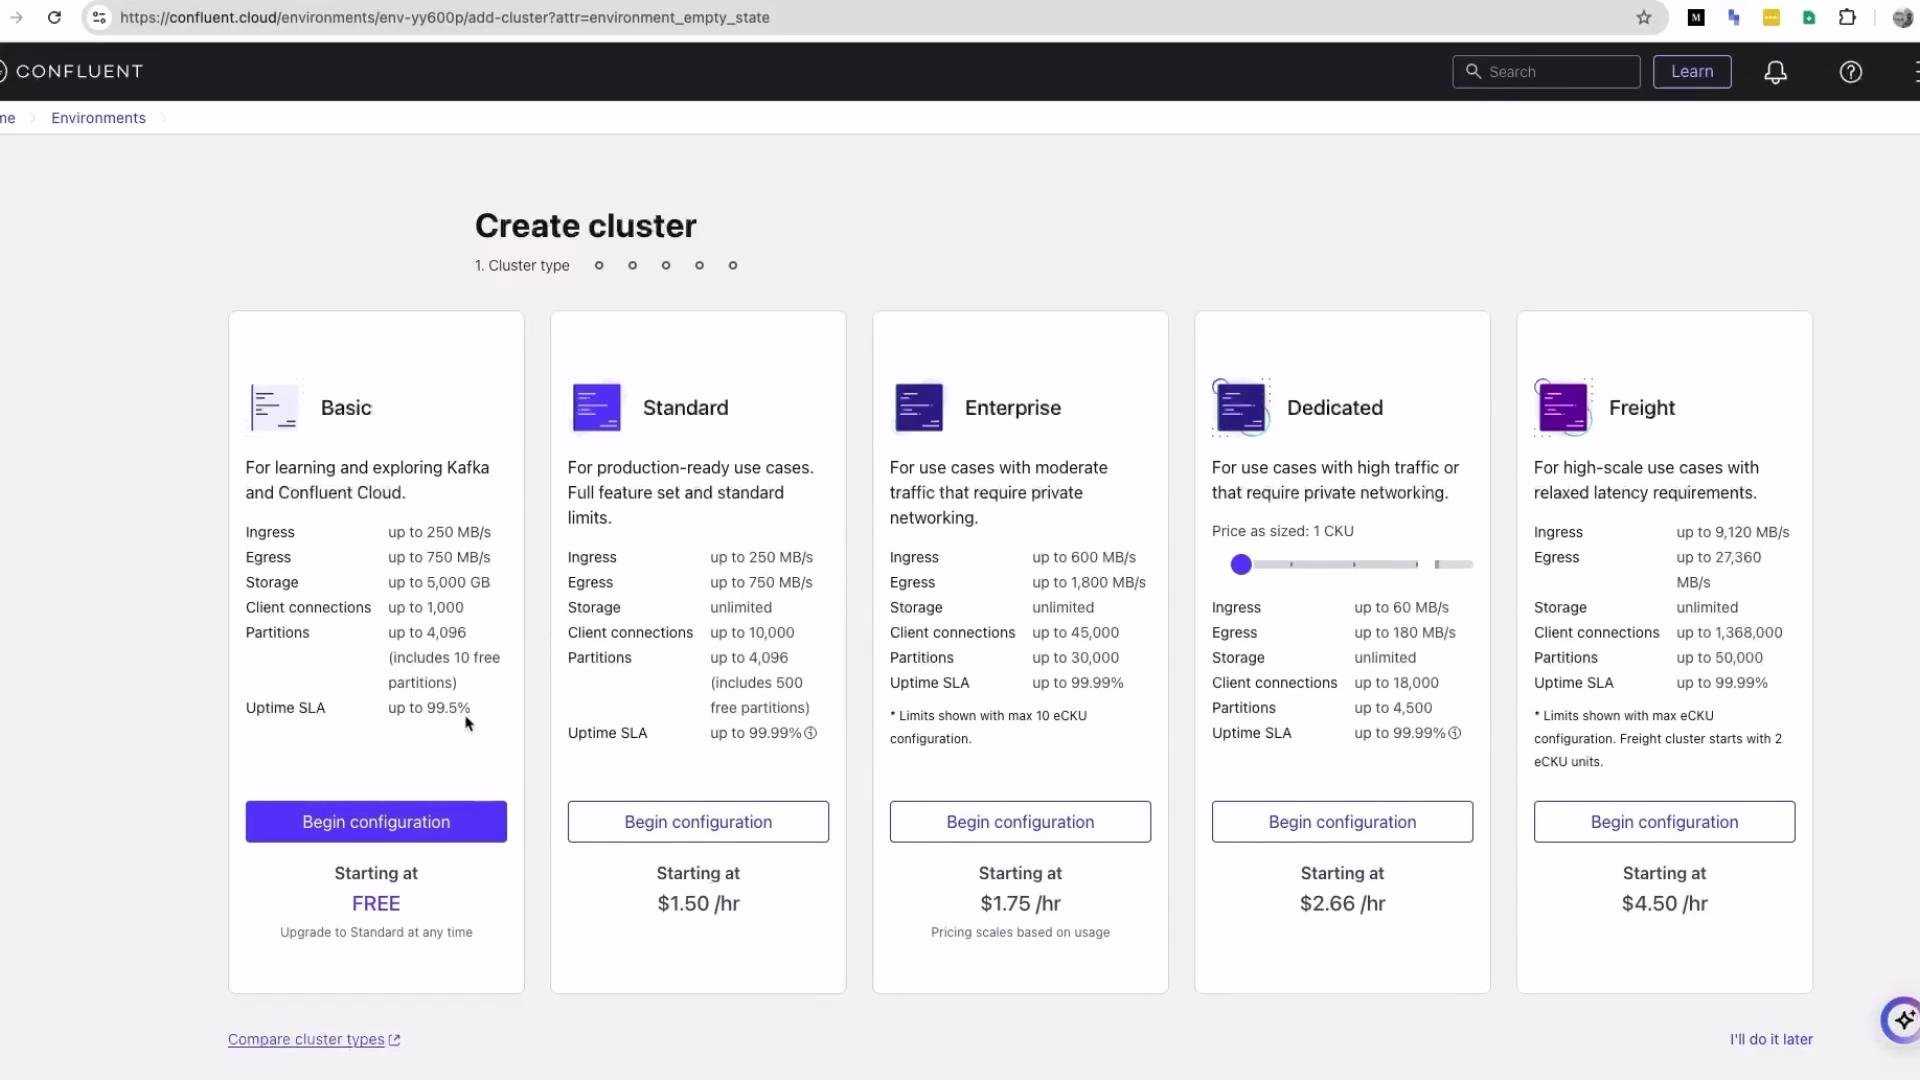
4. Create a Kafka cluster
* From the left sidebar click Environments → open the default environment → Create a cluster.
* Choose plan: for this demo select Basic (suitable for learning and low-cost testing).
* Click Begin configuration, choose a cloud provider (AWS, GCP, or Azure), select a region (single-zone is fine for demo), name your cluster (e.g., `Kafka cluster`), then Launch cluster.
 Notes on provisioning
* Confluent provisions the infrastructure in the selected cloud on your behalf for the managed Basic flow (it does not create resources in your own cloud account).
* If account validation (email or payment verification) is incomplete, provisioning may fail — complete those steps first.
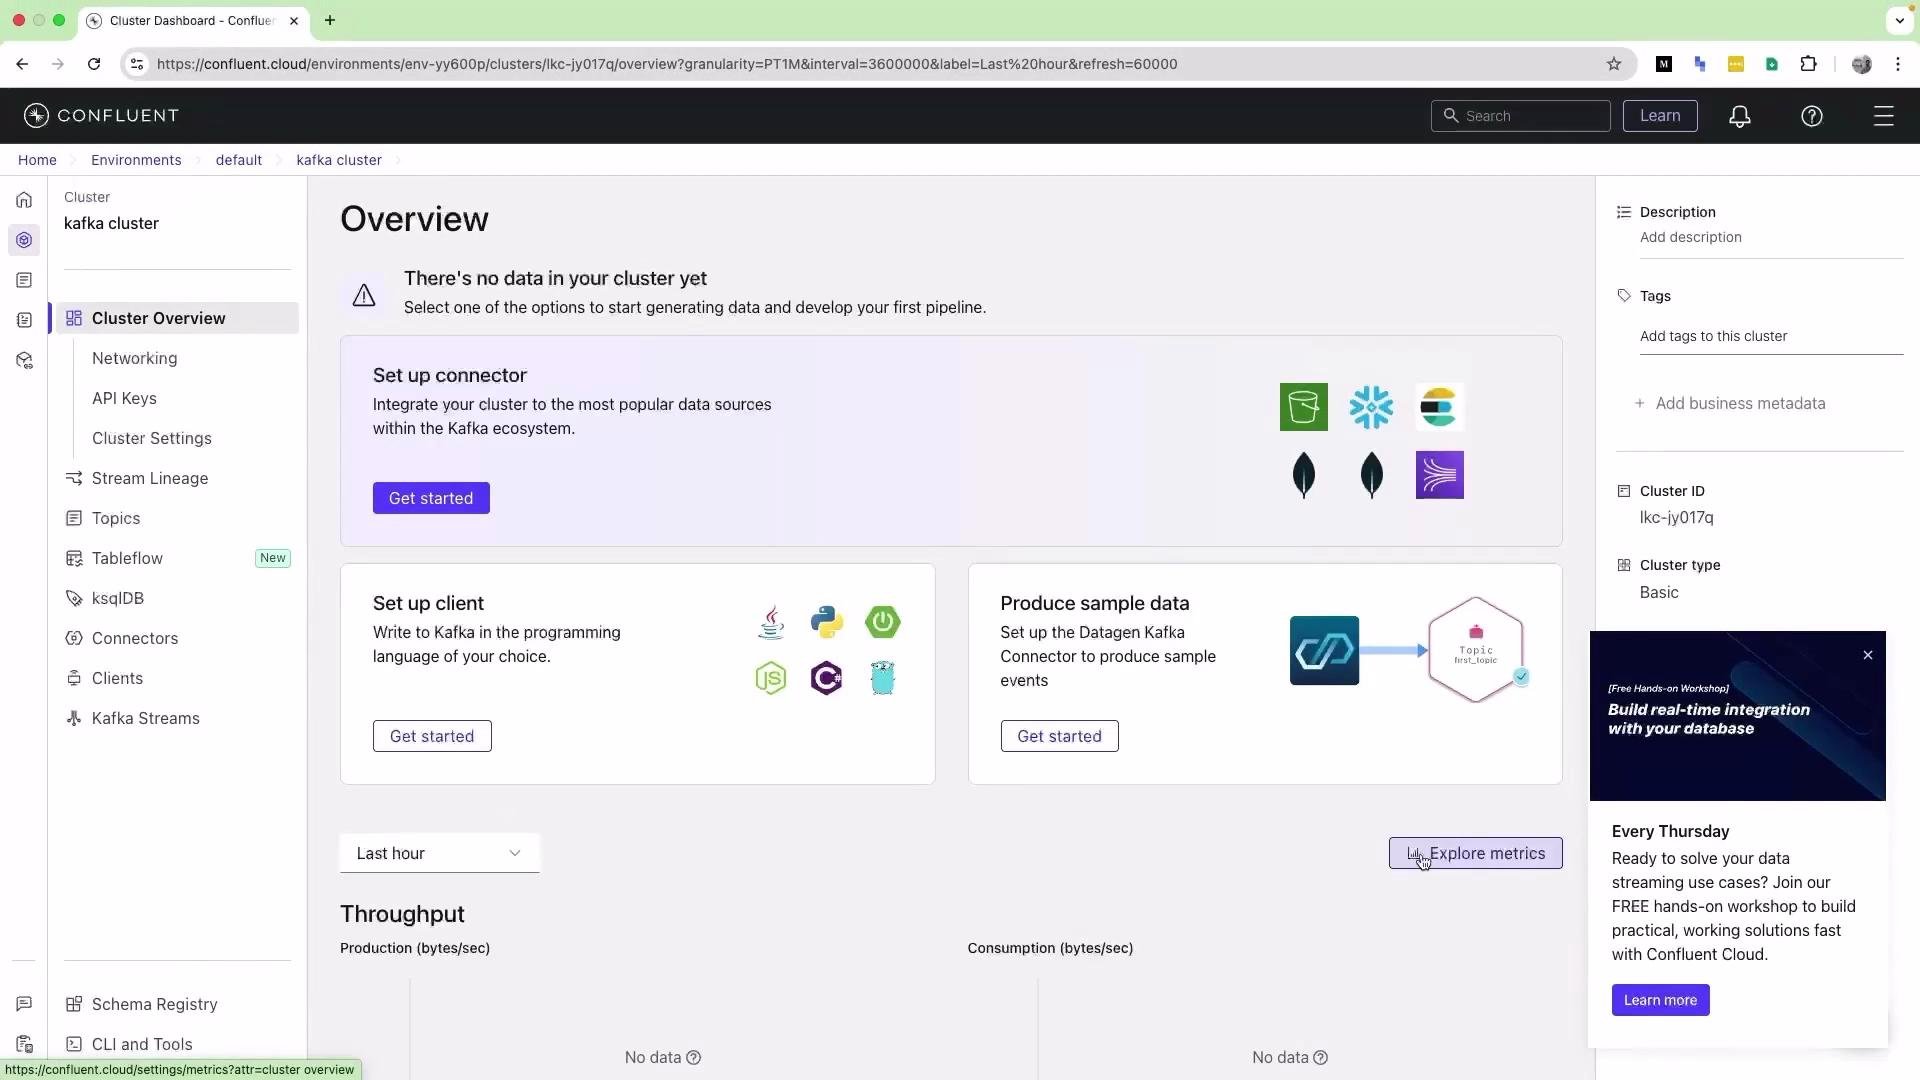
5. Cluster overview and data tools
* When the cluster is ready, open Home → Environment → Default to see your Kafka cluster listed.
* From the cluster overview you can access connectors, clients, sample-data producers, networking, and API key management.
Notes on provisioning
* Confluent provisions the infrastructure in the selected cloud on your behalf for the managed Basic flow (it does not create resources in your own cloud account).
* If account validation (email or payment verification) is incomplete, provisioning may fail — complete those steps first.
5. Cluster overview and data tools
* When the cluster is ready, open Home → Environment → Default to see your Kafka cluster listed.
* From the cluster overview you can access connectors, clients, sample-data producers, networking, and API key management.
 6. Create a topic
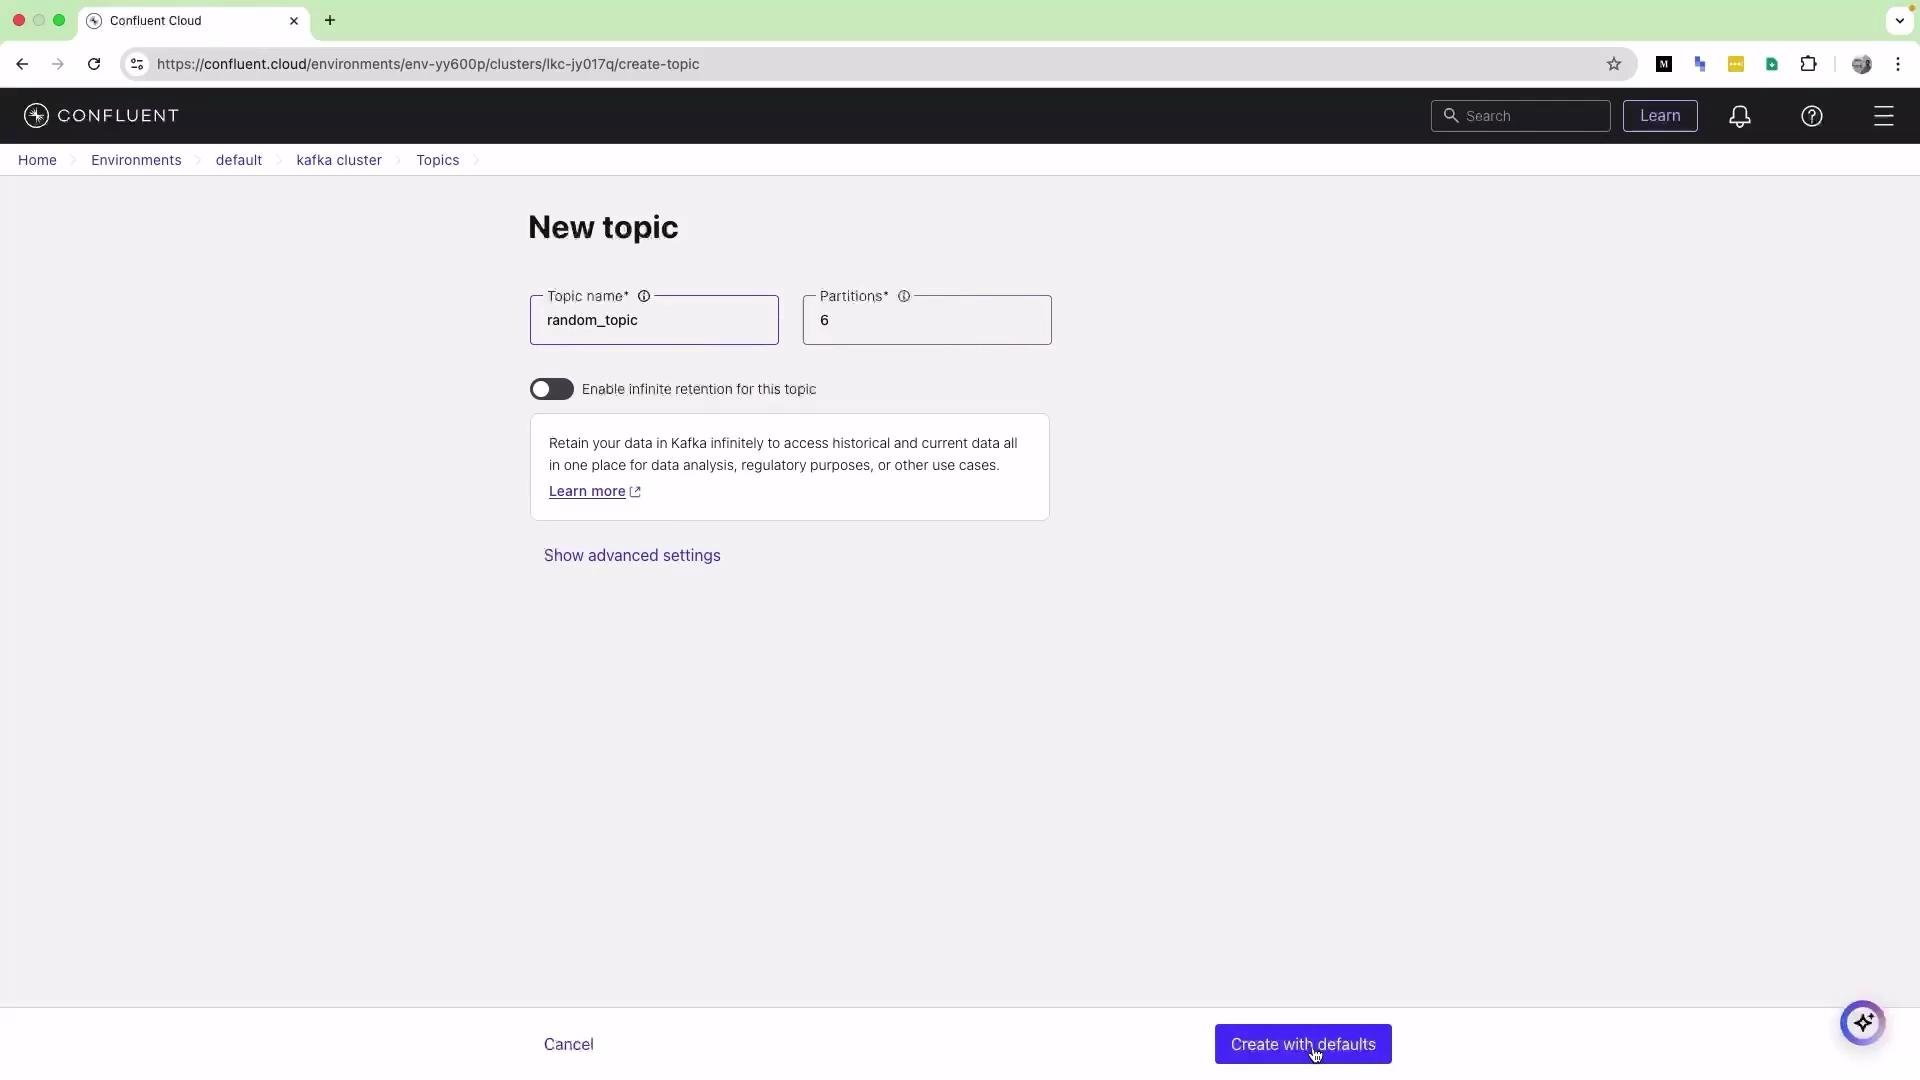
* Navigate to Topics → Create topic.
* Enter a topic name (for example `random topic`) and accept or update the default number of partitions (default shown was 6).
* Click Create with defaults to finish.
6. Create a topic
* Navigate to Topics → Create topic.
* Enter a topic name (for example `random topic`) and accept or update the default number of partitions (default shown was 6).
* Click Create with defaults to finish.
 7. Produce sample data
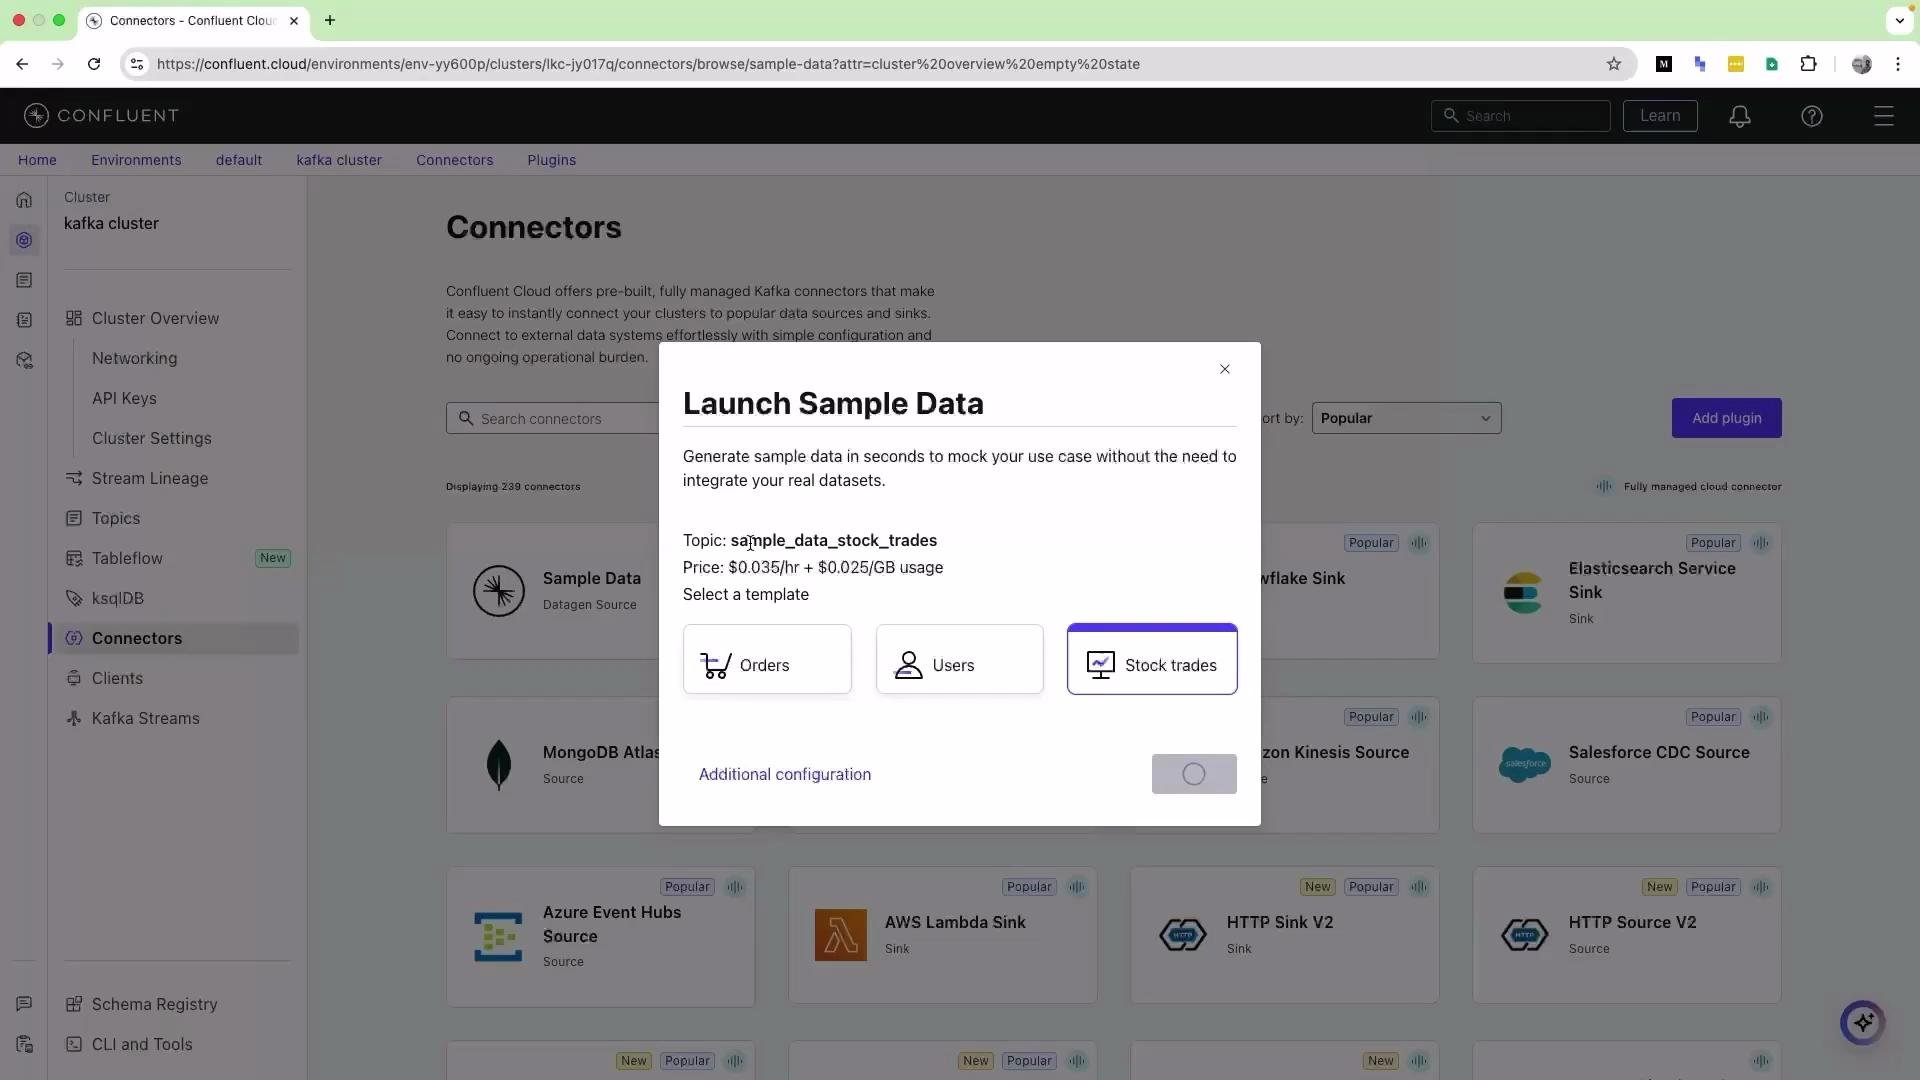
* From the cluster overview click Get started → Produce sample data.
* Select a template (for this demo choose Stock trade) and click Launch.
* The sample producer will provision a connector that sends events to a demo topic — commonly `sample_data_stock_trades`. You do not need to pre-create this topic.
7. Produce sample data
* From the cluster overview click Get started → Produce sample data.
* Select a template (for this demo choose Stock trade) and click Launch.
* The sample producer will provision a connector that sends events to a demo topic — commonly `sample_data_stock_trades`. You do not need to pre-create this topic.
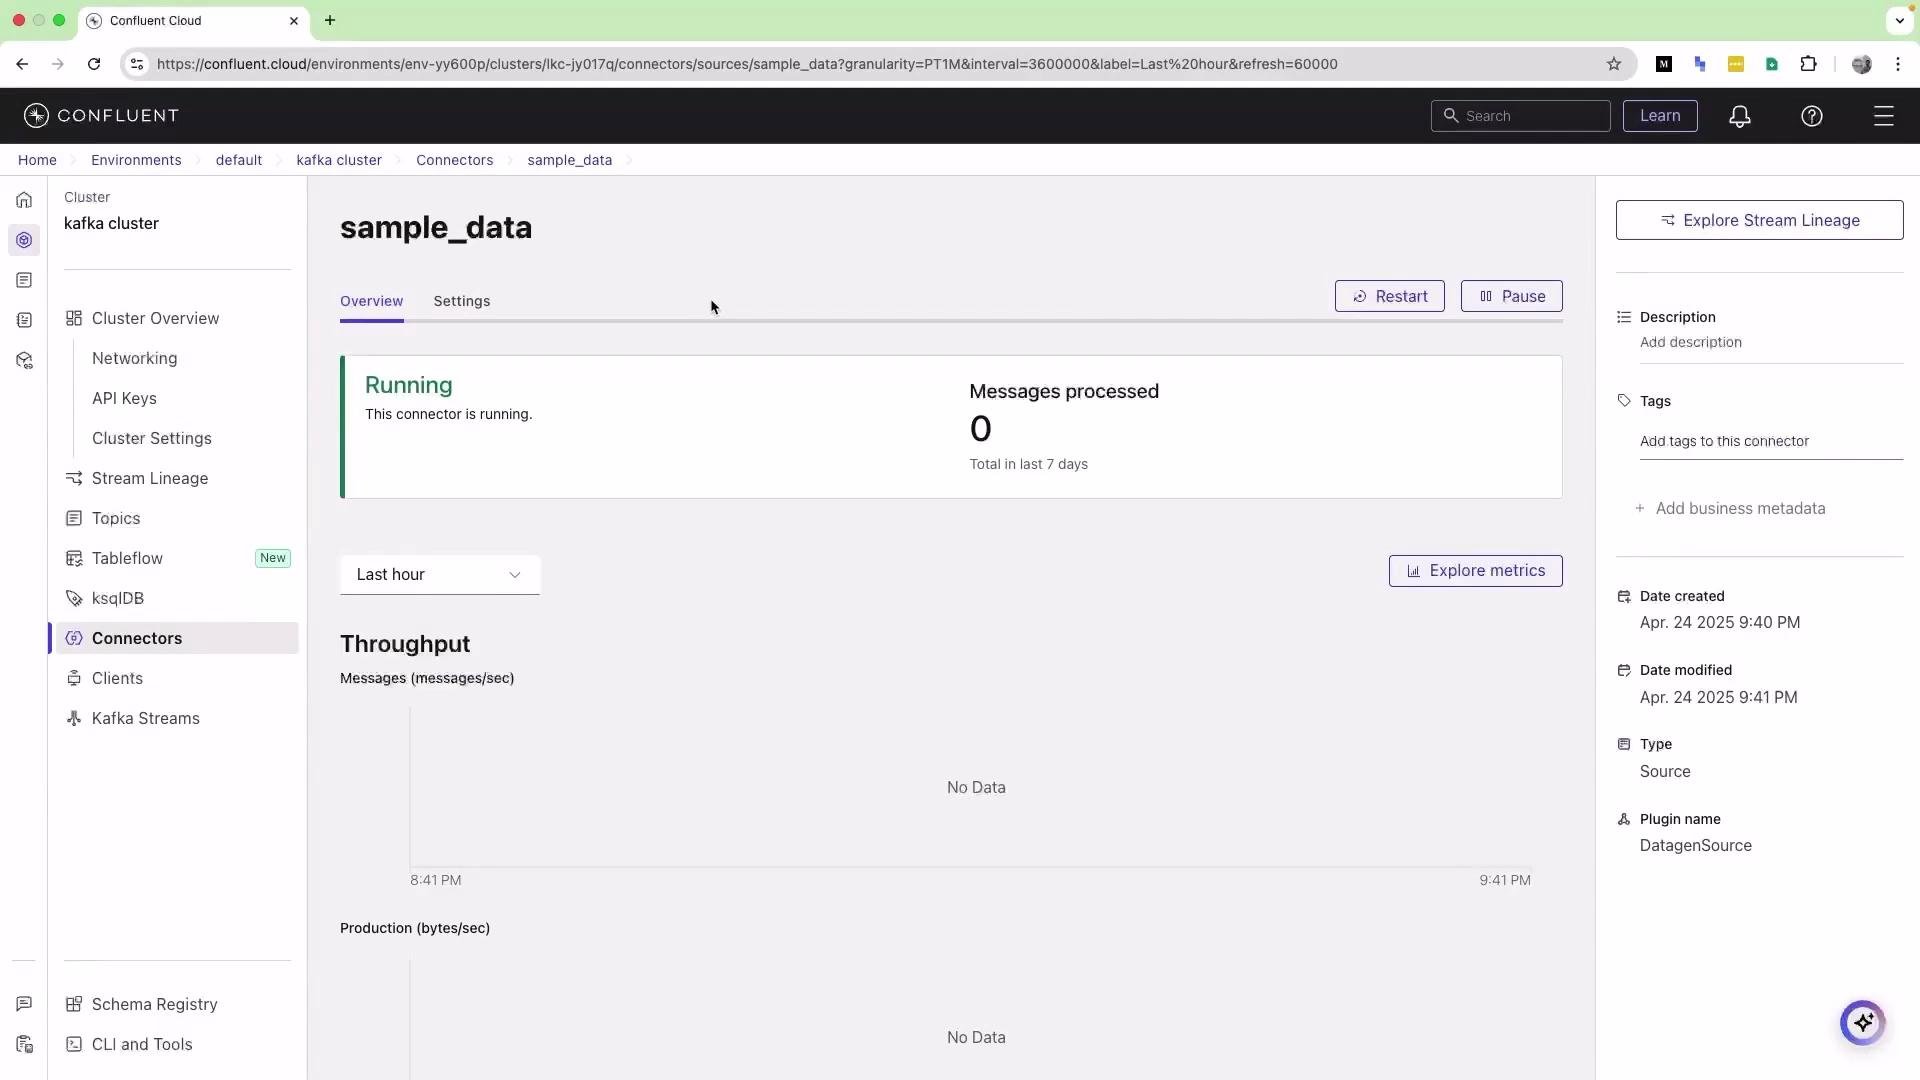
 * The sample producer appears in the Connectors area and will show a Provisioning status before moving to Running. Wait until it shows Running.
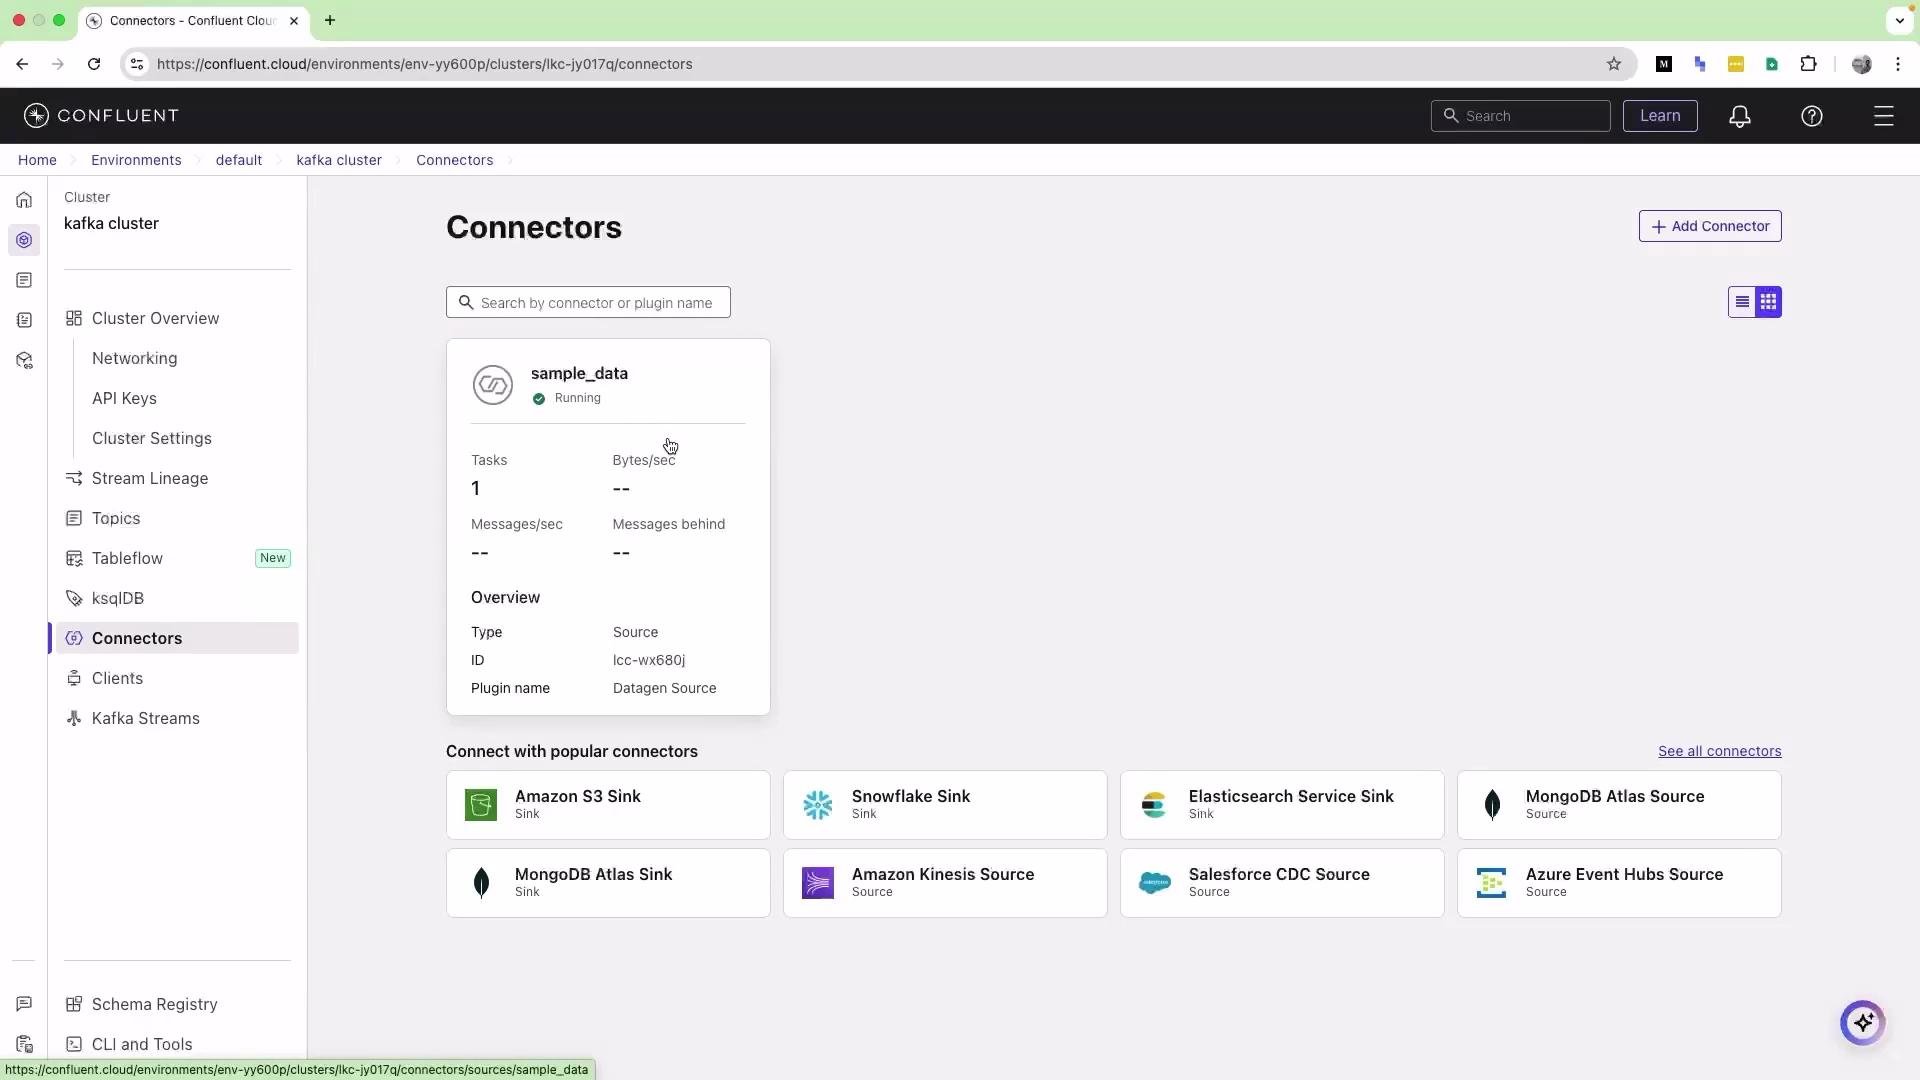 * Refresh the Connectors page periodically to see the status change.
 8. Inspect topics and messages
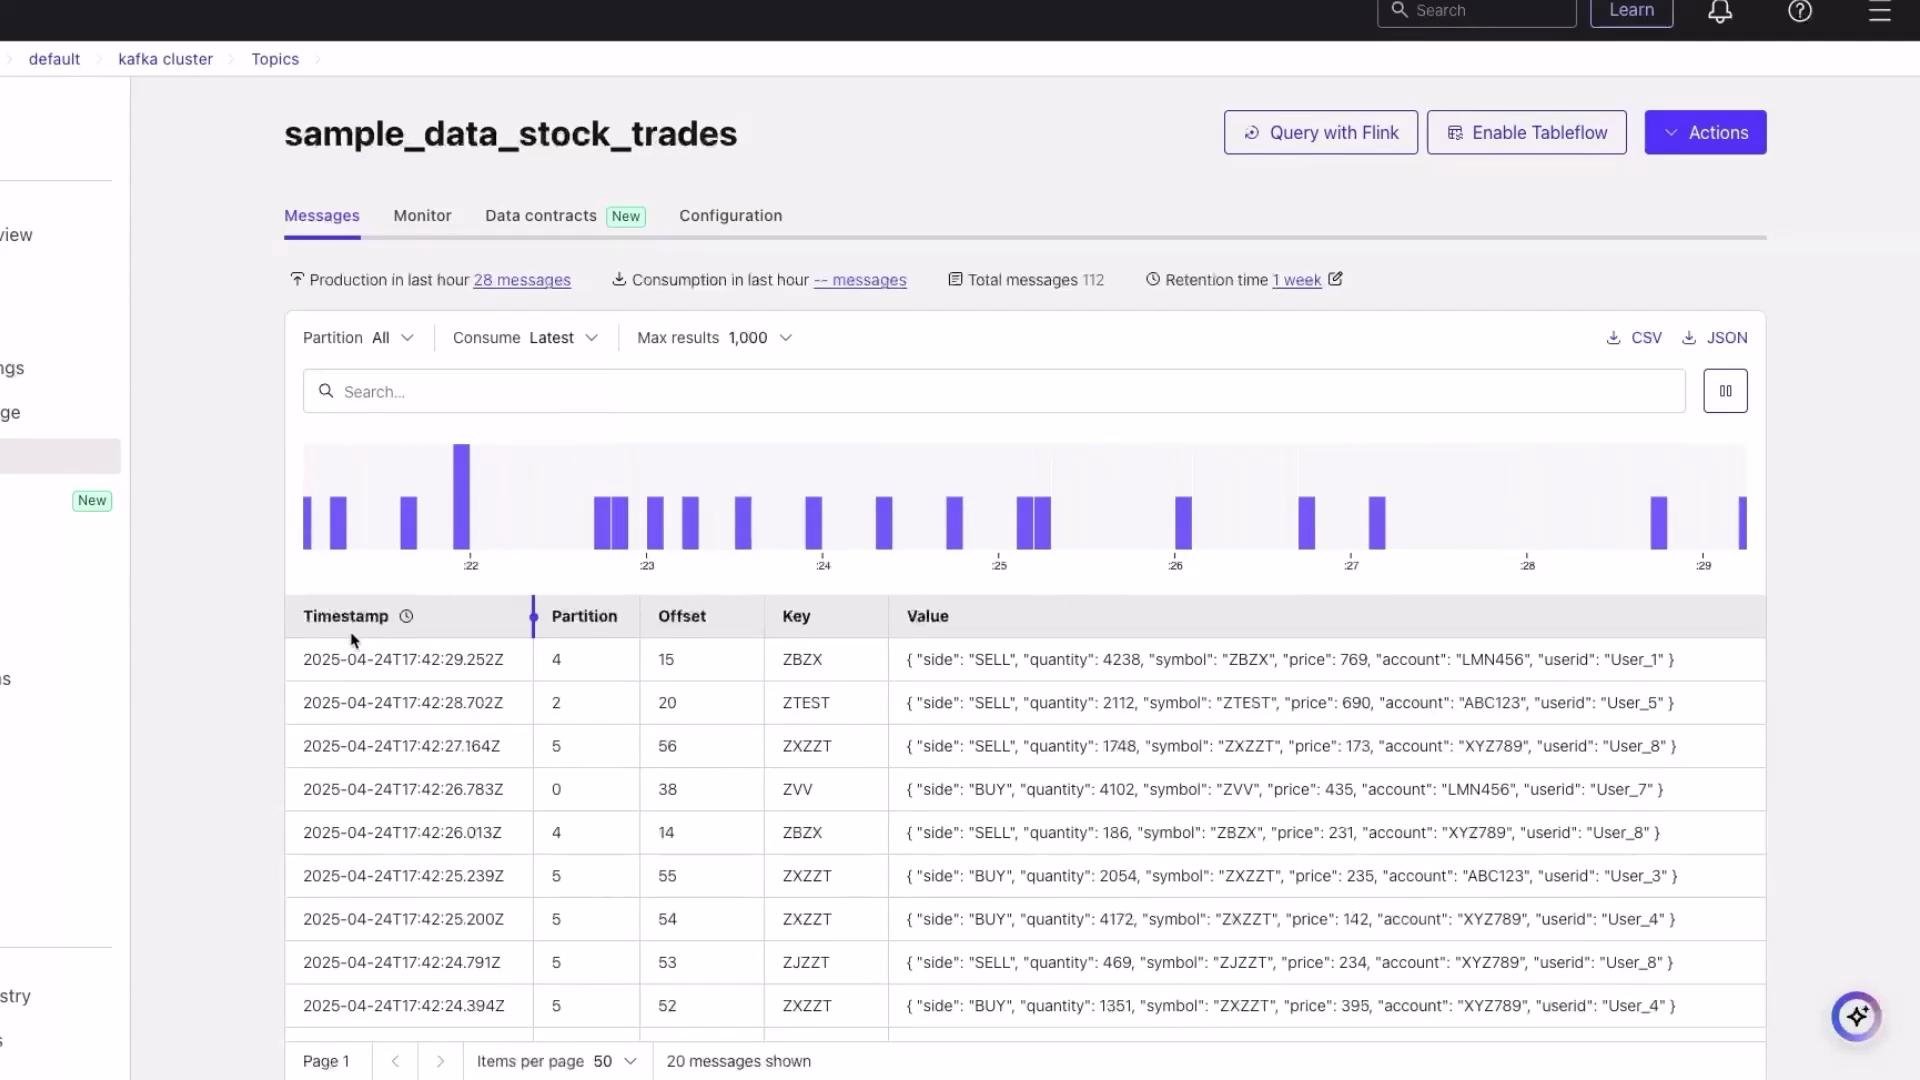
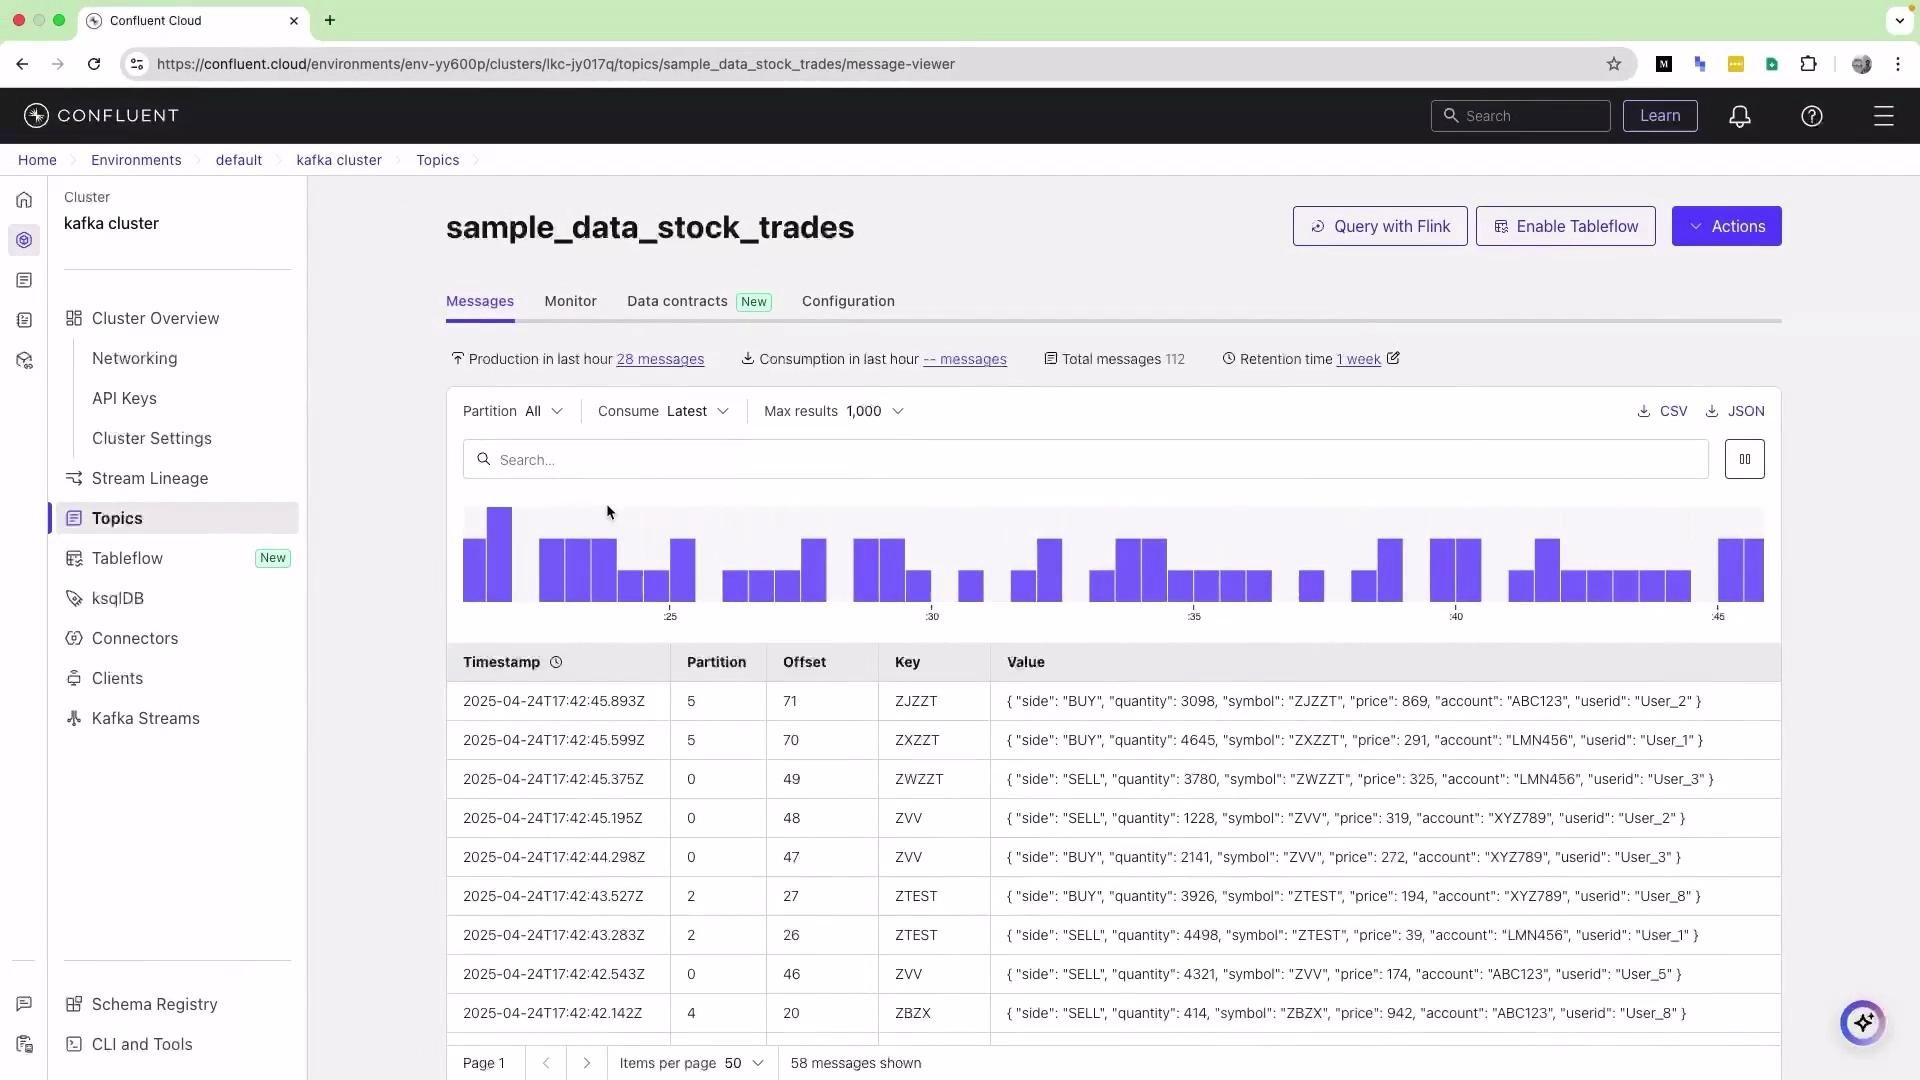
* Go to Topics. You should see both the `random topic` you created and the auto-created `sample_data_stock_trades` topic.
* Open `sample_data_stock_trades` to view messages — the UI displays timestamp, partition, offset, key, and value. Values are typically JSON objects (e.g., trade events with ticker, price, buy/sell fields).
8. Inspect topics and messages
* Go to Topics. You should see both the `random topic` you created and the auto-created `sample_data_stock_trades` topic.
* Open `sample_data_stock_trades` to view messages — the UI displays timestamp, partition, offset, key, and value. Values are typically JSON objects (e.g., trade events with ticker, price, buy/sell fields).
 9. Consuming and sinking data
* To export topic data to another system, go to Connectors → add a Sink connector (for example Amazon S3).
* Select the sink connector (e.g., Amazon S3), choose the topic(s), and provide destination configuration (AWS credentials, S3 bucket, path, etc.). Confluent will deliver topic data to the configured sink.
9. Consuming and sinking data
* To export topic data to another system, go to Connectors → add a Sink connector (for example Amazon S3).
* Select the sink connector (e.g., Amazon S3), choose the topic(s), and provide destination configuration (AWS credentials, S3 bucket, path, etc.). Confluent will deliver topic data to the configured sink.
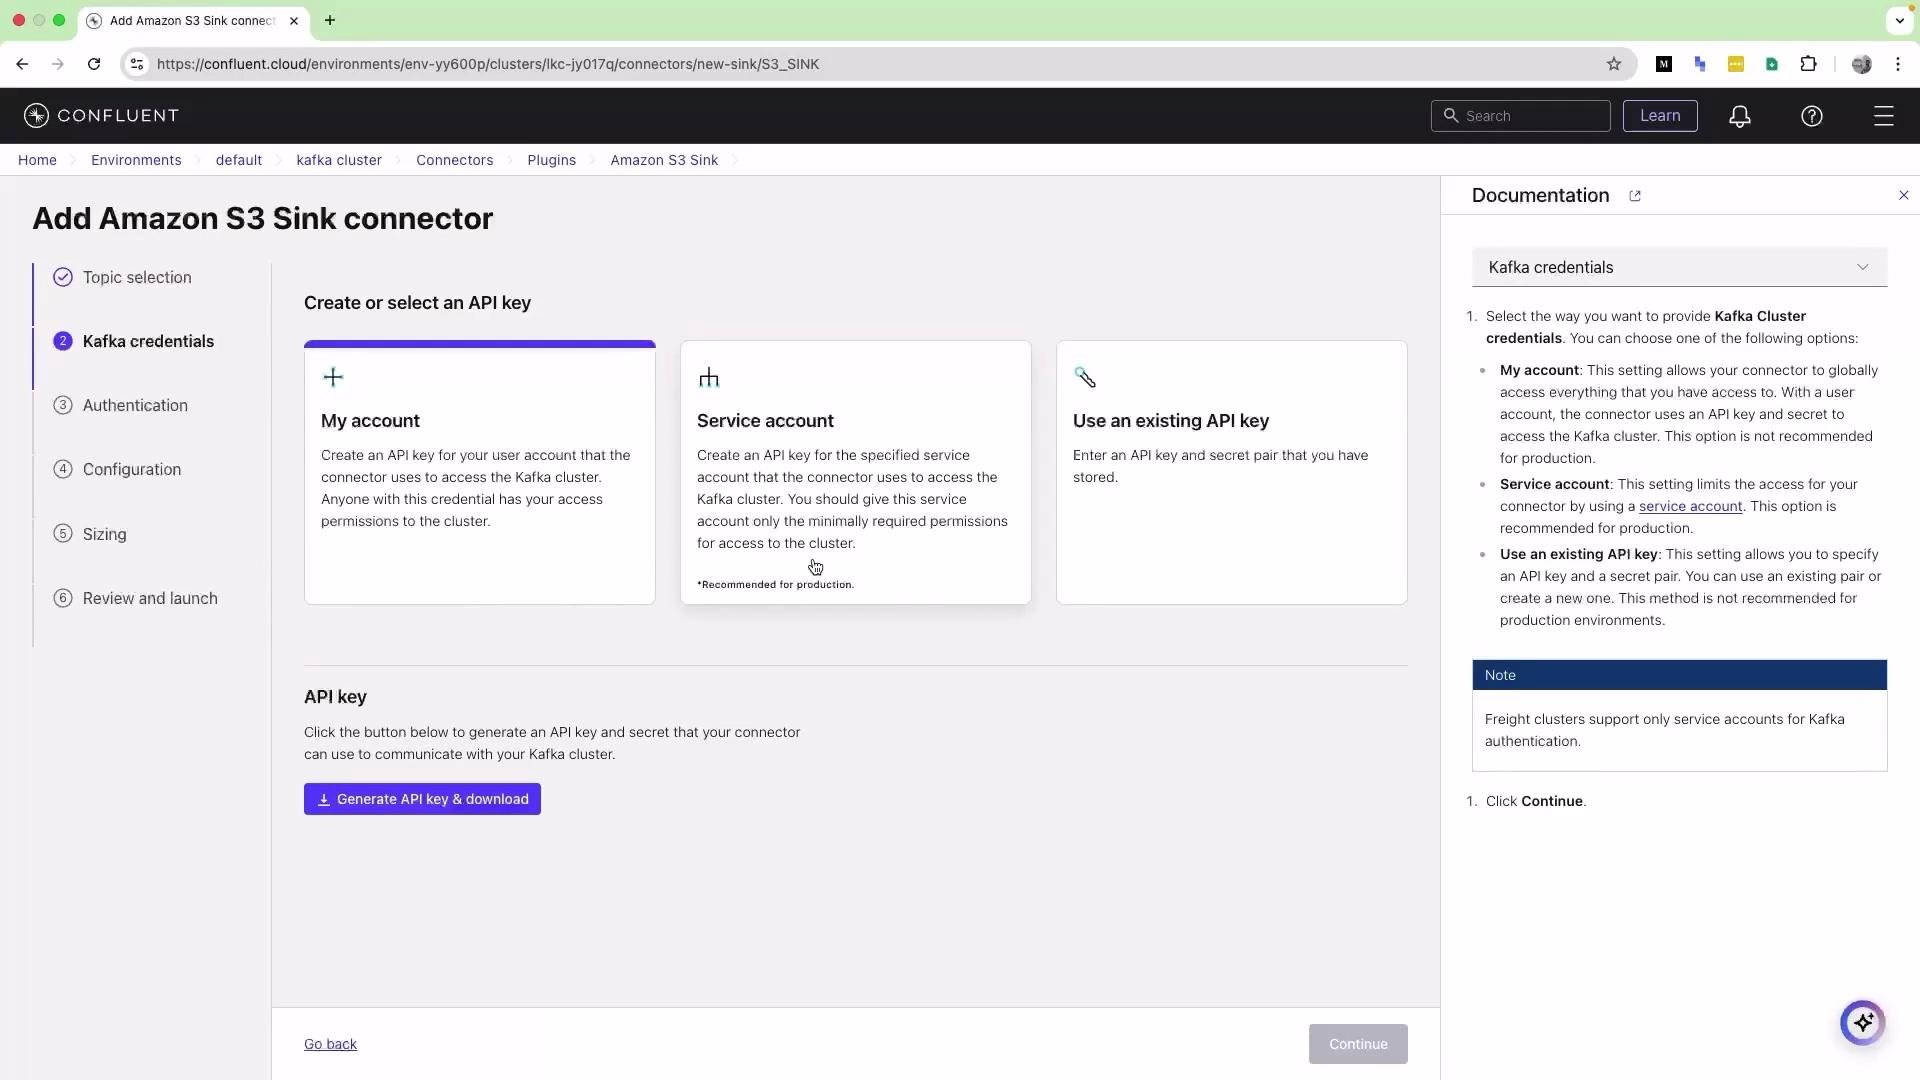 * If you don’t have a destination (e.g., no S3 bucket), you can skip sink configuration while exploring the Console. In this demo we did not configure an S3 sink.
10. Monitor and configure
* Click Monitor on any topic to view metrics and performance charts.
* Use the topic configuration to change retention settings, partitions, and other parameters as needed.
Quick reference table
| Action | Location in Console | Notes / Example |
| ------------------- | ----------------------------------------- | ---------------------------------------------------------------------- |
| Create cluster | Environments → Default → Create a cluster | Choose `Basic` plan for demo; select provider & region |
| Create topic | Topics → Create topic | Example name: `random topic`, default partitions often shown as 6 |
| Produce sample data | Cluster Overview → Produce sample data | Choose template like Stock trade → produces `sample_data_stock_trades` |
| Add sink | Connectors → Add connector → Sink | Example: Amazon S3 (requires credentials & bucket) |
Summary and next steps
* Confluent Cloud makes provisioning and managing Kafka clusters fast and simple, including built-in connectors, sample producers, and monitoring.
* For stream processing and querying explore ksqlDB ([https://ksqldb.io/](https://ksqldb.io/)) or Flink ([https://flink.apache.org/](https://flink.apache.org/)).
* Other managed Kafka options include AWS MSK ([https://aws.amazon.com/msk/](https://aws.amazon.com/msk/)) and Google Cloud Pub/Sub or Confluent on GCP; choose based on organizational needs and cost trade-offs.
Links and references
* Confluent Cloud: [https://www.confluent.io/confluent-cloud/](https://www.confluent.io/confluent-cloud/)
* ksqlDB: [https://ksqldb.io/](https://ksqldb.io/)
* Apache Flink: [https://flink.apache.org/](https://flink.apache.org/)
* AWS MSK: [https://aws.amazon.com/msk/](https://aws.amazon.com/msk/)
Thanks for following this lesson — you should now be able to sign up, provision a cluster, create topics, and produce/inspect sample events in Confluent Cloud. See you in the next lesson.
* If you don’t have a destination (e.g., no S3 bucket), you can skip sink configuration while exploring the Console. In this demo we did not configure an S3 sink.
10. Monitor and configure
* Click Monitor on any topic to view metrics and performance charts.
* Use the topic configuration to change retention settings, partitions, and other parameters as needed.
Quick reference table
| Action | Location in Console | Notes / Example |
| ------------------- | ----------------------------------------- | ---------------------------------------------------------------------- |
| Create cluster | Environments → Default → Create a cluster | Choose `Basic` plan for demo; select provider & region |
| Create topic | Topics → Create topic | Example name: `random topic`, default partitions often shown as 6 |
| Produce sample data | Cluster Overview → Produce sample data | Choose template like Stock trade → produces `sample_data_stock_trades` |
| Add sink | Connectors → Add connector → Sink | Example: Amazon S3 (requires credentials & bucket) |
Summary and next steps
* Confluent Cloud makes provisioning and managing Kafka clusters fast and simple, including built-in connectors, sample producers, and monitoring.
* For stream processing and querying explore ksqlDB ([https://ksqldb.io/](https://ksqldb.io/)) or Flink ([https://flink.apache.org/](https://flink.apache.org/)).
* Other managed Kafka options include AWS MSK ([https://aws.amazon.com/msk/](https://aws.amazon.com/msk/)) and Google Cloud Pub/Sub or Confluent on GCP; choose based on organizational needs and cost trade-offs.
Links and references
* Confluent Cloud: [https://www.confluent.io/confluent-cloud/](https://www.confluent.io/confluent-cloud/)
* ksqlDB: [https://ksqldb.io/](https://ksqldb.io/)
* Apache Flink: [https://flink.apache.org/](https://flink.apache.org/)
* AWS MSK: [https://aws.amazon.com/msk/](https://aws.amazon.com/msk/)
Thanks for following this lesson — you should now be able to sign up, provision a cluster, create topics, and produce/inspect sample events in Confluent Cloud. See you in the next lesson.