> ## Documentation Index
> Fetch the complete documentation index at: https://notes.kodekloud.com/llms.txt
> Use this file to discover all available pages before exploring further.
# Demo Kafka Connect Setting up Kafka using KRaft
> Guide to provisioning an EC2 instance and setting up a single-node KRaft Kafka broker for Kafka Connect and S3 integration
Welcome — in this lesson you'll provision an EC2 instance, install a single-node KRaft-based Kafka broker+controller, and prepare the host for Kafka Connect so you can later sync topic data to S3 using an S3 connector. This guide covers:
* Creating an IAM role for SSM access
* Launching an EC2 instance with the role attached
* Connecting via Session Manager (browser shell)
* Installing Java and Kafka
* Formatting KRaft metadata storage and configuring `server.properties`
* Opening the Kafka port and starting the broker
Prerequisites
* An AWS account with permission to create IAM roles and EC2 instances.
* Basic familiarity with the AWS Console and SSH/Session Manager.
* Browser access for the Session Manager shell (no SSH key required for this demo).
## Create an IAM role
Create an IAM role for EC2 that allows Session Manager (SSM) access:
1. In the AWS Console, search for and open **IAM**.
2. Click **Roles → Create role**.
3. Select **EC2** as the trusted entity.
4. Click **Next**.
5. Attach at minimum the `AmazonSSMManagedInstanceCore` managed policy. This enables Session Manager connectivity.
6. Name the role (example: `Kafka S3 Demo`) and create it.
This is the EC2 instance trust policy that corresponds to the role you just created:
```json theme={null}
{
"Principal": {
"Service": [
"ec2.amazonaws.com"
]
}
}
```
## Launch an EC2 instance
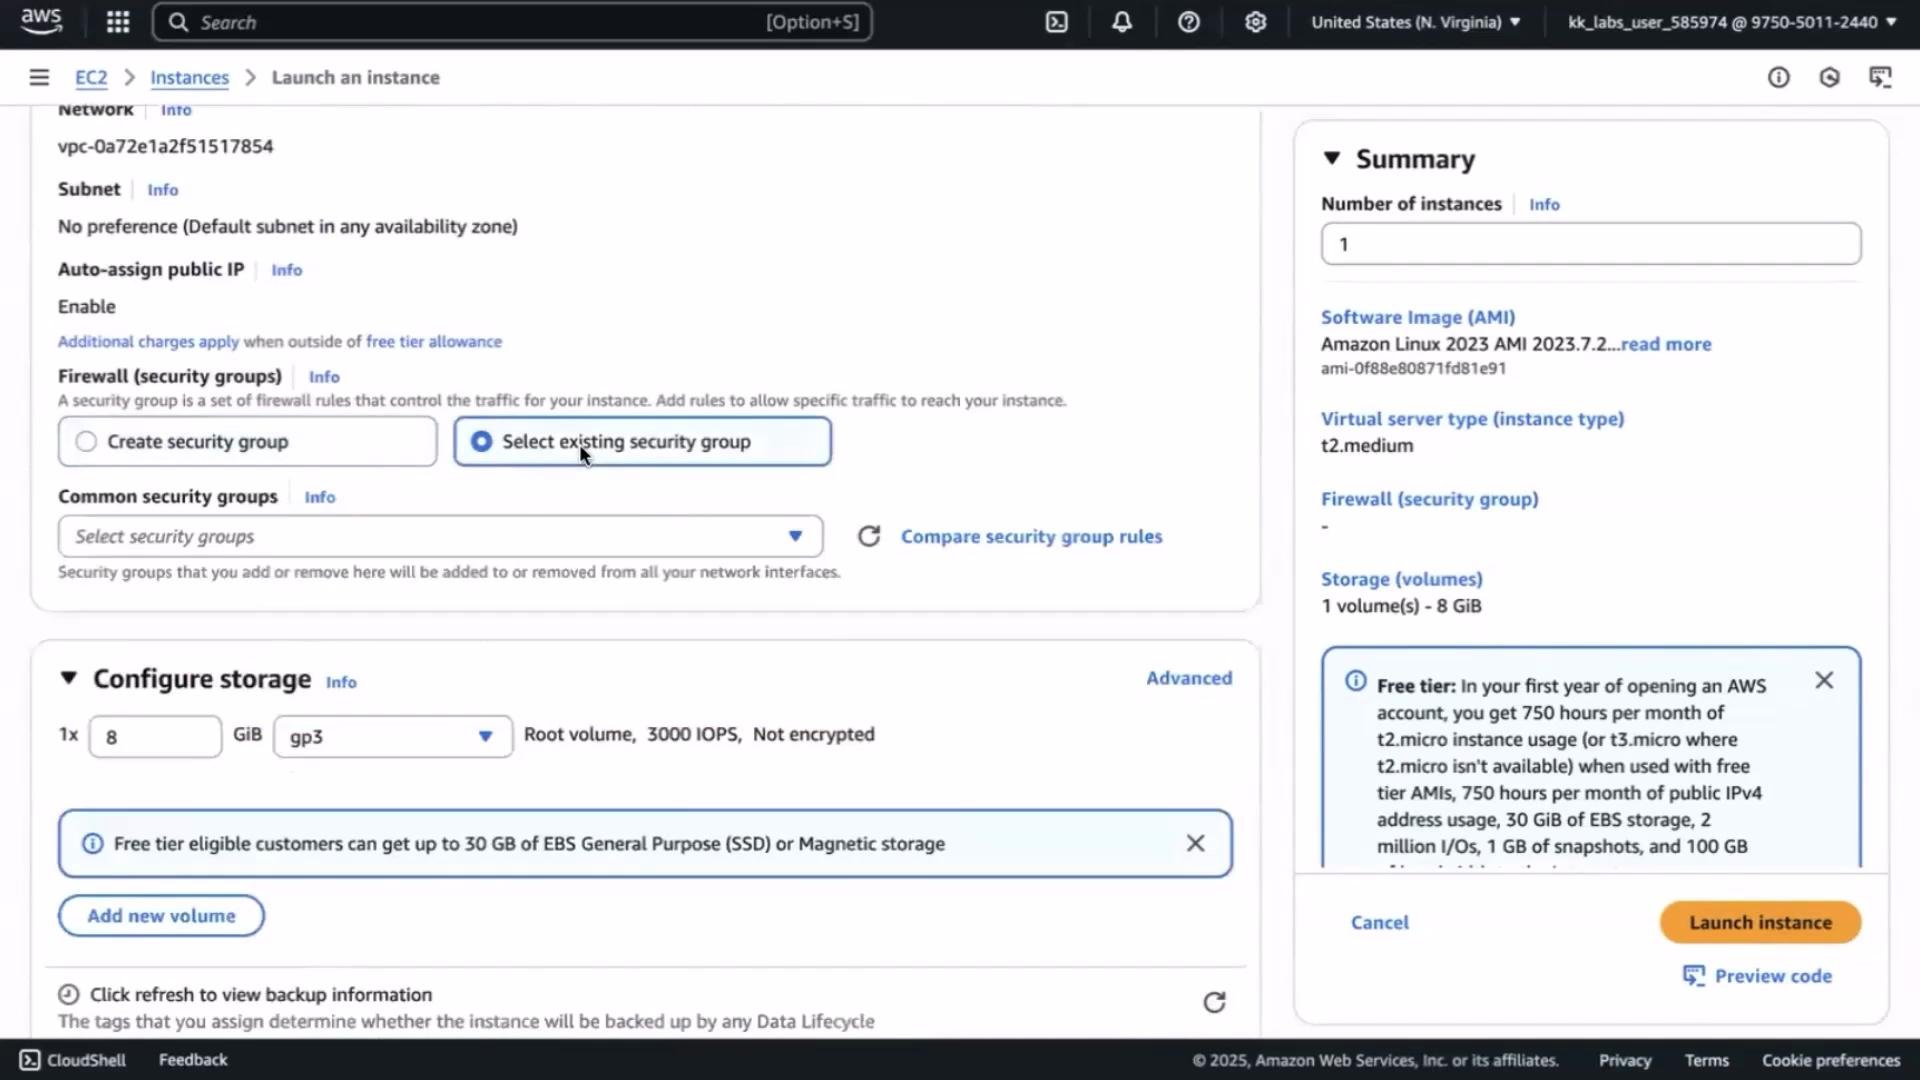
Launch an EC2 instance and attach the IAM role you created. Recommended configuration for this demo:
| Setting | Recommended value | Notes |
| -------------- | -------------------- | -------------------------------------------------------- |
| Instance name | `Kafka S3 Demo` | Human-readable tag to identify the instance |
| Instance type | `t2.medium` | Small demo node; scale for production |
| Key pair | None required | Using Session Manager; no SSH key required for this demo |
| Security group | Default (edit later) | We'll open port 9092 explicitly below |
| Root volume | `16 GiB` (optional) | Helps store logs and KRaft metadata |
| IAM role | `Kafka S3 Demo` | Attach the role created earlier under Advanced details |
1. In the AWS Console, open **EC2 → Instances → Launch Instance**.
2. Configure the instance using the recommended settings above.
3. Under **Advanced details**, select the IAM role (`Kafka S3 Demo`) you created.
4. Launch the instance.
 ## Connect to the instance using Session Manager
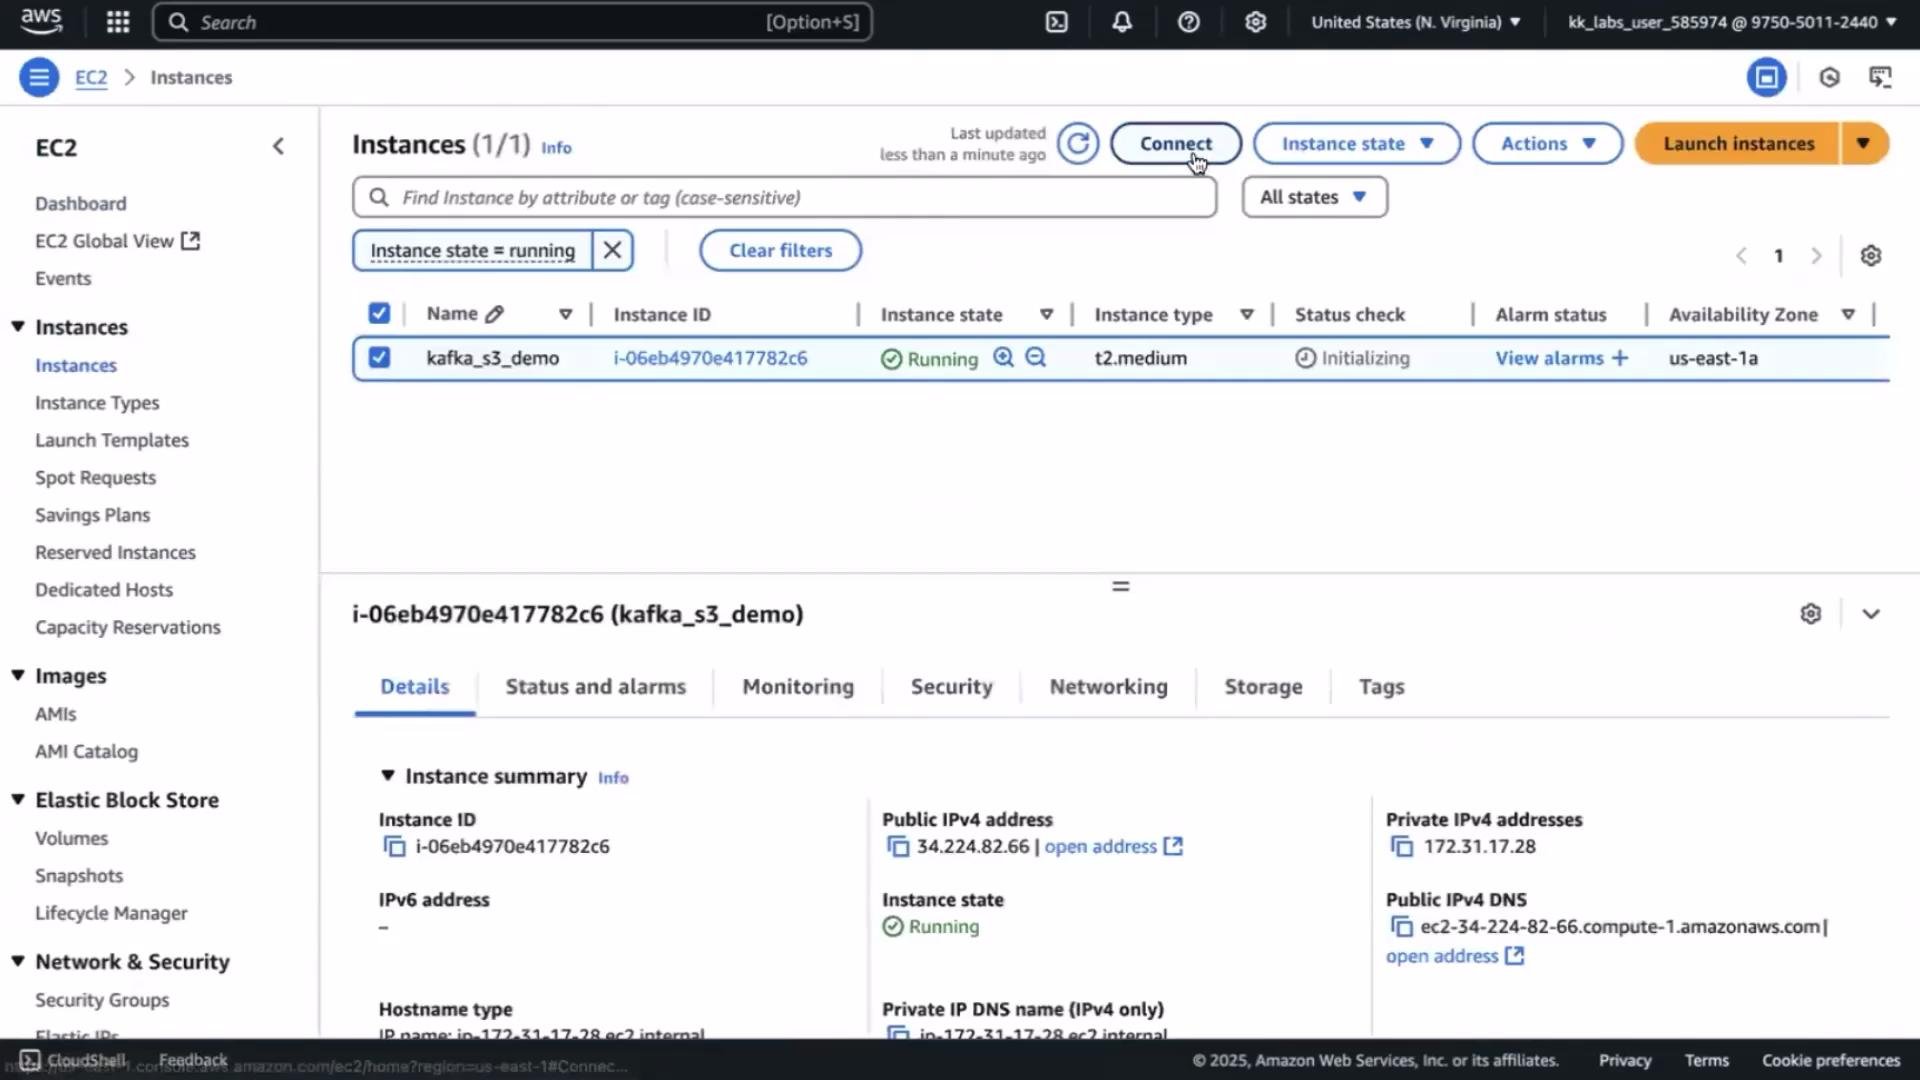
Because the EC2 instance has the SSM role attached, you can open a browser shell without an SSH key.
1. Go to **EC2 → Instances**.
2. Select the instance and click **Connect**.
3. Choose **Session Manager** and click **Connect** to open a browser-based shell.
Session Manager is convenient for demos and secure access: no inbound SSH port or key pairs are required. Ensure your instance has the SSM agent installed (most recent AMIs include it by default) and the attached IAM role has `AmazonSSMManagedInstanceCore`.
## Switch to root, download Kafka, and inspect files
Once connected, become root and move to the home directory:
```bash theme={null}
sudo su
cd ~
```
Download and extract a Kafka binary release (example uses Kafka 3.0.0 with Scala 2.13):
```bash theme={null}
# Download and extract Kafka binary
wget https://archive.apache.org/dist/kafka/3.0.0/kafka_2.13-3.0.0.tgz
tar -xzf kafka_2.13-3.0.0.tgz
cd kafka_2.13-3.0.0
ls -l
```
The Kafka distribution contains `config`, `bin`, and `libs` — Kafka Connect is bundled, so no separate Connect install is required. Connector-specific JARs (for S3) will be added later.
## Install Java
KRaft and Kafka need a JDK. Check if Java is installed:
```bash theme={null}
java -version
# If not installed you will typically see: "bash: java: command not found"
```
Install Amazon Corretto 8 (or another supported JDK) if Java is missing:
```bash theme={null}
sudo yum install -y java-1.8.0-amazon-corretto
java -version
# Expected output example:
# openjdk version "1.8.0_442"
# OpenJDK Runtime Environment Corretto-8.442.06.1 (build 1.8.0_442-b06)
# OpenJDK 64-Bit Server VM Corretto-8.442.06.1 (build 25.442-b06, mixed mode)
```
## Format storage for KRaft metadata
KRaft stores metadata locally and requires initializing the storage directory with a cluster UUID.
Generate a UUID:
```bash theme={null}
# Generate a UUID for KRaft metadata storage
bin/kafka-storage.sh random-uuid
# Example output: IEDtYa9aQA8Wg7x8FWoQ
```
Use the UUID to format the storage path referenced in your KRaft config (adjust the path if you extracted Kafka elsewhere):
```bash theme={null}
bin/kafka-storage.sh format -t IEDtYa9aQA8Wg7x8FWoQ -c ~/kafka_2.13-3.0.0/config/kraft/server.properties
# Expected output:
# Formatting /tmp/kraft-combined-logs
```
## Edit the KRaft server.properties
Open `config/kraft/server.properties` and update the settings required for a single-node KRaft cluster. Key items:
* Enable both broker and controller roles: `process.roles=broker,controller`
* Assign a node id: `node.id=1`
* Define controller quorum voters for a single-node cluster
* Bind listeners to all interfaces (`0.0.0.0`)
* Set `inter.broker.listener.name`
* Advertise the EC2 public IP so remote clients can connect
Example entries to add or modify in `server.properties`:
```properties theme={null}
process.roles=broker,controller
node.id=1
controller.quorum.voters=1@localhost:9093
listeners=PLAINTEXT://0.0.0.0:9092,CONTROLLER://0.0.0.0:9093
inter.broker.listener.name=PLAINTEXT
advertised.listeners=PLAINTEXT://:9092
```
Replace `` with your instance's public IP (copy from the EC2 console) and save the file.
## Open the Kafka broker port in the security group
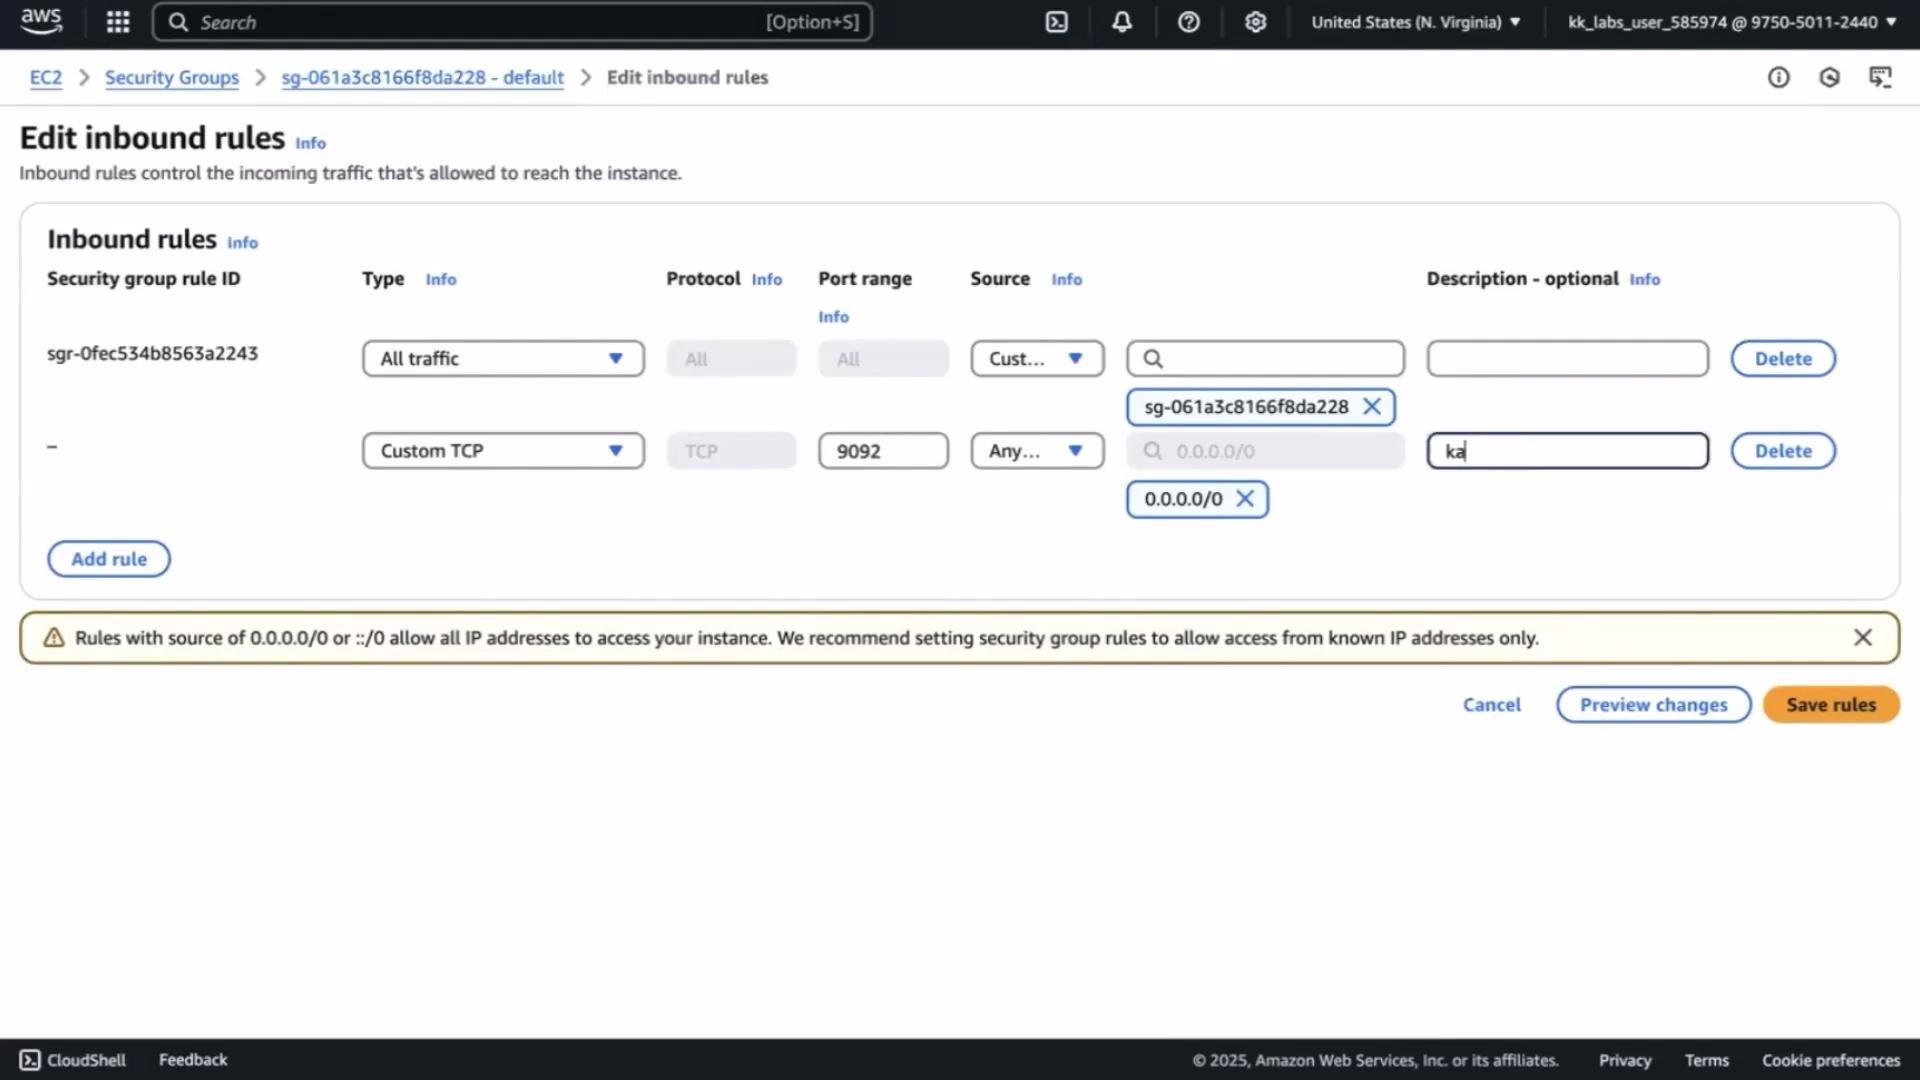
Before starting the broker, allow inbound traffic on TCP port `9092` in your instance's security group so clients can reach Kafka.
For production or organizational environments, never open Kafka to the entire internet. Restrict inbound rules to specific IP ranges (for example, your office IP or VPN CIDR). Allowing `0.0.0.0/0` exposes your cluster to attacks.
## Connect to the instance using Session Manager
Because the EC2 instance has the SSM role attached, you can open a browser shell without an SSH key.
1. Go to **EC2 → Instances**.
2. Select the instance and click **Connect**.
3. Choose **Session Manager** and click **Connect** to open a browser-based shell.
Session Manager is convenient for demos and secure access: no inbound SSH port or key pairs are required. Ensure your instance has the SSM agent installed (most recent AMIs include it by default) and the attached IAM role has `AmazonSSMManagedInstanceCore`.
## Switch to root, download Kafka, and inspect files
Once connected, become root and move to the home directory:
```bash theme={null}
sudo su
cd ~
```
Download and extract a Kafka binary release (example uses Kafka 3.0.0 with Scala 2.13):
```bash theme={null}
# Download and extract Kafka binary
wget https://archive.apache.org/dist/kafka/3.0.0/kafka_2.13-3.0.0.tgz
tar -xzf kafka_2.13-3.0.0.tgz
cd kafka_2.13-3.0.0
ls -l
```
The Kafka distribution contains `config`, `bin`, and `libs` — Kafka Connect is bundled, so no separate Connect install is required. Connector-specific JARs (for S3) will be added later.
## Install Java
KRaft and Kafka need a JDK. Check if Java is installed:
```bash theme={null}
java -version
# If not installed you will typically see: "bash: java: command not found"
```
Install Amazon Corretto 8 (or another supported JDK) if Java is missing:
```bash theme={null}
sudo yum install -y java-1.8.0-amazon-corretto
java -version
# Expected output example:
# openjdk version "1.8.0_442"
# OpenJDK Runtime Environment Corretto-8.442.06.1 (build 1.8.0_442-b06)
# OpenJDK 64-Bit Server VM Corretto-8.442.06.1 (build 25.442-b06, mixed mode)
```
## Format storage for KRaft metadata
KRaft stores metadata locally and requires initializing the storage directory with a cluster UUID.
Generate a UUID:
```bash theme={null}
# Generate a UUID for KRaft metadata storage
bin/kafka-storage.sh random-uuid
# Example output: IEDtYa9aQA8Wg7x8FWoQ
```
Use the UUID to format the storage path referenced in your KRaft config (adjust the path if you extracted Kafka elsewhere):
```bash theme={null}
bin/kafka-storage.sh format -t IEDtYa9aQA8Wg7x8FWoQ -c ~/kafka_2.13-3.0.0/config/kraft/server.properties
# Expected output:
# Formatting /tmp/kraft-combined-logs
```
## Edit the KRaft server.properties
Open `config/kraft/server.properties` and update the settings required for a single-node KRaft cluster. Key items:
* Enable both broker and controller roles: `process.roles=broker,controller`
* Assign a node id: `node.id=1`
* Define controller quorum voters for a single-node cluster
* Bind listeners to all interfaces (`0.0.0.0`)
* Set `inter.broker.listener.name`
* Advertise the EC2 public IP so remote clients can connect
Example entries to add or modify in `server.properties`:
```properties theme={null}
process.roles=broker,controller
node.id=1
controller.quorum.voters=1@localhost:9093
listeners=PLAINTEXT://0.0.0.0:9092,CONTROLLER://0.0.0.0:9093
inter.broker.listener.name=PLAINTEXT
advertised.listeners=PLAINTEXT://:9092
```
Replace `` with your instance's public IP (copy from the EC2 console) and save the file.
## Open the Kafka broker port in the security group
Before starting the broker, allow inbound traffic on TCP port `9092` in your instance's security group so clients can reach Kafka.
For production or organizational environments, never open Kafka to the entire internet. Restrict inbound rules to specific IP ranges (for example, your office IP or VPN CIDR). Allowing `0.0.0.0/0` exposes your cluster to attacks.
 ## Start the KRaft Kafka service
Start Kafka with the KRaft configuration:
```bash theme={null}
bin/kafka-server-start.sh ~/kafka_2.13-3.0.0/config/kraft/server.properties
```
The server log streams to the terminal. Review the output for successful controller and broker startup messages and confirm that listeners bind to ports `9092` and `9093`. Watch for fatal errors — if you see errors, check the `server.properties` values and the storage format step.
## Start the KRaft Kafka service
Start Kafka with the KRaft configuration:
```bash theme={null}
bin/kafka-server-start.sh ~/kafka_2.13-3.0.0/config/kraft/server.properties
```
The server log streams to the terminal. Review the output for successful controller and broker startup messages and confirm that listeners bind to ports `9092` and `9093`. Watch for fatal errors — if you see errors, check the `server.properties` values and the storage format step.
 ## What’s next
With a single-node KRaft broker+controller up and reachable, the next lessons will cover:
* Downloading and installing an S3 connector (Confluent S3 connector or a community connector)
* Preparing the connector configuration (including AWS credentials and S3 bucket settings)
* Running Kafka Connect and syncing topic data to S3
Links and references
* [Confluent S3 Connector](https://www.confluent.io/hub/confluentinc/kafka-connect-s3)
* [KRaft (KIP-500) overview and Kafka documentation](https://kafka.apache.org/documentation/)
* [AWS Systems Manager Session Manager](https://docs.aws.amazon.com/systems-manager/latest/userguide/session-manager.html)
That’s it for this lesson — in the follow-up article we’ll install and configure the S3 connector and run a demo sync from a Kafka topic to S3.
## What’s next
With a single-node KRaft broker+controller up and reachable, the next lessons will cover:
* Downloading and installing an S3 connector (Confluent S3 connector or a community connector)
* Preparing the connector configuration (including AWS credentials and S3 bucket settings)
* Running Kafka Connect and syncing topic data to S3
Links and references
* [Confluent S3 Connector](https://www.confluent.io/hub/confluentinc/kafka-connect-s3)
* [KRaft (KIP-500) overview and Kafka documentation](https://kafka.apache.org/documentation/)
* [AWS Systems Manager Session Manager](https://docs.aws.amazon.com/systems-manager/latest/userguide/session-manager.html)
That’s it for this lesson — in the follow-up article we’ll install and configure the S3 connector and run a demo sync from a Kafka topic to S3.