> ## Documentation Index
> Fetch the complete documentation index at: https://notes.kodekloud.com/llms.txt
> Use this file to discover all available pages before exploring further.
# Demo Setting up S3 Kafka Connect
> Step-by-step guide to configure and run Kafka Connect standalone with Confluent S3 Sink connector to stream Kafka topic data into an S3 bucket, including IAM and config steps.
Welcome back. In this lesson you'll configure and run Kafka Connect (standalone) with the Confluent Amazon S3 Sink connector to stream messages from a Kafka topic into an S3 bucket.
High-level checklist
* Keep your Kafka broker process running in the original terminal. Do not stop it.
* Open a second terminal on the EC2 instance for the Kafka Connect steps.
* Ensure the EC2 instance has permission to access the S3 bucket used for the connector.
Example Kafka broker logs (verify your broker is running and accepting connections):
```text theme={null}
transaction.state.log.num.partitions = 50
transaction.state.log.replication.factor = 1
...
[2025-05-10 10:57:05,755] INFO Kafka version: 3.0.0 (org.apache.kafka.common.utils.AppInfoParser)
[2025-05-10 10:57:05,761] INFO [Controller 1 started (kafka.server.KafkaServer)]
[2025-05-10 10:57:05,780] INFO [BrokerLifecycleManager id=1] The broker has been unfenced. Transitioning from RECOVERY to RUNNING. (kafka.server.BrokerLifecycleManager)
```
Step-by-step
1. Open a new terminal on the EC2 instance and become root
```bash theme={null}
sudo su
cd
```
2. Download the Confluent / Amazon S3 Sink connector plugin
* The connector is available on Confluent Hub: [https://www.confluent.io/hub/confluentinc/kafka-connect-s3](https://www.confluent.io/hub/confluentinc/kafka-connect-s3)
* In this demo the connector zip has been staged in an S3 bucket and will be downloaded with the AWS CLI.
Attempt to download:
```bash theme={null}
aws s3 cp s3://kafka-s3-jar-file-confluent-lab/confluentinc-kafka-connect-s3-10.5.23.zip .
```
If you get a 403 Forbidden error, the EC2 instance role needs permission to access the bucket. Attach an appropriate S3 policy to the EC2 role (the demo uses `AmazonS3FullAccess`; for production, use least-privilege policies).
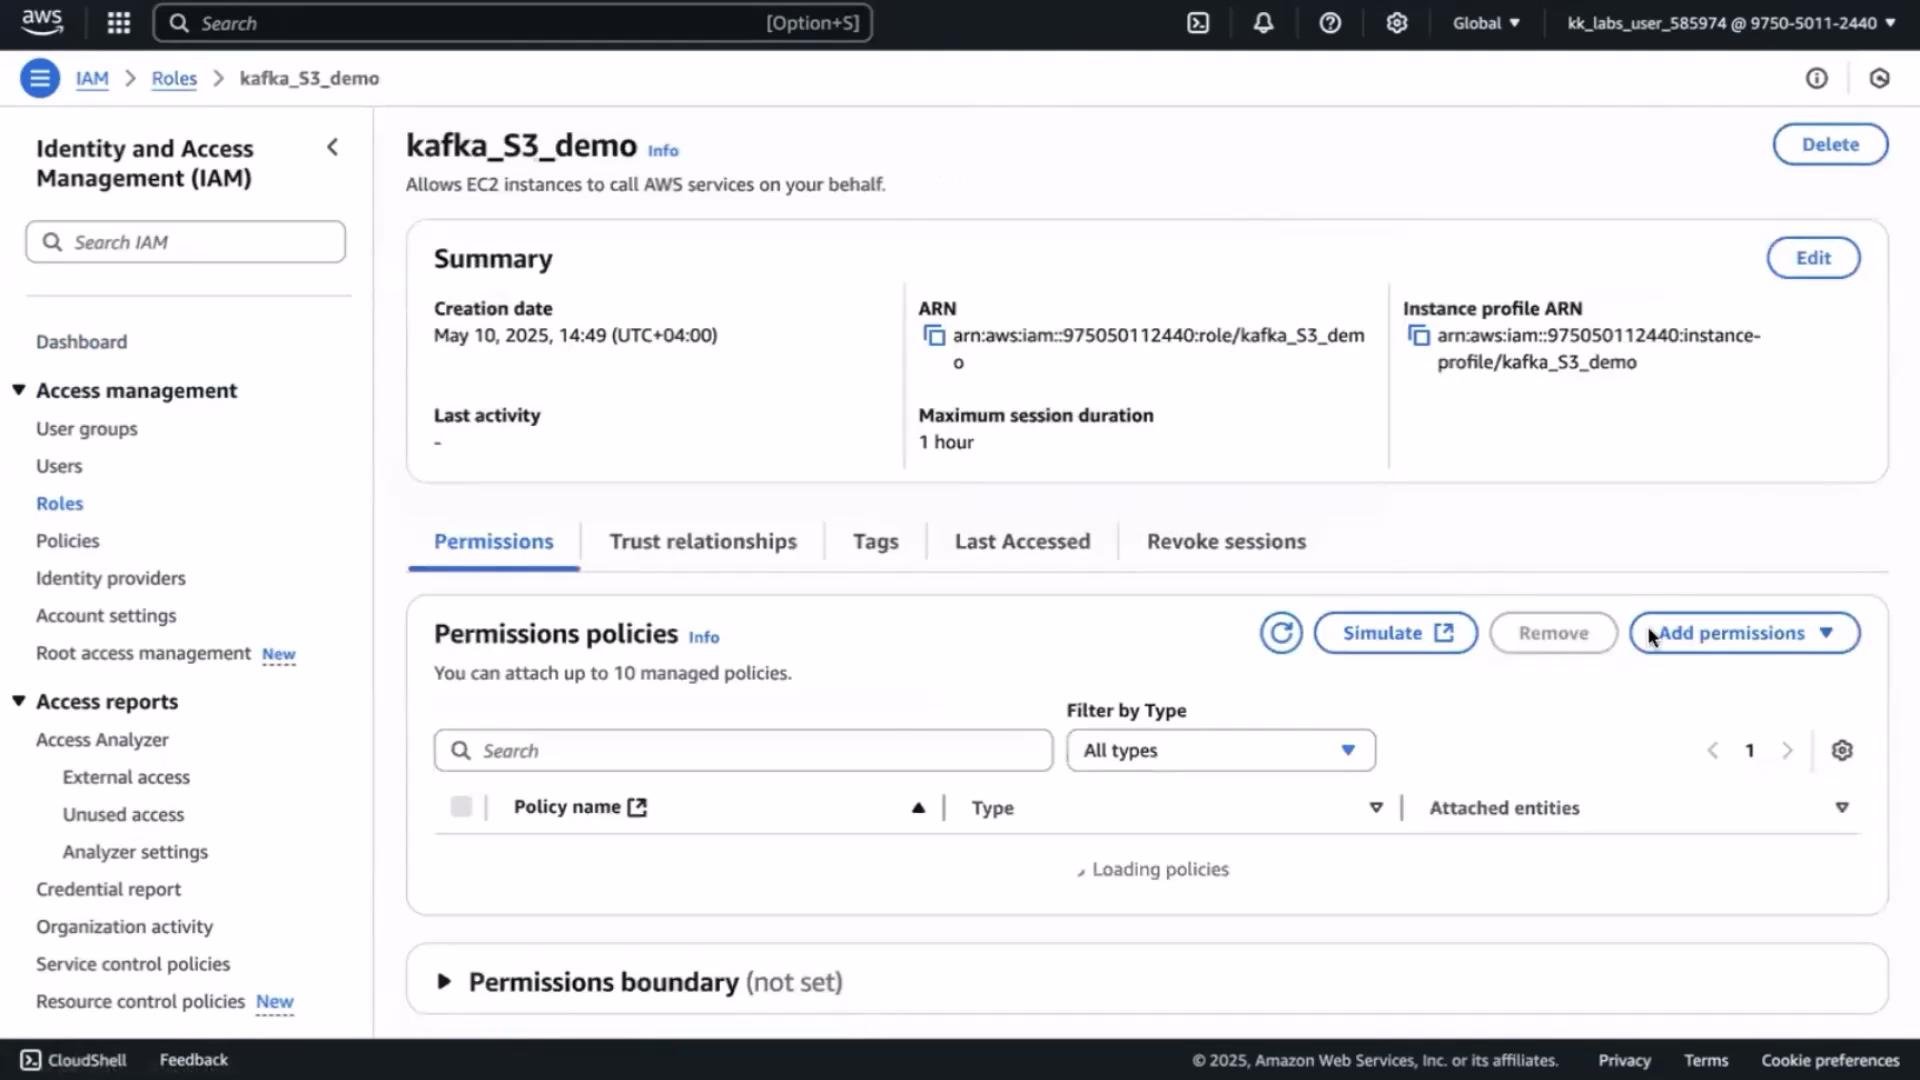 Attach the S3 policy to the role:
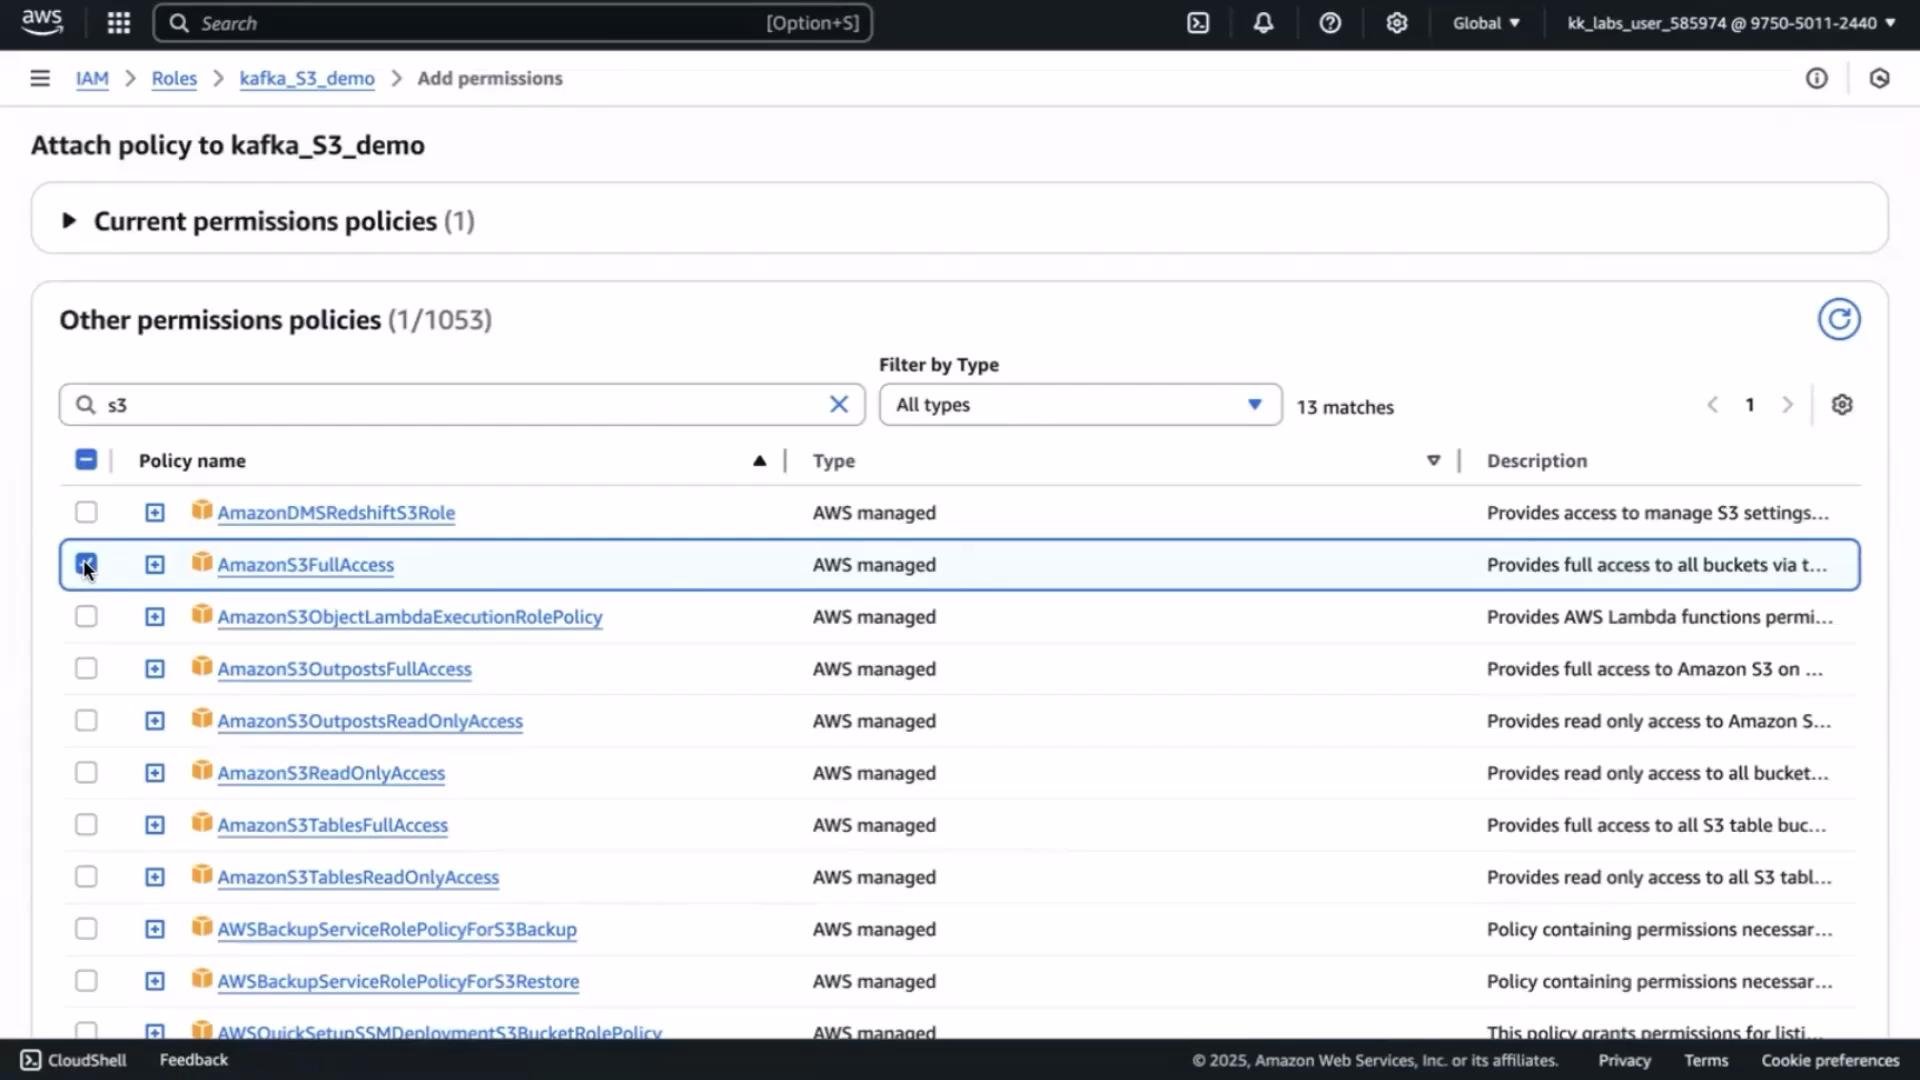 For production use, follow least-privilege principles. Grant only the S3 actions and bucket resources the connector requires (for example `s3:PutObject`, `s3:ListBucket` on the specific bucket).
After attaching the policy, re-run the `aws s3 cp` command. Successful download example:
```bash theme={null}
aws s3 cp s3://kafka-s3-jar-file-confluent-lab/confluentinc-kafka-connect-s3-10.5.23.zip .
# download: s3://kafka-s3-jar-file-confluent-lab/confluentinc-kafka-connect-s3-10.5.23.zip to ./confluentinc-kafka-connect-s3-10.5.23.zip
```
Verify and unzip:
```bash theme={null}
ls -l
unzip confluentinc-kafka-connect-s3-10.5.23.zip
ls -l
# Should show a directory like: confluentinc-kafka-connect-s3-10.5.23
```
3. Configure the Kafka Connect worker (standalone)
Open the worker properties shipped with Kafka (adjust the path if your Kafka distro is elsewhere):
```bash theme={null}
vim kafka_2.13-3.0.0/config/connect-standalone.properties
```
Edit or confirm the following key settings. Replace the `bootstrap.servers` value with your broker's IP/hostname and set `plugin.path` to the directory where you unpacked the connector.
Example connect-standalone.properties:
```properties theme={null}
# Worker configuration
bootstrap.servers=34.224.82.66:9092
# Converters: how Connect converts Kafka bytes into Connect data structures
key.converter=org.apache.kafka.connect.json.JsonConverter
value.converter=org.apache.kafka.connect.json.JsonConverter
# If you're using schemaless JSON, disable schemas
key.converter.schemas.enable=false
value.converter.schemas.enable=false
# Offsets
offset.storage.file.filename=/tmp/connect.offsets
offset.flush.interval.ms=10000
# Where Connect looks for plugin directories (must point to the unpacked connector)
plugin.path=/root/confluentinc-kafka-connect-s3-10.5.23
```
Save and exit the editor.
Quick reference — important `connect-standalone.properties` entries
| Property | Purpose | Example |
| ----------------------------------- | --------------------------------------------------- | --------------------------------------------- |
| `bootstrap.servers` | Kafka broker endpoint Connect should reach | `34.224.82.66:9092` |
| `key.converter` / `value.converter` | Data format converters used by Connect tasks | `org.apache.kafka.connect.json.JsonConverter` |
| `plugin.path` | Directory where Connect scans for connector plugins | `/root/confluentinc-kafka-connect-s3-10.5.23` |
| `offset.storage.file.filename` | Local offset storage for standalone mode | `/tmp/connect.offsets` |
4. Create the S3 Sink connector configuration
Create a connector properties file that describes connector behavior (topics to read, S3 bucket, formatting, etc.):
```bash theme={null}
vim kafka_2.13-3.0.0/config/s3-sink-connector.properties
```
Example `s3-sink-connector.properties` — replace `s3.bucket.name`, `s3.region`, and `topics` as appropriate:
```properties theme={null}
name=s3-sink-connector
connector.class=io.confluent.connect.s3.S3SinkConnector
tasks.max=1
topics=cartevent
# Replace with your S3 bucket name (example)
s3.bucket.name=kafka-connect-s3-sink-example
s3.region=us-east-1
# When to flush objects to S3
flush.size=5
rotate.schedule.interval.ms=60000
storage.class=io.confluent.connect.s3.storage.S3Storage
format.class=io.confluent.connect.s3.format.json.JsonFormat
partitioner.class=io.confluent.connect.storage.partitioner.DefaultPartitioner
timezone=UTC
# Converters should be compatible with worker converters
key.converter=org.apache.kafka.connect.json.JsonConverter
value.converter=org.apache.kafka.connect.json.JsonConverter
key.converter.schemas.enable=false
value.converter.schemas.enable=false
behavior.on.null.values=ignore
```
Connector properties explained (high-level)
* `topics`: Kafka topic(s) to sink to S3.
* `s3.bucket.name` / `s3.region`: Target S3 bucket and region.
* `flush.size`: Number of records before writing to S3.
* `format.class`: Output format (JSON in this example).
* `plugin.path` in the worker must include the connector JARs for Connect to load the `io.confluent.connect.s3.S3SinkConnector` class.
5. Create the S3 bucket (if you haven't already)
Create the bucket via the AWS Console and ensure the region matches `s3.region` in the connector config.
For production use, follow least-privilege principles. Grant only the S3 actions and bucket resources the connector requires (for example `s3:PutObject`, `s3:ListBucket` on the specific bucket).
After attaching the policy, re-run the `aws s3 cp` command. Successful download example:
```bash theme={null}
aws s3 cp s3://kafka-s3-jar-file-confluent-lab/confluentinc-kafka-connect-s3-10.5.23.zip .
# download: s3://kafka-s3-jar-file-confluent-lab/confluentinc-kafka-connect-s3-10.5.23.zip to ./confluentinc-kafka-connect-s3-10.5.23.zip
```
Verify and unzip:
```bash theme={null}
ls -l
unzip confluentinc-kafka-connect-s3-10.5.23.zip
ls -l
# Should show a directory like: confluentinc-kafka-connect-s3-10.5.23
```
3. Configure the Kafka Connect worker (standalone)
Open the worker properties shipped with Kafka (adjust the path if your Kafka distro is elsewhere):
```bash theme={null}
vim kafka_2.13-3.0.0/config/connect-standalone.properties
```
Edit or confirm the following key settings. Replace the `bootstrap.servers` value with your broker's IP/hostname and set `plugin.path` to the directory where you unpacked the connector.
Example connect-standalone.properties:
```properties theme={null}
# Worker configuration
bootstrap.servers=34.224.82.66:9092
# Converters: how Connect converts Kafka bytes into Connect data structures
key.converter=org.apache.kafka.connect.json.JsonConverter
value.converter=org.apache.kafka.connect.json.JsonConverter
# If you're using schemaless JSON, disable schemas
key.converter.schemas.enable=false
value.converter.schemas.enable=false
# Offsets
offset.storage.file.filename=/tmp/connect.offsets
offset.flush.interval.ms=10000
# Where Connect looks for plugin directories (must point to the unpacked connector)
plugin.path=/root/confluentinc-kafka-connect-s3-10.5.23
```
Save and exit the editor.
Quick reference — important `connect-standalone.properties` entries
| Property | Purpose | Example |
| ----------------------------------- | --------------------------------------------------- | --------------------------------------------- |
| `bootstrap.servers` | Kafka broker endpoint Connect should reach | `34.224.82.66:9092` |
| `key.converter` / `value.converter` | Data format converters used by Connect tasks | `org.apache.kafka.connect.json.JsonConverter` |
| `plugin.path` | Directory where Connect scans for connector plugins | `/root/confluentinc-kafka-connect-s3-10.5.23` |
| `offset.storage.file.filename` | Local offset storage for standalone mode | `/tmp/connect.offsets` |
4. Create the S3 Sink connector configuration
Create a connector properties file that describes connector behavior (topics to read, S3 bucket, formatting, etc.):
```bash theme={null}
vim kafka_2.13-3.0.0/config/s3-sink-connector.properties
```
Example `s3-sink-connector.properties` — replace `s3.bucket.name`, `s3.region`, and `topics` as appropriate:
```properties theme={null}
name=s3-sink-connector
connector.class=io.confluent.connect.s3.S3SinkConnector
tasks.max=1
topics=cartevent
# Replace with your S3 bucket name (example)
s3.bucket.name=kafka-connect-s3-sink-example
s3.region=us-east-1
# When to flush objects to S3
flush.size=5
rotate.schedule.interval.ms=60000
storage.class=io.confluent.connect.s3.storage.S3Storage
format.class=io.confluent.connect.s3.format.json.JsonFormat
partitioner.class=io.confluent.connect.storage.partitioner.DefaultPartitioner
timezone=UTC
# Converters should be compatible with worker converters
key.converter=org.apache.kafka.connect.json.JsonConverter
value.converter=org.apache.kafka.connect.json.JsonConverter
key.converter.schemas.enable=false
value.converter.schemas.enable=false
behavior.on.null.values=ignore
```
Connector properties explained (high-level)
* `topics`: Kafka topic(s) to sink to S3.
* `s3.bucket.name` / `s3.region`: Target S3 bucket and region.
* `flush.size`: Number of records before writing to S3.
* `format.class`: Output format (JSON in this example).
* `plugin.path` in the worker must include the connector JARs for Connect to load the `io.confluent.connect.s3.S3SinkConnector` class.
5. Create the S3 bucket (if you haven't already)
Create the bucket via the AWS Console and ensure the region matches `s3.region` in the connector config.
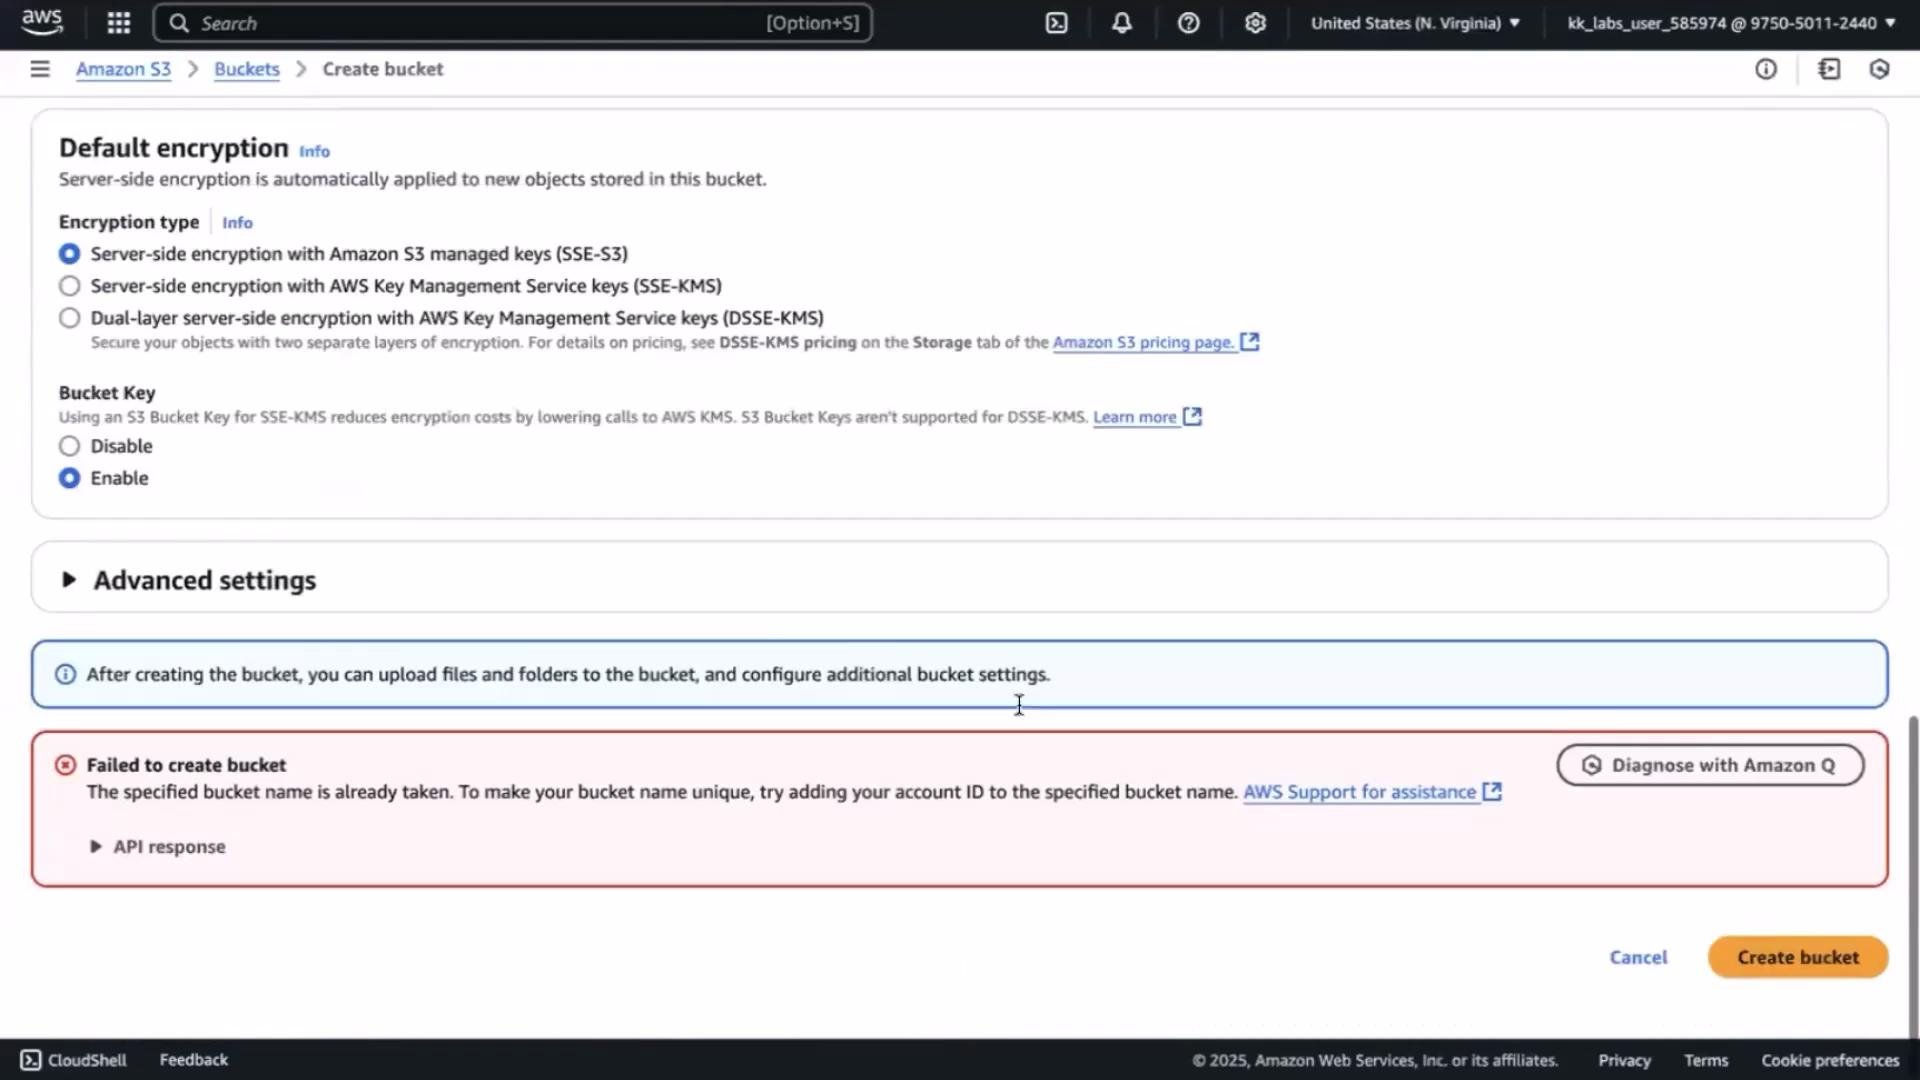 6. Start Kafka Connect (standalone)
Change into the Kafka installation directory (or reference the full path to the script) and start Connect with the worker and connector config files:
```bash theme={null}
cd kafka_2.13-3.0.0
bin/connect-standalone.sh config/connect-standalone.properties config/s3-sink-connector.properties
```
Run the `connect-standalone.sh` script from the Kafka root directory (the directory that contains `bin/`), or supply the full path. If you run it from the wrong folder you will see `No such file or directory`.
On startup the worker will scan plugin paths and attempt to load the S3 connector. Example logs showing plugin scanning and consumer group assignment:
```text theme={null}
[2025-05-10 11:41:944] INFO Scanning for plugin classes. This might take a moment ... (org.apache.kafka.connect.cli.ConnectStandalone)
[2025-05-10 11:41:968] INFO Loading plugin from: /root/confluentinc-kafka-connect-s3-10.5.23/doc/ (org.apache.kafka.connect.runtime.isolation.DelegatingClassLoader)
[2025-05-10 11:41:989] INFO Added 0 plugins. (org.apache.kafka.connect.runtime.isolation.DelegatingClassLoader)
[2025-05-10 11:11:49,961] INFO [3-sink-connector-0] Successfully joined group with generation Generation(generationId=1, memberId='connector-consumer-s3-sink-connector-0', protocol='range')
[2025-05-10 11:11:53,066] INFO [3-sink-connector-0] Found no committed offset for partition cartevent-0
[2025-05-10 11:11:53,088] INFO [3-sink-connector-0] Resetting offset for partition cartevent-0 to position(offset=0)
```
Important notes and troubleshooting
* Topic existence: If the configured topic (for example `cartevent`) does not exist, Kafka Connect will not create it for you. Topic creation is controlled by the broker setting `auto.create.topics.enable`. Create the topic ahead of time with your desired partitions and replication: `kafka-topics.sh --create ...`
* plugin.path: Ensure `plugin.path` points to the directory containing the unpacked connector JARs. Each plugin typically lives in its own subdirectory under `plugin.path`; if Connect cannot find the S3 connector classes it will not load the plugin.
* Permissions: Confirm the EC2 instance IAM role has S3 permissions for the bucket (PutObject, ListBucket).
* Converters: Keep worker and connector converters compatible. If you disable schemas (`schemas.enable=false`) ensure your messages are formatted accordingly.
Recap — what we did
* Downloaded and unpacked the Confluent S3 Sink connector.
* Updated `connect-standalone.properties` to reference the connector via `plugin.path`.
* Created a connector configuration describing topics, S3 bucket, converters, and formatting.
* Started Kafka Connect in standalone mode and verified plugin scanning and consumer assignment via logs.
Next steps
* Produce events to the configured topic (`cartevent`) and observe Kafka Connect writing files to the S3 bucket.
* Monitor the S3 bucket for objects written by the connector and adjust `flush.size` / `rotate.schedule.interval.ms` to balance latency and file sizes.
See you in the next lesson.
6. Start Kafka Connect (standalone)
Change into the Kafka installation directory (or reference the full path to the script) and start Connect with the worker and connector config files:
```bash theme={null}
cd kafka_2.13-3.0.0
bin/connect-standalone.sh config/connect-standalone.properties config/s3-sink-connector.properties
```
Run the `connect-standalone.sh` script from the Kafka root directory (the directory that contains `bin/`), or supply the full path. If you run it from the wrong folder you will see `No such file or directory`.
On startup the worker will scan plugin paths and attempt to load the S3 connector. Example logs showing plugin scanning and consumer group assignment:
```text theme={null}
[2025-05-10 11:41:944] INFO Scanning for plugin classes. This might take a moment ... (org.apache.kafka.connect.cli.ConnectStandalone)
[2025-05-10 11:41:968] INFO Loading plugin from: /root/confluentinc-kafka-connect-s3-10.5.23/doc/ (org.apache.kafka.connect.runtime.isolation.DelegatingClassLoader)
[2025-05-10 11:41:989] INFO Added 0 plugins. (org.apache.kafka.connect.runtime.isolation.DelegatingClassLoader)
[2025-05-10 11:11:49,961] INFO [3-sink-connector-0] Successfully joined group with generation Generation(generationId=1, memberId='connector-consumer-s3-sink-connector-0', protocol='range')
[2025-05-10 11:11:53,066] INFO [3-sink-connector-0] Found no committed offset for partition cartevent-0
[2025-05-10 11:11:53,088] INFO [3-sink-connector-0] Resetting offset for partition cartevent-0 to position(offset=0)
```
Important notes and troubleshooting
* Topic existence: If the configured topic (for example `cartevent`) does not exist, Kafka Connect will not create it for you. Topic creation is controlled by the broker setting `auto.create.topics.enable`. Create the topic ahead of time with your desired partitions and replication: `kafka-topics.sh --create ...`
* plugin.path: Ensure `plugin.path` points to the directory containing the unpacked connector JARs. Each plugin typically lives in its own subdirectory under `plugin.path`; if Connect cannot find the S3 connector classes it will not load the plugin.
* Permissions: Confirm the EC2 instance IAM role has S3 permissions for the bucket (PutObject, ListBucket).
* Converters: Keep worker and connector converters compatible. If you disable schemas (`schemas.enable=false`) ensure your messages are formatted accordingly.
Recap — what we did
* Downloaded and unpacked the Confluent S3 Sink connector.
* Updated `connect-standalone.properties` to reference the connector via `plugin.path`.
* Created a connector configuration describing topics, S3 bucket, converters, and formatting.
* Started Kafka Connect in standalone mode and verified plugin scanning and consumer assignment via logs.
Next steps
* Produce events to the configured topic (`cartevent`) and observe Kafka Connect writing files to the S3 bucket.
* Monitor the S3 bucket for objects written by the connector and adjust `flush.size` / `rotate.schedule.interval.ms` to balance latency and file sizes.
See you in the next lesson.