> ## Documentation Index
> Fetch the complete documentation index at: https://notes.kodekloud.com/llms.txt
> Use this file to discover all available pages before exploring further.
# Demo Starting Our Internal Interface
> Setting up a warehouse backend UI that consumes front-end order events from Kafka, configures a consumer, and demonstrates running and testing the packer dashboard.
Welcome back. In this lesson we start the warehouse backend UI (the internal web interface) and connect it to the Kafka topic that receives cart/order events. The backend consumes events produced by the front-end and renders them for warehouse packers.
Below we walk through the key producer behavior from the frontend, how the warehouse app consumes those events, sample logs, the consumer implementation used by the UI, and how to run and test the dashboard end-to-end.
## Producer: front-end order event (context)
When an order is placed in the front-end, the app produces an order event to Kafka. The producer code looks like this:
```python theme={null}
# Producer: sending order event to Kafka
order_event = {
'customer_name': name,
'delivery_address': address,
'products': cart,
'total_amount': sum(item['price'] for item in cart)
}
event_string = json.dumps(order_event)
logger.info(f"Sending order event to Kafka: {event_string}")
producer.produce(
topic='cartevnt',
value=event_string
)
```
Producer delivery is asynchronous by default. To ensure delivery before shutdown, either call `producer.flush()` on shutdown or supply a delivery callback to confirm the message reached the broker.
Example terminal output from the front-end when placing an order:
```text theme={null}
127.0.0.1 - - [20/Apr/2025 10:30:31] "GET /add_to_cart/1 HTTP/1.1" 302 -
127.0.0.1 - - [20/Apr/2025 10:30:31] "GET / HTTP/1.1" 200 -
127.0.0.1 - - [20/Apr/2025 10:30:31] "GET /static/styles/toy1.jpg HTTP/1.1" 304 -
127.0.0.1 - - [20/Apr/2025 10:30:31] "GET /static/images/toy3.jpg HTTP/1.1" 304 -
127.0.0.1 - - [20/Apr/2025 10:30:31] "GET /static/images/toy2.jpg HTTP/1.1" 304 -
127.0.0.1 - - [20/Apr/2025 10:30:31] "GET /static/images/toy6.jpg HTTP/1.1" 304 -
127.0.0.1 - - [20/Apr/2025 10:30:31] "GET /static/images/toy1.jpg HTTP/1.1" 304 -
127.0.0.1 - - [20/Apr/2025 10:30:31] "GET /cart HTTP/1.1" 304 -
127.0.0.1 - - [20/Apr/2025 10:30:34] "POST /place_order HTTP/1.1" 200 -
```
## Configure the backend consumer to connect to your Kafka broker
Open the warehouse UI app (folder: `final-projects/warehouse`, file: `app.py`) and locate the Consumer import from `confluent_kafka`. The consumer configuration needs the broker address in `bootstrap.servers`. Replace the placeholder with the public IP (and port) of the EC2 instance running Kafka.
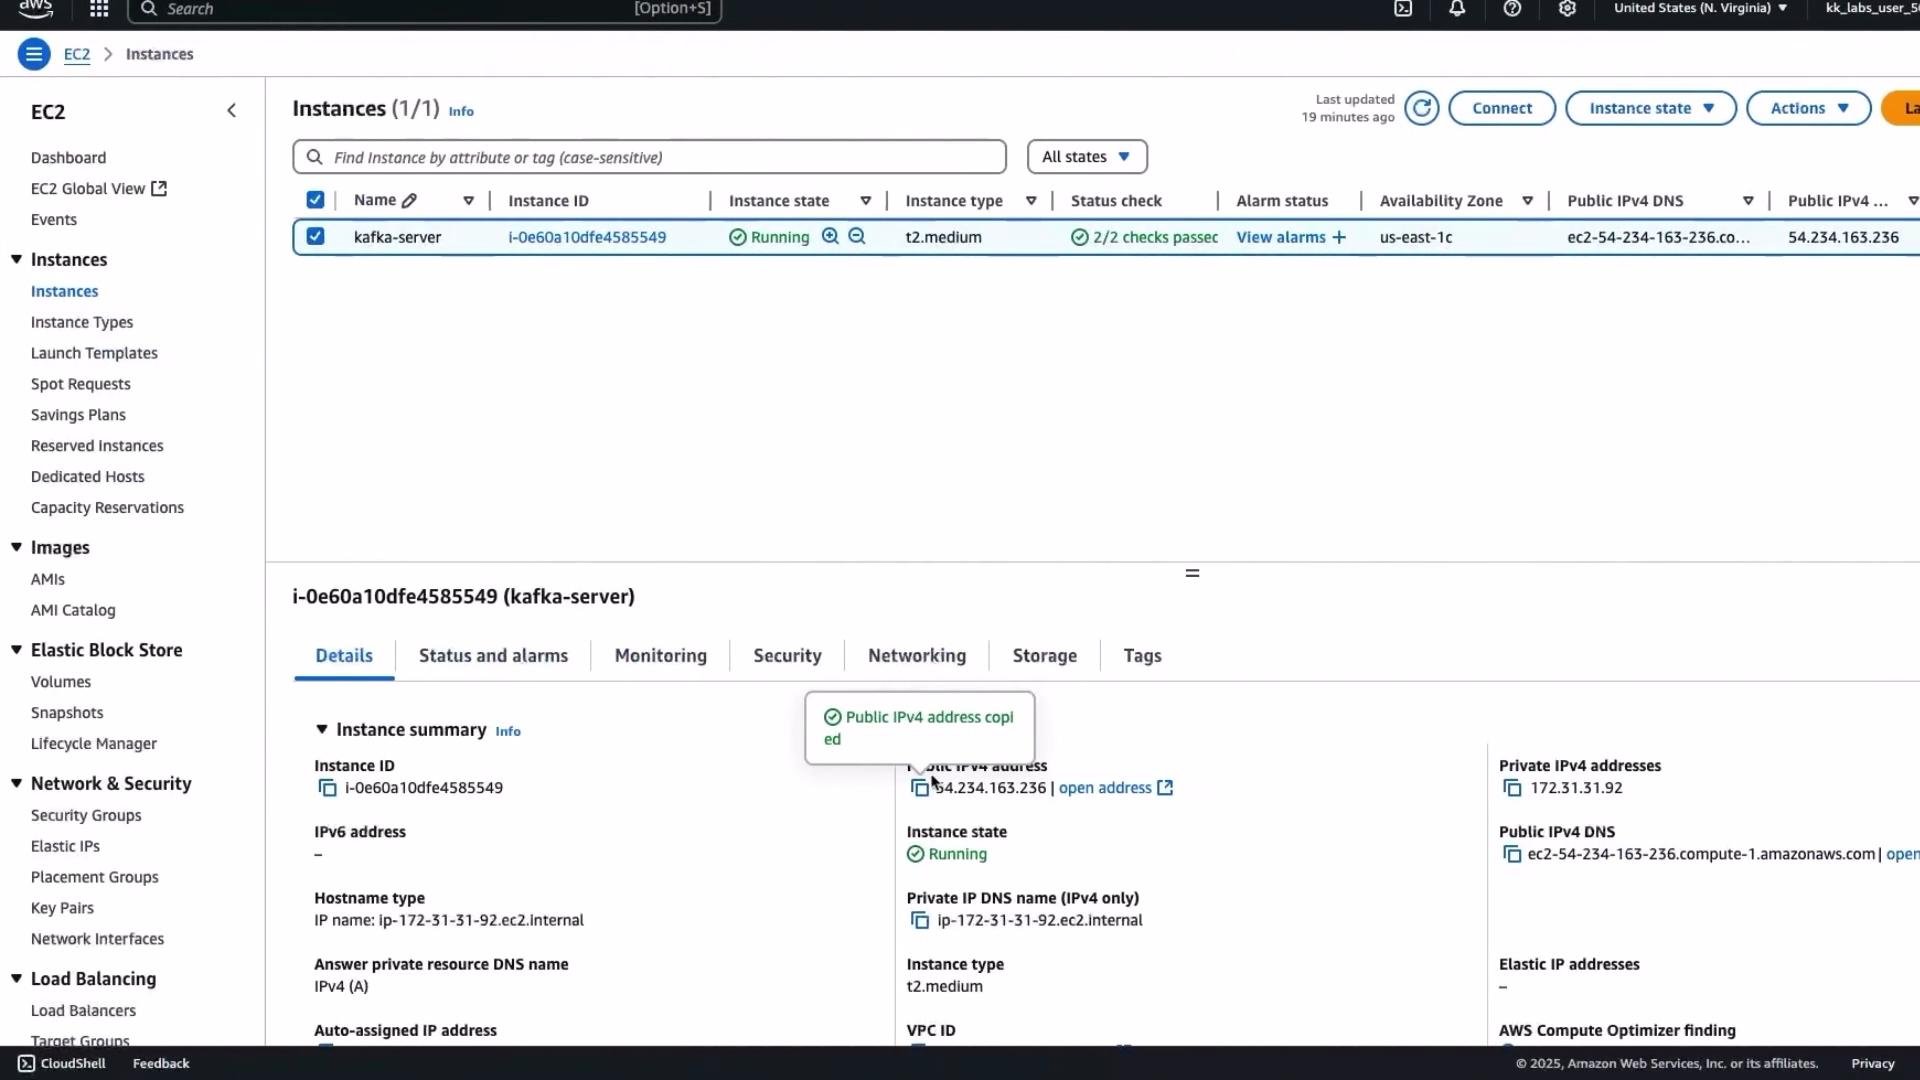 Replace `bootstrap.servers` with the EC2 instance’s public IP and Kafka port (for example `54.234.163.236:9092`). This allows the consumer running locally (or from another host) to connect to the Kafka broker.
### Consumer configuration notes
Below are the important consumer settings used by the warehouse dashboard and why they matter:
| Config key | Purpose | Example / Advice |
| -------------------- | ------------------------------------------------------------------------------------------------------------------------------------- | ------------------------- |
| `bootstrap.servers` | Broker address to connect to (host:port). | `54.234.163.236:9092` |
| `group.id` | Consumer group name. Use a stable ID in production; a unique one (e.g., appending a UUID) can be used for independent read-only runs. | `warehouse_reader_` |
| `auto.offset.reset` | Where to start when no committed offset exists. | `earliest` |
| `enable.auto.commit` | Whether offsets are auto-committed. We disable this to control processing. | `False` |
If you generate a new unique `group.id` on every run and do not commit offsets, the consumer will re-read messages from the earliest offset each time. For normal operation, use a stable `group.id` and commit offsets to avoid duplicate processing.
## Consumer implementation used by the warehouse UI
This implementation polls Kafka for available messages, decodes JSON payloads, skips tombstone messages (value is `None`), and returns a list of parsed order dictionaries for rendering in the UI.
```python theme={null}
import json
import uuid
import logging
from confluent_kafka import Consumer
logger = logging.getLogger(__name__)
KAFKA_TOPIC = 'cartevnt'
def get_kafka_messages():
"""Get all available messages from Kafka and return as a list of dicts."""
messages = []
# Consumer configuration - replace bootstrap.servers with your broker IP:port
consumer_config = {
'bootstrap.servers': '54.234.163.236:9092',
'group.id': 'warehouse_reader_' + str(uuid.uuid4()),
'auto.offset.reset': 'earliest',
'enable.auto.commit': False
}
consumer = Consumer(consumer_config)
logger.info("Created new Kafka consumer")
try:
consumer.subscribe([KAFKA_TOPIC])
logger.info(f"Subscribed to topic: {KAFKA_TOPIC}")
# Poll for messages with a timeout; adjust tries/timeouts as required
for _ in range(10): # try a few times to collect available messages
msg = consumer.poll(1.0)
if msg is None:
continue
if msg.error():
logger.error(f'Error consuming message: {msg.error()}')
continue
# Skip tombstone messages where value is None
raw_val = msg.value()
if raw_val is None:
logger.info("Skipped tombstone or message with no value")
continue
try:
# Ensure we have a string before loading JSON
if isinstance(raw_val, (bytes, bytearray)):
raw_val = raw_val.decode('utf-8')
value = json.loads(raw_val)
logger.info(f'Reading message for customer: {value.get("customer_name")}')
messages.append(value)
except json.JSONDecodeError as e:
logger.error(f'Failed to parse message: {e}')
finally:
consumer.close()
logger.info("Kafka consumer closed")
return messages
```
How the UI uses this function:
* The dashboard calls `get_kafka_messages()` when the packer clicks "Refresh Dashboard".
* Each returned dict should contain `customer_name`, `delivery_address`, `products`, and `total_amount`.
* The frontend renders those fields in an actionable format for packers (items, prices, totals, address).
## Running the warehouse UI locally
1. Open a terminal in the `final-projects/warehouse` folder.
2. Start the app:
* `python3 app.py`
3. Open the dashboard in your browser (or use the editor’s "Open in Browser").
## Test the end-to-end flow
1. Place an order in the shop front-end (e.g., add toy 6, view cart, enter customer name "Rose" and address "Delhi", then click Place Order). This produces an event to the `cartevnt` topic.
2. In the warehouse dashboard, click **Refresh Dashboard**. The backend consumer will poll Kafka, parse the event, and render it.
The dashboard displays orders in a packer-friendly way (product list, prices, totals, customer, address). You can extend the dashboard to:
* Auto-refresh on a timer or via WebSocket updates.
* Group orders into batches for efficient picking.
* Highlight priority shipments or fragile items.
* Enrich events with inventory metadata (e.g., rack locations).
Replace `bootstrap.servers` with the EC2 instance’s public IP and Kafka port (for example `54.234.163.236:9092`). This allows the consumer running locally (or from another host) to connect to the Kafka broker.
### Consumer configuration notes
Below are the important consumer settings used by the warehouse dashboard and why they matter:
| Config key | Purpose | Example / Advice |
| -------------------- | ------------------------------------------------------------------------------------------------------------------------------------- | ------------------------- |
| `bootstrap.servers` | Broker address to connect to (host:port). | `54.234.163.236:9092` |
| `group.id` | Consumer group name. Use a stable ID in production; a unique one (e.g., appending a UUID) can be used for independent read-only runs. | `warehouse_reader_` |
| `auto.offset.reset` | Where to start when no committed offset exists. | `earliest` |
| `enable.auto.commit` | Whether offsets are auto-committed. We disable this to control processing. | `False` |
If you generate a new unique `group.id` on every run and do not commit offsets, the consumer will re-read messages from the earliest offset each time. For normal operation, use a stable `group.id` and commit offsets to avoid duplicate processing.
## Consumer implementation used by the warehouse UI
This implementation polls Kafka for available messages, decodes JSON payloads, skips tombstone messages (value is `None`), and returns a list of parsed order dictionaries for rendering in the UI.
```python theme={null}
import json
import uuid
import logging
from confluent_kafka import Consumer
logger = logging.getLogger(__name__)
KAFKA_TOPIC = 'cartevnt'
def get_kafka_messages():
"""Get all available messages from Kafka and return as a list of dicts."""
messages = []
# Consumer configuration - replace bootstrap.servers with your broker IP:port
consumer_config = {
'bootstrap.servers': '54.234.163.236:9092',
'group.id': 'warehouse_reader_' + str(uuid.uuid4()),
'auto.offset.reset': 'earliest',
'enable.auto.commit': False
}
consumer = Consumer(consumer_config)
logger.info("Created new Kafka consumer")
try:
consumer.subscribe([KAFKA_TOPIC])
logger.info(f"Subscribed to topic: {KAFKA_TOPIC}")
# Poll for messages with a timeout; adjust tries/timeouts as required
for _ in range(10): # try a few times to collect available messages
msg = consumer.poll(1.0)
if msg is None:
continue
if msg.error():
logger.error(f'Error consuming message: {msg.error()}')
continue
# Skip tombstone messages where value is None
raw_val = msg.value()
if raw_val is None:
logger.info("Skipped tombstone or message with no value")
continue
try:
# Ensure we have a string before loading JSON
if isinstance(raw_val, (bytes, bytearray)):
raw_val = raw_val.decode('utf-8')
value = json.loads(raw_val)
logger.info(f'Reading message for customer: {value.get("customer_name")}')
messages.append(value)
except json.JSONDecodeError as e:
logger.error(f'Failed to parse message: {e}')
finally:
consumer.close()
logger.info("Kafka consumer closed")
return messages
```
How the UI uses this function:
* The dashboard calls `get_kafka_messages()` when the packer clicks "Refresh Dashboard".
* Each returned dict should contain `customer_name`, `delivery_address`, `products`, and `total_amount`.
* The frontend renders those fields in an actionable format for packers (items, prices, totals, address).
## Running the warehouse UI locally
1. Open a terminal in the `final-projects/warehouse` folder.
2. Start the app:
* `python3 app.py`
3. Open the dashboard in your browser (or use the editor’s "Open in Browser").
## Test the end-to-end flow
1. Place an order in the shop front-end (e.g., add toy 6, view cart, enter customer name "Rose" and address "Delhi", then click Place Order). This produces an event to the `cartevnt` topic.
2. In the warehouse dashboard, click **Refresh Dashboard**. The backend consumer will poll Kafka, parse the event, and render it.
The dashboard displays orders in a packer-friendly way (product list, prices, totals, customer, address). You can extend the dashboard to:
* Auto-refresh on a timer or via WebSocket updates.
* Group orders into batches for efficient picking.
* Highlight priority shipments or fragile items.
* Enrich events with inventory metadata (e.g., rack locations).
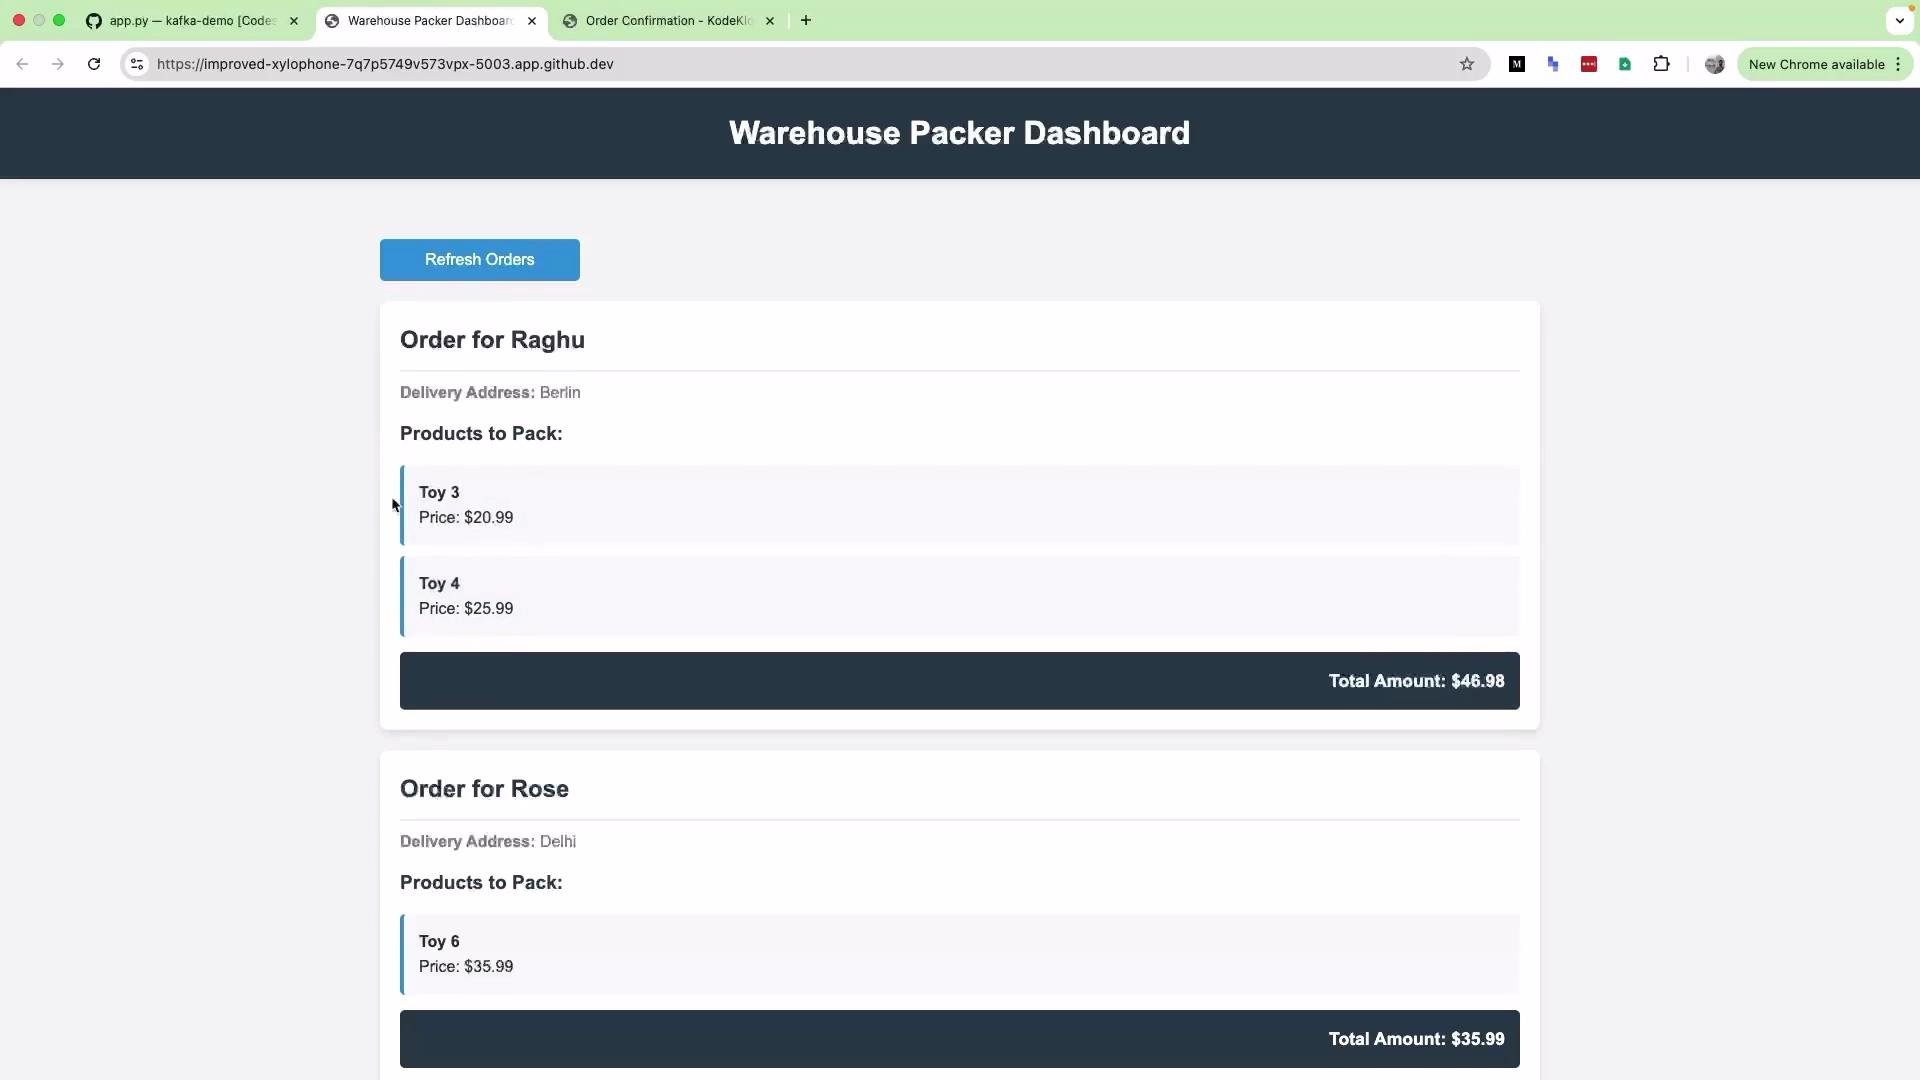 Example extension idea: For each product in the Kafka event, query an inventory service or database to join a `rack` or `location` field (e.g., "rack 15"), then include that in the rendered order to speed up picking.
## Key takeaway
Kafka serves as the central event bus connecting front-end producers and backend consumers like the warehouse UI. This decouples systems and enables a flexible, event-driven architecture where each service can independently produce or consume events.
This completes the end-to-end demo for the warehouse backend UI. See you in the next lesson!
## Links and references
* [Apache Kafka Documentation](https://kafka.apache.org/documentation/)
* [confluent-kafka-python (Confluent)](https://github.com/confluentinc/confluent-kafka-python)
Example extension idea: For each product in the Kafka event, query an inventory service or database to join a `rack` or `location` field (e.g., "rack 15"), then include that in the rendered order to speed up picking.
## Key takeaway
Kafka serves as the central event bus connecting front-end producers and backend consumers like the warehouse UI. This decouples systems and enables a flexible, event-driven architecture where each service can independently produce or consume events.
This completes the end-to-end demo for the warehouse backend UI. See you in the next lesson!
## Links and references
* [Apache Kafka Documentation](https://kafka.apache.org/documentation/)
* [confluent-kafka-python (Confluent)](https://github.com/confluentinc/confluent-kafka-python)