> ## Documentation Index
> Fetch the complete documentation index at: https://notes.kodekloud.com/llms.txt
> Use this file to discover all available pages before exploring further.

# Configuring AutoDevOps

> Automate the CI/CD pipeline for your Node.js Solar System application using GitLab Auto DevOps for end-to-end detection, building, testing, and deployment.

Automate the CI/CD pipeline for your Node.js Solar System application with **GitLab Auto DevOps**. Since this repository contains only source code—no Dockerfile, Kubernetes manifests, or `.gitlab-ci.yml`—Auto DevOps will detect, build, test, and deploy your app end to end.

## 1. Importing the Project

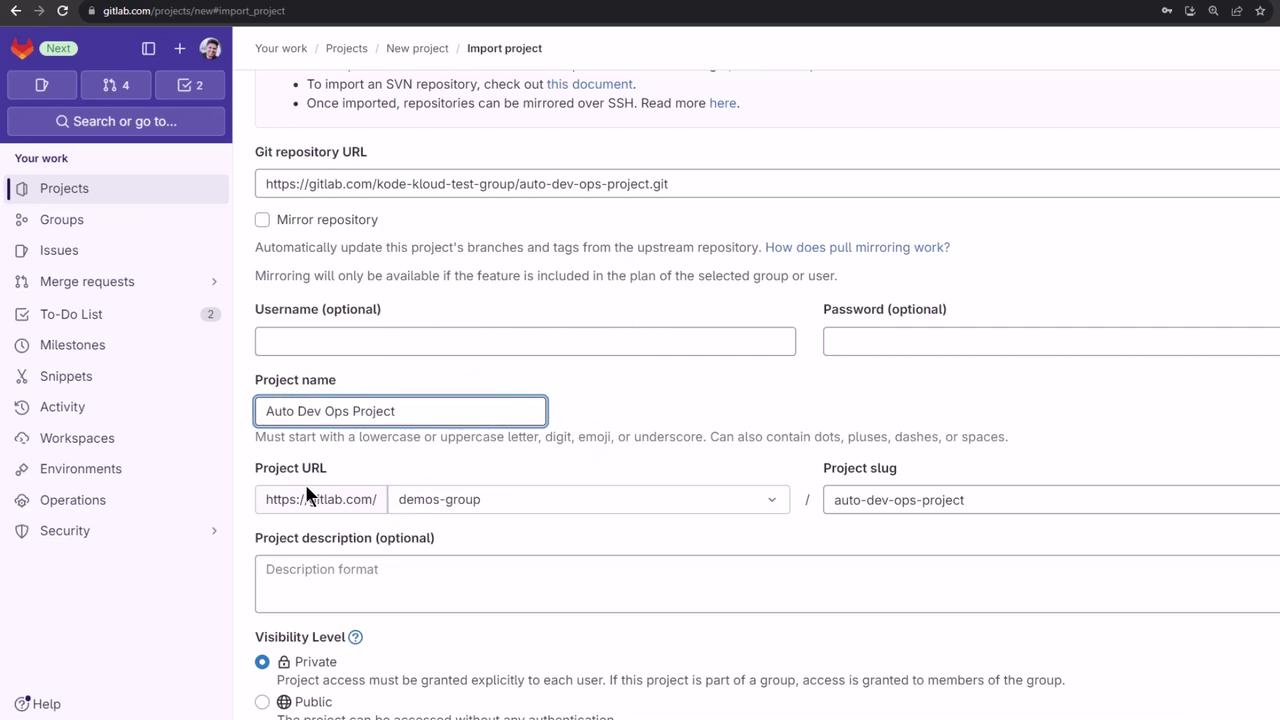
1. In GitLab, click **+ New project** → **Import project** → **Repo by URL**.
2. Paste your repository URL.
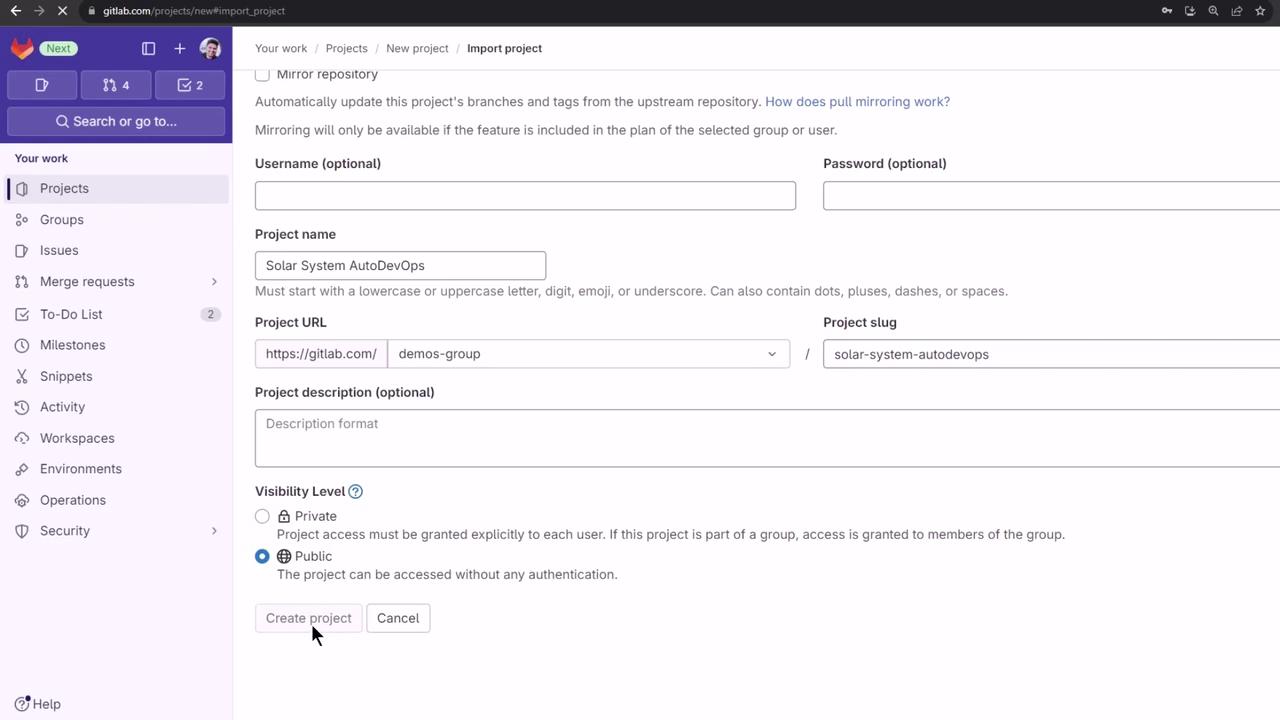
3. Under **Select namespace**, pick **demos**. Set **Project name** to `solar-system-auto-devops`, choose **Public**, then click **Create project**.
<Frame>
  ![The image shows a GitLab interface for importing a project, with fields for the repository URL, project name, and visibility settings. The project name is set to "Auto Dev Ops Project."](https://kodekloud.com/kk-media/image/upload/v1752877079/notes-assets/images/GitLab-CICD-Architecting-Deploying-and-Optimizing-Pipelines-Configuring-AutoDevOps/gitlab-import-project-auto-dev-ops.jpg)
</Frame>

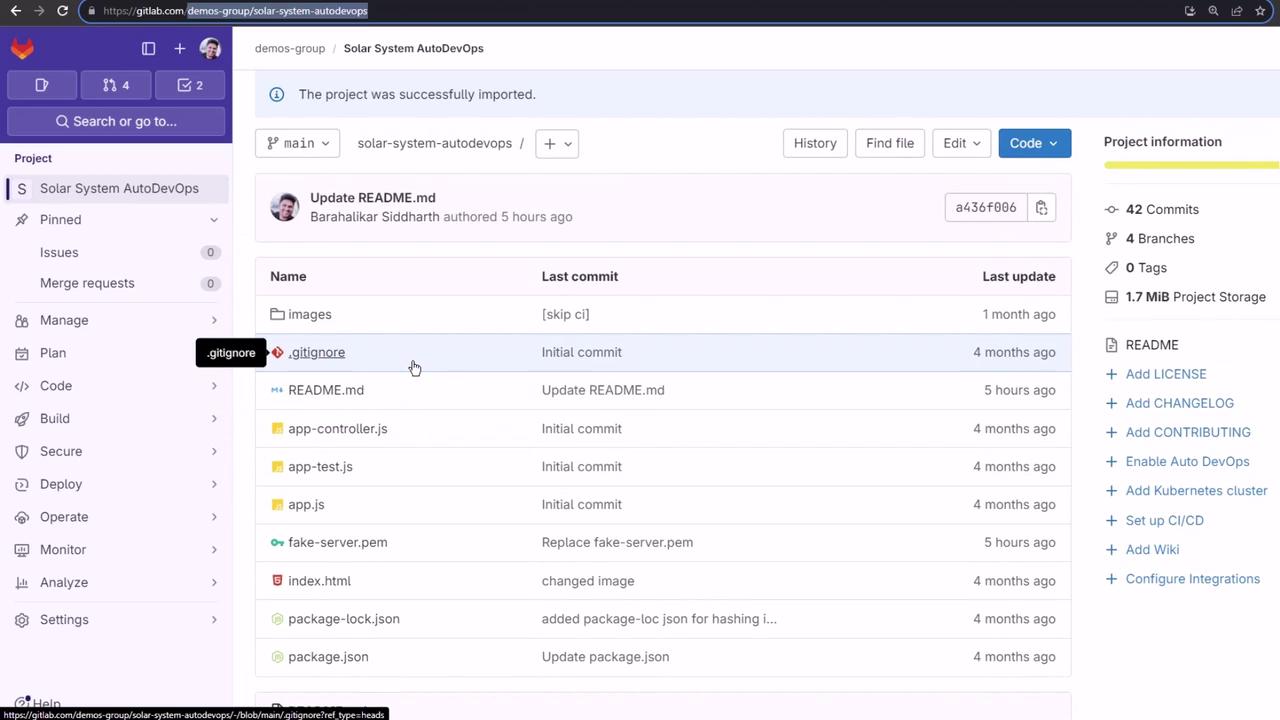
After import, you'll see your project without a Dockerfile, Kubernetes manifests, or `.gitlab-ci.yml`.
<Frame>
  ![The image shows a GitLab interface for importing a new project, with fields for project name, URL, and visibility settings. The "Create project" button is highlighted.](https://kodekloud.com/kk-media/image/upload/v1752877079/notes-assets/images/GitLab-CICD-Architecting-Deploying-and-Optimizing-Pipelines-Configuring-AutoDevOps/gitlab-import-new-project-interface.jpg)
</Frame>

<Frame>
  ![The image shows a GitLab project interface for "Solar System AutoDevOps," displaying a list of files and their last commit details. The sidebar includes options for managing, planning, and deploying the project.](https://kodekloud.com/kk-media/image/upload/v1752877080/notes-assets/images/GitLab-CICD-Architecting-Deploying-and-Optimizing-Pipelines-Configuring-AutoDevOps/gitlab-solarsystem-autodevops-interface.jpg)
</Frame>

## 2. Reviewing Auto DevOps Documentation

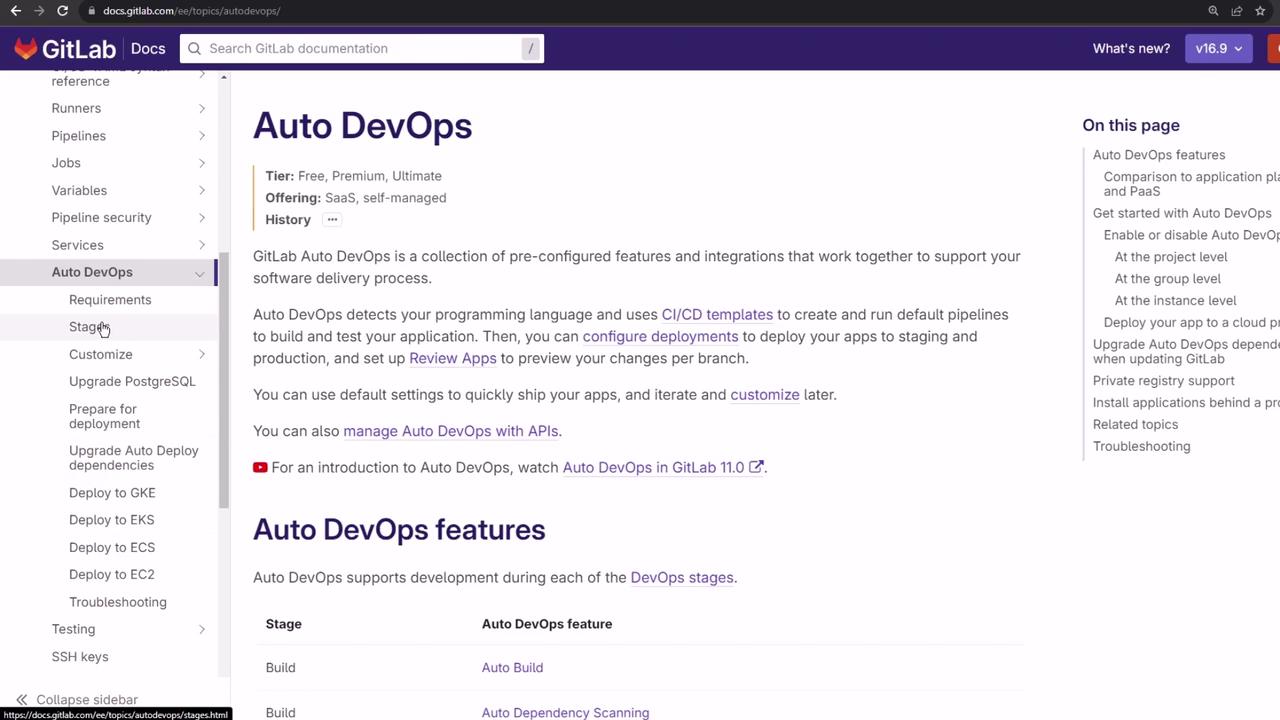
GitLab’s [Auto DevOps docs](https://docs.gitlab.com/ee/topics/autodevops/) cover its features, stages, and integration points.
<Frame>
  ![The image shows a GitLab documentation page about Auto DevOps, detailing its features and integration for software delivery processes. It includes a sidebar with navigation options and a section on Auto DevOps features.](https://kodekloud.com/kk-media/image/upload/v1752877082/notes-assets/images/GitLab-CICD-Architecting-Deploying-and-Optimizing-Pipelines-Configuring-AutoDevOps/gitlab-auto-devops-documentation.jpg)
</Frame>

### 2.1 Requirements

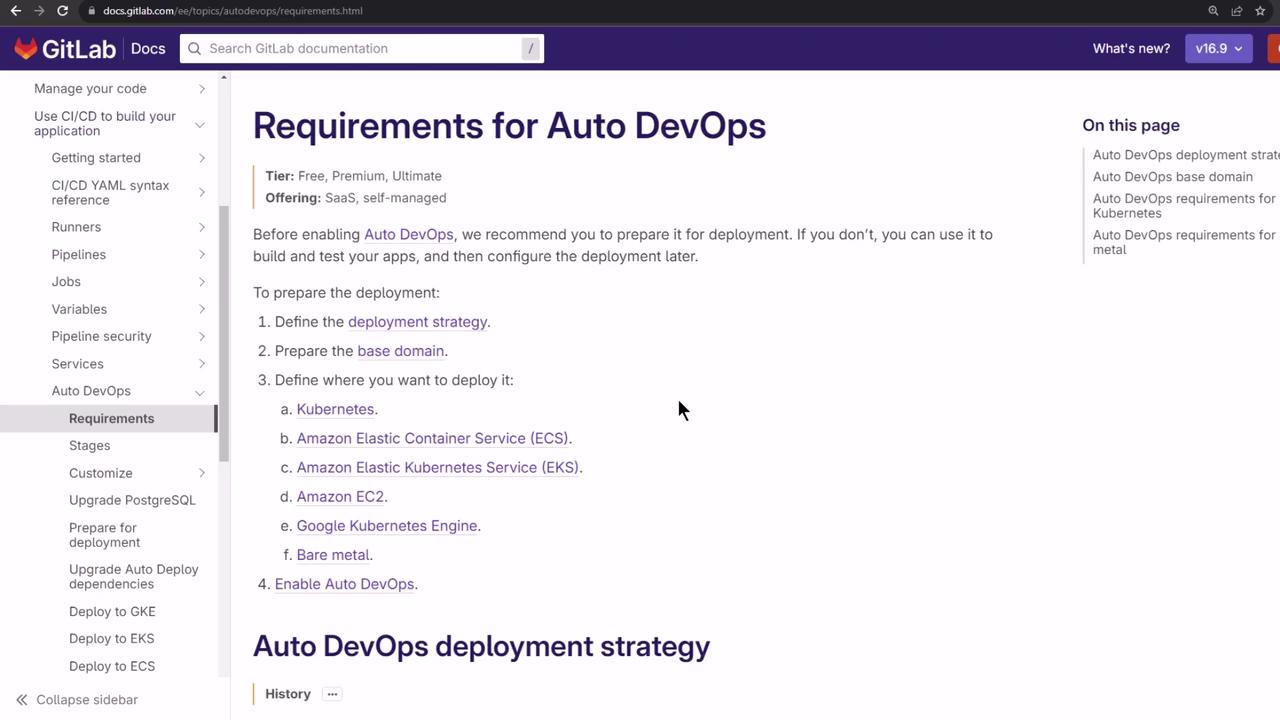
To build and test, no Kubernetes is needed. For automated deployment you must have:

* Kubernetes cluster (v1.12+)
* Wildcard DNS (e.g., `nip.io`)
* GitLab Agent or cluster integration
<Frame>
  ![The image shows a GitLab documentation page detailing the requirements for Auto DevOps, including steps for deployment preparation and options for deployment environments like Kubernetes and Amazon ECS.](https://kodekloud.com/kk-media/image/upload/v1752877082/notes-assets/images/GitLab-CICD-Architecting-Deploying-and-Optimizing-Pipelines-Configuring-AutoDevOps/gitlab-autodevops-requirements-docs.jpg)
</Frame>

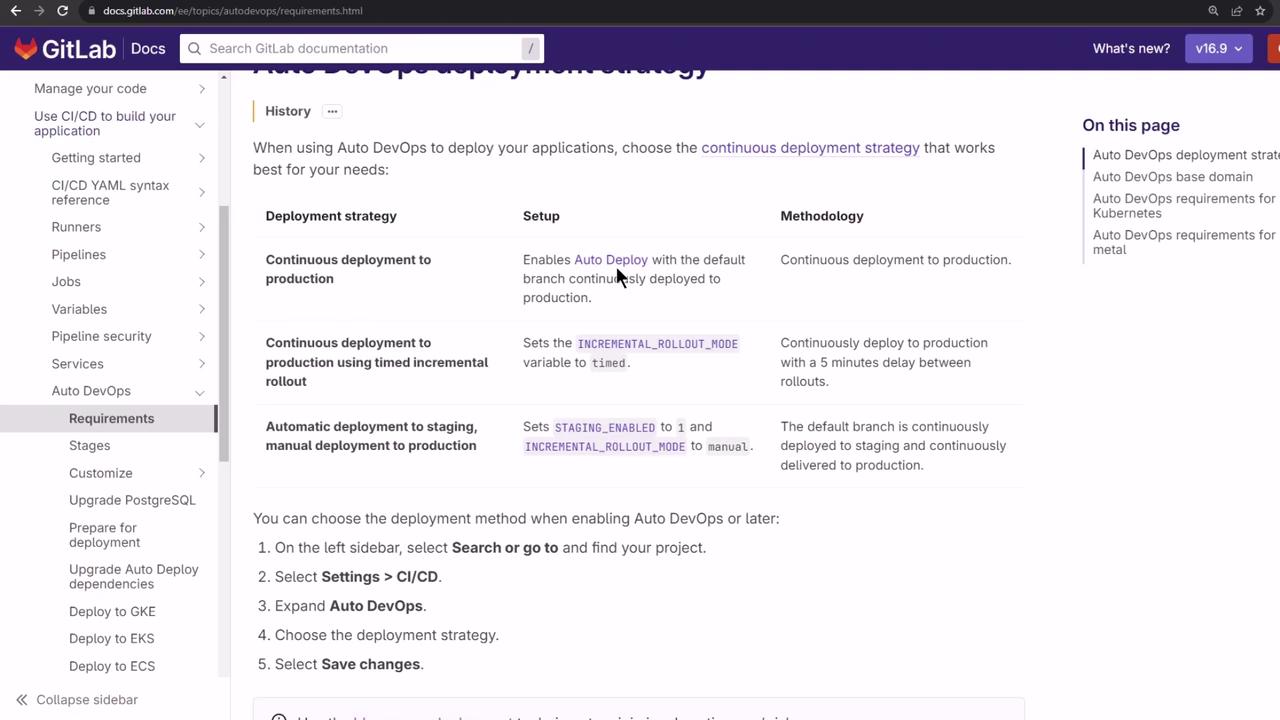
### 2.2 Deployment Strategies

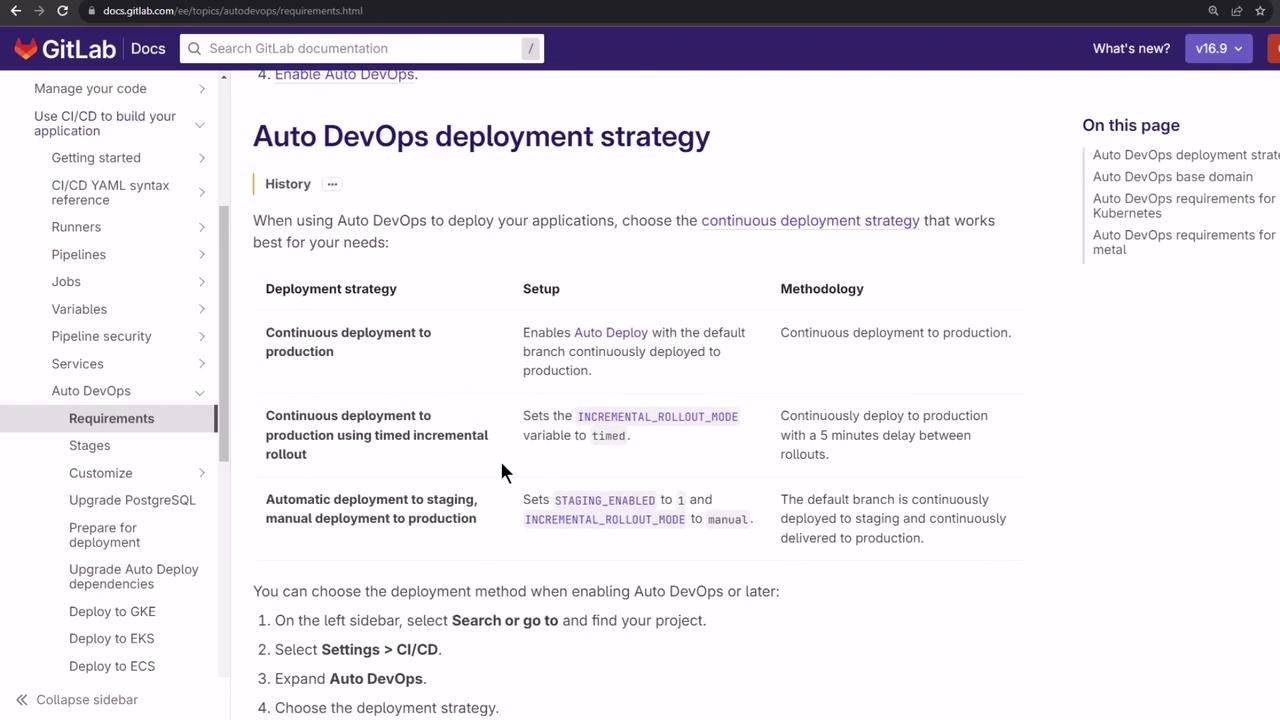
Auto DevOps supports:

| Strategy                            | Description                                          |
| ----------------------------------- | ---------------------------------------------------- |
| Continuous Deployment to Production | Deploy every successful pipeline to production       |
| Continuous Deployment with Canary   | Gradual traffic shift for safer rollouts             |
| Manual Promotion                    | Requires explicit approval before production release |

We’ll use **Continuous Deployment to Production**.
<Frame>
  ![The image shows a GitLab documentation page detailing the "Auto DevOps deployment strategy," including different deployment strategies, their setup, and methodology. The sidebar contains navigation links for various related topics.](https://kodekloud.com/kk-media/image/upload/v1752877084/notes-assets/images/GitLab-CICD-Architecting-Deploying-and-Optimizing-Pipelines-Configuring-AutoDevOps/gitlab-auto-devops-deployment-strategy.jpg)
</Frame>

## 3. Enabling Auto DevOps

1. Go to **Settings > CI/CD > Auto DevOps**.
2. Toggle **Enable Auto DevOps** on.

You'll choose the deployment strategy after configuring your cluster.

## 4. Connecting a Kubernetes Cluster

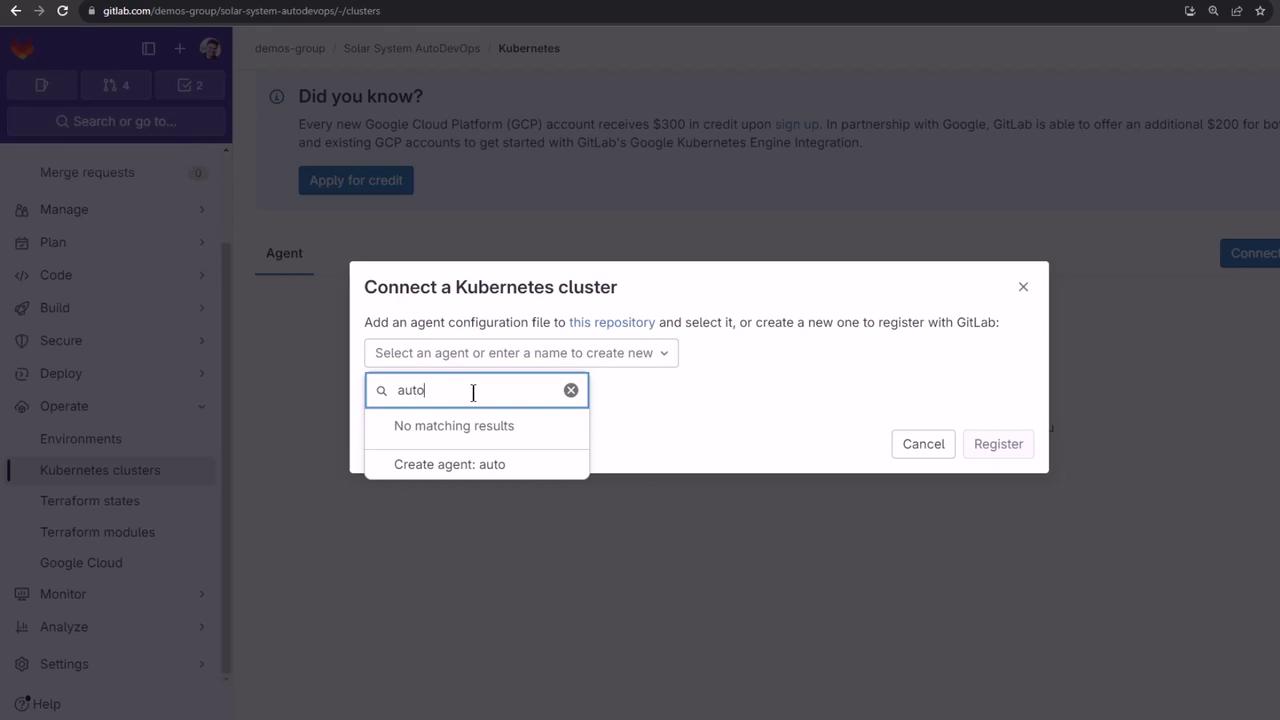
1. Navigate to **Operate > Kubernetes clusters**.
2. Click **Connect cluster** → **Create GitLab Agent**.
3. Name it `auto-devops-agent` and click **Register**.
<Frame>
  ![The image shows a GitLab interface where a user is attempting to connect a Kubernetes cluster by selecting or creating an agent. A dropdown menu is visible with the option to create a new agent named "auto."](https://kodekloud.com/kk-media/image/upload/v1752877085/notes-assets/images/GitLab-CICD-Architecting-Deploying-and-Optimizing-Pipelines-Configuring-AutoDevOps/gitlab-kubernetes-agent-connection.jpg)
</Frame>

4. Install the agent via Helm:

```bash theme={null}
helm repo add gitlab https://charts.gitlab.io
helm repo update

helm upgrade --install auto-devops-agent gitlab/gitlab-agent \
  --namespace gitlab-agent-auto-devops-agent \
  --create-namespace \
  --set image.tag=v16.9.0-rc2 \
  --set config.token=glagent-rthdvds1zyCnME14AM8tdE5HVzy7iZJ9Avr~Bg_epySyxtbw \
  --set config.kasAddress=wss://kas.gitlab.com
```

5. Confirm the namespace and pods:

```bash theme={null}
kubectl get namespaces | grep gitlab-agent-auto-devops-agent
kubectl get pods -n gitlab-agent-auto-devops-agent
```

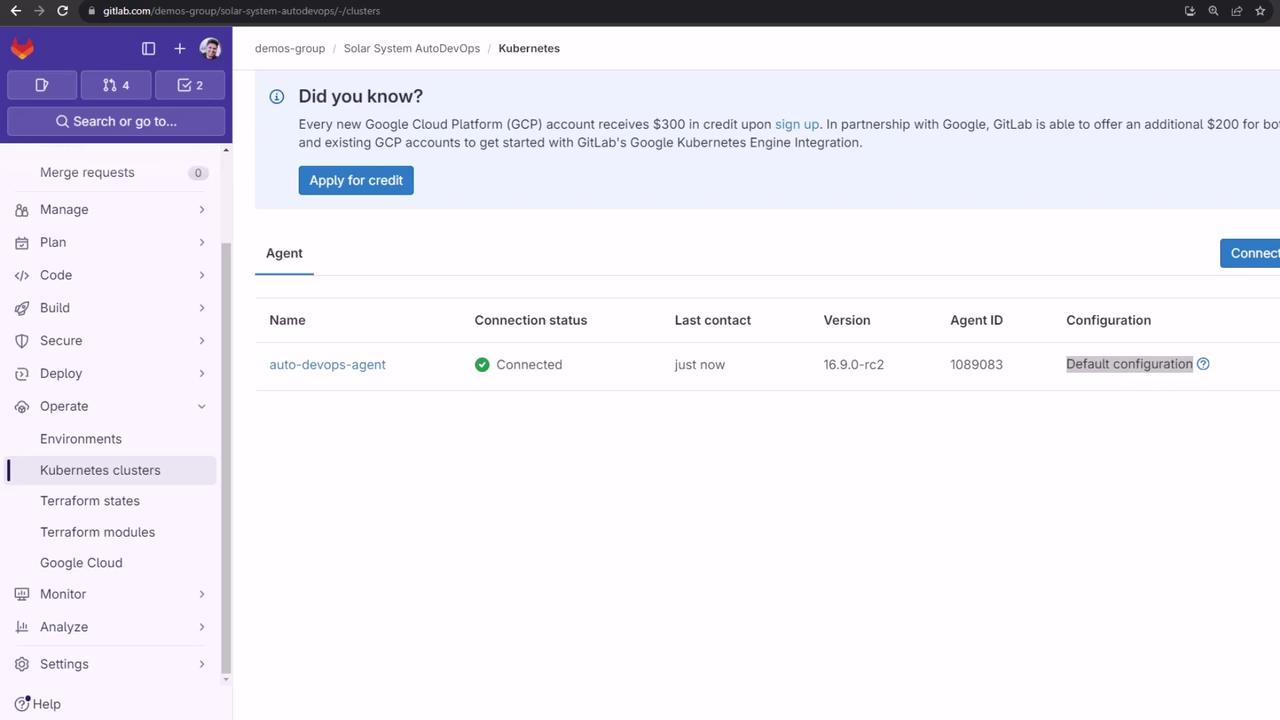
Once connected, your cluster appears in GitLab.
<Frame>
  ![The image shows a GitLab interface displaying a connected Kubernetes cluster with details such as connection status, last contact, version, agent ID, and configuration. There's also a banner about Google Cloud Platform credits.](https://kodekloud.com/kk-media/image/upload/v1752877086/notes-assets/images/GitLab-CICD-Architecting-Deploying-and-Optimizing-Pipelines-Configuring-AutoDevOps/gitlab-kubernetes-cluster-interface.jpg)
</Frame>

## 5. Configuring the Agent

Add the configuration at `.gitlab/agents/auto-devops-agent/config.yaml`:

```yaml theme={null}
user_access:
  access_as:
    agent: {}
  projects:
    - id: demos-group/solar-system-auto-devops

ci_access:
  projects:
    - id: demos-group/solar-system-auto-devops
```

Commit to `main`. GitLab will apply these permissions automatically.

## 6. Defining Environments

We’ll target two namespaces: **staging** and **production**.

1. **Staging**
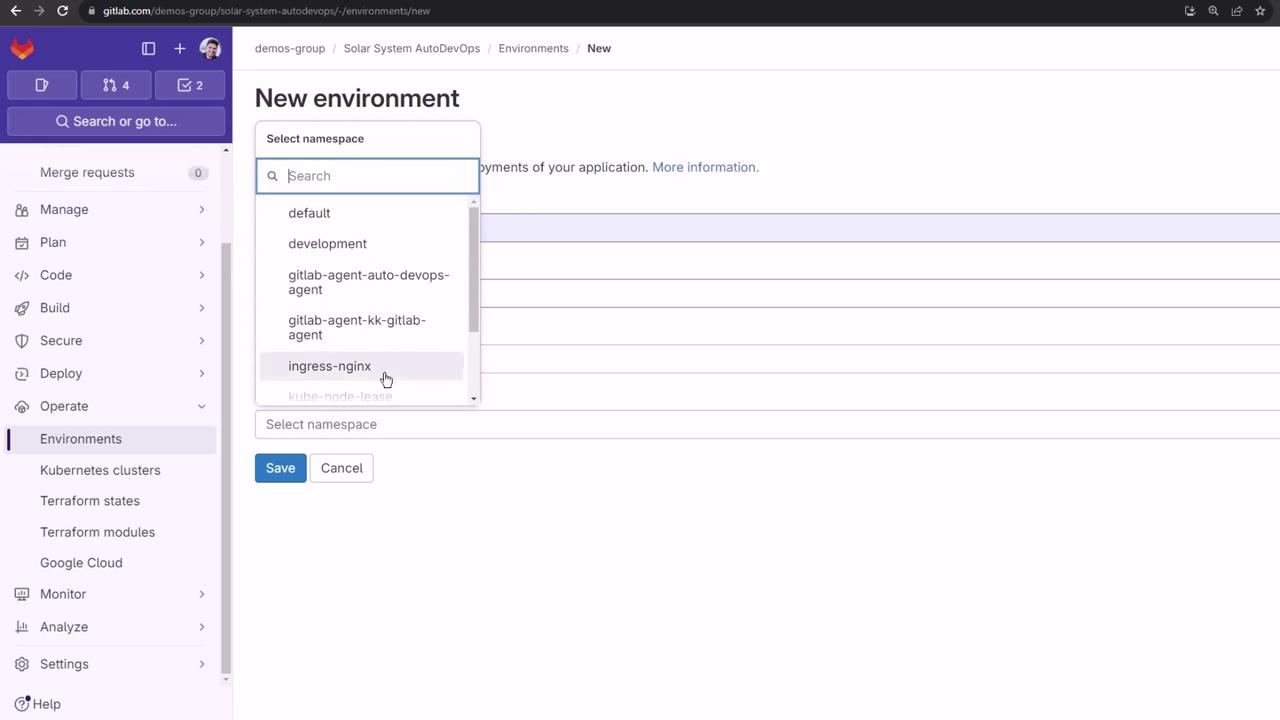
   * Go to **Environments > New environment**.
   * Name: `staging`
   * Kubernetes agent: `auto-devops-agent`
   * Namespace: **All namespaces**
   * Click **Save**.
<Frame>
  ![The image shows a GitLab interface where a user is creating a new environment and selecting a namespace from a dropdown menu.](https://kodekloud.com/kk-media/image/upload/v1752877087/notes-assets/images/GitLab-CICD-Architecting-Deploying-and-Optimizing-Pipelines-Configuring-AutoDevOps/gitlab-new-environment-namespace-dropdown.jpg)
</Frame>

2. **Production**

   * Create the namespace:

   ```bash theme={null}
   kubectl create namespace production
   ```

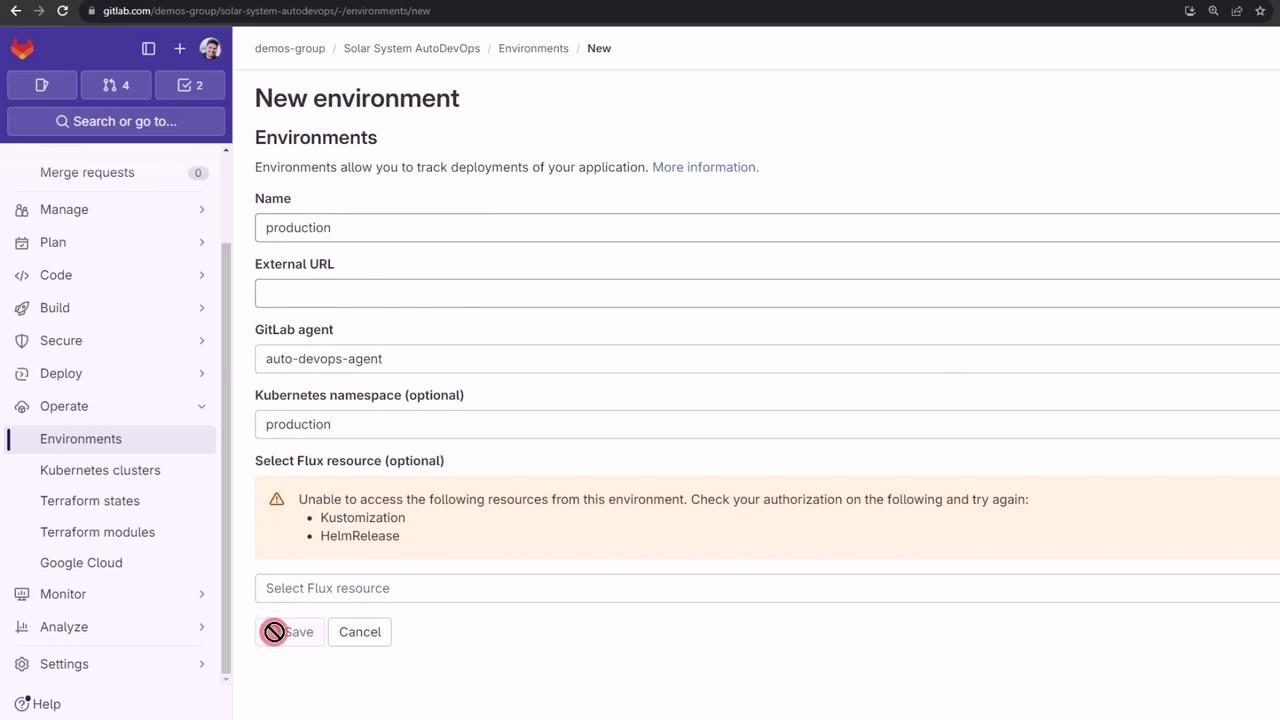
   * In **Environments > New environment**:
     * Name: `production`
     * Agent: `auto-devops-agent`
     * Namespace: `production`
   * Click **Save**.
<Frame>
  ![The image shows a GitLab interface for creating a new environment, with fields for name, external URL, GitLab agent, and Kubernetes namespace. There is a warning about authorization issues with accessing certain resources.](https://kodekloud.com/kk-media/image/upload/v1752877088/notes-assets/images/GitLab-CICD-Architecting-Deploying-and-Optimizing-Pipelines-Configuring-AutoDevOps/gitlab-new-environment-interface.jpg)
</Frame>

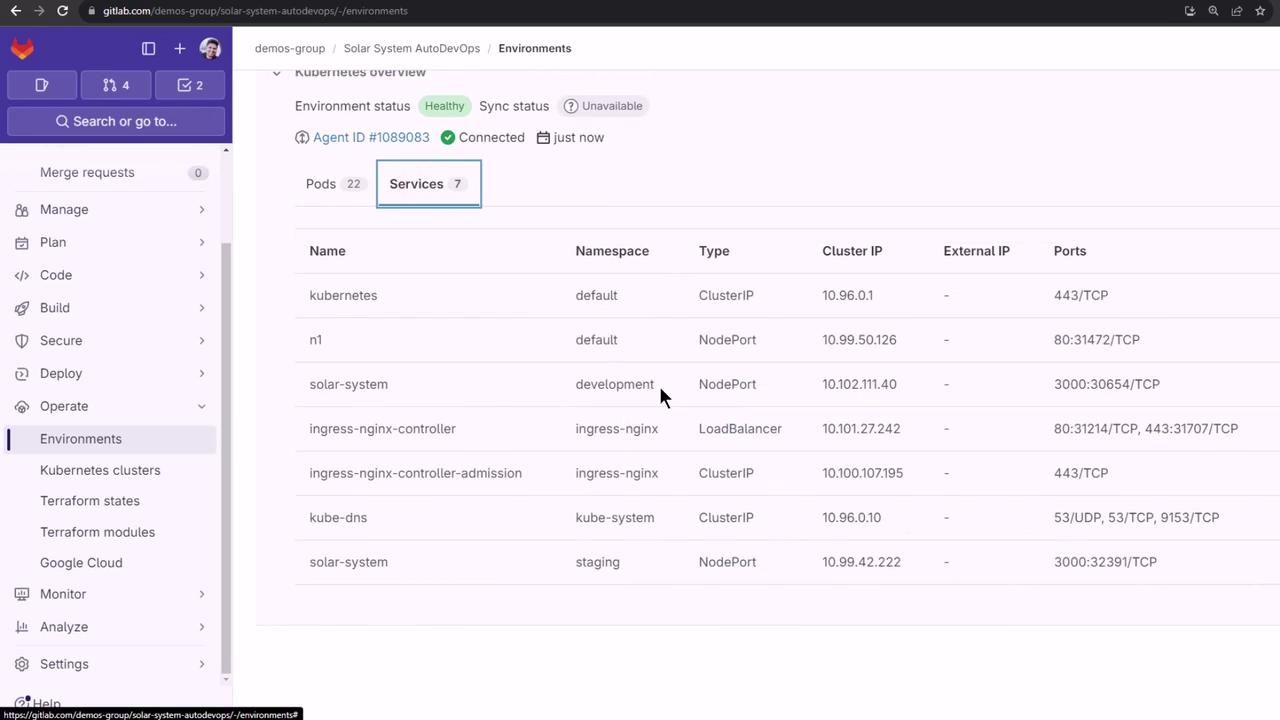
After setup, the **Kubernetes** overview lists your workloads:
<Frame>
  ![The image shows a GitLab interface displaying a Kubernetes environment overview with a list of services, including details like name, namespace, type, cluster IP, and ports.](https://kodekloud.com/kk-media/image/upload/v1752877090/notes-assets/images/GitLab-CICD-Architecting-Deploying-and-Optimizing-Pipelines-Configuring-AutoDevOps/gitlab-kubernetes-overview-services.jpg)
</Frame>

## 7. Setting CI/CD Variables

Retrieve your Ingress load balancer IP:

```bash theme={null}
kubectl -n ingress-nginx get svc ingress-nginx-controller \
  -o json | jq -r '.status.loadBalancer.ingress[0].ip'
```

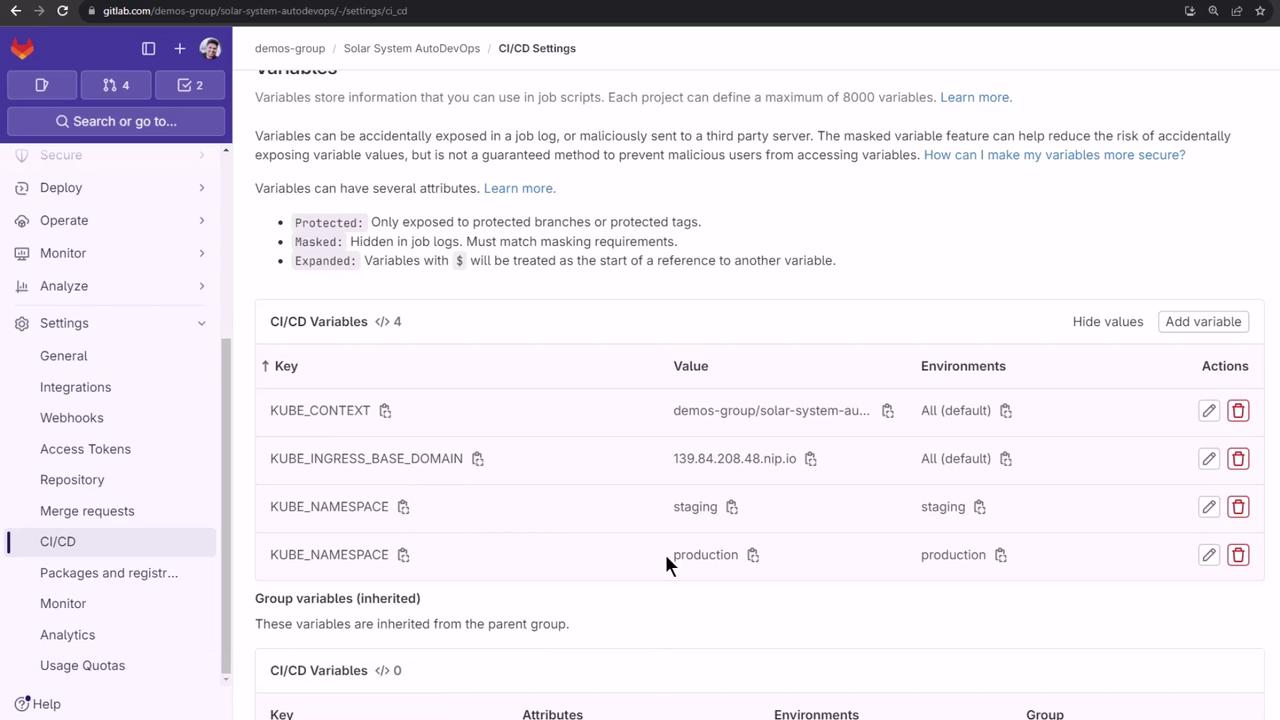
In **Settings > CI/CD > Variables**, add:

| Variable                    | Value                                                    | Environment |
| --------------------------- | -------------------------------------------------------- | ----------- |
| KUBE\_INGRESS\_BASE\_DOMAIN | `<LOAD_BALANCER_IP>.nip.io`                              | all         |
| KUBE\_CONTEXT               | `demos-group/solar-system-auto-devops:auto-devops-agent` | all         |
| KUBE\_NAMESPACE             | `staging`                                                | staging     |
| KUBE\_NAMESPACE             | `production`                                             | production  |
| PRODUCTION\_REPLICAS        | `10`                                                     | production  |
<Frame>
  ![The image shows a GitLab CI/CD settings page with a list of variables, their values, environments, and actions. The sidebar includes navigation options like Settings, Deploy, and Monitor.](https://kodekloud.com/kk-media/image/upload/v1752877091/notes-assets/images/GitLab-CICD-Architecting-Deploying-and-Optimizing-Pipelines-Configuring-AutoDevOps/gitlab-ci-cd-settings-variables.jpg)
</Frame>

<Callout icon="lightbulb" color="#1CB2FE">
  Variable names are case-sensitive. Double-check the values before running your pipeline.
</Callout>

Refer to the [Auto DevOps CI/CD variables documentation](https://docs.gitlab.com/ee/ci/variables/predefined_variables.html) for more options.
<Frame>
  ![The image shows a GitLab documentation page about Auto DevOps deployment strategies, detailing different deployment methods and their setups. It includes a sidebar with navigation options and a table comparing deployment strategies.](https://kodekloud.com/kk-media/image/upload/v1752877092/notes-assets/images/GitLab-CICD-Architecting-Deploying-and-Optimizing-Pipelines-Configuring-AutoDevOps/gitlab-autodevops-deployment-strategies.jpg)
</Frame>

## 8. Selecting Deployment Strategy

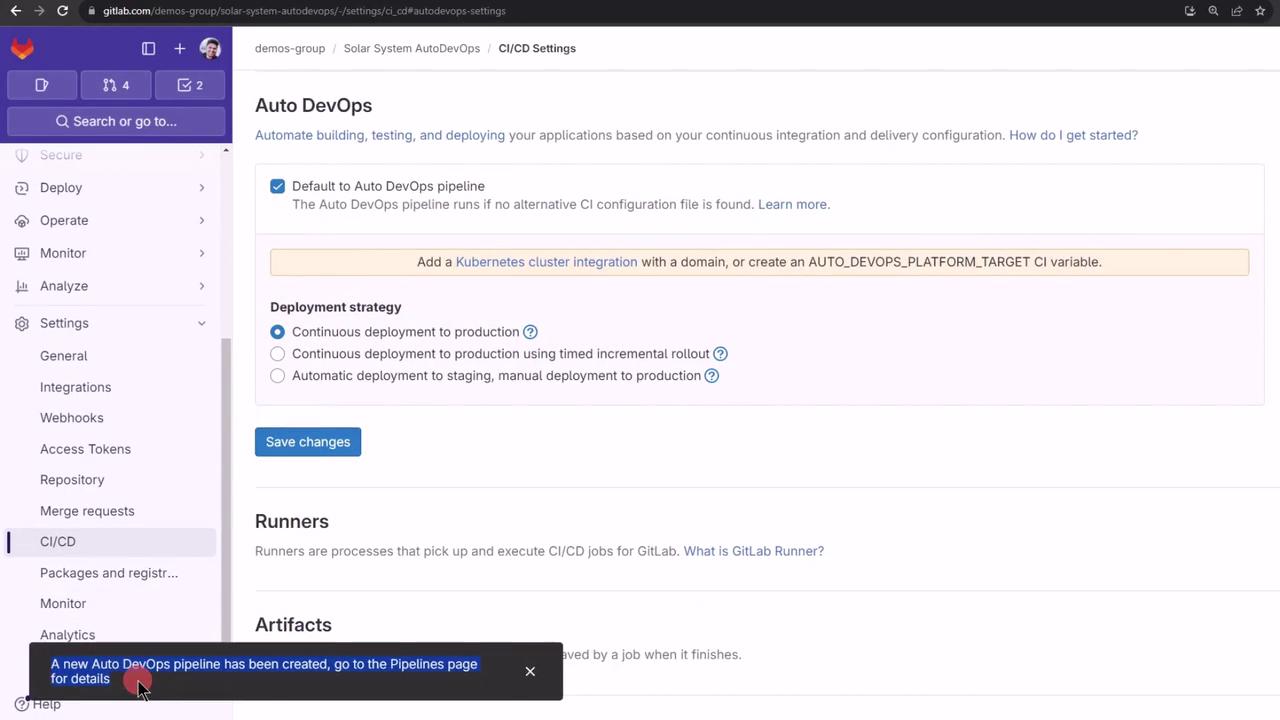
Back in **Settings > CI/CD > Auto DevOps**, choose **Continuous Deployment to Production** and click **Save**. A new pipeline will start automatically.
<Frame>
  ![The image shows a GitLab CI/CD settings page for Auto DevOps, with options for deployment strategies and a notification about a new pipeline creation.](https://kodekloud.com/kk-media/image/upload/v1752877093/notes-assets/images/GitLab-CICD-Architecting-Deploying-and-Optimizing-Pipelines-Configuring-AutoDevOps/gitlab-cicd-autodevops-settings.jpg)
</Frame>

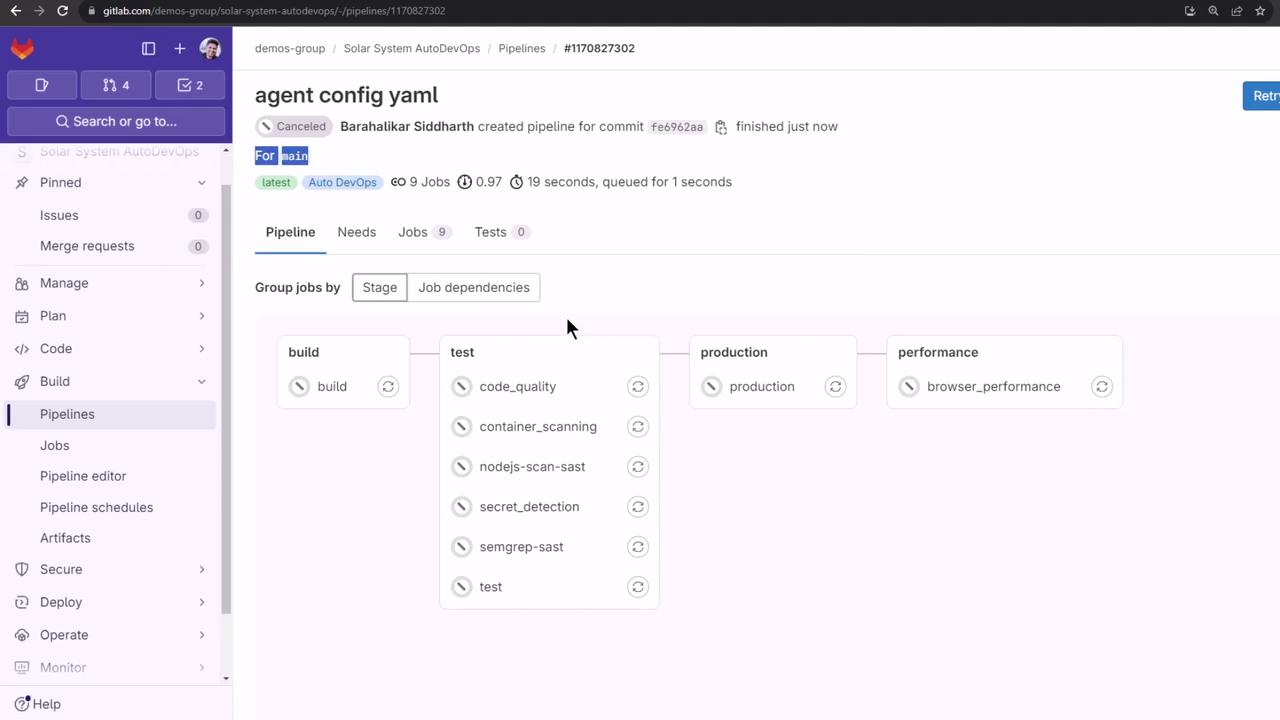
Go to **CI/CD > Pipelines** to track progress:
<Frame>
  ![The image shows a GitLab pipeline interface with stages for build, test, production, and performance, displaying job dependencies and statuses.](https://kodekloud.com/kk-media/image/upload/v1752877094/notes-assets/images/GitLab-CICD-Architecting-Deploying-and-Optimizing-Pipelines-Configuring-AutoDevOps/gitlab-pipeline-interface-stages.jpg)
</Frame>

<Callout icon="lightbulb" color="#1CB2FE">
  Test feature branches before merging into `main` to avoid production issues.
</Callout>

***

* [GitLab Auto DevOps Documentation](https://docs.gitlab.com/ee/topics/autodevops/)
* [GitLab CI/CD Variables](https://docs.gitlab.com/ee/ci/variables/predefined_variables.html)
* [Kubernetes Basics](https://kubernetes.io/docs/concepts/overview/what-is-kubernetes/)
* [Helm Charts for GitLab Agent](https://docs.gitlab.com/charts/)

<CardGroup>
  <Card title="Watch Video" icon="video" cta="Learn more" href="https://learn.kodekloud.com/user/courses/gitlab-ci-cd-architecting-deploying-and-optimizing-pipelines/module/a6a5540f-e7d1-4820-afc8-2be1d6e3061a/lesson/23193b3a-e8a9-4a5e-82e2-1f56f83fda43" />
</CardGroup>
