> ## Documentation Index
> Fetch the complete documentation index at: https://notes.kodekloud.com/llms.txt
> Use this file to discover all available pages before exploring further.
# Configure Gitlab Agent
> This guide reviews how to install and configure the GitLab Agent in your Kubernetes cluster for managing deployments and GitOps workflows.
In this guide, we’ll review how to install and configure the GitLab Agent in your Kubernetes cluster. The GitLab Agent establishes a secure, real-time connection (via KAS) to clusters—even those behind firewalls—so you can manage deployments and GitOps workflows directly from GitLab.
Full documentation:
* Connecting your clusters: [https://docs.gitlab.com/ee/user/clusters/agent/](https://docs.gitlab.com/ee/user/clusters/agent/)
* GitOps with FluxCD in GitLab CI/CD: [https://docs.gitlab.com/ee/user/clusters/agent/gitops\_with\_fluxcd.html](https://docs.gitlab.com/ee/user/clusters/agent/gitops_with_fluxcd.html)
## Prerequisites
* A GitLab project with **Owner** or **Maintainer** role
* `kubectl` configured to target your cluster
* Helm 3 installed locally
## 1. Navigate to Kubernetes Integration
1. In your GitLab project, select **Operate** → **Kubernetes clusters**.
2. Click **Connect a cluster** (skip the managed-cluster wizard if you already have one).
## 2. Verify Local Cluster Access
Confirm you can reach the cluster from your terminal:
| Command | Purpose |
| ----------------------------- | ------------------------ |
| `kubectl get nodes` | List cluster nodes |
| `kubectl config get-contexts` | Show active context |
| `kubectl get namespaces` | List existing namespaces |
```bash theme={null}
kubectl get nodes
kubectl config get-contexts
kubectl get namespaces
```
At this point, you should see no agent-related namespaces.
## 3. Create a New Agent in GitLab
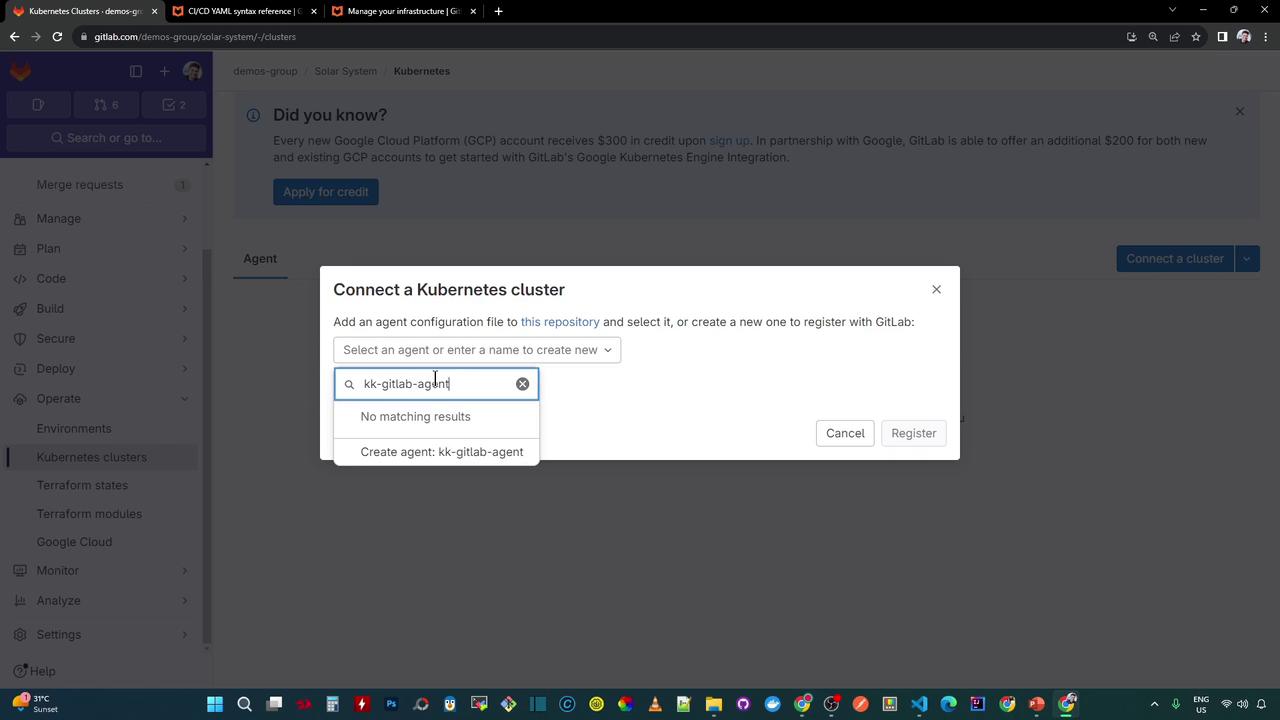
In the **Connect a cluster** dialog:
1. Choose **Add an agent configuration** → **Create a new agent**.
2. Enter a name (for example, `kk-gitlab-agent`).
3. Click **Create agent** to generate a one-time access token.
Copy and securely store the generated token now—this value is shown only once.
## 4. Install the Agent via Helm
Add the GitLab Helm repo and deploy the agent chart:
```bash theme={null}
helm repo add gitlab https://charts.gitlab.io
helm repo update
helm upgrade --install kk-gitlab-agent gitlab/gitlab-agent \
--namespace gitlab-agent-kk-gitlab-agent \
--create-namespace \
--set image.tag=v16.9.0-rc2 \
--set config.token= \
--set config.kasAddress=wss://kas.gitlab.com
```
This command will:
* Add and update the GitLab charts repository
* Install (or upgrade) the `kk-gitlab-agent` release
* Create namespace `gitlab-agent-kk-gitlab-agent` if it doesn’t exist
* Connect to the GitLab Agent Server (KAS) using your token
### Verify the Helm Release
```bash theme={null}
# You should see "STATUS: deployed"
helm status kk-gitlab-agent -n gitlab-agent-kk-gitlab-agent
```
## 5. Inspect Deployed Resources
Check pods, deployments, replica sets, config maps, and secrets:
```bash theme={null}
kubectl -n gitlab-agent-kk-gitlab-agent get all
kubectl -n gitlab-agent-kk-gitlab-agent get configmap,secrets,ingress
```
Retrieve the agent token secret in YAML:
```bash theme={null}
kubectl -n gitlab-agent-kk-gitlab-agent get secret kk-gitlab-agent-token -o yaml
```
## 6. Confirm Connection in GitLab
Return to **Operate** → **Kubernetes clusters** in your project and refresh.\
The cluster’s **Connection Status** should now display **Connected** and active.
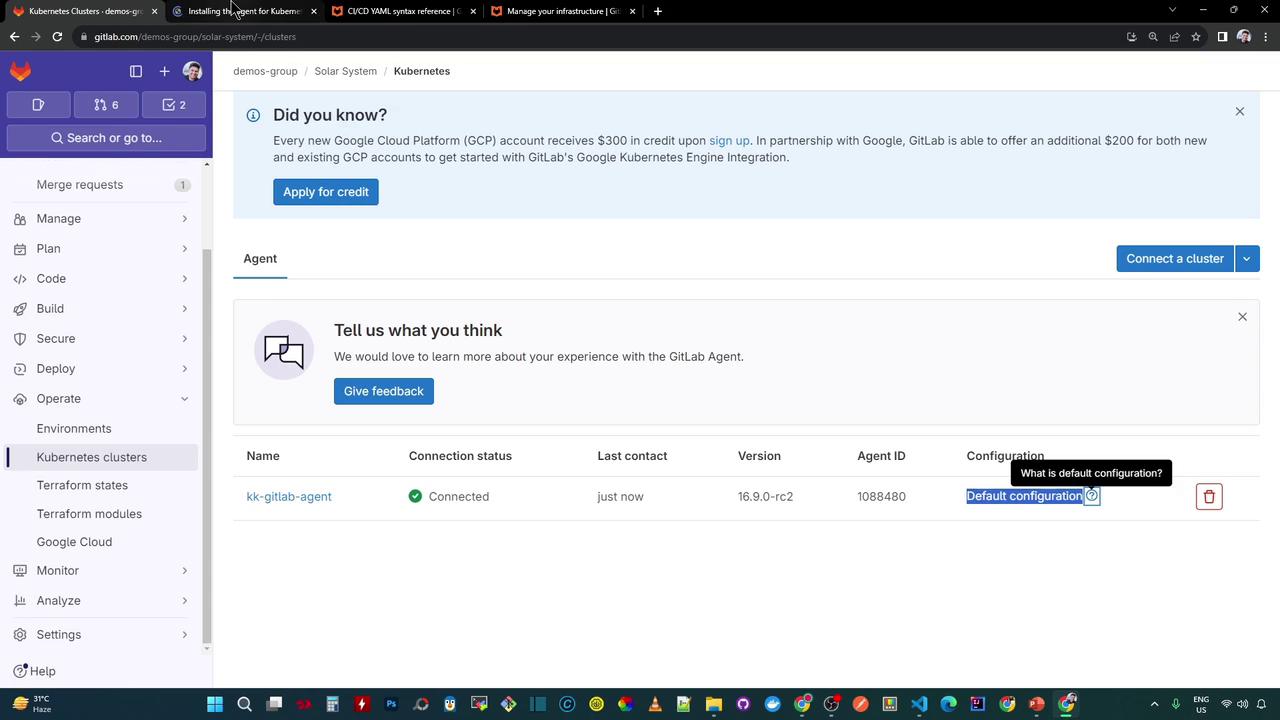
By default, GitLab applies the agent’s built-in config. To customize it, create a file at:
```text theme={null}
.gitlab/agents/kk-gitlab-agent/config.yaml
```
Refer to the [official documentation](https://docs.gitlab.com/ee/user/clusters/agent/) for configuration options.
## Next Steps
* Define a custom `config.yaml` to enable GitOps and environment deployments
* Create and annotate environments to surface cluster metrics in the GitLab UI
Happy deploying!