> ## Documentation Index
> Fetch the complete documentation index at: https://notes.kodekloud.com/llms.txt
> Use this file to discover all available pages before exploring further.
# Demo Cloud Spanner Setup and Table Creation
> Guide to provisioning Cloud Spanner, creating an interleaved flights and bookings schema, adding indexes, inserting sample data, and running queries in Spanner Studio.
In this lesson you'll provision a Cloud Spanner instance, create a database, define a parent table and an interleaved child table, add secondary indexes, insert sample data, and run queries in Spanner Studio (the in-console SQL editor). The instructions assume you are signed in to the Google Cloud Console.
Getting started — create an instance
1. Open Cloud Spanner from the GCP Console (left menu or search bar) and click **Create Instance**.
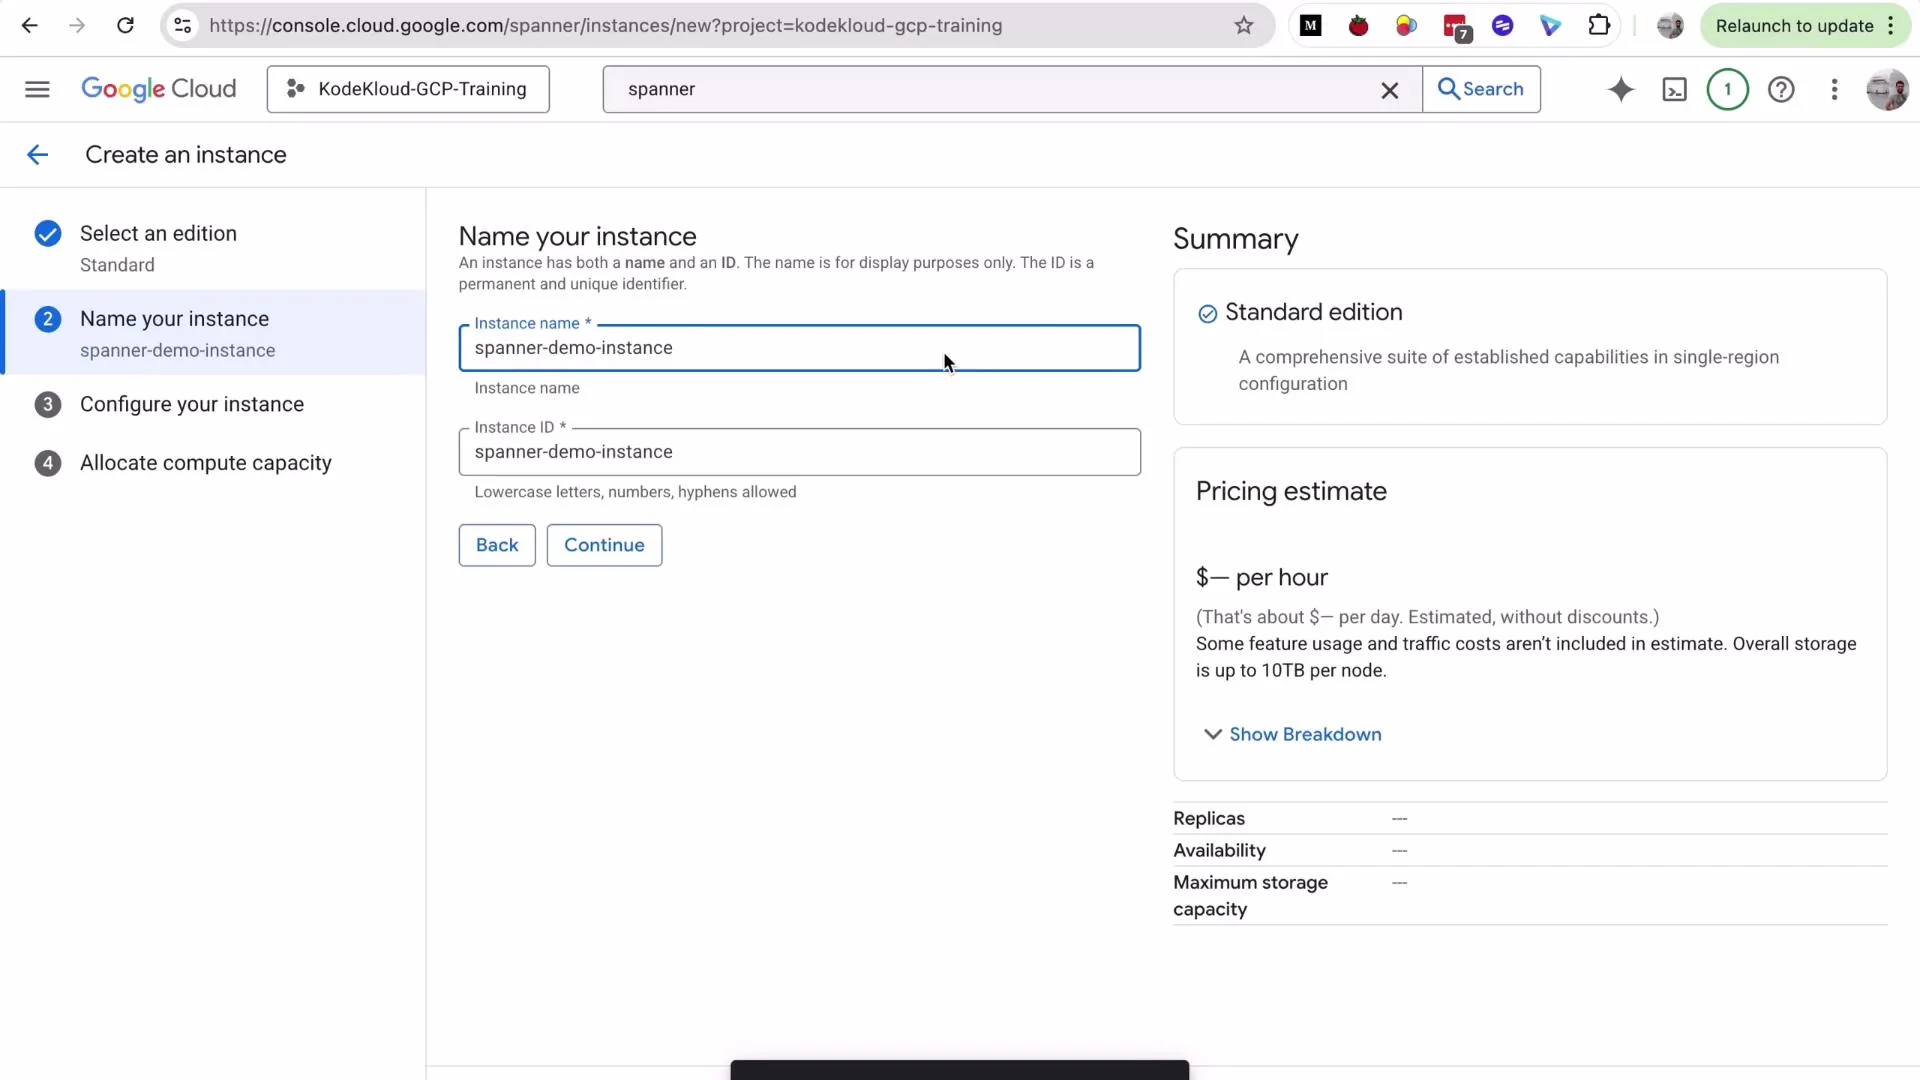 Steps on the Create Instance form:
1. Select the edition: choose **Standard** and click **Continue**.
2. Provide an instance name, e.g., `spanner-demo-instance` (the instance ID is auto-filled).
3. Choose a configuration: for this demo select **Regional -> `us-central1`**.
4. For processing units, keep the default for the demo (note: production commonly starts at 100 PUs).
5. Uncheck **Enable default backup schedule** for the demo (enable backups in production).
6. Click **Create**. Instance creation typically takes 2–5 minutes.
Regional configurations provide 99.99% availability and are a good default for development and staging. For higher availability across regions, choose a multi-region configuration (99.999% SLA) but be aware of the increased cost.
After creation, go to **All instances** and refresh to confirm the instance status.
Steps on the Create Instance form:
1. Select the edition: choose **Standard** and click **Continue**.
2. Provide an instance name, e.g., `spanner-demo-instance` (the instance ID is auto-filled).
3. Choose a configuration: for this demo select **Regional -> `us-central1`**.
4. For processing units, keep the default for the demo (note: production commonly starts at 100 PUs).
5. Uncheck **Enable default backup schedule** for the demo (enable backups in production).
6. Click **Create**. Instance creation typically takes 2–5 minutes.
Regional configurations provide 99.99% availability and are a good default for development and staging. For higher availability across regions, choose a multi-region configuration (99.999% SLA) but be aware of the increased cost.
After creation, go to **All instances** and refresh to confirm the instance status.
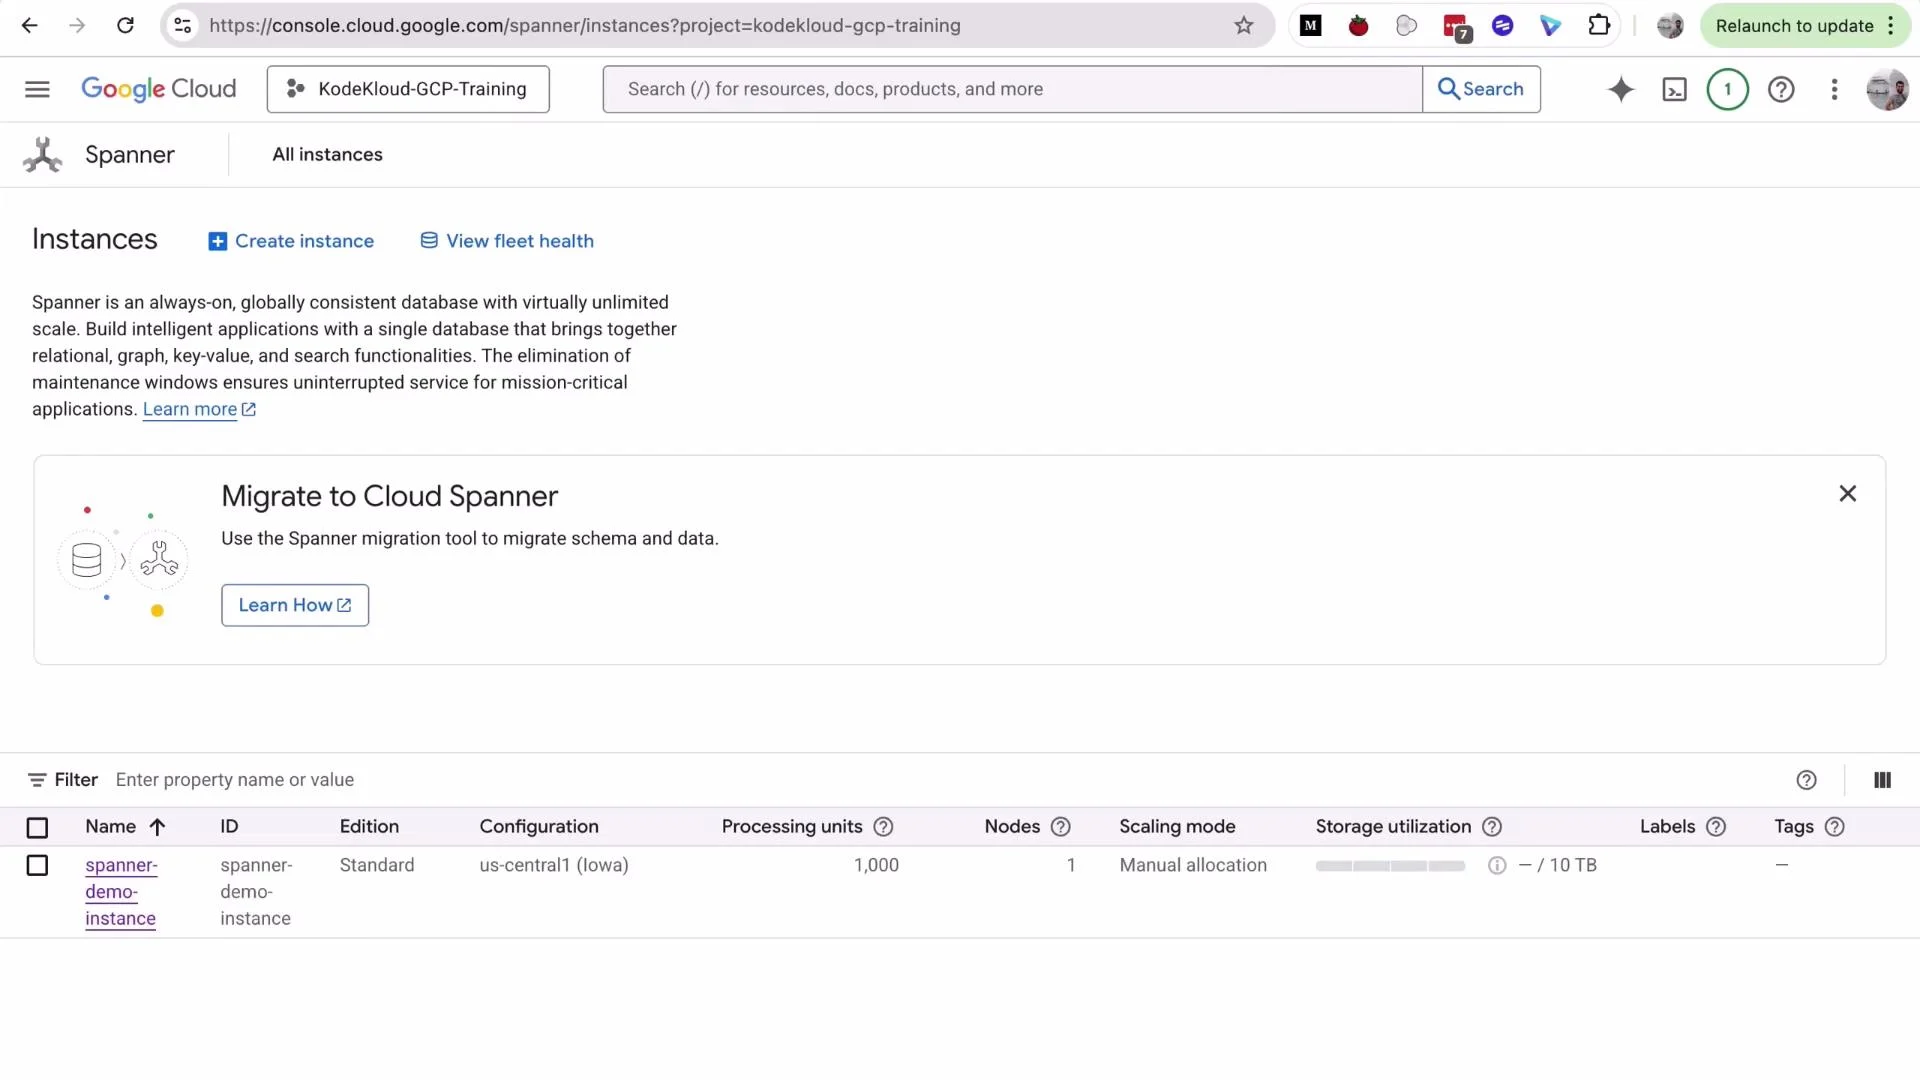 When the instance is **READY**, open it and click **Create Database**.
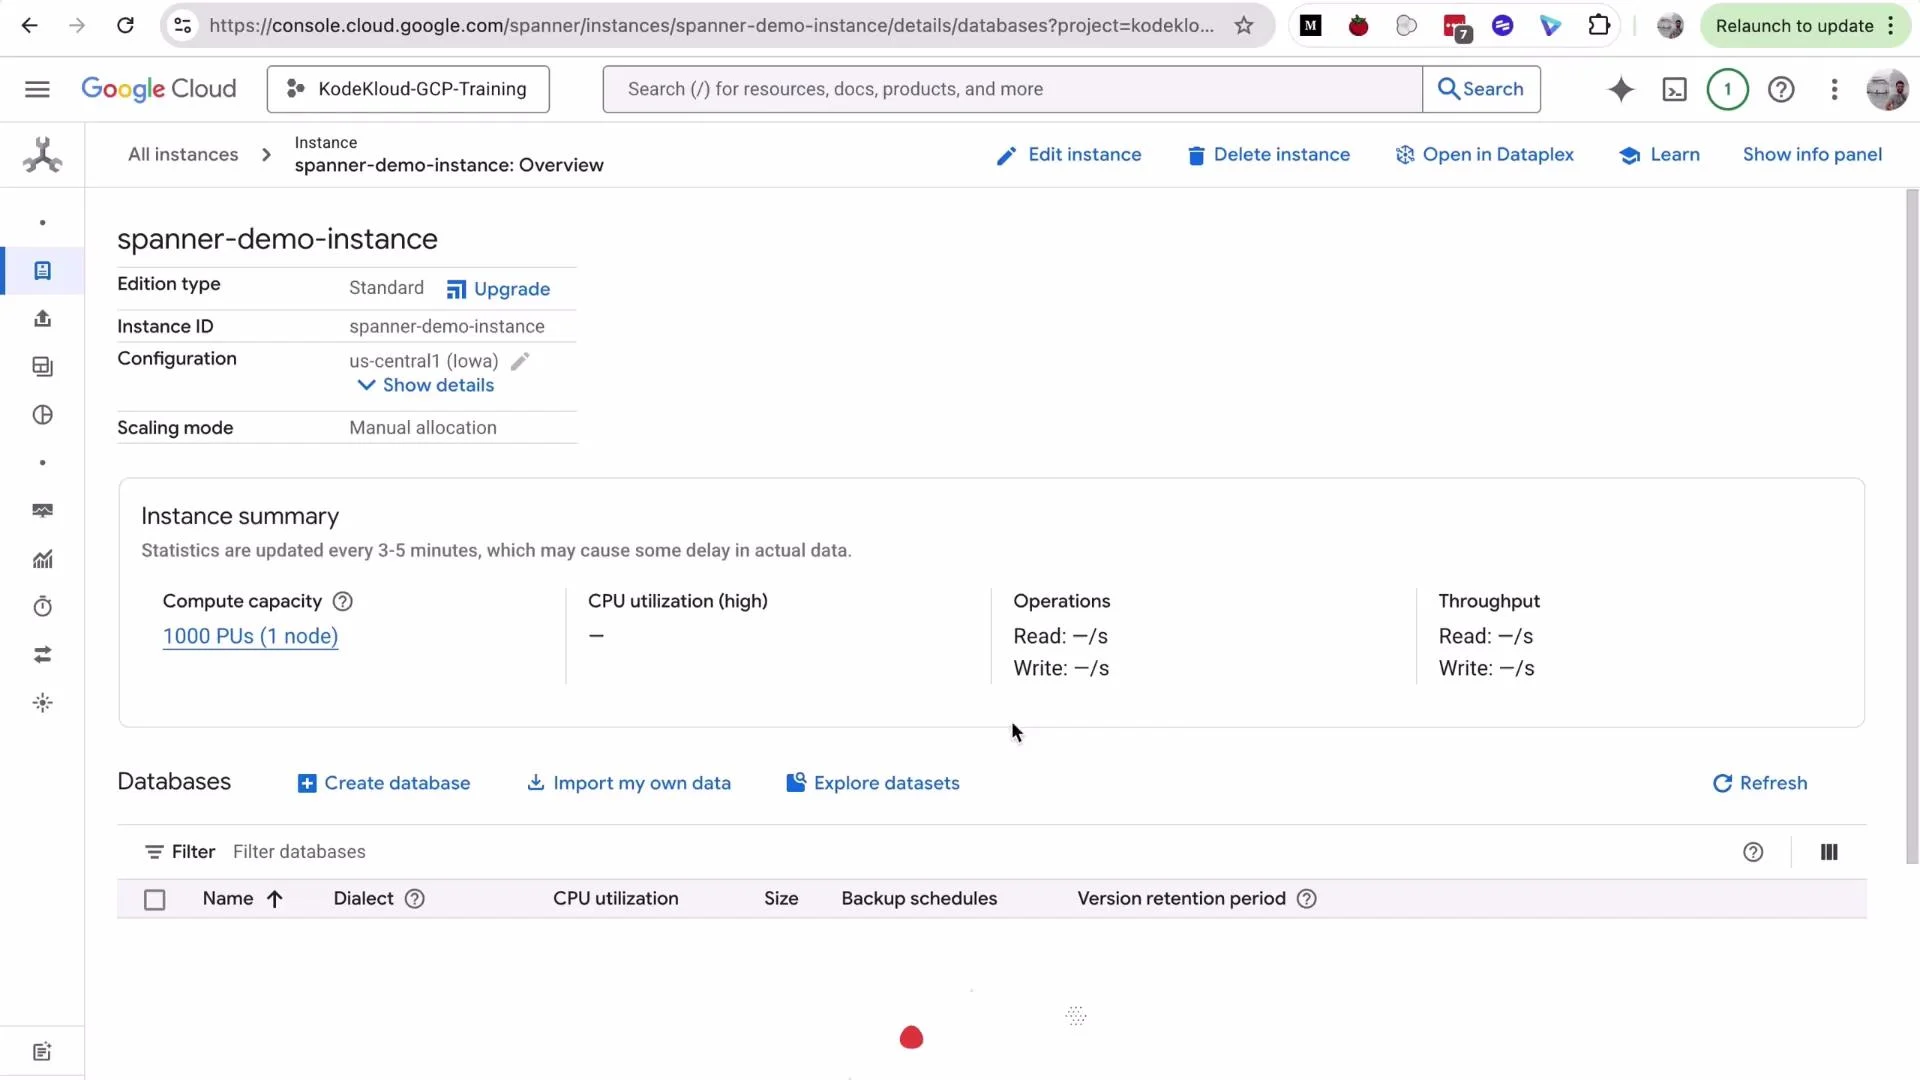 Database creation
* Name the database, for example `flightbookingdb`.
* Choose the SQL dialect: select **Google Standard SQL** (default). This dialect is based on SQL:2011 and is broadly compatible with PostgreSQL-style query syntax. A PostgreSQL dialect option exists if you need extra compatibility.
* Click **Create**.
Open Spanner Studio (the SQL editor) for the database to create tables and run queries. Spanner Studio submits SQL to your Spanner instance and shows results, execution plans, and schema.
Data types and best-fits
Use Cloud Spanner-compatible types when designing the schema. The table below summarizes common choices used in this demo.
| Purpose | Spanner type | Notes |
| ---------------------------------- | ------------: | --------------------------------------------------------------------------------- |
| Text | `STRING(MAX)` | Use for variable-length text. |
| Integers | `INT64` | 64-bit signed integers. |
| Timestamps | `TIMESTAMP` | Use with `OPTIONS (allow_commit_timestamp = true)` if you want commit timestamps. |
| Monetary / high-precision decimals | `NUMERIC` | Fixed-point numeric type. |
Create schema — parent and interleaved child table
We'll create a parent table named `flights` and an interleaved child table `booking`. Interleaving stores child rows physically with their parent, improving locality for parent-child queries.
Create the parent table `flights`:
```sql theme={null}
CREATE TABLE flights (
flight_id STRING(MAX) NOT NULL,
flight_number STRING(MAX),
airline STRING(MAX),
origin STRING(MAX),
destination STRING(MAX),
departure_time TIMESTAMP,
arrival_time TIMESTAMP,
aircraft STRING(MAX),
total_seats INT64,
available_seats INT64
) PRIMARY KEY (flight_id);
```
Create the child table `booking` interleaved in `flights`. Note the child primary key begins with the parent's primary key and that `created_at` allows commit timestamps:
```sql theme={null}
CREATE TABLE booking (
flight_id STRING(MAX) NOT NULL,
booking_id STRING(MAX) NOT NULL,
passenger_name STRING(MAX),
passenger_email STRING(MAX),
seat_number STRING(MAX),
booking_class STRING(MAX),
booking_status STRING(MAX),
booking_date TIMESTAMP,
total_amount NUMERIC,
created_at TIMESTAMP OPTIONS (allow_commit_timestamp = true)
) PRIMARY KEY (flight_id, booking_id),
INTERLEAVE IN PARENT flights ON DELETE CASCADE;
```
Why this schema?
* `PRIMARY KEY (flight_id, booking_id)` groups bookings under a flight and ensures uniqueness per booking.
* `INTERLEAVE IN PARENT` places child rows alongside parent rows on storage, improving query performance for parent-child lookups and reducing cross-partition traffic.
* `ON DELETE CASCADE` automatically removes child rows when the parent flight is deleted.
* `created_at ... allow_commit_timestamp = true` enables use of `PENDING_COMMIT_TIMESTAMP()` in INSERTs so the timestamp is set to the actual transaction commit time.
Create secondary indexes
Secondary indexes accelerate lookups by non-primary-key columns. Spanner maintains indexes automatically and chooses them in query plans as appropriate.
```sql theme={null}
CREATE INDEX bookings_by_email ON booking (passenger_email);
CREATE INDEX bookings_by_status ON booking (booking_status);
```
Verify the schema in Spanner Studio — you should see `flights`, `booking`, and the two indexes under the database schema.
Insert sample data
Insert sample flights into `flights`:
```sql theme={null}
INSERT INTO flights (
flight_id, flight_number, airline, origin, destination,
departure_time, arrival_time, aircraft, total_seats, available_seats
) VALUES
('FL1001', '1001', 'Acme Air', 'SFO', 'JFK', TIMESTAMP '2026-06-01T08:00:00Z', TIMESTAMP '2026-06-01T16:00:00Z', 'A320', 180, 180),
('FL1002', '1002', 'Acme Air', 'JFK', 'SFO', TIMESTAMP '2026-06-02T09:00:00Z', TIMESTAMP '2026-06-02T17:00:00Z', 'A320', 180, 180),
('FL1003', '1003', 'Contoso Airlines', 'SEA', 'LAX', TIMESTAMP '2026-06-03T07:30:00Z', TIMESTAMP '2026-06-03T09:30:00Z', '737', 160, 160);
```
Insert sample bookings. This example demonstrates `PENDING_COMMIT_TIMESTAMP()` for the `created_at` column:
```sql theme={null}
INSERT INTO booking (
flight_id, booking_id, passenger_name, passenger_email,
seat_number, booking_class, booking_status, booking_date,
total_amount, created_at
) VALUES
('FL1001', 'BKG001', 'Alice Smith', 'alice@example.com', '12A', 'Economy', 'CONFIRMED', TIMESTAMP '2026-05-01T10:00:00Z', 199.99, PENDING_COMMIT_TIMESTAMP()),
('FL1001', 'BKG002', 'Bob Jones', 'bob@example.com', '12B', 'Economy', 'CONFIRMED', TIMESTAMP '2026-05-01T10:05:00Z', 199.99, PENDING_COMMIT_TIMESTAMP()),
('FL1002', 'BKG003', 'Carol Lee', 'carol@example.com', '3C', 'Business', 'CONFIRMED', TIMESTAMP '2026-05-02T11:00:00Z', 599.00, PENDING_COMMIT_TIMESTAMP());
```
`PENDING_COMMIT_TIMESTAMP()` sets the timestamp to the transaction commit time. For this to work the TIMESTAMP column must be declared with `OPTIONS (allow_commit_timestamp = true)`. This is useful for audit trails and ensures all rows inserted in the same transaction share the exact same commit timestamp.
Run queries in Spanner Studio
Examples you can run immediately in Spanner Studio:
* Select all flights ordered by departure time:
```sql theme={null}
SELECT *
FROM flights
ORDER BY departure_time;
```
* Select bookings for a particular flight:
```sql theme={null}
SELECT *
FROM booking
WHERE flight_id = 'FL1001';
```
* Count total bookings:
```sql theme={null}
SELECT COUNT(*) AS total_bookings
FROM booking;
```
Use the Explain / Execution details in Spanner Studio to inspect query plans, view scans, and see which indexes (if any) Spanner used.
Design notes and best practices
* Parent-child interleaving: child primary key must start with the parent primary key. This enables efficient locality and reduces cross-partition queries for parent-child access patterns.
* Use interleaving for high-volume, locality-sensitive workloads (e.g., many bookings per flight). For small test datasets, the benefits may be less visible but become significant at scale.
* Plan primary keys and access patterns carefully before deploying large distributed workloads; changing primary keys later is not straightforward.
* Add secondary indexes selectively—indexes speed reads but add write overhead and storage costs. Choose indexes based on query patterns and cardinality.
* Enable backups and monitoring in production. Use IAM roles to restrict who can modify schema and run administrative operations.
References and further reading
* Cloud Spanner documentation: [https://cloud.google.com/spanner/docs](https://cloud.google.com/spanner/docs)
* Spanner SQL reference: [https://cloud.google.com/spanner/docs/query-syntax](https://cloud.google.com/spanner/docs/query-syntax)
* Designing schemas for Cloud Spanner: [https://cloud.google.com/spanner/docs/schema-design](https://cloud.google.com/spanner/docs/schema-design)
That concludes this walkthrough on setting up Cloud Spanner, creating an interleaved schema, adding indexes, inserting sample data, and running queries in Spanner Studio.
Database creation
* Name the database, for example `flightbookingdb`.
* Choose the SQL dialect: select **Google Standard SQL** (default). This dialect is based on SQL:2011 and is broadly compatible with PostgreSQL-style query syntax. A PostgreSQL dialect option exists if you need extra compatibility.
* Click **Create**.
Open Spanner Studio (the SQL editor) for the database to create tables and run queries. Spanner Studio submits SQL to your Spanner instance and shows results, execution plans, and schema.
Data types and best-fits
Use Cloud Spanner-compatible types when designing the schema. The table below summarizes common choices used in this demo.
| Purpose | Spanner type | Notes |
| ---------------------------------- | ------------: | --------------------------------------------------------------------------------- |
| Text | `STRING(MAX)` | Use for variable-length text. |
| Integers | `INT64` | 64-bit signed integers. |
| Timestamps | `TIMESTAMP` | Use with `OPTIONS (allow_commit_timestamp = true)` if you want commit timestamps. |
| Monetary / high-precision decimals | `NUMERIC` | Fixed-point numeric type. |
Create schema — parent and interleaved child table
We'll create a parent table named `flights` and an interleaved child table `booking`. Interleaving stores child rows physically with their parent, improving locality for parent-child queries.
Create the parent table `flights`:
```sql theme={null}
CREATE TABLE flights (
flight_id STRING(MAX) NOT NULL,
flight_number STRING(MAX),
airline STRING(MAX),
origin STRING(MAX),
destination STRING(MAX),
departure_time TIMESTAMP,
arrival_time TIMESTAMP,
aircraft STRING(MAX),
total_seats INT64,
available_seats INT64
) PRIMARY KEY (flight_id);
```
Create the child table `booking` interleaved in `flights`. Note the child primary key begins with the parent's primary key and that `created_at` allows commit timestamps:
```sql theme={null}
CREATE TABLE booking (
flight_id STRING(MAX) NOT NULL,
booking_id STRING(MAX) NOT NULL,
passenger_name STRING(MAX),
passenger_email STRING(MAX),
seat_number STRING(MAX),
booking_class STRING(MAX),
booking_status STRING(MAX),
booking_date TIMESTAMP,
total_amount NUMERIC,
created_at TIMESTAMP OPTIONS (allow_commit_timestamp = true)
) PRIMARY KEY (flight_id, booking_id),
INTERLEAVE IN PARENT flights ON DELETE CASCADE;
```
Why this schema?
* `PRIMARY KEY (flight_id, booking_id)` groups bookings under a flight and ensures uniqueness per booking.
* `INTERLEAVE IN PARENT` places child rows alongside parent rows on storage, improving query performance for parent-child lookups and reducing cross-partition traffic.
* `ON DELETE CASCADE` automatically removes child rows when the parent flight is deleted.
* `created_at ... allow_commit_timestamp = true` enables use of `PENDING_COMMIT_TIMESTAMP()` in INSERTs so the timestamp is set to the actual transaction commit time.
Create secondary indexes
Secondary indexes accelerate lookups by non-primary-key columns. Spanner maintains indexes automatically and chooses them in query plans as appropriate.
```sql theme={null}
CREATE INDEX bookings_by_email ON booking (passenger_email);
CREATE INDEX bookings_by_status ON booking (booking_status);
```
Verify the schema in Spanner Studio — you should see `flights`, `booking`, and the two indexes under the database schema.
Insert sample data
Insert sample flights into `flights`:
```sql theme={null}
INSERT INTO flights (
flight_id, flight_number, airline, origin, destination,
departure_time, arrival_time, aircraft, total_seats, available_seats
) VALUES
('FL1001', '1001', 'Acme Air', 'SFO', 'JFK', TIMESTAMP '2026-06-01T08:00:00Z', TIMESTAMP '2026-06-01T16:00:00Z', 'A320', 180, 180),
('FL1002', '1002', 'Acme Air', 'JFK', 'SFO', TIMESTAMP '2026-06-02T09:00:00Z', TIMESTAMP '2026-06-02T17:00:00Z', 'A320', 180, 180),
('FL1003', '1003', 'Contoso Airlines', 'SEA', 'LAX', TIMESTAMP '2026-06-03T07:30:00Z', TIMESTAMP '2026-06-03T09:30:00Z', '737', 160, 160);
```
Insert sample bookings. This example demonstrates `PENDING_COMMIT_TIMESTAMP()` for the `created_at` column:
```sql theme={null}
INSERT INTO booking (
flight_id, booking_id, passenger_name, passenger_email,
seat_number, booking_class, booking_status, booking_date,
total_amount, created_at
) VALUES
('FL1001', 'BKG001', 'Alice Smith', 'alice@example.com', '12A', 'Economy', 'CONFIRMED', TIMESTAMP '2026-05-01T10:00:00Z', 199.99, PENDING_COMMIT_TIMESTAMP()),
('FL1001', 'BKG002', 'Bob Jones', 'bob@example.com', '12B', 'Economy', 'CONFIRMED', TIMESTAMP '2026-05-01T10:05:00Z', 199.99, PENDING_COMMIT_TIMESTAMP()),
('FL1002', 'BKG003', 'Carol Lee', 'carol@example.com', '3C', 'Business', 'CONFIRMED', TIMESTAMP '2026-05-02T11:00:00Z', 599.00, PENDING_COMMIT_TIMESTAMP());
```
`PENDING_COMMIT_TIMESTAMP()` sets the timestamp to the transaction commit time. For this to work the TIMESTAMP column must be declared with `OPTIONS (allow_commit_timestamp = true)`. This is useful for audit trails and ensures all rows inserted in the same transaction share the exact same commit timestamp.
Run queries in Spanner Studio
Examples you can run immediately in Spanner Studio:
* Select all flights ordered by departure time:
```sql theme={null}
SELECT *
FROM flights
ORDER BY departure_time;
```
* Select bookings for a particular flight:
```sql theme={null}
SELECT *
FROM booking
WHERE flight_id = 'FL1001';
```
* Count total bookings:
```sql theme={null}
SELECT COUNT(*) AS total_bookings
FROM booking;
```
Use the Explain / Execution details in Spanner Studio to inspect query plans, view scans, and see which indexes (if any) Spanner used.
Design notes and best practices
* Parent-child interleaving: child primary key must start with the parent primary key. This enables efficient locality and reduces cross-partition queries for parent-child access patterns.
* Use interleaving for high-volume, locality-sensitive workloads (e.g., many bookings per flight). For small test datasets, the benefits may be less visible but become significant at scale.
* Plan primary keys and access patterns carefully before deploying large distributed workloads; changing primary keys later is not straightforward.
* Add secondary indexes selectively—indexes speed reads but add write overhead and storage costs. Choose indexes based on query patterns and cardinality.
* Enable backups and monitoring in production. Use IAM roles to restrict who can modify schema and run administrative operations.
References and further reading
* Cloud Spanner documentation: [https://cloud.google.com/spanner/docs](https://cloud.google.com/spanner/docs)
* Spanner SQL reference: [https://cloud.google.com/spanner/docs/query-syntax](https://cloud.google.com/spanner/docs/query-syntax)
* Designing schemas for Cloud Spanner: [https://cloud.google.com/spanner/docs/schema-design](https://cloud.google.com/spanner/docs/schema-design)
That concludes this walkthrough on setting up Cloud Spanner, creating an interleaved schema, adding indexes, inserting sample data, and running queries in Spanner Studio.