> ## Documentation Index
> Fetch the complete documentation index at: https://notes.kodekloud.com/llms.txt
> Use this file to discover all available pages before exploring further.
# Deploy the docker image manually using Console on ECS
> Step-by-step guide to deploy a Docker image to AWS ECS Fargate using the console by creating task definitions, container definitions, services, optional Application Load Balancer, and testing the app.
Welcome! In this hands-on lesson you'll deploy an existing Docker image to an AWS ECS cluster running on Fargate. We’ll create and register a task definition, then run it as a Fargate service (optionally behind an Application Load Balancer). Finally, you’ll test the app through the ALB or service endpoint.
## Prerequisites
* An ECS cluster already created and set to run Fargate tasks.
* Your Docker image pushed to Amazon ECR.
* A VPC and subnets configured for Fargate (and ALB if you plan to expose HTTP traffic).
* IAM permissions to create task definitions, roles, and services.
## Step 1 — Create a new Task Definition
1. Open the ECS console and select **Task Definitions**.
2. Click **Create new task definition** and give it a name (for example, `Crypto App`).
3. For Launch type / infrastructure choose **AWS Fargate**.
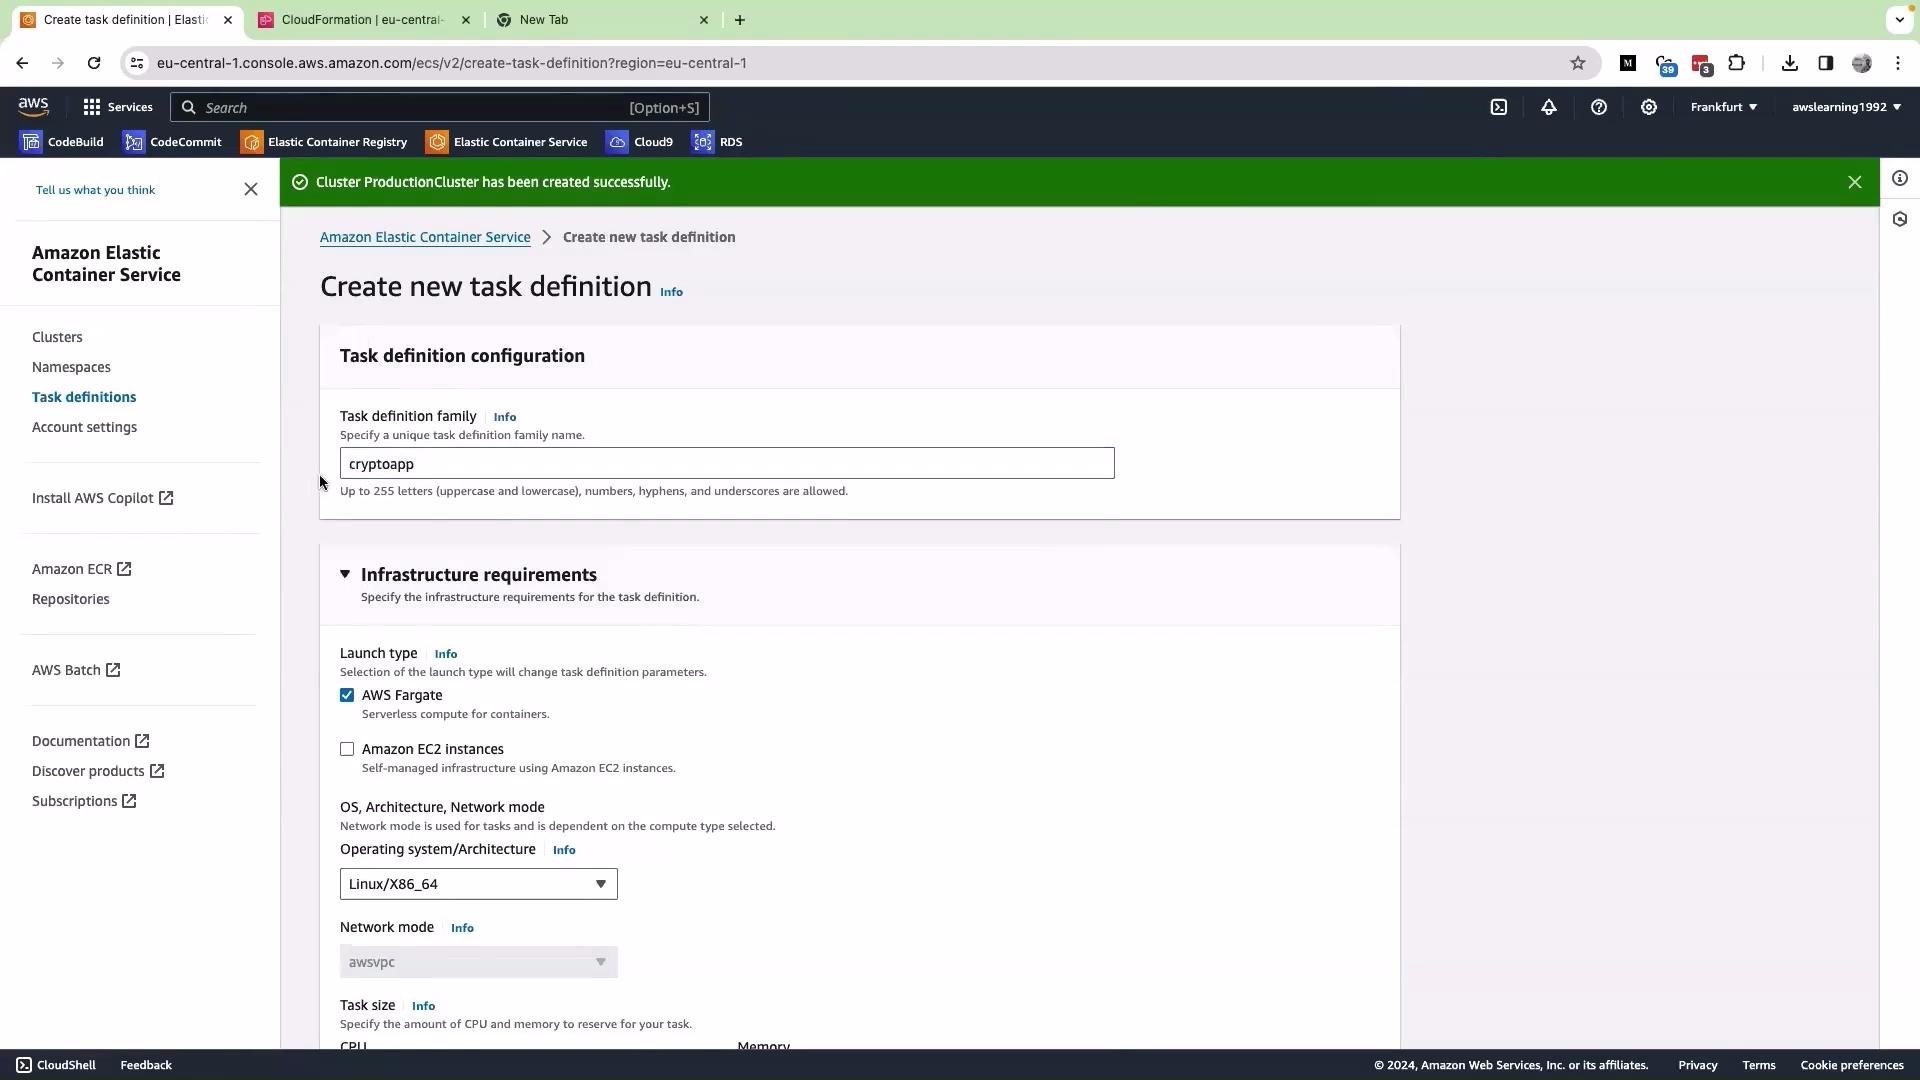 Leave OS / architecture at the default values unless you have specific requirements. Choose CPU and memory sizing according to your app’s resource needs.
### Task role vs Task execution role
* Task role: assumed by the application container when it calls AWS APIs directly (for example, to access S3 or DynamoDB).
* Task execution role: used by the ECS agent to pull images from ECR and send logs to CloudWatch.
If you do not have a task role already, you can leave Task role as `None`. For the task execution role, choose **Create a new role** so ECS can attach the permissions required to pull images and manage logs.
## Step 2 — Add a Container Definition
Scroll down and add a container definition:
* Name the container (e.g., `crypto-app`).
* Provide the container image URI from ECR.
Leave OS / architecture at the default values unless you have specific requirements. Choose CPU and memory sizing according to your app’s resource needs.
### Task role vs Task execution role
* Task role: assumed by the application container when it calls AWS APIs directly (for example, to access S3 or DynamoDB).
* Task execution role: used by the ECS agent to pull images from ECR and send logs to CloudWatch.
If you do not have a task role already, you can leave Task role as `None`. For the task execution role, choose **Create a new role** so ECS can attach the permissions required to pull images and manage logs.
## Step 2 — Add a Container Definition
Scroll down and add a container definition:
* Name the container (e.g., `crypto-app`).
* Provide the container image URI from ECR.
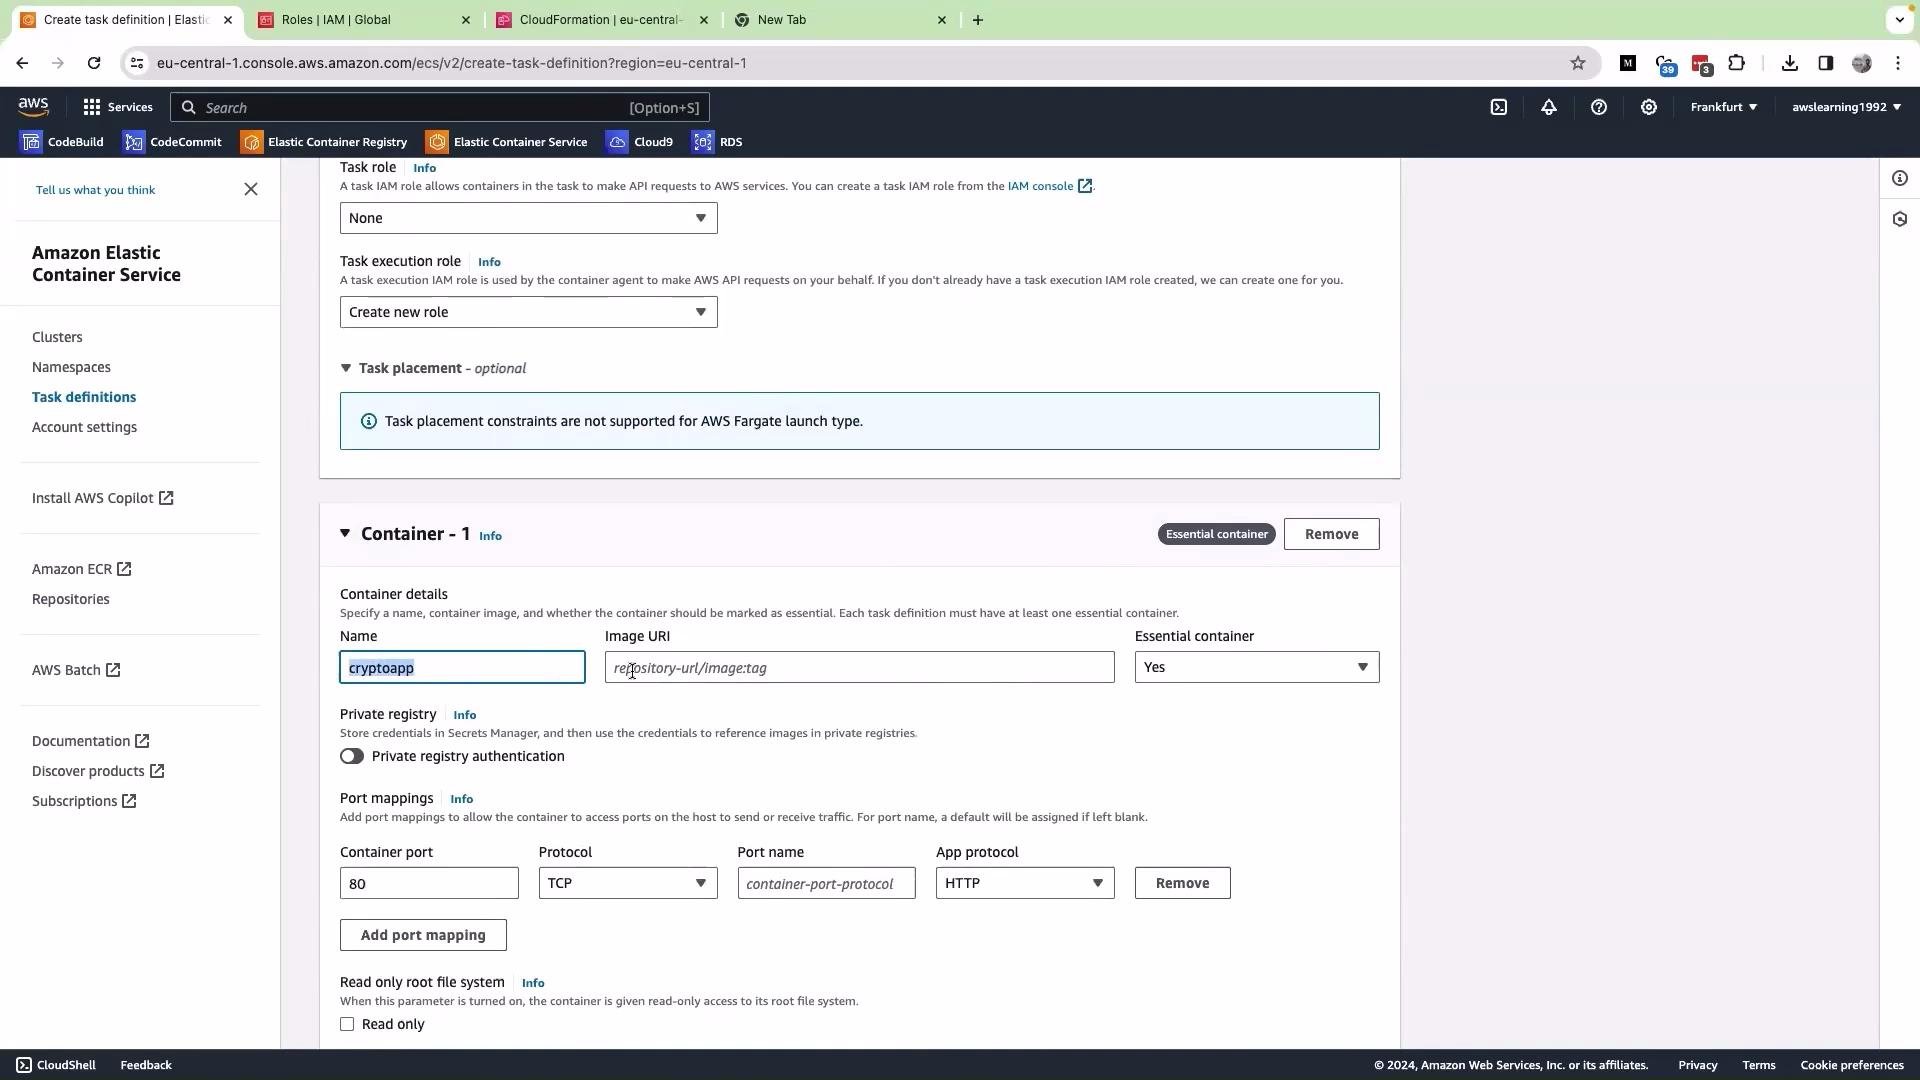 To obtain the image URI:
1. Open your ECR repository.
2. Locate the desired image tag and copy the image URI.\
Example:
`123456789012.dkr.ecr..amazonaws.com/:`
Paste that URI into the container image field in the task definition.
## Step 3 — Configure Ports and Health Checks
* Set the container port to the port your application listens on (e.g., a Flask app commonly uses `5000`).
* If exposing via an Application Load Balancer (ALB) on port `80`, configure the ALB target group to use the container port (for example, `5000`) and forward traffic from port `80` to the target group.
* Configure container health checks or ALB health checks to point at the correct path and port (for example, `/health` on port `5000`).
Note: ECS/Fargate does not require port `80` internally—only the ALB listener typically uses `80`/`443`. Ensure your security groups allow the ALB to reach the container port.
Tip: For predictable behavior, configure both container health checks and ALB health checks to the same path. This simplifies troubleshooting when a service fails to reach a healthy state.
Leave resource limits and any advanced settings according to your workload, then create the task definition.
## Step 4 — Register and Run the Task / Create a Service
After creating the task definition:
* Register it (the console does this as part of creation).
* Create a new Fargate service in your cluster using that task definition.
If you want external HTTP access:
* Create or select an ALB.
* Create a target group with the container port (e.g., `5000`).
* Attach the Fargate service to that target group.
* Configure the ALB listener to forward from port `80` (or `443`) to the target group.
Once the service is created and tasks are running, open the ALB DNS name or the service URL in your browser to test the application.
## Example: Testing the deployed app
In this lesson we performed a simple functional test:
* Opened the app, filled the order form (name, address, quantity), and clicked **Submit Order**.
* Returned to the product page and verified the expected app flow and responses.
This confirmed the container was running correctly on ECS Fargate and integrated with the ALB and backend services.
## Architecture summary
| Component | Purpose | Example / Notes |
| --------------------- | ---------------------------------------- | ---------------------------------------------------------- |
| ECR | Stores Docker images | `123456789012.dkr.ecr..amazonaws.com/:` |
| ECS Task Definition | Describes container runtime settings | Contains container image, port mappings, resource limits |
| ECS Service (Fargate) | Runs and maintains desired task count | Integrates with ALB target groups for traffic |
| ALB (optional) | External HTTP(S) traffic + health checks | Listener forwards from `80`/`443` to target group |
| IAM Task Role | App permissions for AWS APIs | Optional—only if container calls AWS directly |
| IAM Execution Role | Permissions to pull images and push logs | Required for ECR pull and CloudWatch logs |
## Troubleshooting checklist
* Confirm the task execution role has ECR pull and CloudWatch permissions.
* Verify security groups allow ALB-to-task traffic on the container port.
* Check target group health checks and ECS container health checks for correct path and port.
* Review CloudWatch logs for container startup errors.
* Ensure the image URI and tag match what’s present in ECR.
## Further reading and references
* [Amazon ECS Documentation](https://docs.aws.amazon.com/ecs/latest/developerguide/what-is-amazon-ecs.html)
* [Amazon ECR Documentation](https://docs.aws.amazon.com/AmazonECR/latest/userguide/what-is-ecr.html)
* [Application Load Balancer Overview](https://docs.aws.amazon.com/elasticloadbalancing/latest/application/introduction.html)
That completes this lesson. See you in the next one!
To obtain the image URI:
1. Open your ECR repository.
2. Locate the desired image tag and copy the image URI.\
Example:
`123456789012.dkr.ecr..amazonaws.com/:`
Paste that URI into the container image field in the task definition.
## Step 3 — Configure Ports and Health Checks
* Set the container port to the port your application listens on (e.g., a Flask app commonly uses `5000`).
* If exposing via an Application Load Balancer (ALB) on port `80`, configure the ALB target group to use the container port (for example, `5000`) and forward traffic from port `80` to the target group.
* Configure container health checks or ALB health checks to point at the correct path and port (for example, `/health` on port `5000`).
Note: ECS/Fargate does not require port `80` internally—only the ALB listener typically uses `80`/`443`. Ensure your security groups allow the ALB to reach the container port.
Tip: For predictable behavior, configure both container health checks and ALB health checks to the same path. This simplifies troubleshooting when a service fails to reach a healthy state.
Leave resource limits and any advanced settings according to your workload, then create the task definition.
## Step 4 — Register and Run the Task / Create a Service
After creating the task definition:
* Register it (the console does this as part of creation).
* Create a new Fargate service in your cluster using that task definition.
If you want external HTTP access:
* Create or select an ALB.
* Create a target group with the container port (e.g., `5000`).
* Attach the Fargate service to that target group.
* Configure the ALB listener to forward from port `80` (or `443`) to the target group.
Once the service is created and tasks are running, open the ALB DNS name or the service URL in your browser to test the application.
## Example: Testing the deployed app
In this lesson we performed a simple functional test:
* Opened the app, filled the order form (name, address, quantity), and clicked **Submit Order**.
* Returned to the product page and verified the expected app flow and responses.
This confirmed the container was running correctly on ECS Fargate and integrated with the ALB and backend services.
## Architecture summary
| Component | Purpose | Example / Notes |
| --------------------- | ---------------------------------------- | ---------------------------------------------------------- |
| ECR | Stores Docker images | `123456789012.dkr.ecr..amazonaws.com/:` |
| ECS Task Definition | Describes container runtime settings | Contains container image, port mappings, resource limits |
| ECS Service (Fargate) | Runs and maintains desired task count | Integrates with ALB target groups for traffic |
| ALB (optional) | External HTTP(S) traffic + health checks | Listener forwards from `80`/`443` to target group |
| IAM Task Role | App permissions for AWS APIs | Optional—only if container calls AWS directly |
| IAM Execution Role | Permissions to pull images and push logs | Required for ECR pull and CloudWatch logs |
## Troubleshooting checklist
* Confirm the task execution role has ECR pull and CloudWatch permissions.
* Verify security groups allow ALB-to-task traffic on the container port.
* Check target group health checks and ECS container health checks for correct path and port.
* Review CloudWatch logs for container startup errors.
* Ensure the image URI and tag match what’s present in ECR.
## Further reading and references
* [Amazon ECS Documentation](https://docs.aws.amazon.com/ecs/latest/developerguide/what-is-amazon-ecs.html)
* [Amazon ECR Documentation](https://docs.aws.amazon.com/AmazonECR/latest/userguide/what-is-ecr.html)
* [Application Load Balancer Overview](https://docs.aws.amazon.com/elasticloadbalancing/latest/application/introduction.html)
That completes this lesson. See you in the next one!