> ## Documentation Index
> Fetch the complete documentation index at: https://notes.kodekloud.com/llms.txt
> Use this file to discover all available pages before exploring further.

# Continuous deployment of both application

> Implementing continuous deployment for two microservices using AWS CodeCommit, CodePipeline, CodeBuild, and ECS to automatically build, deploy, and verify UI updates.

Welcome back. In this lesson we implement continuous deployment for both microservices and verify that commits pushed to each repository are automatically built and deployed to ECS via CodePipeline — without manual intervention.

## Overview

The original monolithic application has been split into independent microservices. Each microservice lives in its own repository and is built, tested, and deployed independently. This architecture enables faster releases, isolation of failures, and autonomy for different teams.

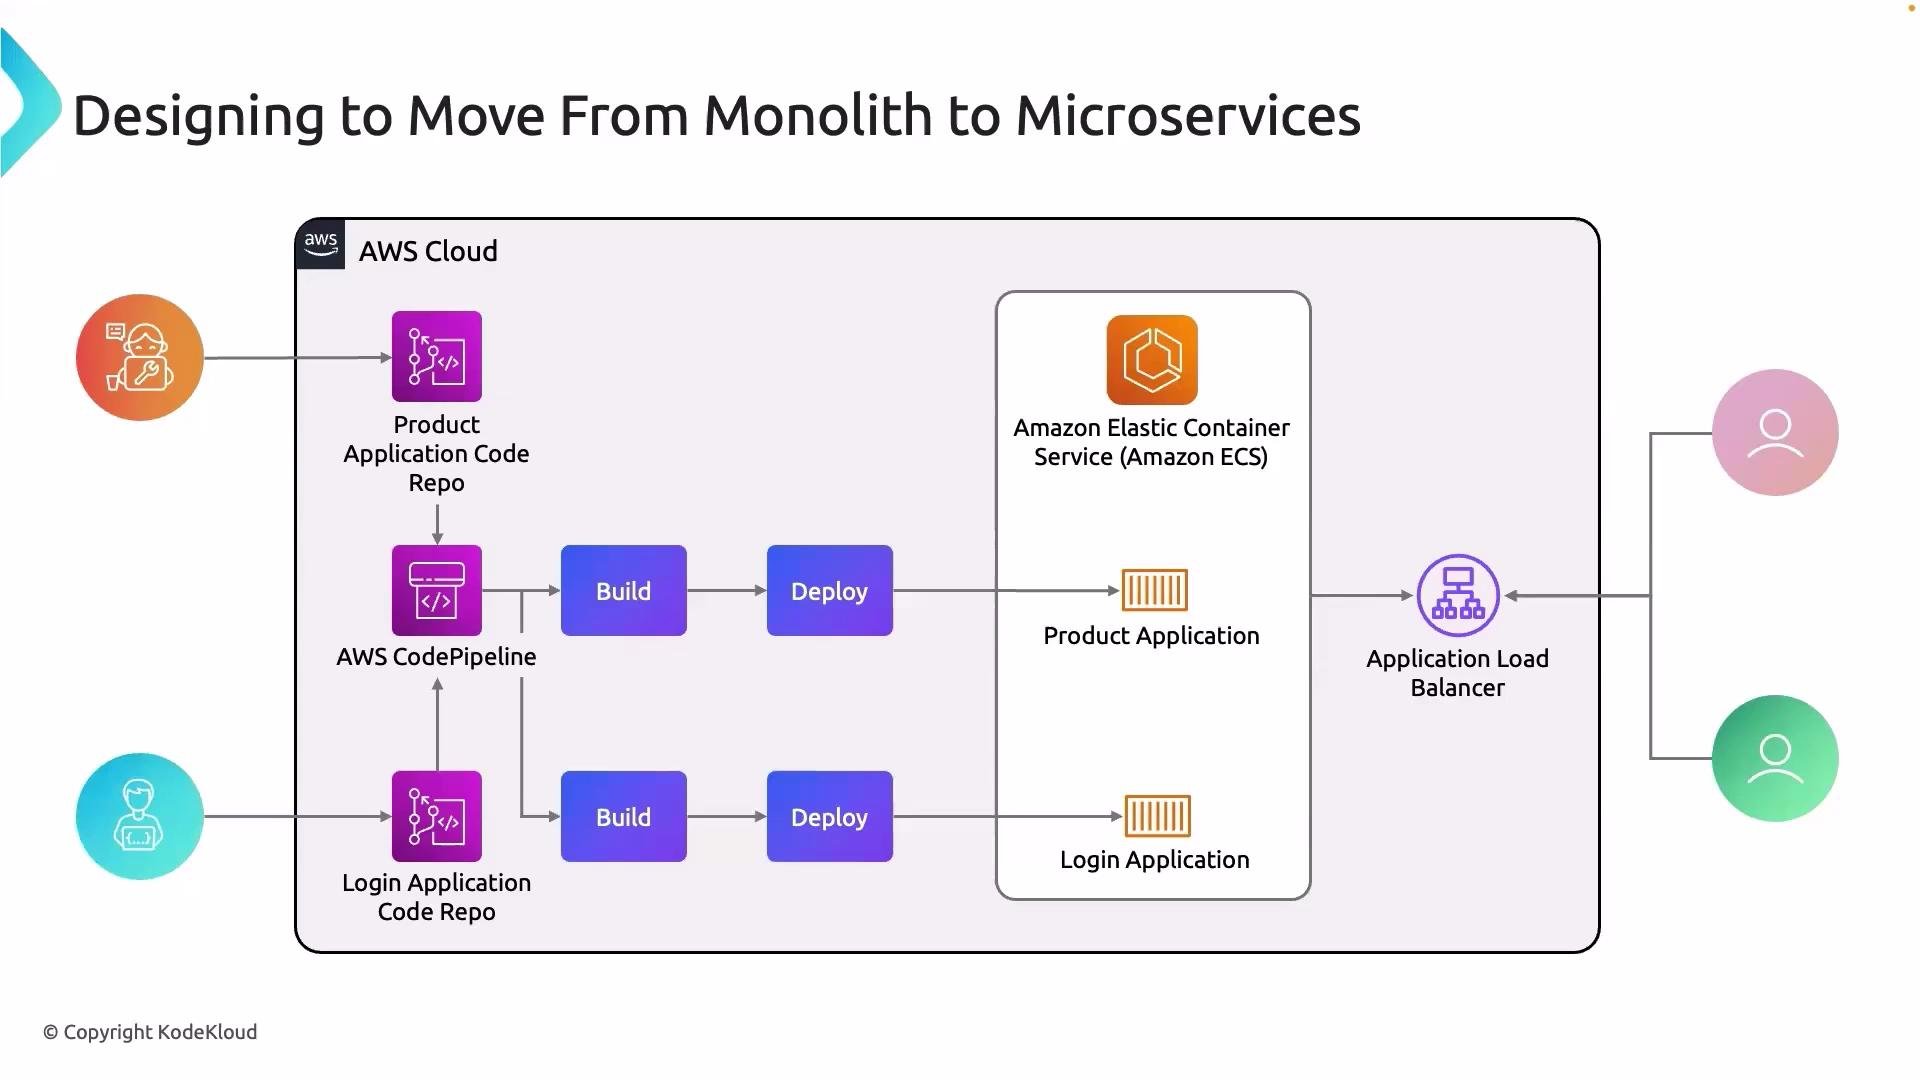
Below is a diagram that illustrates the migration from a monolith to microservices and how AWS CodePipeline and Amazon ECS work together in the CI/CD flow.

<Frame>
  <img src="https://mintcdn.com/kodekloud-c4ac6d9a/1ccKtG7aZllQmXlF/images/Hands-On-AWS-Project-Deploy-Your-First-Crypto-App/Monolith-to-Microservice-design/Continuous-deployment-of-both-application/monolithic-to-microservices-aws-diagram.jpg?fit=max&auto=format&n=1ccKtG7aZllQmXlF&q=85&s=169310b969dc0214b8668a18630e0313" alt="The image illustrates the process of moving from a monolithic architecture to microservices using AWS Cloud services. It shows how applications are built and deployed via AWS CodePipeline and Amazon Elastic Container Service, with an Application Load Balancer distributing traffic." width="1920" height="1080" data-path="images/Hands-On-AWS-Project-Deploy-Your-First-Crypto-App/Monolith-to-Microservice-design/Continuous-deployment-of-both-application/monolithic-to-microservices-aws-diagram.jpg" />
</Frame>

What we'll do in this lesson:

* Make small UI changes to the product page and the login page.
* Commit and push those changes to each microservice repository.
* Watch CodePipeline detect the changes, build Docker images, and update the ECS services.
* Verify the new versions are served by the Application Load Balancer.

## Changes made

I used the Cloud9 IDE to edit both microservice repositories. Below are the final files I saved for each service.

### Product microservice — templates/product.html

This is the polished, production-ready product page that was committed to the product microservice repository:

```html theme={null}
<!DOCTYPE html>
<html>
<head>
    <meta charset="UTF-8">
    <meta name="viewport" content="width=device-width, initial-scale=1.0">
    <title>product.page</title>
    <link rel="stylesheet" href="{{ url_for('static', filename='css/project_styles.css') }}">
</head>
<body>
    <div class="container">
        <h1>NodeCloud Crypto Version 01</h1>
        <p>This is not actual crypto. This is just for learning purposes.</p>
    </div>

    <!-- Repeat this block for each product, just change the id and image source -->
    <div class="product" id="product1">
        <img src="{{ url_for('static', filename='images/product1.png') }}" alt="Product 1">
        <button onclick="window.location.href='/place_order?product=1';">ORDER NOW</button>
    </div>

    <div class="product" id="product2">
        <img src="{{ url_for('static', filename='images/product2.png') }}" alt="Product 2">
        <button onclick="window.location.href='/place_order?product=2';">ORDER NOW</button>
    </div>

    <div class="product" id="product3">
        <img src="{{ url_for('static', filename='images/product3.png') }}" alt="Product 3">
        <button onclick="window.location.href='/place_order?product=3';">ORDER NOW</button>
    </div>

    <div class="product" id="product4">
        <img src="{{ url_for('static', filename='images/product4.png') }}" alt="Product 4">
        <button onclick="window.location.href='/place_order?product=4';">ORDER NOW</button>
    </div>

    <div class="product" id="product5">
        <img src="{{ url_for('static', filename='images/product5.png') }}" alt="Product 5">
        <button onclick="window.location.href='/place_order?product=5';">ORDER NOW</button>
    </div>
</body>
</html>
```

### Login microservice — templates/login.html

I updated the login button text and improved inline styles for clarity. The final saved `login.html`:

```html theme={null}
<!DOCTYPE html>
<html>
<head>
    <meta charset="utf-8">
    <title>Login</title>
    <style>
        body {
            width: 100%;
            padding: 10px;
            border: 4px solid #007f7f;
            background-color: #007f7f;
            color: white;
            box-sizing: border-box;
        }
        input {
            display: block;
            margin: 8px 0;
            padding: 8px;
        }
        button[type="submit"] {
            background-color: #00563c;
            color: white;
            padding: 8px 12px;
            border: none;
            cursor: pointer;
        }
        button[type="submit"]:hover {
            opacity: 0.9;
        }
    </style>
</head>
<body>
    <form action="/login" method="post">
        <input type="email" name="email" placeholder="Email" required>
        <input type="password" name="password" placeholder="Password" required>
        <button type="submit">Application login</button>
    </form>
</body>
</html>
```

## Commit and push (triggering pipelines)

After editing the files, I staged, committed, and pushed changes in each repository from Cloud9. The push to AWS CodeCommit triggered the associated CodePipelines.

Product microservice — example terminal steps:

```bash theme={null}
# Check status, stage changes, commit and push
ec2-user@environment ~/aws-microservice-project (master) $ git status
Your branch is up to date with 'origin/master'.

Changes not staged for commit:
  modified: templates/product.html

ec2-user@environment ~/aws-microservice-project (master) $ git add .
ec2-user@environment ~/aws-microservice-project (master) $ git commit -m "Deploy product page v01"
[master abc1234] Deploy product page v01
 1 file changed, 60 insertions(+), 2 deletions(-)
ec2-user@environment ~/aws-microservice-project (master) $ git push origin master
Enumerating objects: 5, done.
Counting objects: 100% (5/5), done.
Delta compression using up to 2 threads
Compressing objects: 100% (3/3), done.
Writing objects: 100% (3/3), 1.20 KiB | 1.20 MiB/s, done.
Total 3 (delta 1), reused 0 (delta 0)
To https://git-codecommit.us-east-1.amazonaws.com/v1/repos/aws-microservice-project
   def5678..abc1234  master -> master
```

Login microservice — example terminal steps:

```bash theme={null}
ec2-user@environment ~/login-page-microservice (master) $ git status
On branch master
Your branch is up to date with 'origin/master'.

Changes not staged for commit:
  modified: templates/login.html

ec2-user@environment ~/login-page-microservice (master) $ git add .
ec2-user@environment ~/login-page-microservice (master) $ git commit -m "Update login button text"
[master def5678] Update login button text
 1 file changed, 22 insertions(+), 8 deletions(-)
ec2-user@environment ~/login-page-microservice (master) $ git push origin master
Counting objects: 6, done.
Delta compression using up to 2 threads
Compressing objects: 100% (3/3), done.
Writing objects: 100% (4/4), 1.05 KiB | 1.05 MiB/s, done.
Total 4 (delta 1), reused 0 (delta 0)
To https://git-codecommit.us-east-1.amazonaws.com/v1/repos/login-page-microservice
   123abcd..def5678  master -> master
```

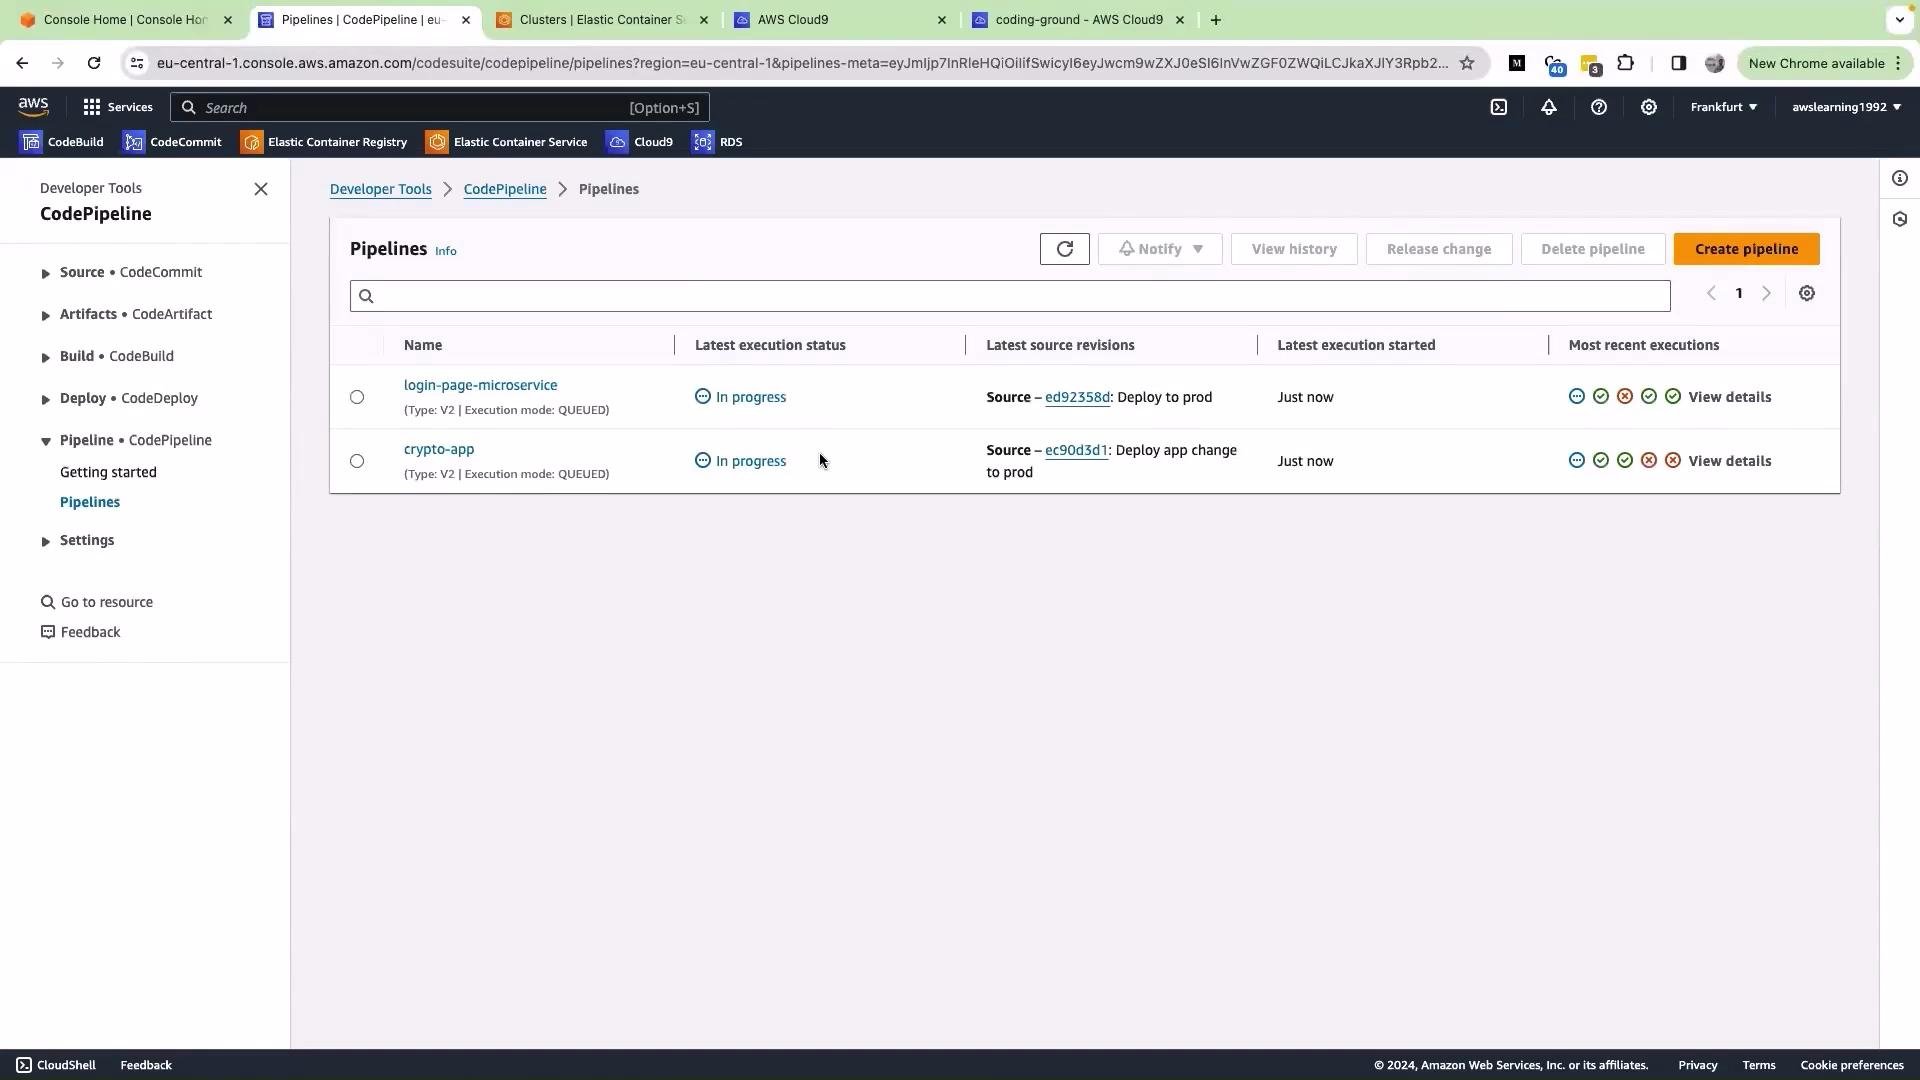
Pushing these commits started the pipelines in CodePipeline automatically.

<Frame>
  <img src="https://mintcdn.com/kodekloud-c4ac6d9a/1ccKtG7aZllQmXlF/images/Hands-On-AWS-Project-Deploy-Your-First-Crypto-App/Monolith-to-Microservice-design/Continuous-deployment-of-both-application/aws-codepipeline-login-crypto-pipelines.jpg?fit=max&auto=format&n=1ccKtG7aZllQmXlF&q=85&s=b85f5572e9ad256d4057cc2bee4fc664" alt="The image shows the AWS CodePipeline interface with two pipelines, &#x22;login-page-microservice&#x22; and &#x22;crypto-app,&#x22; both currently in progress. It includes details such as source information and execution status." width="1920" height="1080" data-path="images/Hands-On-AWS-Project-Deploy-Your-First-Crypto-App/Monolith-to-Microservice-design/Continuous-deployment-of-both-application/aws-codepipeline-login-crypto-pipelines.jpg" />
</Frame>

## Monitor pipeline progress and verify deployment

I opened each pipeline in the AWS Console and watched them progress through the standard stages:

| Stage  | Typical Actions                                                   |
| ------ | ----------------------------------------------------------------- |
| Source | CodeCommit detects a push and supplies source artifacts           |
| Build  | CodeBuild builds Docker images and pushes to ECR                  |
| Deploy | CodePipeline updates ECS task definitions and deploys to services |

Both pipelines progressed through Source → Build → Deploy automatically. When the build completed, new ECS task definitions were registered and the ECS services were updated.

To verify the login UI change:

1. Open the ECS service for the login application.
2. Click "View Load Balancer" and copy the load balancer DNS name.
3. Open the DNS in your browser.

During a rolling deployment you may briefly see the old and new UI versions as the load balancer routes traffic between old and new containers. This is expected behavior until draining and health checks finish.

<Callout icon="lightbulb" color="#1CB2FE">
  During a rolling deployment, you may briefly see both old and new versions as the load balancer routes traffic between container instances. This is expected until old tasks are drained and the new tasks pass health checks.
</Callout>

After the deployment finished, the login button consistently showed "Application login." I logged in with valid credentials and was redirected to the updated product page — confirming both microservices were independently deployed and working together.

## Why this approach matters

| Benefit         | Description                                                                                   |
| --------------- | --------------------------------------------------------------------------------------------- |
| Faster releases | Independent pipelines let teams ship changes without coordinating a monolithic release.       |
| Fault isolation | A problematic deployment in one service does not require rolling back the entire application. |
| Clear ownership | Teams own their code, pipeline, and deployment lifecycle.                                     |
| Scalable CI/CD  | Pipeline automation scales as you add services or teams.                                      |

## Key takeaways

* Continuous deployment was implemented for both microservices using CodeCommit → CodePipeline → CodeBuild → ECS.
* Each service has an independent pipeline; pushing to a repository triggers only that service’s pipeline.
* Rolling ECS deployments can show temporary mixed versions while tasks are being replaced — this is expected.
* Microservice architecture enables faster iteration and independent team velocity.

## Links and references

* [AWS CodePipeline documentation](https://docs.aws.amazon.com/codepipeline/latest/userguide/welcome.html)
* [Amazon ECS documentation](https://docs.aws.amazon.com/ecs/latest/developerguide/what-is-ecs.html)
* [AWS CodeCommit documentation](https://docs.aws.amazon.com/codecommit/latest/userguide/welcome.html)

That concludes this lesson. See you in the next article.

<CardGroup>
  <Card title="Watch Video" icon="video" cta="Learn more" href="https://learn.kodekloud.com/user/courses/building-scalable-microservices-on-aws-deploy-a-crypto-app/module/d14608f9-c900-4ec7-9bdd-ed8e215da540/lesson/fcec06b7-0521-4544-949d-07c4c6f84d16" />
</CardGroup>