HashiCorp Certified: Consul Associate Certification
Secure Services with Basic ACLs
Creating ACL Policies
Learn how to define and manage ACL policies in HashiCorp Consul to enforce fine-grained access control and enhance security.
What Is a Policy?
An ACL policy in Consul is a named collection of rules that govern the permissions of one or more tokens. Policies are:
- Reusable: Attach the same policy to multiple tokens.
- Composable: A token’s effective permissions are the union of all its policies.
- Modular: In production, you might create distinct policies for:
- Each Consul server node
- Different client applications
- The Consul Snapshot Agent (for backups)
- Any other process interacting with Consul
Each policy includes:
- ID: Auto-generated, immutable public identifier
- Name: Unique within the Consul cluster
- Description (optional): Human-readable notes
- Rules: HCL or JSON granting or denying permissions
- Datacenters (optional): Scopes where the policy applies
- Namespace (Enterprise only): Limits policy to a namespace
Default Consul Policies
When you bootstrap Consul’s ACL system, two built-in policies are created by default:
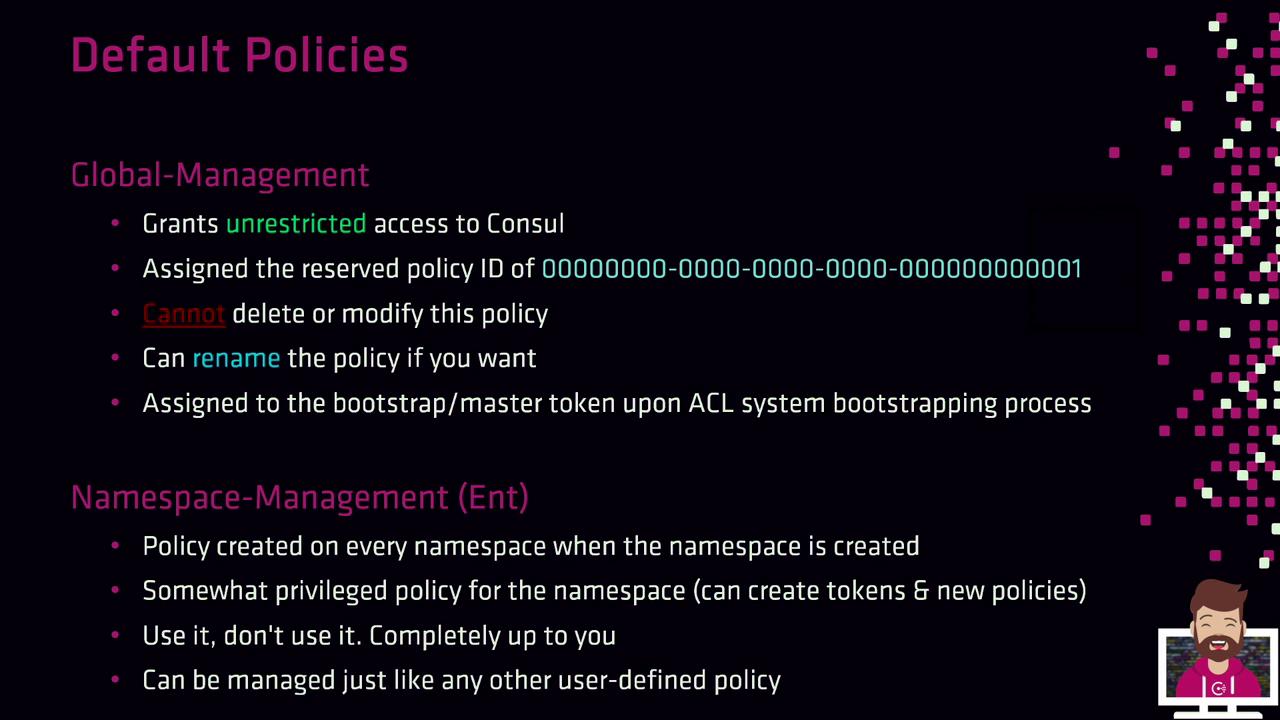
Global-Management
- Policy ID:
00000000-0000-0000-0000-000000000001 - Unrestricted access to the entire cluster
- Cannot be deleted or modified (rename allowed)
- Auto-assigned to the bootstrap master token
- Policy ID:
Namespace-Management (Enterprise only)
- Created per namespace
- Manages policies and tokens within its namespace
- Behaves like a user-defined policy
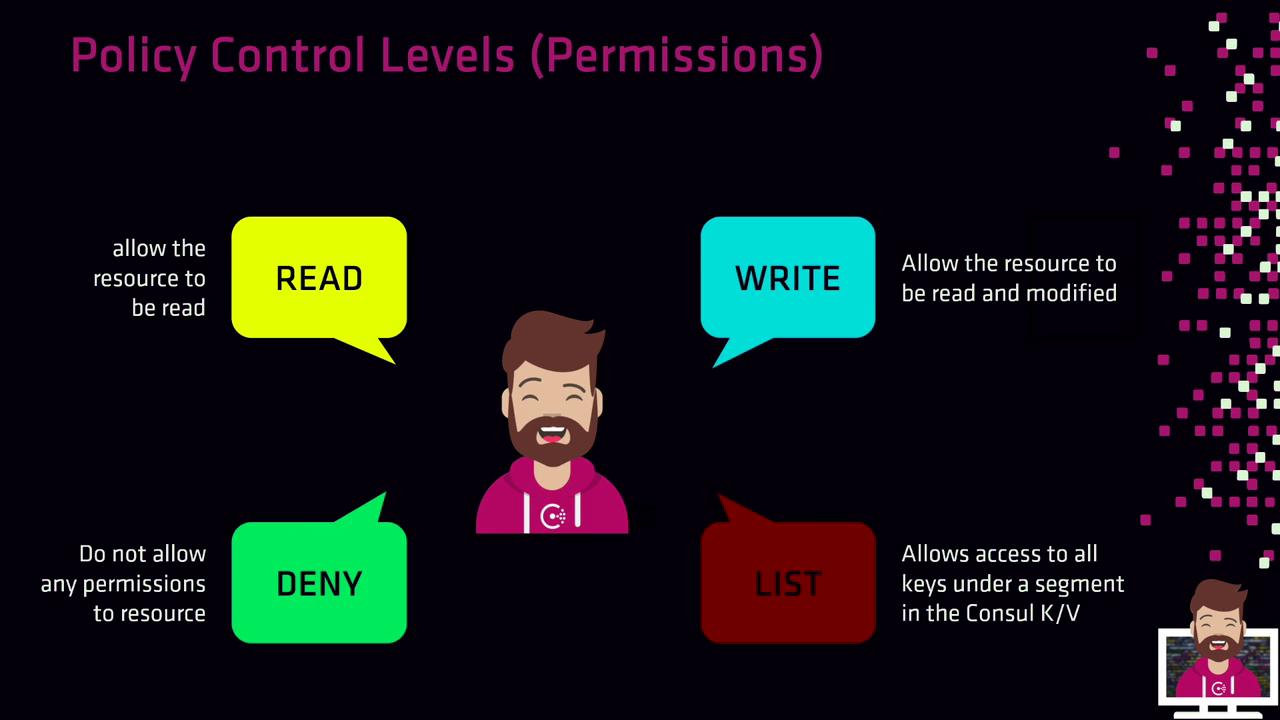
Policy Control Levels
Control levels determine how rules interact with resources. Consul supports four levels:
| Control Level | Description |
|---|---|
| read | Retrieve resource data |
| write | Modify or create resources and read them |
| deny | Block access regardless of other policies |
| list | Enumerate keys or resources under a given prefix |
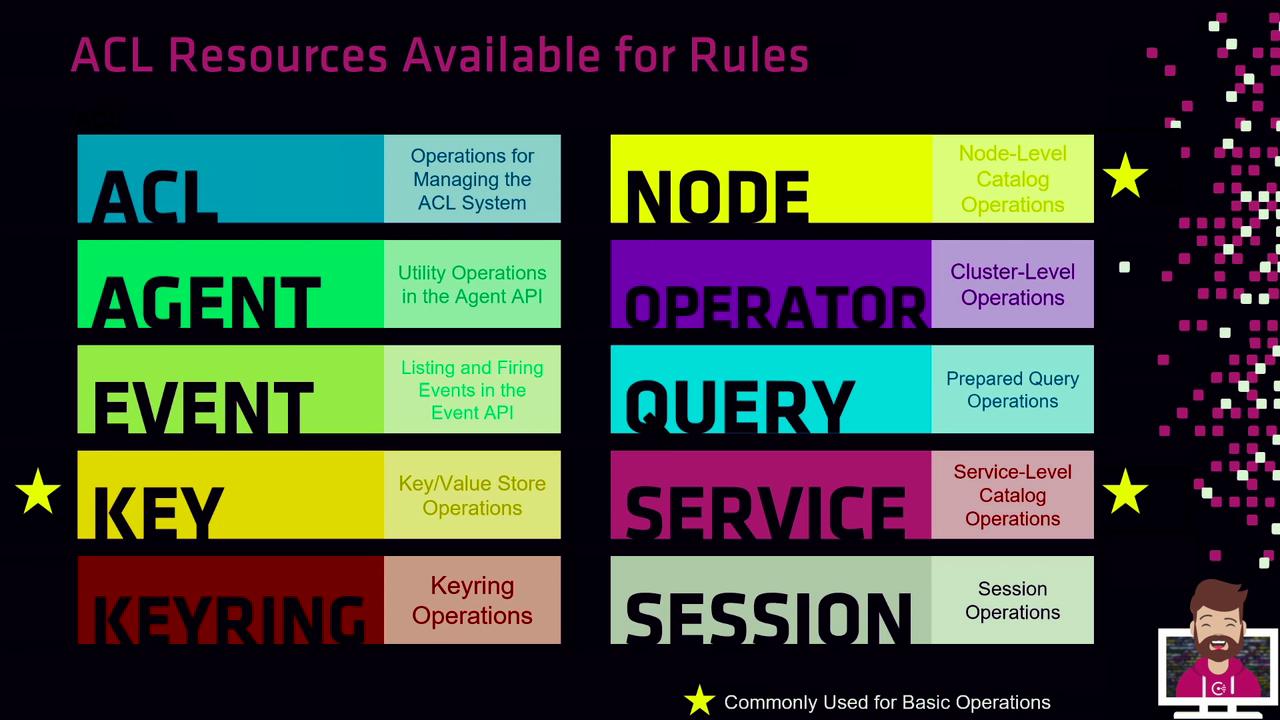
ACL Resource Types
Consul ACL rules apply to various resource types. Below is a breakdown of common and advanced resources:
| Resource Type | Description | Use Case |
|---|---|---|
key, key_prefix | KV store operations | Common |
node, node_prefix | Node registration and catalog | Common |
service, service_prefix | Service discovery and health checks | Common |
acl, agent, event, keyring | ACL management, agent operations, events | Advanced scenarios |
operator, query, session, prepared_query | Cluster control, queries, and sessions | Advanced scenarios |
Exact vs. Prefix Matching
Exact Match
Grant permissions on a single, named resource:
key "kv/apps/web-app-01" {
  policy = "write"
}

service "customer-db" {
  policy = "read"
}
- Only the key at
kv/apps/web-app-01is writable. - Only the service
customer-dbis readable.
Prefix Match
Cover multiple resources under a common prefix:
key_prefix "kv/" {
  policy = "read"
}

service_prefix "" {
  policy = "read"
}
- Any key under
kv/is readable. - All services (empty prefix) are readable.
Full Policy Example
Below is a complete policy granting specific rights to a web server and application:
# Allow only web-server-01 to register itself
node "web-server-01" {
  policy = "write"
}

# Grant write access to the eCommerce KV subtree
key_prefix "kv/apps/eCommerce" {
  policy = "write"
}

# Allow creating any new session
session_prefix "" {
  policy = "write"
}

# Allow managing the eCommerce-Front-End service
service "eCommerce-Front-End" {
  policy = "write"
}
Creating Policies via CLI
Use the consul acl policy command to create a policy from your HCL file:
$ consul acl policy create \
    --name "ecommerce" \
    --description "eCommerce App" \
    --rules @rules.hcl
ID:          06acc965-df4b-5a99-58cb-3250930c6324
Name:        eCommerce
Description: eCommerce App
Datacenters:
Rules:
  service "eCommerce" {
    policy = "write"
  }
Note
You can also supply rules inline using --rules 'service "eCommerce" { policy = "write" }' if you prefer not to use a file.
Creating Policies via API
Send a PUT request to the ACL policy endpoint:
$ curl -X PUT \
  --header "X-Consul-Token: 45a3bd52-07c7-47a4-52fd-0745e0cfe967" \
  --data @payload.json \
  https://consul.example.com:8500/v1/acl/policy
// payload.json
{
  "Name":        "eCommerce",
  "Description": "eCommerce App",
  "Rules":       "service \"eCommerce\" { policy = \"write\" }"
}
Note
If your default ACL policy is allow, you can omit the X-Consul-Token header.
Anonymous Token Policy
When no token is provided, Consul uses the anonymous token. Typical read-only permissions include:
service_prefix "" {
  policy = "read"
}

query_prefix "" {
  policy = "read"
}

node_prefix "" {
  policy = "read"
}
Warning
Grant only minimal privileges to the anonymous token to avoid exposing sensitive data.
Node-Specific Policies
HashiCorp best practice is to create one policy per node to tightly control registration and catalog operations:
# Policy for web-server-01
node "web-server-01" {
  policy = "write"
}
service_prefix "" {
  policy = "read"
}

# Policy for web-server-02
node "web-server-02" {
  policy = "write"
}
service_prefix "" {
  policy = "read"
}
Assign each policy to its node’s token so only that node can perform registration and catalog updates.
We will explore a hands-on lab to practice creating and managing ACL policies in Consul.
Links and References
Watch Video
Watch video content