> ## Documentation Index
> Fetch the complete documentation index at: https://notes.kodekloud.com/llms.txt
> Use this file to discover all available pages before exploring further.
# Perform a UI task using a Token
> This guide explains managing operations in the Consul UI with ACLs enabled, requiring a valid ACL token for changes.
This guide shows how to manage operations in the Consul UI when ACLs are enabled with a default deny-all policy. With ACL enforcement active, read-only views remain accessible, but any change—such as modifying services, nodes, or KV pairs—requires a valid ACL token.
Ensure you have the correct ACL token (Secret ID) before continuing. Without it, all management actions in the UI will be blocked.
## Prerequisites
* A running Consul cluster or single server with ACL enforcement enabled
* Your ACL bootstrap token or another token with sufficient privileges
* Access to the Consul UI (node IP, load balancer, or `localhost`)
## Authenticating in the UI
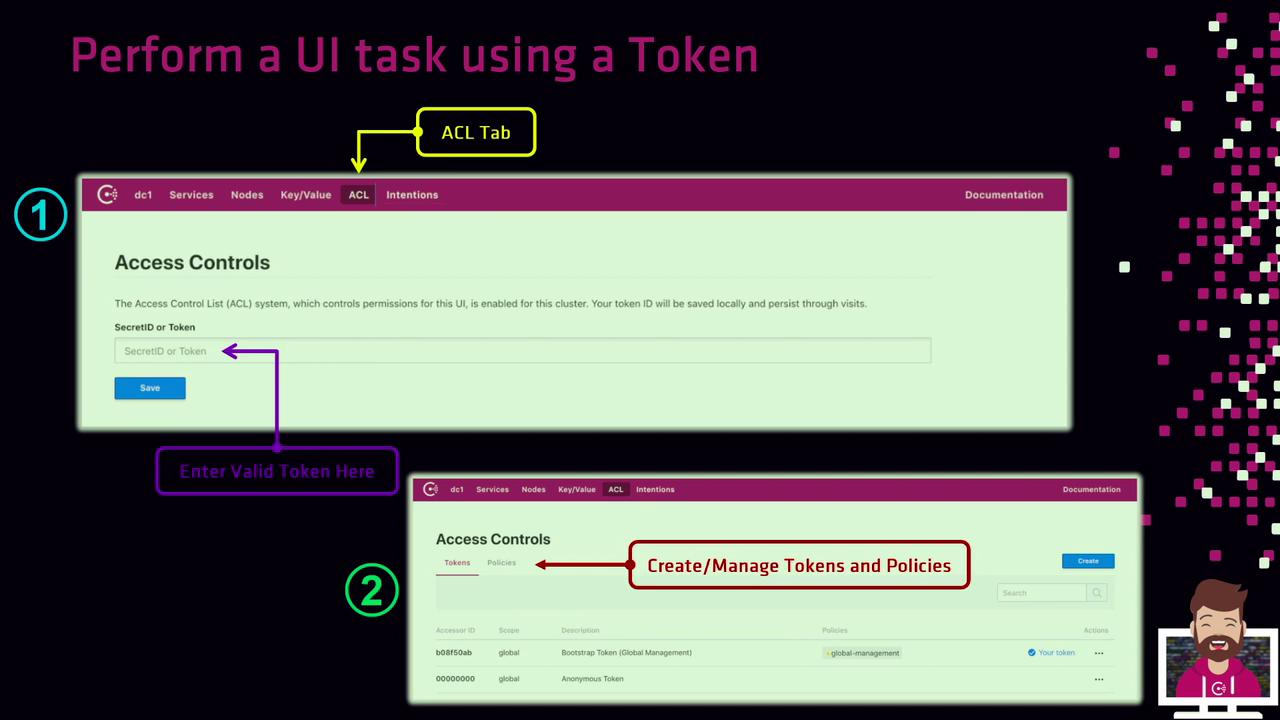
1. Open the Consul UI and click the **ACL** tab (highlighted in yellow).
2. Paste your ACL Secret ID into the token field.
3. Click **Save**.
After successful authentication, two sub-tabs appear under **Access Controls**:
| Sub-Tab | Purpose |
| -------- | ----------------------------------------------------------------------------------------------------- |
| Tokens | View default tokens (`bootstrap`, `anonymous`) and create new tokens bound to policies. |
| Policies | Define, edit, or delete ACL policies. Then return to **Tokens** to issue tokens using those policies. |
## Managing Tokens and Policies
1. **Tokens**
* Click **Create Token** to issue a new token and bind it to one or more policies.
* Provide a name and select the policies that define its permissions.
2. **Policies**
* Click **Create Policy** to open the policy editor.
* Define rules using [HCL syntax](https://www.consul.io/docs/security/acl/policies#policy-rules).
* Save the policy, then switch back to **Tokens** to issue tokens using your new policy.
## Next Steps
* Explore the **Services**, **Nodes**, and **KV** tabs to verify your permissions.
* Automate workflows by using your token with the [Consul CLI](https://www.consul.io/docs/commands) or API.
For complete ACL configuration and best practices, see the [Consul ACL documentation](https://www.consul.io/docs/security/acl).