This article explores Helms core components and their roles in streamlining application management within Kubernetes clusters.
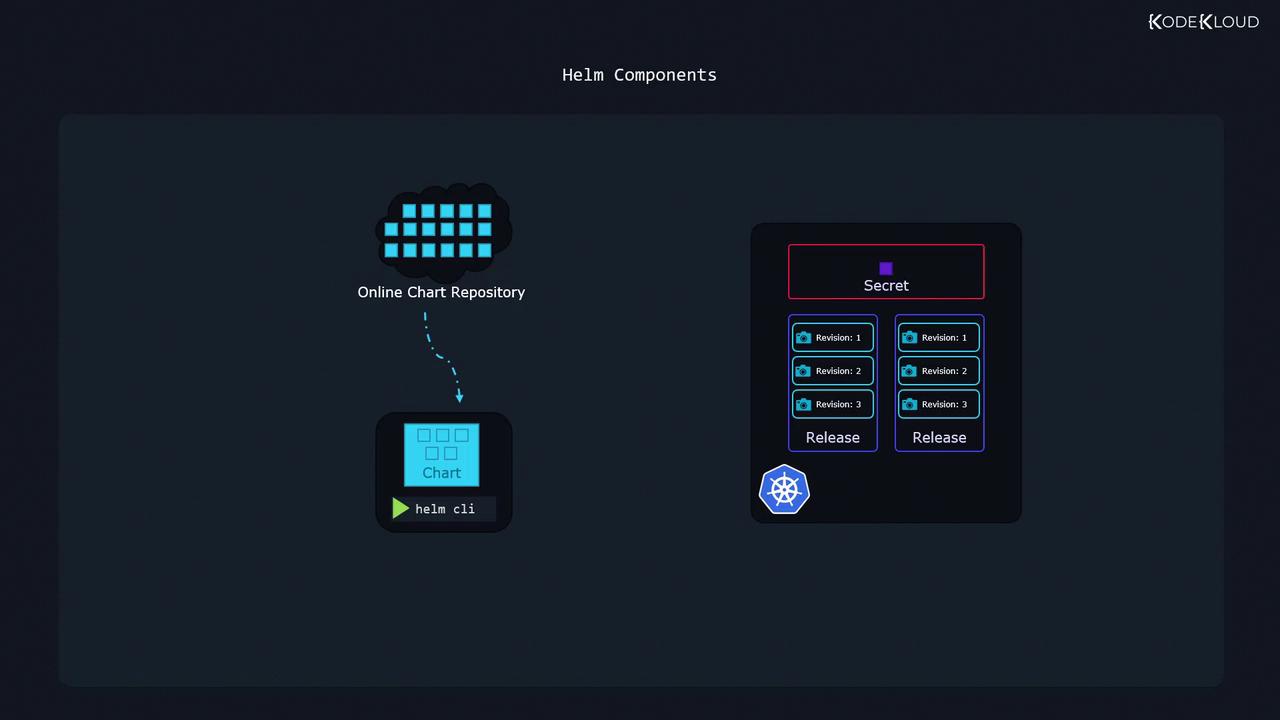
In this article, we explore the core components of Helm and examine how they work together to streamline application management within a Kubernetes cluster. Helm simplifies tasks such as installing charts, performing upgrades, and rolling back changes by leveraging several key components: the Helm CLI, Charts, Releases, and metadata storage.
Helm CLI
The Helm command-line utility runs on your local machine, enabling you to install charts, upgrade releases, and roll back changes, among other operations.
Charts
Charts are packages comprised of files that include all the instructions Helm needs to create the Kubernetes objects required by an application. They serve as reusable deployment packages and are available publicly from various repositories.
Releases
A release is created when a chart is deployed to your cluster. It represents a single installation of an application based on a Helm chart. Each time you perform an action—such as an upgrade or configuration change—a new revision (or snapshot) is generated, enabling independent management of multiple application versions.
Metadata
Helm stores release metadata, including chart details and revision history, as secrets within your Kubernetes cluster. This ensures that the deployment history remains accessible to everyone working on the cluster.
The diagram below illustrates the overall Helm architecture, showcasing how the Helm CLI interacts with chart repositories to create and manage releases within your Kubernetes environment:
Helm charts bundle not only Kubernetes manifest files but also powerful templating capabilities that support flexibility and customization. Consider a simple HelloWorld application running an Nginx web server. This application uses two primary Kubernetes objects—a Deployment and a Service. The deployment template uses templating to substitute values defined in a separate configuration file.Below is an example of a basic Helm chart, organized into distinct files:
In this example, the values.yaml file provides dynamic configuration values (such as replica count and image repository), allowing you to customize deployments effortlessly without altering the core chart templates.
For more complex applications, such as deploying WordPress, Helm chart templates leverage advanced functions and conditionals to manage intricate Kubernetes manifest generation. Below is an excerpt from a sophisticated Helm chart template:
Copy
# Deployment template snippet from a complex chartapiVersion: {{ include "common.capabilities.deployment.apiVersion" . }}kind: Deploymentmetadata: name: {{ include "common.names.fullname" . }} namespace: {{ .Release.Namespace | quote }} labels: {{- include "common.labels.standard" . | nindent 4 }} {{- if .Values.commonLabels }} {{- include "common.tplvalues.render" (dict "value" .Values.commonLabels "context" $) }} {{- end }} {{- if .Values.commonAnnotations }} annotations: {{ include "common.tplvalues.render" (dict "value" .Values.commonAnnotations) }} {{- end }}spec: selector: matchLabels: {{- include "common.labels.matchLabels" . | nindent 6 }} strategy: {{- toYaml .Values.updateStrategy | nindent 4 }} {{- if not .Values.autoscaling.enabled }} replicas: {{ .Values.replicaCount }} {{- end }}
This snippet demonstrates how Helm uses templating functions and conditionals to dynamically generate a Deployment manifest, adapting parameters according to different configuration settings.
One of Helm’s standout features is its ability to manage multiple releases from the same chart. For instance, you might deploy two distinct instances of a WordPress website—one for external customers and another for internal development. Although both releases use the same chart, they are managed independently, each with its own configuration and revision history.Below are some example commands to install two separate releases from the same Helm chart:
Copy
# Install the first release with a custom name 'my-site'$ helm install my-site bitnami/wordpress# Install a second independent release named 'my-second-site'$ helm install my-second-site bitnami/wordpress
Using the same chart source for different environments, such as production and development, simplifies management while keeping configurations isolated.
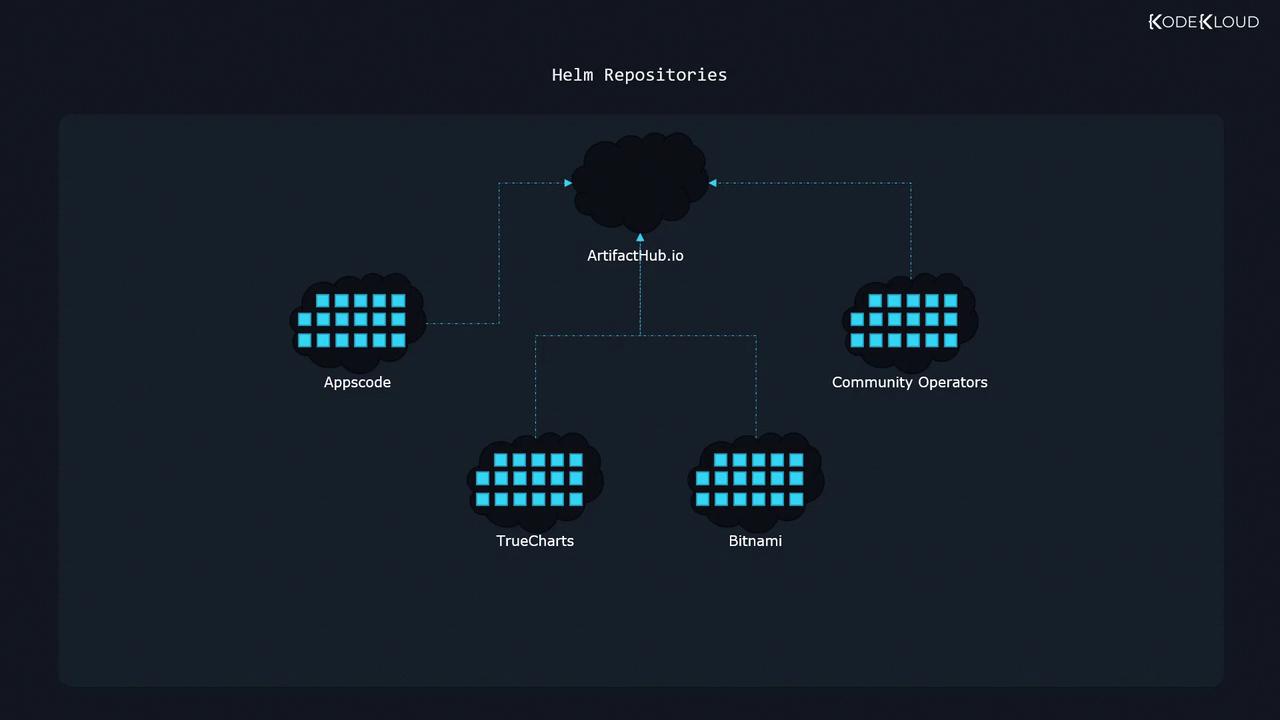
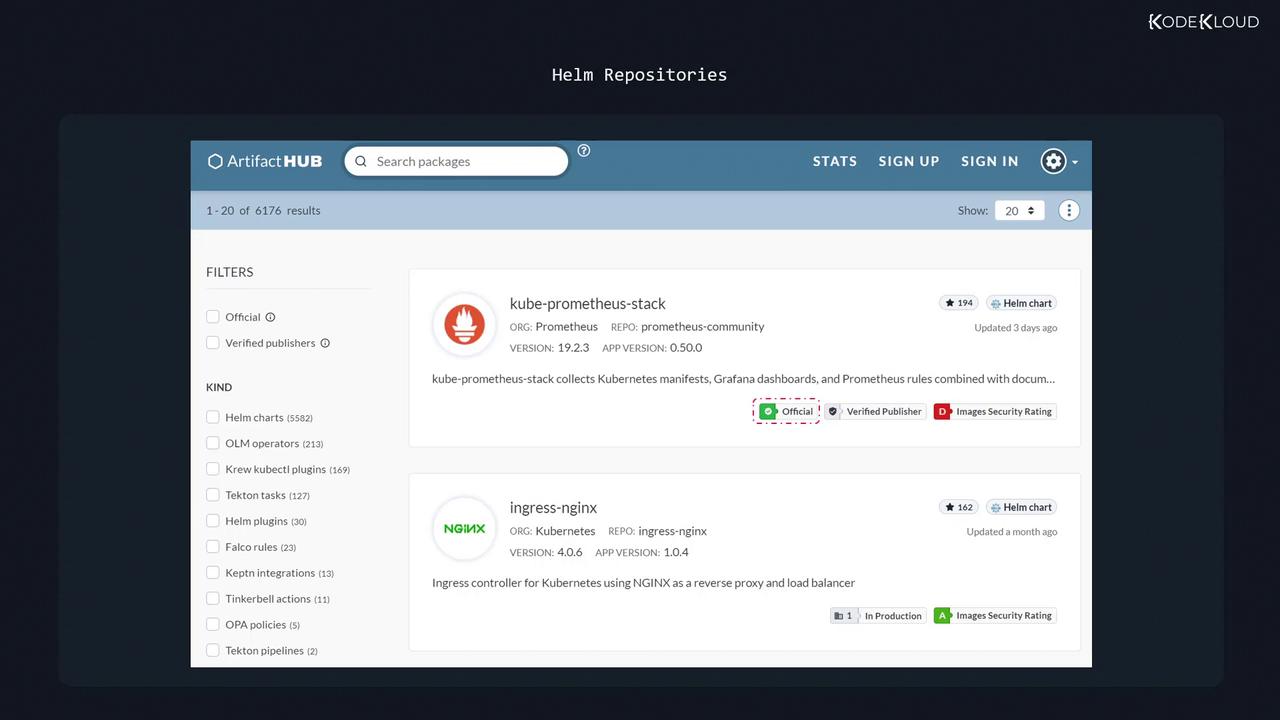
Helm charts are available from a variety of trusted providers worldwide, including Appscode, community operators, TrueCharts, and Bitnami. Instead of visiting each repository individually, you can use the Artifact Hub (also known as Helm Hub) to browse a consolidated view of available charts. Visit artifacthub.io to explore the extensive collection of Helm charts.
Artifact Hub currently hosts over 6300 packages, allowing you to search for specific charts or browse by category. Pay attention to charts marked with official or verified publisher badges for added trust.Furthermore, Artifact Hub features an intuitive web interface for filtering and exploring charts:
In this article, we covered the fundamentals of Helm’s architecture, including its core components, chart templating capabilities, and release management. Additionally, we explored strategies for discovering and utilizing publicly available Helm charts. Future lessons will delve deeper into Helm’s advanced templating features and real-world deployment scenarios.Thank you for reading, and we look forward to exploring more in our next lesson.