Jenkins Pipelines
Kubernetes and GitOps
Manifest Repository and Configure ArgoCD
In this lesson, we will walk through the process of cloning a manifest repository and configuring Argo CD to deploy our Solar System application. The GitHub-hosted repository contains a single Kubernetes folder with the deployment and service YAML files.
Step 1. Initial Deployment Manifest
Below is the initial deployment manifest for the Solar System application:
apiVersion: apps/v1
kind: Deployment
metadata:
  labels:
    app: solar-system
  name: solar-system
  namespace: solar-system
spec:
  replicas: 2
  selector:
    matchLabels:
      app: solar-system
  strategy: {}
  template:
    metadata:
      labels:
        app: solar-system
    spec:
      containers:
      - image: siddharth67/solar-system:3e906e3be059342b1916f020c34d344fb267ddca
        name: solar-system
        imagePullPolicy: Always
Step 2. Cloning the Manifest Repository
Clone the repository into Git using your GitHub migration option. In this example, the migration is performed under the "Dash" organization.
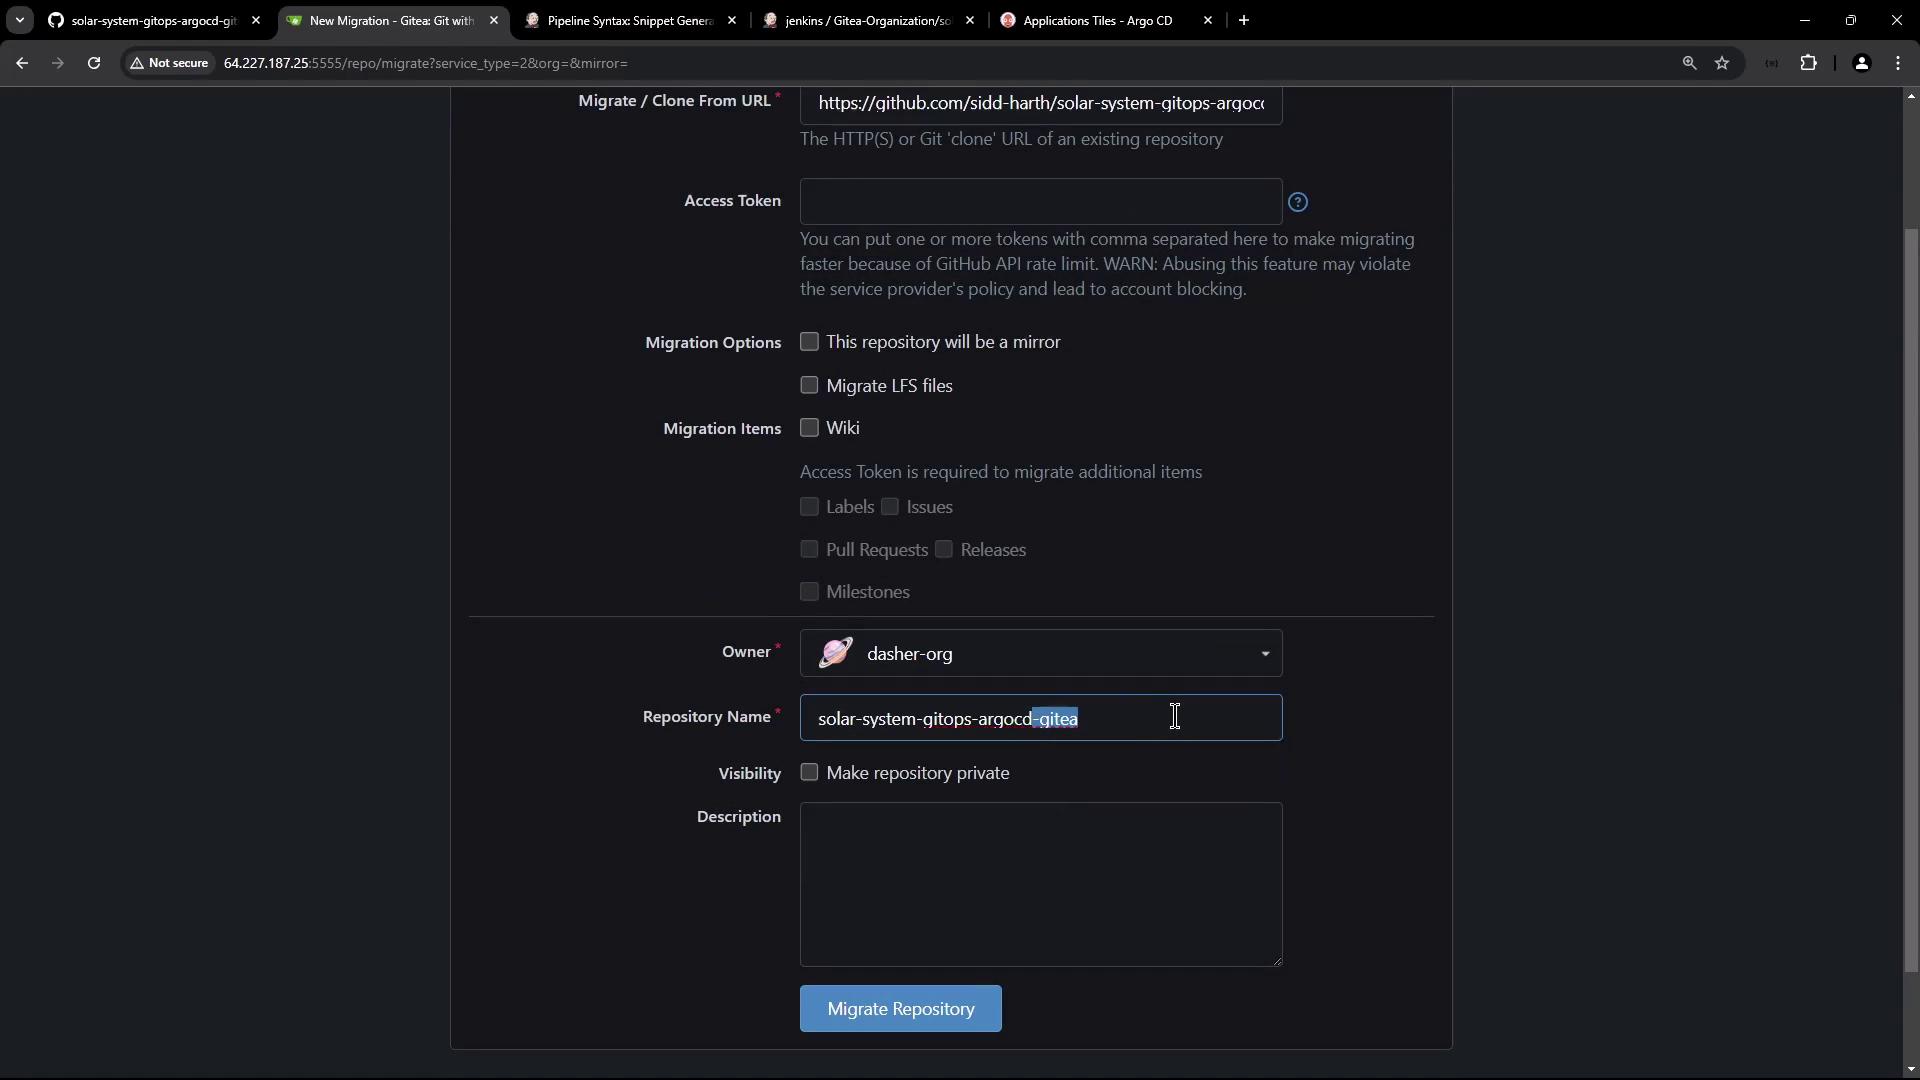
After a brief wait, the repository is successfully imported. Even though both the deployment and service YAML files are present, note that the deployment manifest now requires a secret named mongodb‑secrets—which is currently missing.
Step 3. Updating the Deployment Manifest with a Reference to a Secret
The updated snippet of the deployment YAML includes an environment variable section for MongoDB credentials:
apiVersion: apps/v1
kind: Deployment
metadata:
  labels:
    app: solar-system
  name: solar-system
  namespace: solar-system
spec:
  replicas: 2
  selector:
    matchLabels:
      app: solar-system
  strategy: {}
  template:
    metadata:
      labels:
        app: solar-system
    spec:
      containers:
      - image: siddharth67/solar-system:3e9063be059342b1916f20e034344fb267ddca
        imagePullPolicy: Always
        name: solar-system
        ports:
          - containerPort: 3000
            name: http
            protocol: TCP
      env:
        - name: mongo-db-creds
          valueFrom:
            secretKeyRef:
              name: mongo-db-creds
              key: MONGO_URI
Note
Since the referenced secret is missing, we need to create and store it securely.
Step 4. Creating the Kubernetes Secret
Our cluster already has the "solar-system" namespace. You can verify the namespaces and running nodes with the following commands:
k get ns
Example output:
NAME                STATUS   AGE
argocd              Active   2d20h
default             Active   3d1h
kube-node-lease     Active   3d1h
kube-public         Active   3d1h
kube-system         Active   3d1h
solar-system        Active   2d19h
And to view the nodes:
k get node -o wide
Example output:
NAME                     STATUS   ROLES   AGE     VERSION   INTERNAL-IP     EXTERNAL-IP         OS-IMAGE                       KERNEL-VERSION     CONTAINER-RUNTIME
pool-20kac5b8z-wfmef    Ready    <none>  3d1h    v1.29.9   10.122.3.138   143.244.143.138     Debian GNU/Linux 12 (bookworm)   6.1.0-25-amd64    containerd://1.6.28
pool-20kac5b8z-wfmey    Ready    <none>  3d1h    v1.29.9   10.122.0.4     134.209.155.222     Debian GNU/Linux 12 (bookworm)   6.1.0-25-amd64    containerd://1.6.28
Generate a secret YAML without creating it immediately in the cluster. This command creates a file named "mongo-creds_k8s-secret.yaml" containing the secret’s definition:
kubectl -n solar-system create secret generic mongo-db-creds \
  --from-literal=MONGO_URI=mongodb+srv://supercluster.d83jji.mongodb.net/superData \
  --from-literal=MONGO_USERNAME=superuser \
  --from-literal=MONGO_PASSWORD=SuperPassword \
  --save-config --dry-run=client -o yaml > mongo-creds_k8s-secret.yaml
Warning
Although the generated YAML encodes the values in Base64, storing unencrypted secrets in Git is not recommended. We will improve security by encrypting these secrets using Bitnami Sealed Secrets.
The unencrypted secret YAML might look as follows:
apiVersion: v1
kind: Secret
metadata:
  name: mongo-db-creds
  namespace: solar-system
data:
  MONGO_PASSWORD: U3VwZXJQXjQXNzQyZA==
  MONGO_URI: bW9uZ2k2YjItc3VwZXJjbHVzdGVyX3gyMzQ1Ng==
  MONGO_USERNAME: c3VwZXJ1c2Vyb3VuZw==
Step 5. Encrypting the Secret Using Bitnami Sealed Secrets
First, retrieve the TLS certificate from the Sealed Secrets controller. List the secrets in the "kube-system" namespace and filter for those containing "sealed":
k -n kube-system get secrets | grep -i sealed
Example output:
sealed-secrets-key8dv5k kubernetes.io/tls 2 2d20h
Next, extract and decode the TLS certificate:
kubectl -n kube-system get secret sealed-secrets-key8dv5k -o json | jq -r .data."tls.crt" | base64 -d > sealedSecret-publicCert.crt
Now, use the kubeseal CLI to generate an encrypted sealed secret from your previously generated YAML file:
kubeseal -o yaml --scope cluster-wide --cert sealedSecret-publicCert.crt < mongo-creds_k8s-secret.yaml > mongo-creds_sealed-secret.yaml
The resulting sealed secret will look similar to this:
apiVersion: bitnami.com/v1alpha1
kind: SealedSecret
metadata:
  annotations:
    sealedsecrets.bitnami.com/cluster-wide: "true"
  name: mongo-db-creds
  namespace: solar-system
spec:
  encryptedData:
    MONGO_PASSWORD: AgAo/wX0BYu3m7Yoyj6UAGmQXYEv+/mybwcyJWMk3V5NfR0JAAekYyiU+8S0t2ivkTnkvyyrssjP7c6feGhKz34WqCUKy5cWQJ15XfyB8kFuy5HkEpMkPaf7fS9VSjhy1fQL8=...
    MONGO_URI: AgBNSlDismkdHjpE1ZMD9yej9e9N1B06kubBJQVnJz3ZFv920IV0oDifkm6sIszS/p2KXy9/clz8ue/S4Xanvwy4Z/tVpbRXj6n60WapdlXQSchJNDM/Y9RCO5VqE1w34kSXhr=...
    MONGO_USERNAME: AgBzXwc5Ue006LBFqU2i6J9w6X5XZ5Vi+/zDPQF6b/ikQe2FrTDORX0tX51ygcIPgunx1fkgr0hchHAsbdhzJcdMj0zWubruUsPLn6gYgrcmI=...
  template:
    metadata:
      annotations:
        sealedsecrets.bitnami.com/cluster-wide: "true"
      name: mongo-db-creds
      namespace: solar-system
This sealed secret can now be safely stored in your Git repository. Commit the file (e.g., named secret.yaml) as part of your manifest repository.

Step 6. Configuring the Argo CD Application
Now we configure an Argo CD application to deploy the Solar System app. Argo CD is installed in the Kubernetes cluster and runs in its own namespace. Verify its installation with:
k -n argocd get all
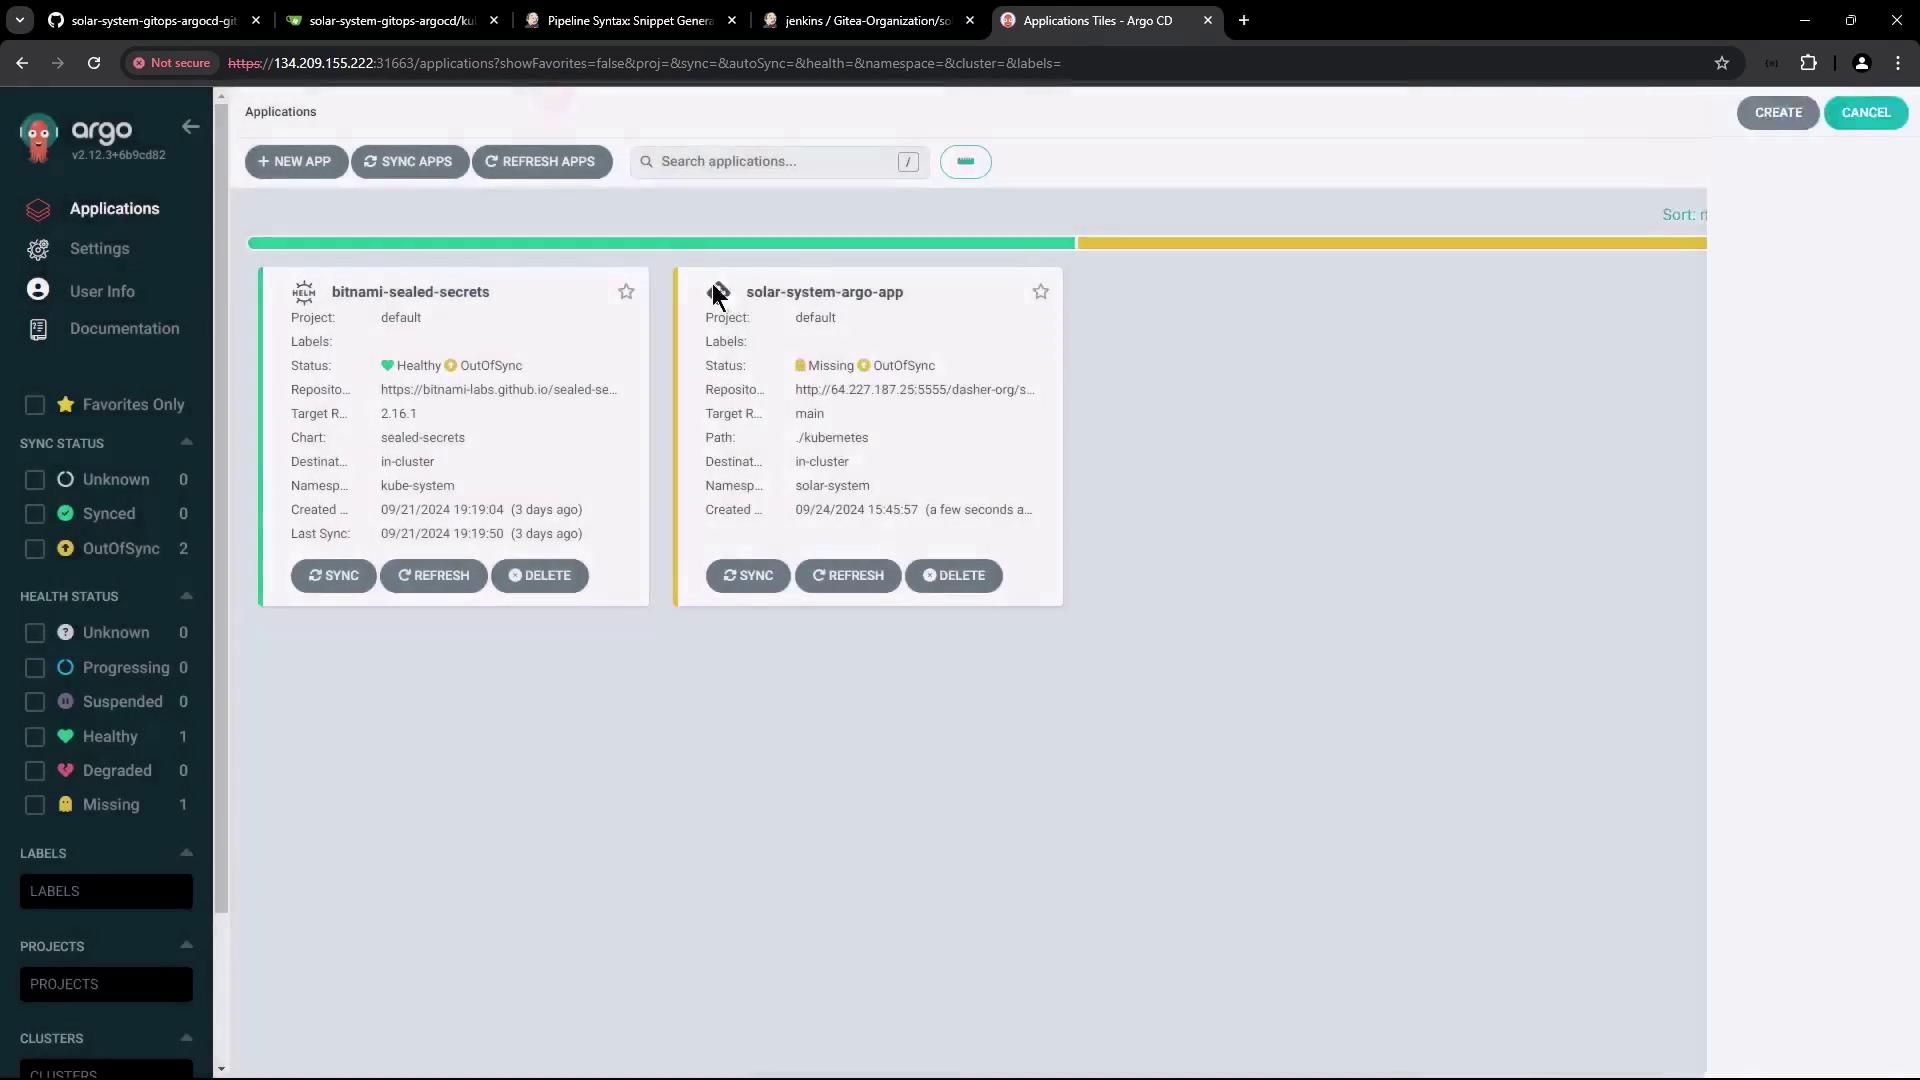
The Argo CD server is accessible on node port 31663. After logging into the Argo CD UI, you'll notice that it manages the Bitnami Sealed Secrets application. For example:

Creating the Solar System Argo CD Application
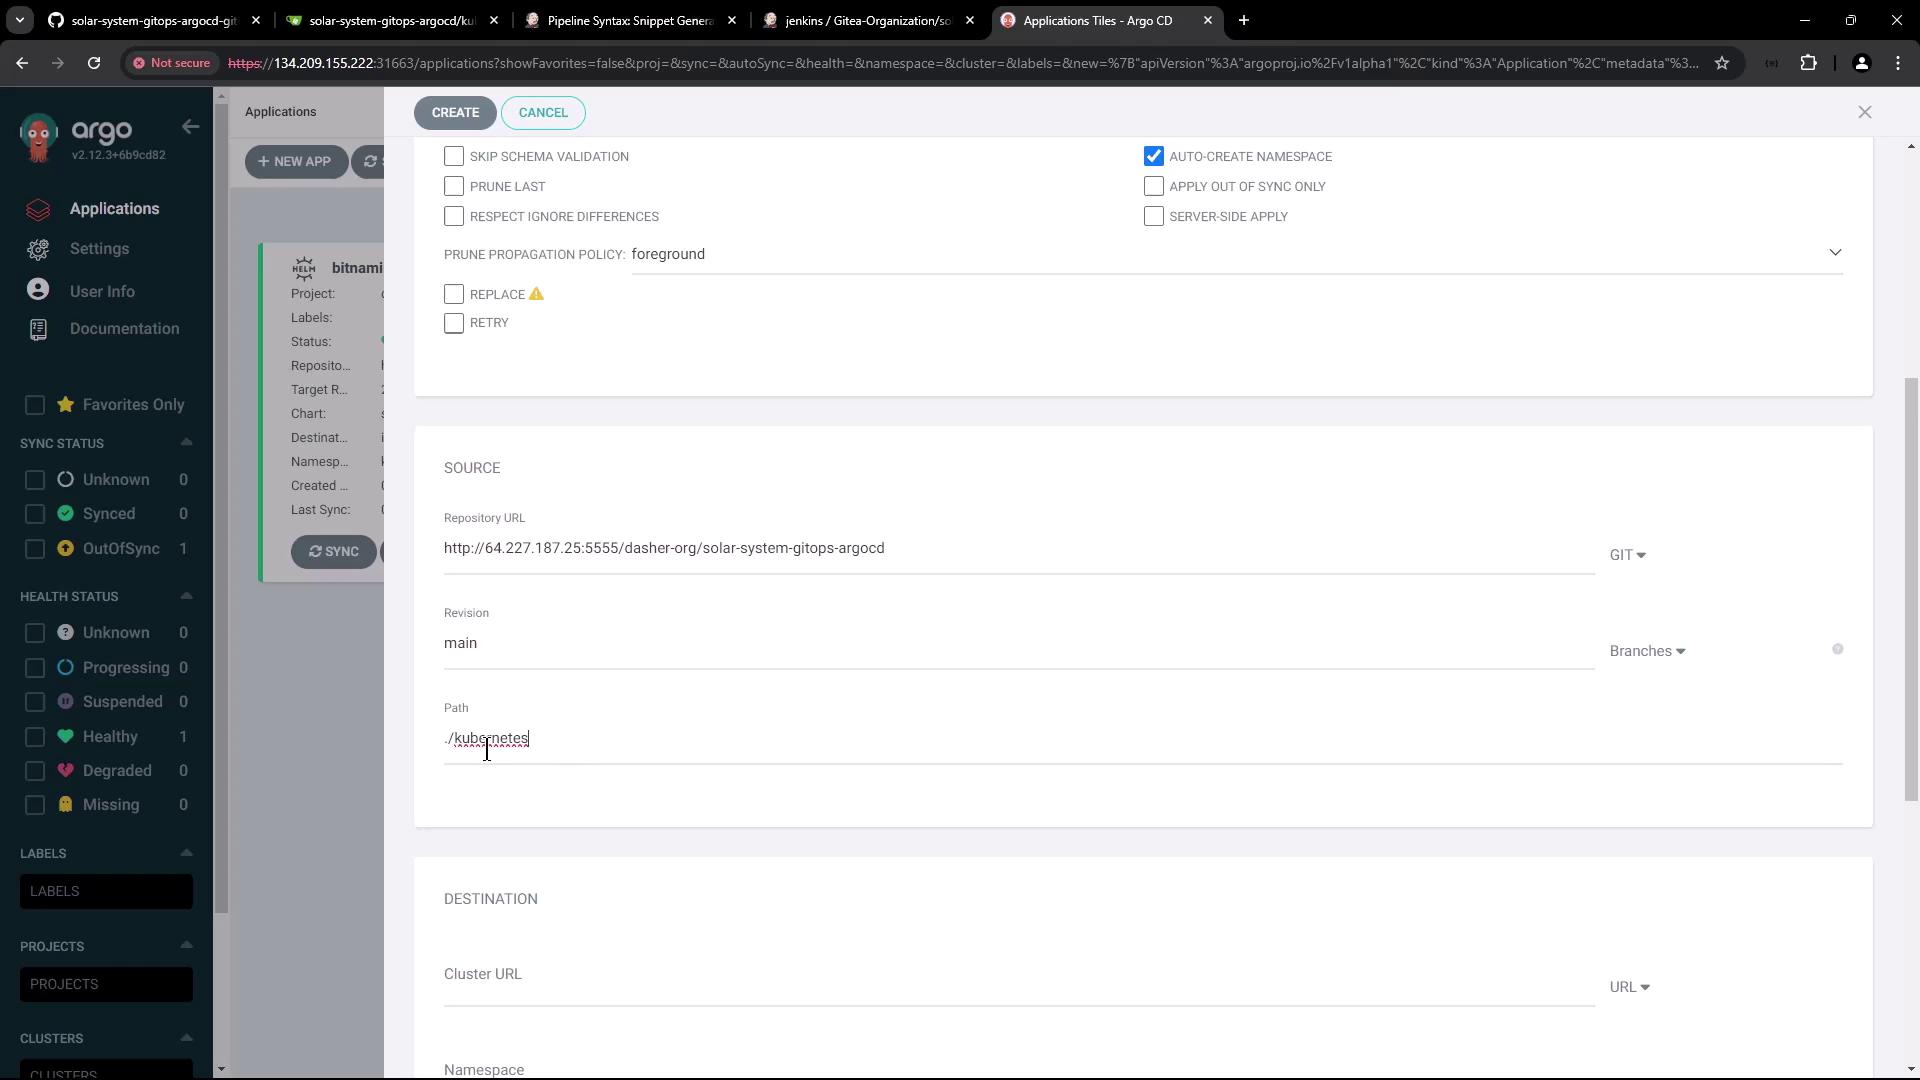
Configure the application with the following settings:
- Name: Solar System Argo App
- Project: default
- Synchronization Policy: Manual (auto-sync is disabled for now)
- Namespace: Enable auto-creation during sync if the target namespace ("solar-system") does not exist
- Repository URL: Use the URL from your migrated repository
- Revision: main
- Path: Kubernetes
- Cluster URL: Use the default in-cluster URL
The application configuration screen looks similar to the following:
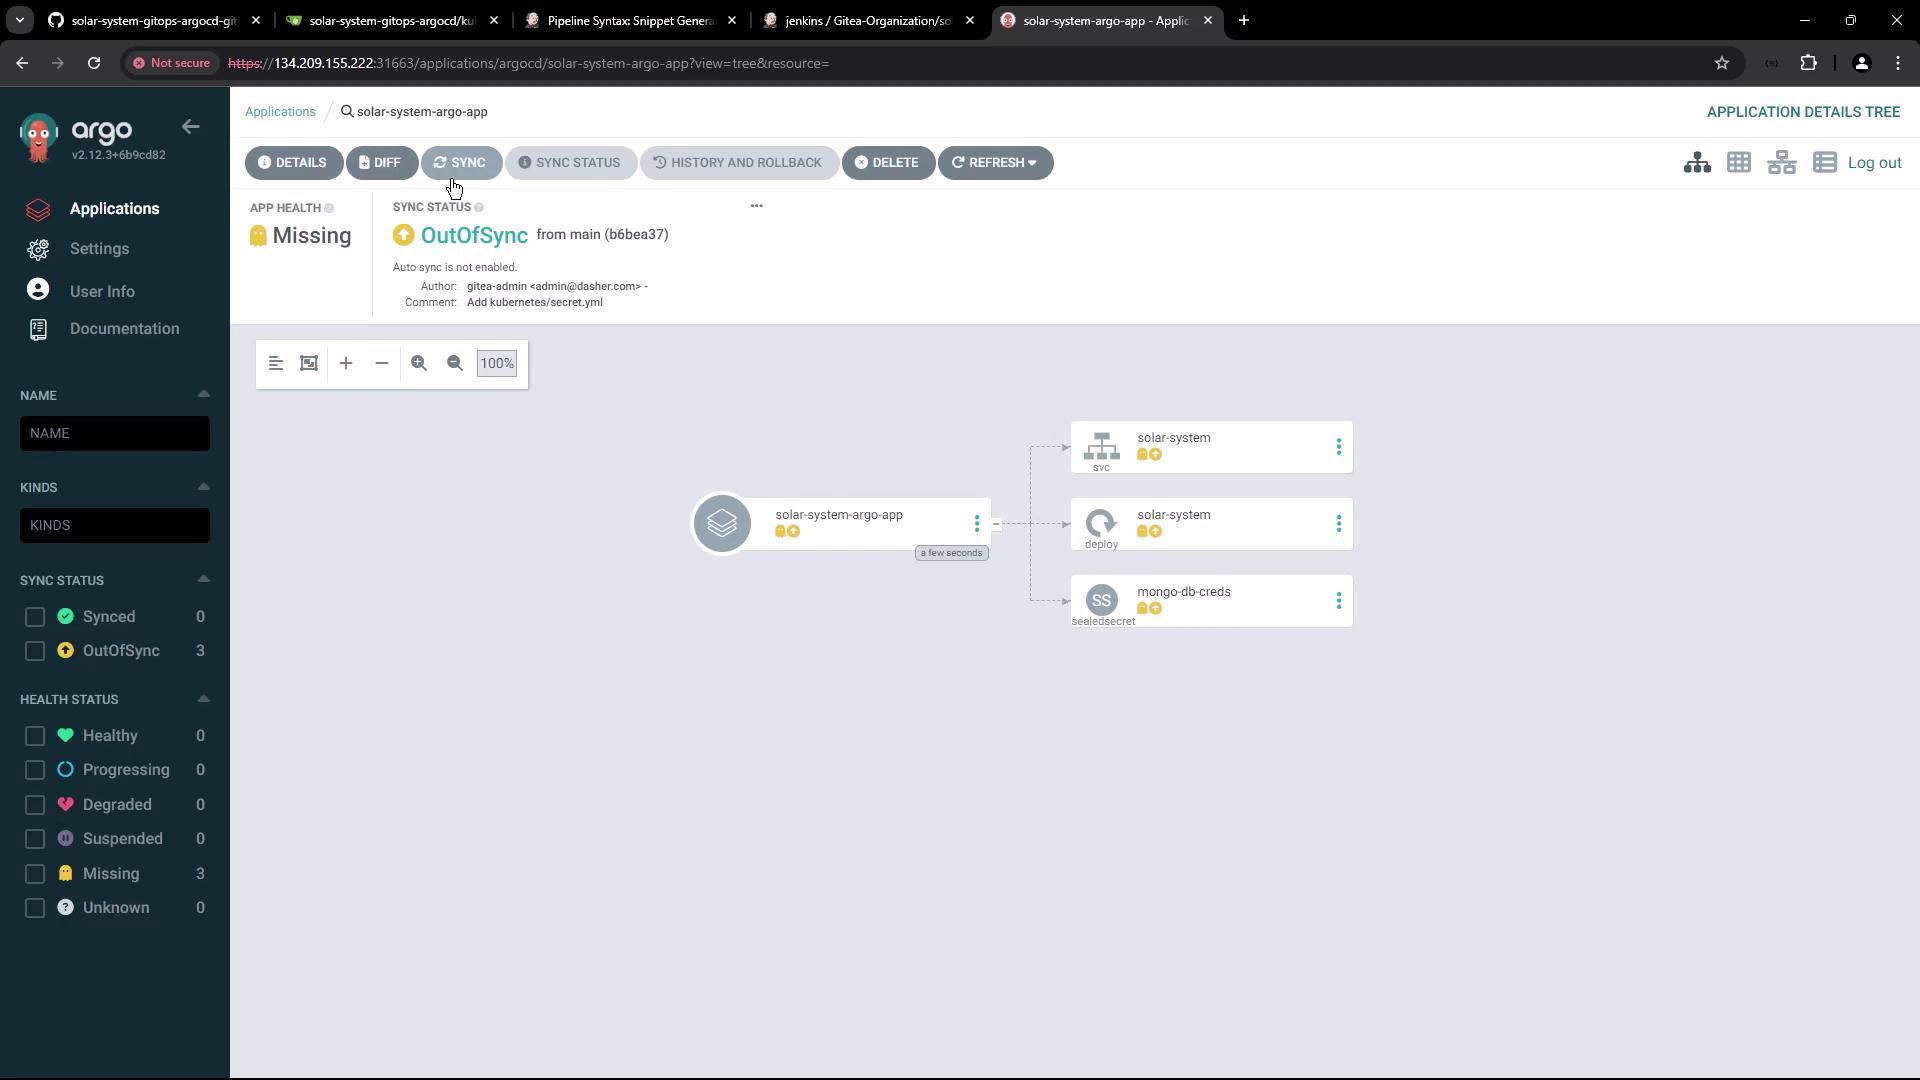
Once created, Argo CD fetches the manifests (service, deployment, and sealed secret files) from the repository. However, since manual synchronization is selected, the application remains out-of-sync until you trigger a sync:
Later, you can update the deployment manifest with the latest Docker image and then manually initiate a synchronization. The final state of the Solar System app in Argo CD is depicted here:
Conclusion
In this lesson, we successfully imported the manifest repository, added an encrypted secret using Bitnami Sealed Secrets, and configured an Argo CD application to manage the Solar System deployment.
Thank you for following along!
For more information, visit the Kubernetes Documentation and the Argo CD project page.
Watch Video
Watch video content