> ## Documentation Index
> Fetch the complete documentation index at: https://notes.kodekloud.com/llms.txt
> Use this file to discover all available pages before exploring further.

# Integrating with Git

> This article explains how to integrate Git with Jenkins for automated builds using a Flask application.

In this lesson, we demonstrate how to integrate Git with Jenkins using a simple Flask application. The goal is to trigger builds automatically whenever changes are pushed to the Git repository.

## Step 1. Start with Your Flask Application

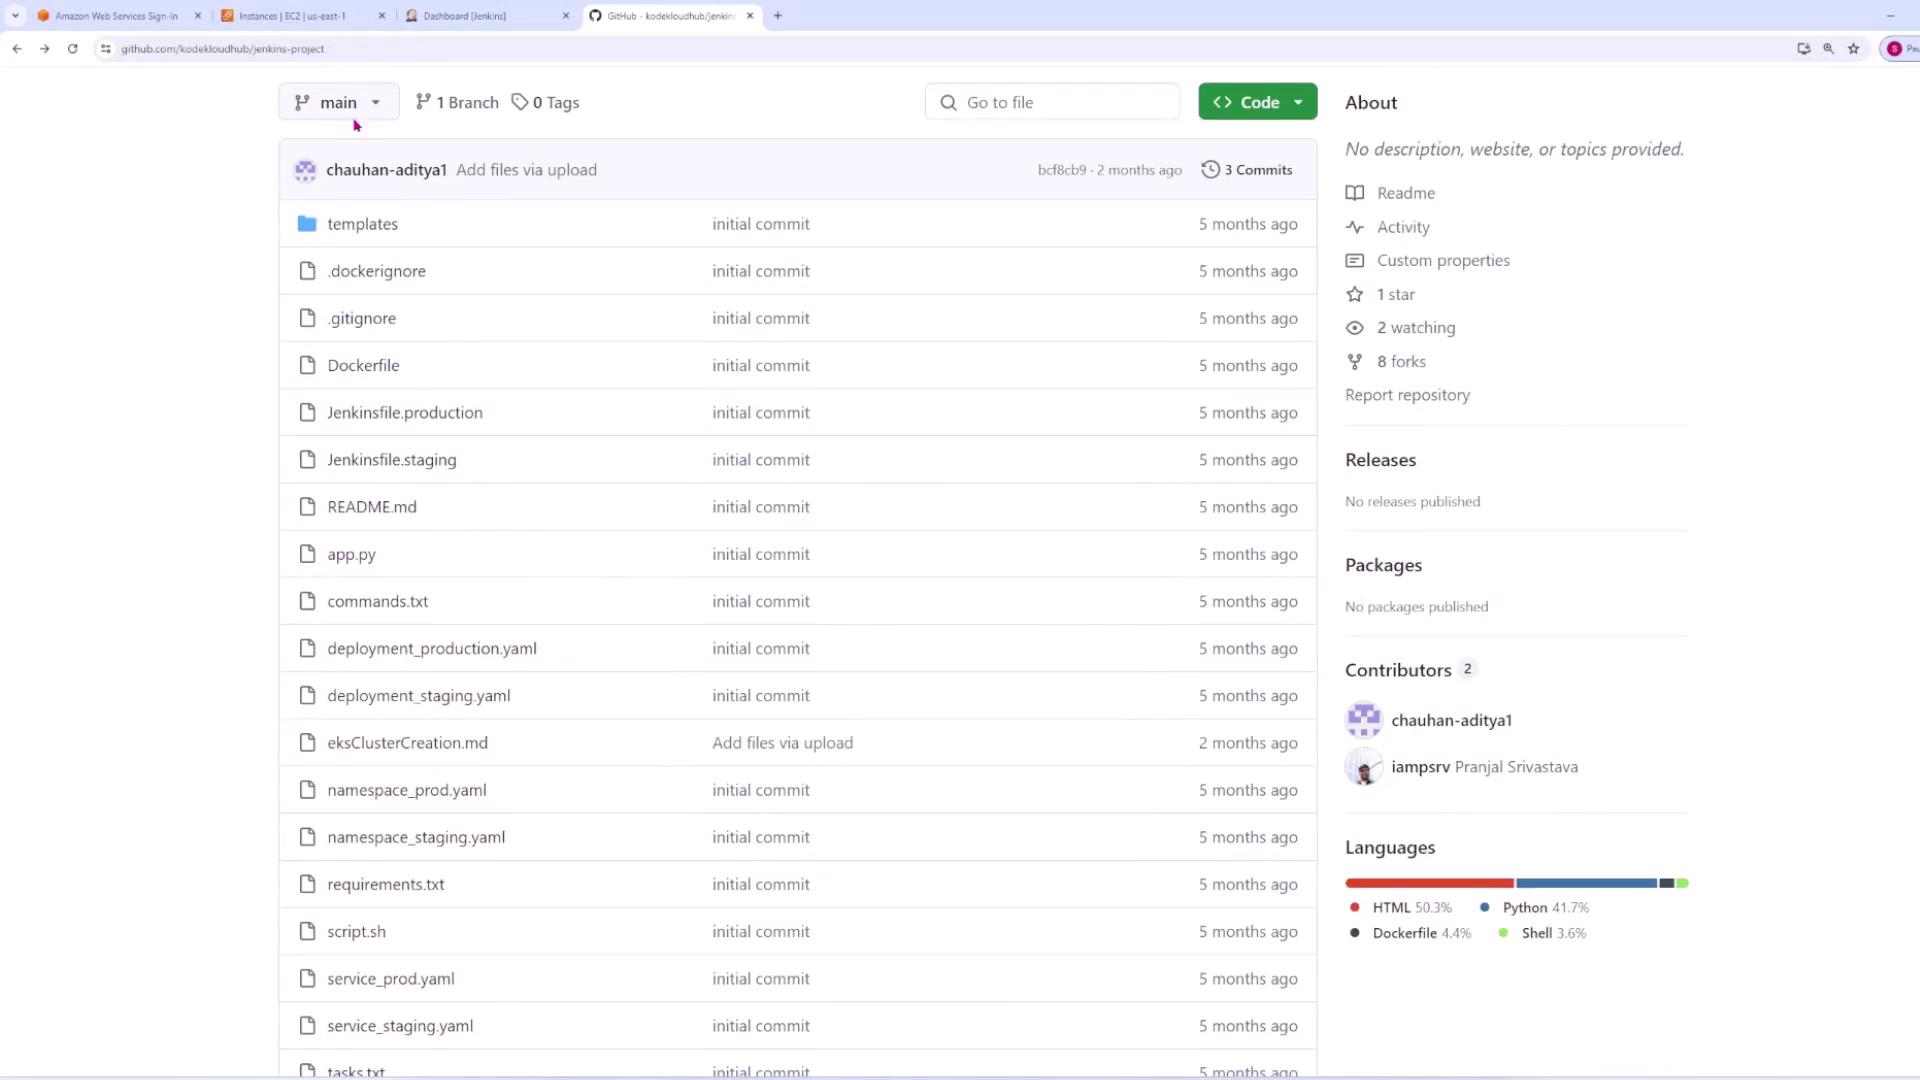
Begin with a Flask application hosted in a Git repository.
<Frame>
  ![GitHub repository with files and directories including configuration and scripts. Repository details such as contributors, languages, and activity statistics are visible in the sidebar.](https://kodekloud.com/kk-media/image/upload/v1752879895/notes-assets/images/Jenkins-Project-Building-CICD-Pipeline-for-Scalable-Web-Applications-Integrating-with-Git/github-repository-files-sidebar.jpg)
</Frame>

## Step 2. Configure Jenkins to Trigger Builds

### Create a New Jenkins Job

1. From the Jenkins dashboard, click on "New Item" and name the job "Flask pipeline."
2. Select the **Freestyle project** option to build a basic pipeline and click **OK**.

<Frame>
  ![Jenkins interface to enter project name and select project type options like Freestyle, Pipeline, and Multi-configuration.](https://kodekloud.com/kk-media/image/upload/v1752879896/notes-assets/images/Jenkins-Project-Building-CICD-Pipeline-for-Scalable-Web-Applications-Integrating-with-Git/jenkins-interface-project-types-selection.jpg)
</Frame>

### Configure Job Details

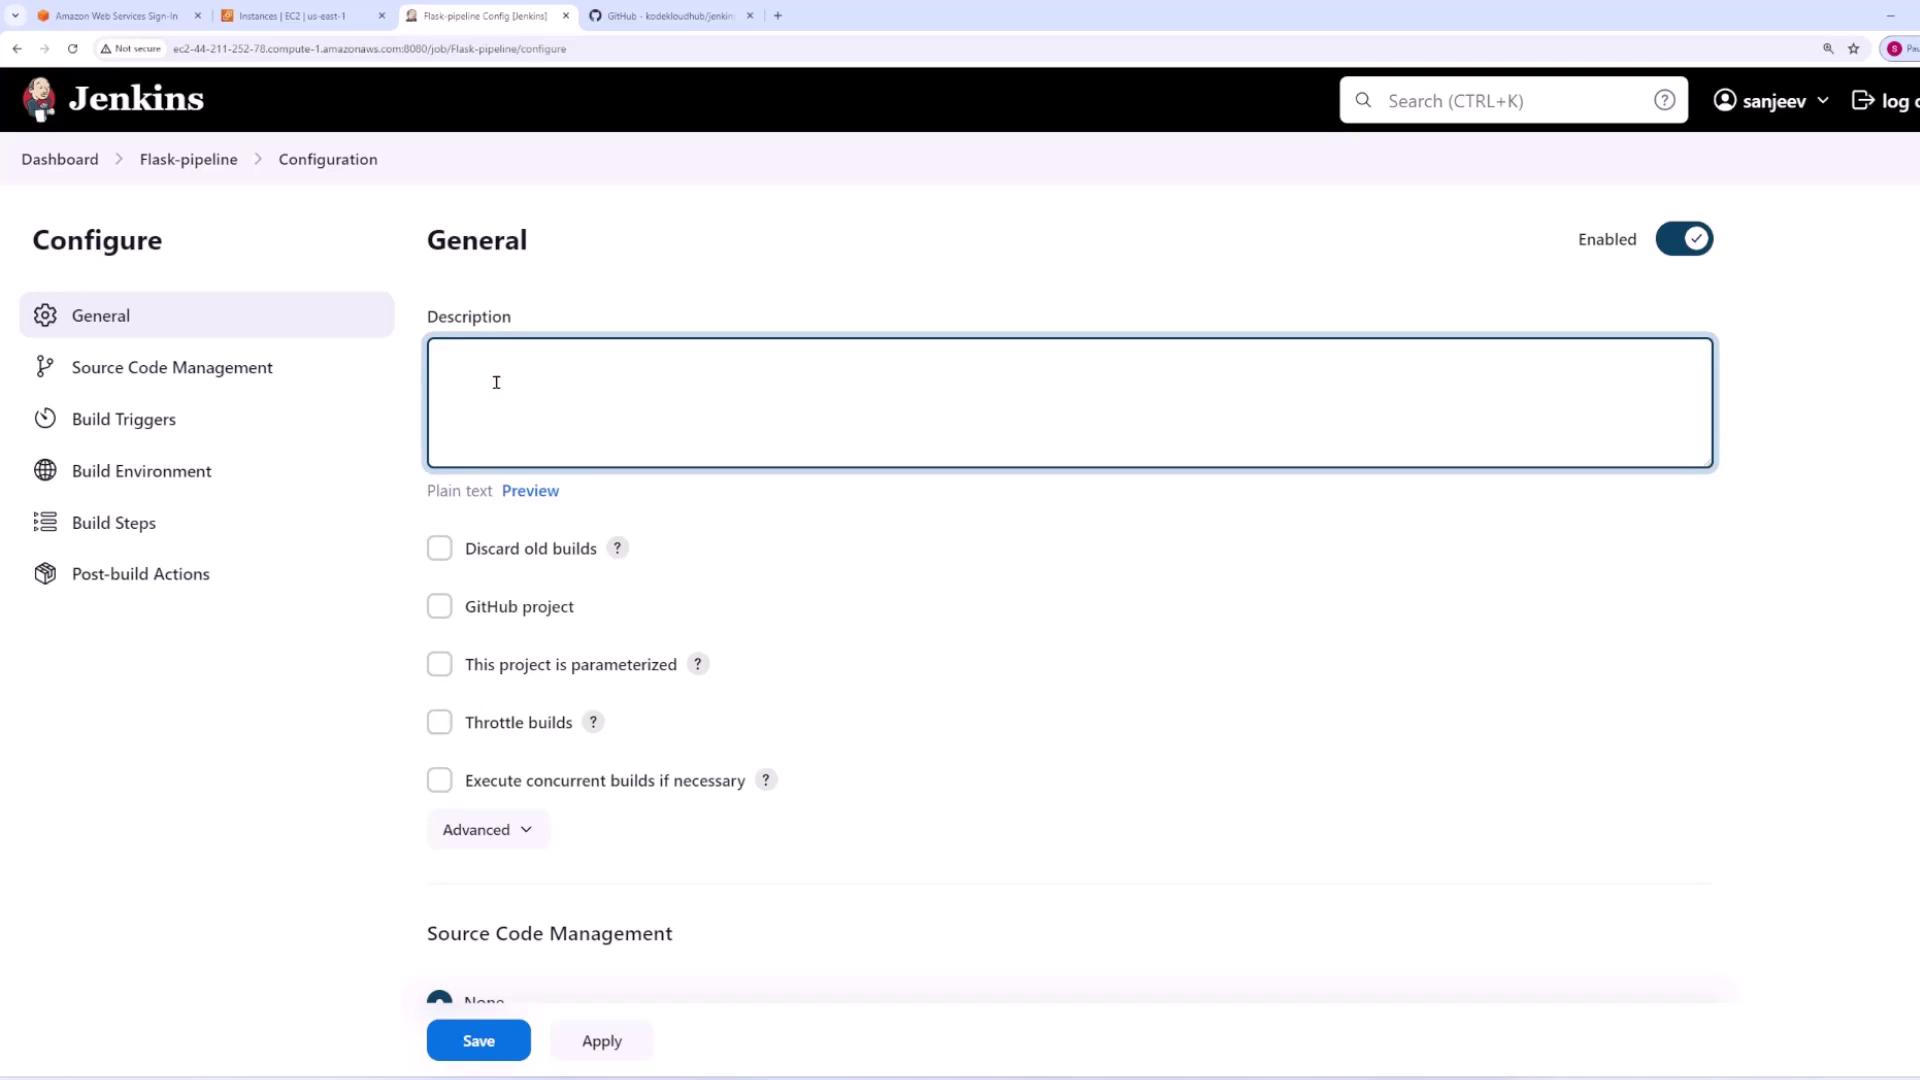
* You can add an optional project description on the next screen to provide context for your team.
<Frame>
  ![Jenkins configuration page for "Flask-pipeline" showing general settings, source code management, and build triggers.](https://kodekloud.com/kk-media/image/upload/v1752879897/notes-assets/images/Jenkins-Project-Building-CICD-Pipeline-for-Scalable-Web-Applications-Integrating-with-Git/jenkins-flask-pipeline-configuration.jpg)
</Frame>

### Set Up Source Code Management

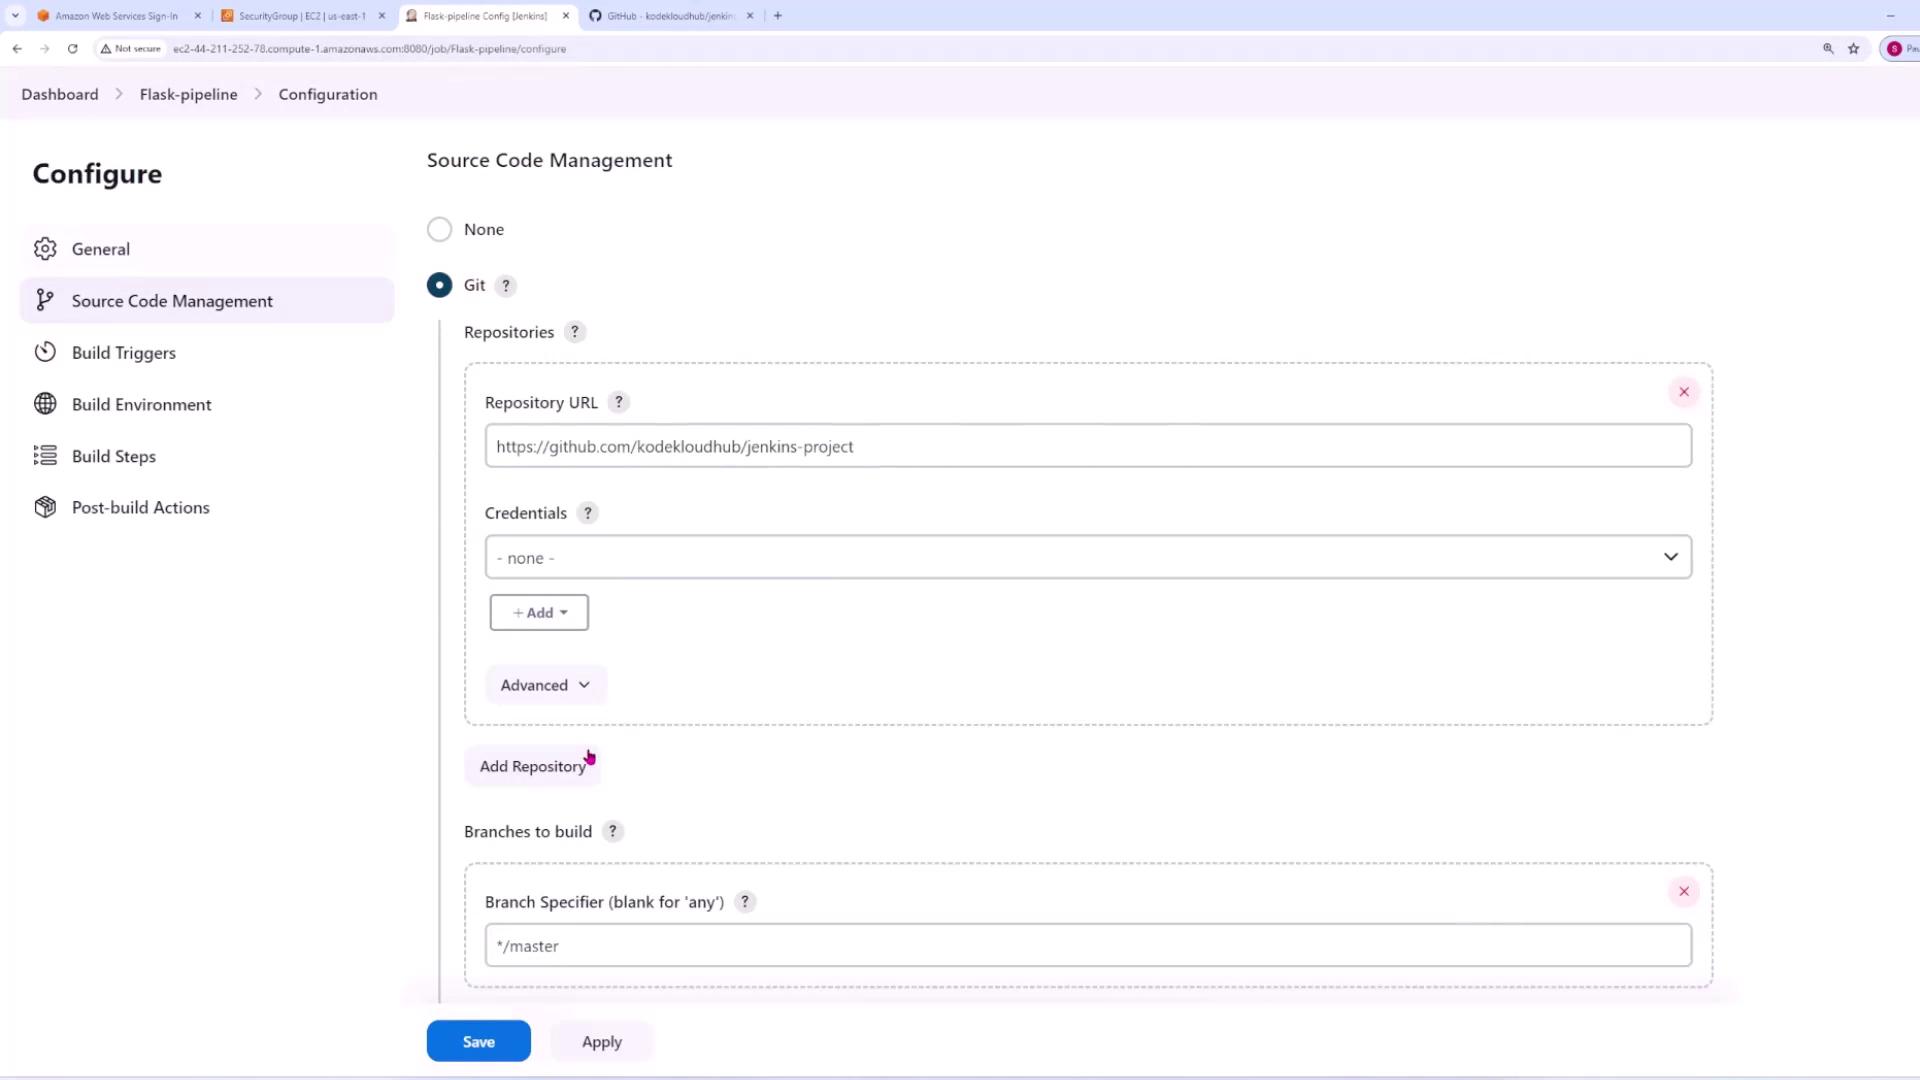
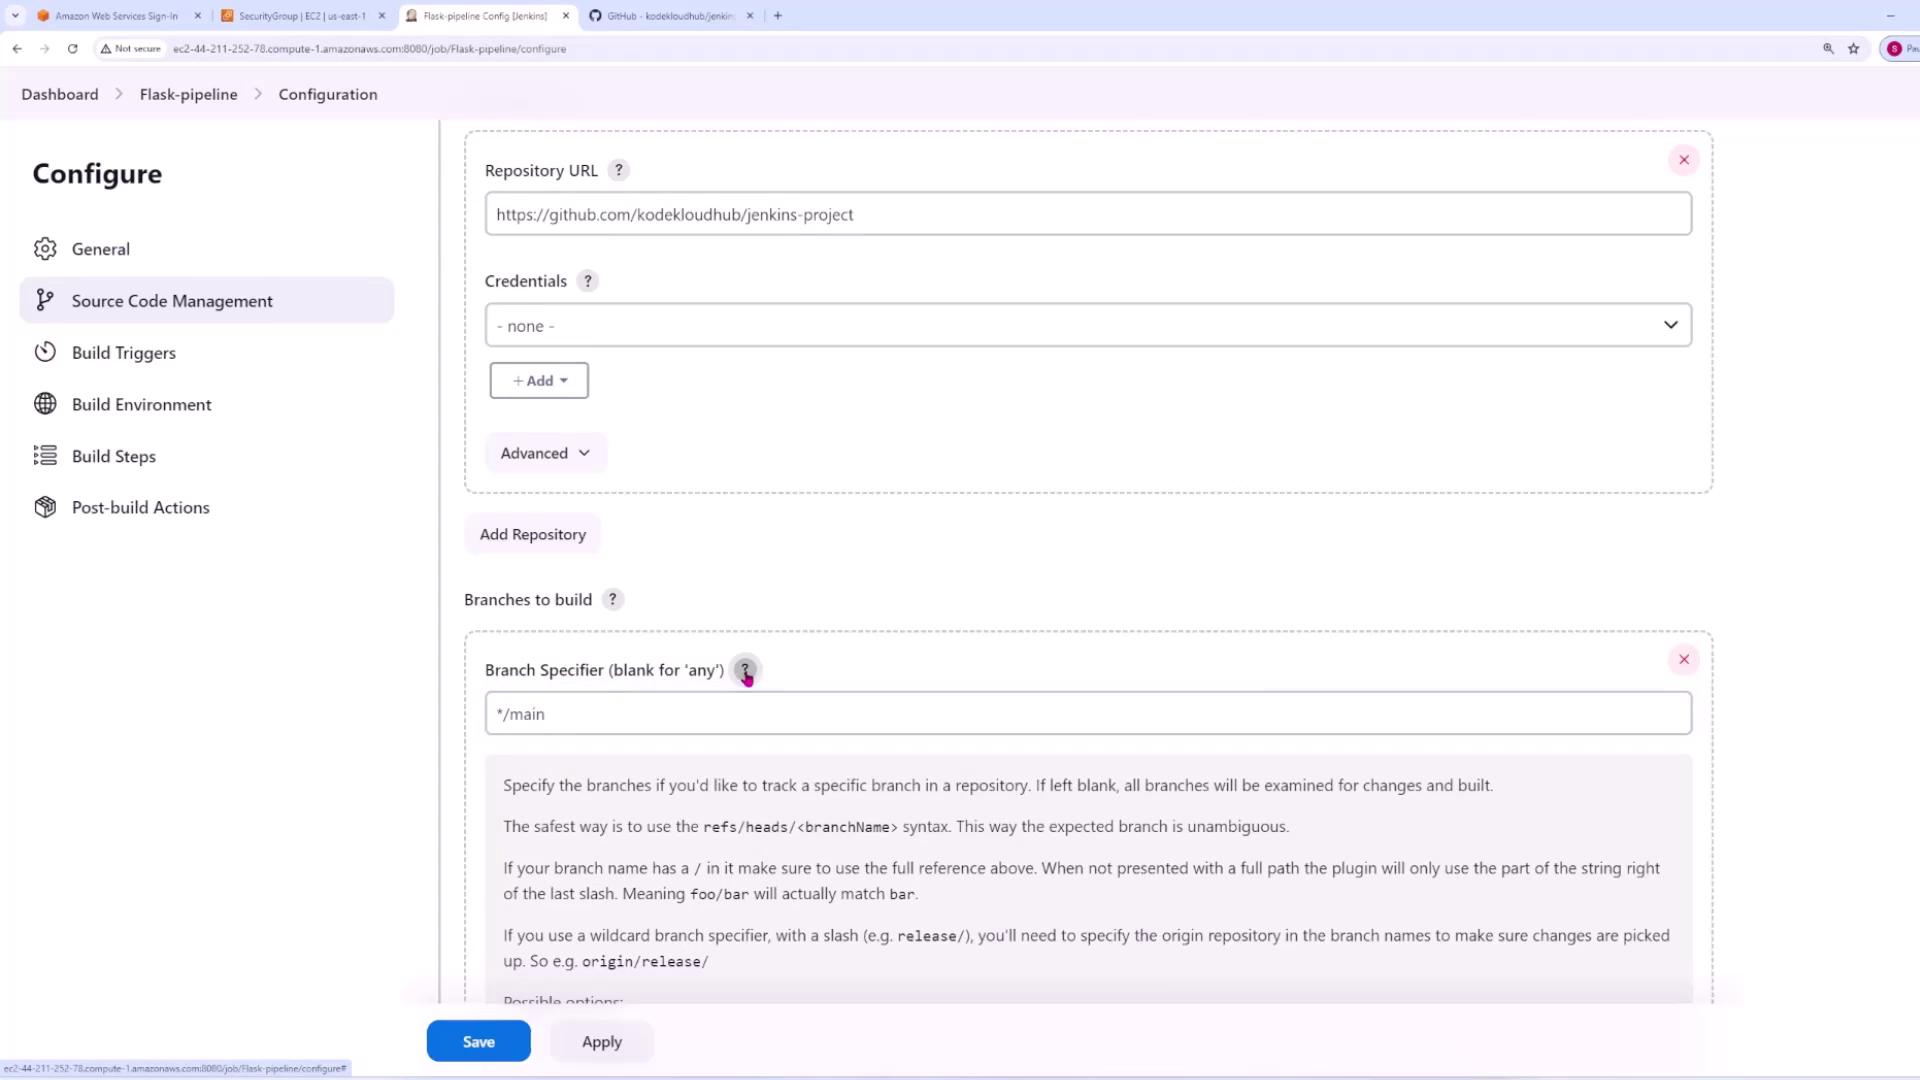
1. In the **Source Code Management** section, change the default "None" option to **Git**.
2. Enter the Git repository URL. For public repositories, credentials are not necessary; for private repositories, configure the appropriate credentials.
<Frame>
  ![Jenkins screen for Git configuration with fields for repository URL and branch specification.](https://kodekloud.com/kk-media/image/upload/v1752879898/notes-assets/images/Jenkins-Project-Building-CICD-Pipeline-for-Scalable-Web-Applications-Integrating-with-Git/jenkins-git-configuration-screen.jpg)
</Frame>

### Specify the Branch to Build

* By default, Jenkins may reference the `/master` branch. If your repository uses a branch named `main`, update the branch information accordingly.
* Leaving the branch field blank triggers builds for any branch; however, the focus here is on the `main` branch.
<Frame>
  ![Jenkins pipeline configuration screen showing repository URL, credentials, and branch options.](https://kodekloud.com/kk-media/image/upload/v1752879899/notes-assets/images/Jenkins-Project-Building-CICD-Pipeline-for-Scalable-Web-Applications-Integrating-with-Git/jenkins-pipeline-configuration-screen.jpg)
</Frame>

### Configure Build Triggers

* Scroll down to the **Build Triggers** section and select **GitHub hook trigger for Git SCM polling**. This enables GitHub to send a webhook notification to the Jenkins server whenever changes are pushed.

### Add Build Steps

1. Add a build step by selecting **Execute Shell**.
2. In the command text box, include the following command to output a test message during the build process:

   ```bash theme={null}
   echo "Hello from Jenkins"
   ```

## Step 3. Set Up GitHub Webhook

Configure GitHub to notify Jenkins when changes occur:

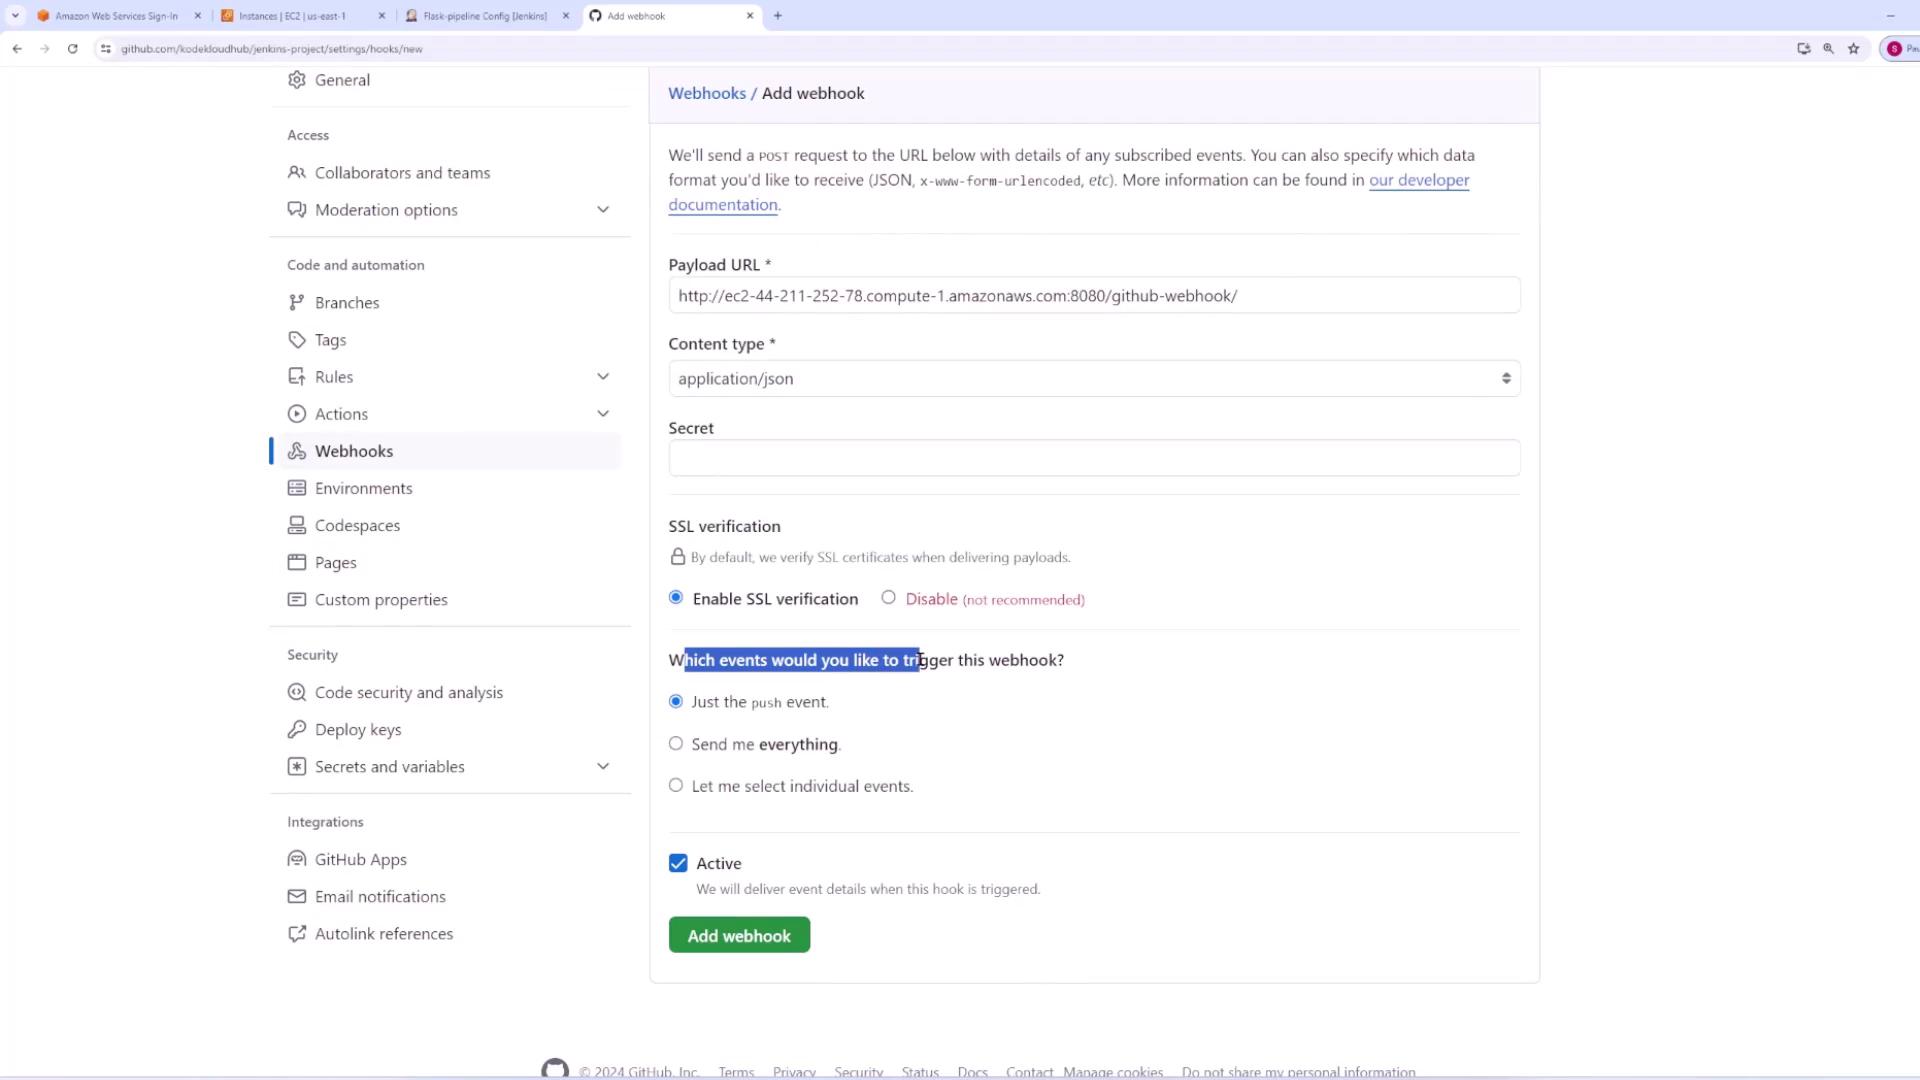
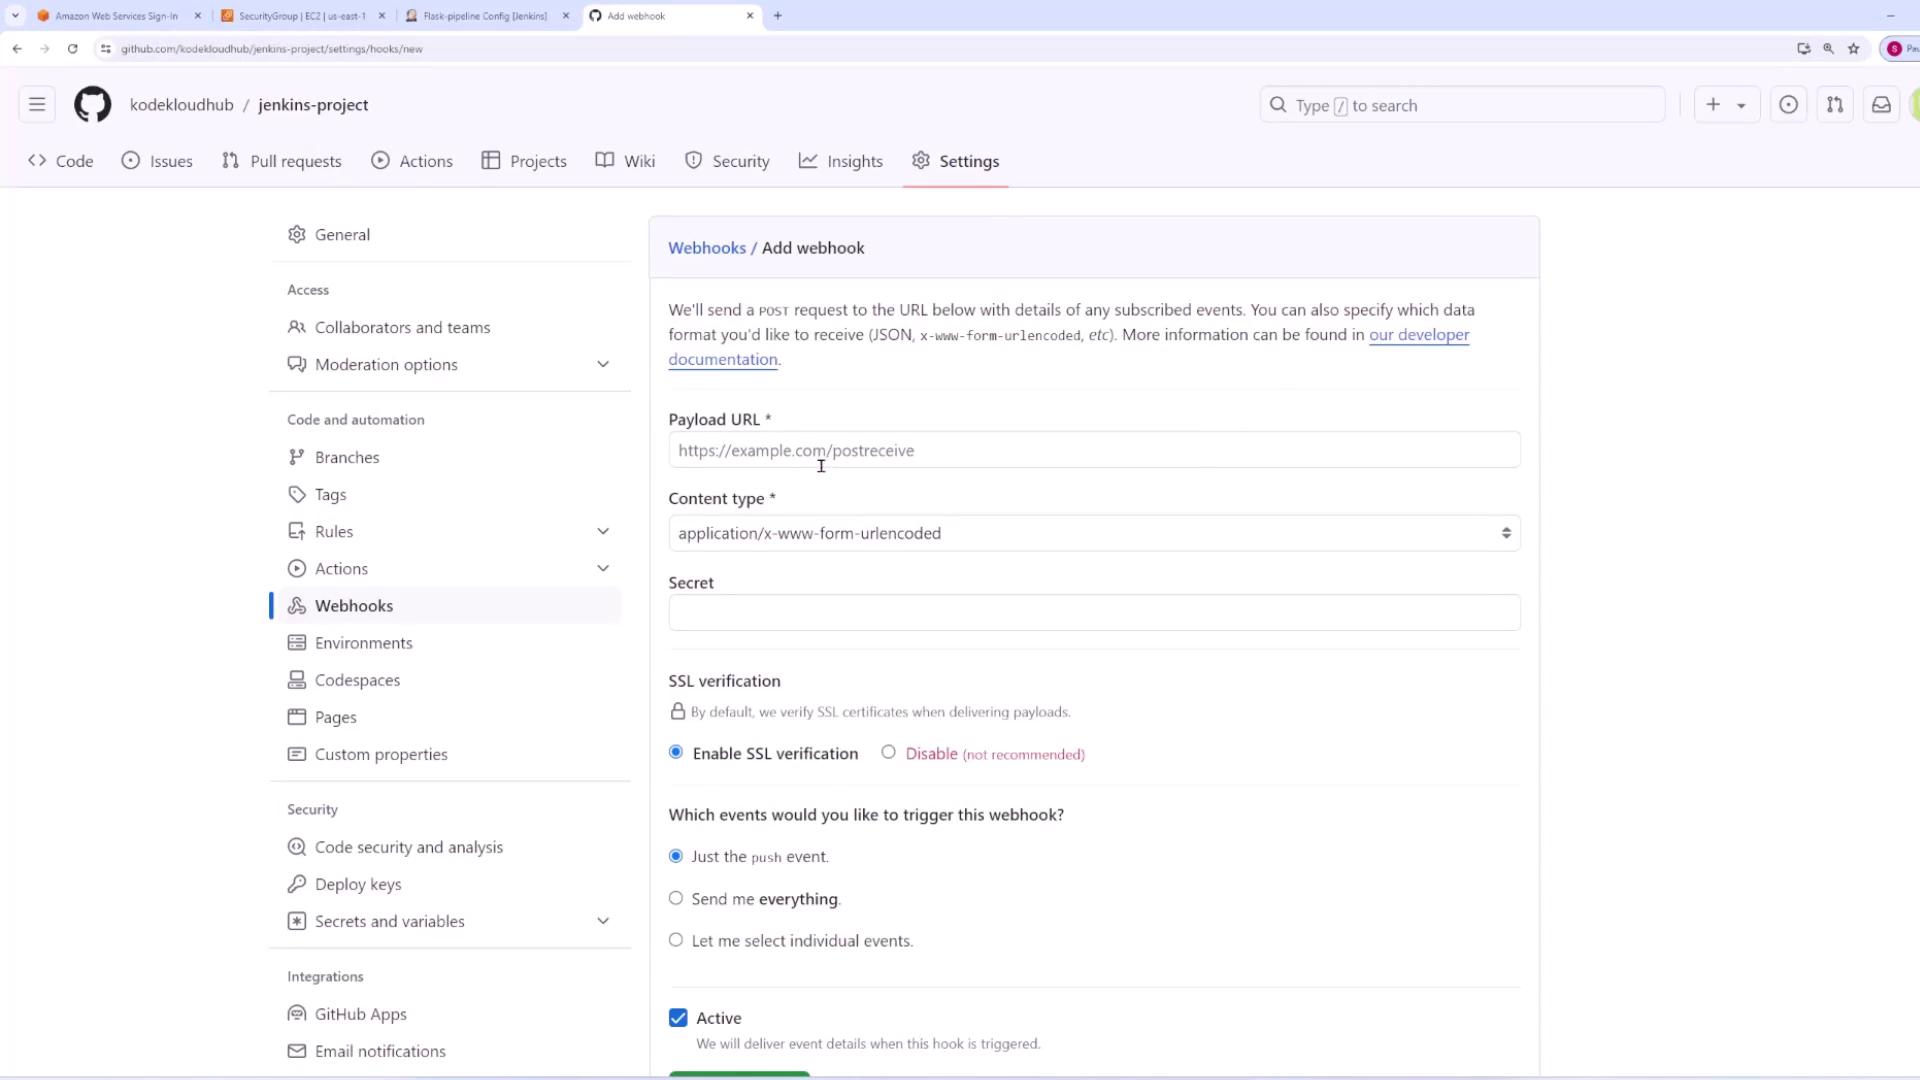
1. Navigate to your GitHub repository’s **Settings**, then access the **Webhooks** section.
2. Click **Add webhook** and complete the following:
   * Set the **Payload URL** to your Jenkins server’s URL (for example, using your EC2 instance's public DNS or IP address). Append `/GitHub-webhooks` if required.
   * Choose `application/json` as the **Content Type**.
   * Select **Push events** to trigger the webhook on code commits.
<Frame>
  ![GitHub settings page for adding a webhook with fields for payload URL, content type, and event triggers.](https://kodekloud.com/kk-media/image/upload/v1752879900/notes-assets/images/Jenkins-Project-Building-CICD-Pipeline-for-Scalable-Web-Applications-Integrating-with-Git/github-settings-webhook-payload-url.jpg)
</Frame>

<Frame>
  ![GitHub webhook configuration screen with options for payload URL, content type, and event triggers.](https://kodekloud.com/kk-media/image/upload/v1752879901/notes-assets/images/Jenkins-Project-Building-CICD-Pipeline-for-Scalable-Web-Applications-Integrating-with-Git/github-settings-webhook-configuration.jpg)
</Frame>

<Callout icon="lightbulb" color="#1CB2FE">
  After configuring, verify that GitHub shows a green checkmark next to your webhook. This confirms that notifications are delivered successfully.
</Callout>

Return to the Jenkins job configuration, click **Apply** and then **Save**.

## Step 4. Run a Manual Build

Perform a manual build in Jenkins to establish the job configuration. During the first build, Jenkins will clone the repository and execute the shell command.

### Sample Console Output

```bash theme={null}
Started by user sanjeev
Running as SYSTEM
Building in workspace /var/lib/jenkins/workspace/Flask-pipeline
The recommended git tool is: NONE
No credentials specified
Cloning the remote Git repository
Cloning repository https://github.com/kodeloudhub/jenkins-project
/usr/bin/git init /var/lib/jenkins/workspace/Flask-pipeline # timeout=10
Fetching upstream changes from https://github.com/kodeloudhub/jenkins-project
> git --version # timeout=10
> git config remote.origin.url https://github.com/kodeloudhub/jenkins-project # timeout=10
> git fetch --tags --force --progress https://github.com/kodeloudhub/jenkins-project +refs/heads/*:refs/remotes/origin/* # timeout=10
> /usr/bin/git rev-parse refs/remotes/origin/main^{commit} # timeout=10
Checking out Revision bfc8c9b987f71911d5c844b1875beeda9 (refs/remotes/origin/main)
> /usr/bin/git config core.sparsecheckout # timeout=10
> /usr/bin/git checkout -f bfc8c9b987f71911d5c844b1875beeda9 # timeout=10
Commit message: "Add files via upload"
First time build. Skipping changelog.
[Flask-pipeline] $ /bin/sh -xe /tmp/jenkins36311316873210734.sh
+ echo 'Hello from Jenkins'
Hello from Jenkins
Finished: SUCCESS
```

## Step 5. Test Auto-Trigger by Pushing Changes

Modify your Flask application (for example, update `index.html`):

```html theme={null}
<html>
  <head>
    <style>
      .task-item {
      }
      .task-text {
        margin: 0;
      }
    </style>
  </head>
  <body>
    <h1>Todo App</h1>
    <!-- Add Task Form -->
    <form method="post">
```

After saving your changes, add, commit, and push them using the following commands:

```bash theme={null}
# Add changes to staging
git add

# Commit the changes with a descriptive message
git commit -m "made changes to index.html"

# Push changes to the main branch
git push origin main
```

Once the changes are pushed, Jenkins will automatically trigger a new build for the "Flask pipeline" job.

### Sample Console Output for the Auto-Triggered Build

```bash theme={null}
Started by GitHub push by sanjeevkt720
Running as SYSTEM
Building in workspace /var/lib/jenkins/workspace/Flask-pipeline
The recommended git tool is: NONE
No credentials specified
> /usr/bin/git rev-parse --resolve-git-dir /var/lib/jenkins/workspace/Flask-pipeline/.git # timeout=10
Fetching changes from the remote Git repository
> /usr/bin/git config remote.origin.url https://github.com/kodeloudhub/jenkins-project # timeout=10
Fetching upstream changes from https://github.com/kodeloudhub/jenkins-project
> /usr/bin/git --version # timeout=10
> git --version # git version 2.40.1
> /usr/bin/git fetch --tags --force --progress https://github.com/kodeloudhub/jenkins-project +refs/heads/*:refs/remotes/origin/* # timeout=10
Checking out Revision 335e2031e167245b217bec9a5402a1c94ec5 (refs/remotes/origin/main)
> /usr/bin/git config core.sparsecheckout # timeout=10
> /usr/bin/git checkout -f 335e2031e167245b217bec9a5402a1c94ec5 # timeout=10
Commit message: "made changes to index.html"
> /usr/bin/git rev-list --no-walk bfc8489d5b1161bb14f565b0bea9e7d9 # timeout=10
[Flask-pipeline] $ /bin/sh -xe /tmp/jenkins34718612456724851020.sh
+ echo 'Hello from Jenkins'
Hello from Jenkins
Finished: SUCCESS
```

<Callout icon="lightbulb" color="#1CB2FE">
  After each build (manual or auto-triggered), review the console output in Jenkins. This ensures that the repository is cloned correctly and the build steps, including the execution of the shell command, are completed successfully.
</Callout>

Now, every time changes are pushed to the `main` branch of your repository, Jenkins will automatically trigger a build using the GitHub webhook integration. For more information on Git and Jenkins integration, check out the [Jenkins Documentation](https://www.jenkins.io/doc/) and [GitHub Docs](https://docs.github.com/).

<CardGroup>
  <Card title="Watch Video" icon="video" cta="Learn more" href="https://learn.kodekloud.com/user/courses/jenkins-project-building-ci-cd-pipeline-for-scalable-web-applications/module/4b025d4d-3ef9-479d-a483-3aa7a206a553/lesson/efdff7d4-fc12-414e-9a26-e287acdf5f2f" />

  <Card title="Practice Lab" icon="installation" cta="Learn more" href="https://learn.kodekloud.com/user/courses/jenkins-project-building-ci-cd-pipeline-for-scalable-web-applications/module/4b025d4d-3ef9-479d-a483-3aa7a206a553/lesson/e502a22e-3b94-4ba5-af3d-9de2b764ec42" />
</CardGroup>