Jenkins Project: Building CI/CD Pipeline for Scalable Web Applications

Lambda Deployment

Demo Configuring Pipeline For Lambda

In this guide, you will learn how to configure a CI/CD pipeline in Jenkins to deploy a Lambda application using AWS credentials. We start by setting up the necessary AWS credentials in Jenkins, then move on to configuring the pipeline and finally updating the Lambda function.

Configuring AWS Credentials in Jenkins

To securely deploy your Lambda function, first configure AWS credentials within your Jenkins instance:

  1. Navigate to Manage Jenkins > Credentials > Global Credentials.
  2. Add a new credential of type Secret Text with the ID aws-access-key. Paste your AWS access key that you normally use locally.

    Security Warning

    For enhanced security, create a dedicated AWS user with only the necessary permissions for Lambda and related services.

  3. Add a second credential of type Secret Text with the ID aws-secret-key and paste your AWS secret access key.

The image shows a Jenkins interface displaying a list of global credentials, including a production server IP, SSH key, and AWS access key, with options to add or edit credentials.

Creating and Configuring the Pipeline

After setting up the credentials, create a new pipeline from the Jenkins dashboard:

  • Name the pipeline "Lambda pipeline."
  • Enable the GitHub hook trigger for Git SCM polling.
  • Choose Pipeline script from SCM.
  • Select Git as the SCM, paste your repository URL, and specify the branch (typically "main").
  • Set the script path to Jenkinsfile.

The image shows a configuration screen for setting up a Git repository in a pipeline, with fields for repository URL, credentials, and branch specification. The URL points to a GitHub repository, and the branch specified is "master".

Save your configuration to complete the pipeline setup.

The Jenkinsfile and Pipeline Steps

The following is the final version of the Jenkinsfile used in this pipeline. It is divided into four stages: Setup, Test, Build, and Deploy. Notice that the AWS credentials are injected as environment variables to be used by the AWS CLI and SAM CLI.

pipeline {
    agent any
    stages {
        stage('Setup') {
            steps {
                sh "pip3 install -r lambda-app/tests/requirements.txt"
            }
        }
        stage('Test') {
            steps {
                sh "pytest"
            }
        }
        stage('Build') {
            steps {
                sh "sam build -t lambda-app/template.yaml"
            }
        }
        stage('Deploy') {
            environment {
                AWS_ACCESS_KEY_ID = credentials('aws-access-key')
                AWS_SECRET_ACCESS_KEY = credentials('aws-secret-key')
            }
            steps {
                sh "sam deploy -t lambda-app/template.yaml --no-confirm-changeset --no-fail-on-empty-changeset"
            }
        }
    }
}

Stage Details

  • Setup Stage:
    Installs the testing dependencies listed in lambda-app/tests/requirements.txt. This file includes important libraries such as pytest, boto3, and requests needed for testing purposes.

  • Test Stage:
    Runs the test suite using Pytest to ensure the application works as expected.

  • Build Stage:
    Utilizes the SAM CLI to build the Lambda application, referencing the lambda-app/template.yaml file.

  • Deploy Stage:
    Injects AWS credentials as environment variables (AWS_ACCESS_KEY_ID and AWS_SECRET_ACCESS_KEY) and deploys the updated Lambda function using the SAM CLI with flags to bypass manual confirmation.

Committing and Pushing Changes

After you have updated your Jenkinsfile and made any necessary changes to your Lambda code, commit and push your changes to your Git repository. For example:

C:\Users\sanje\Documents\Jenkins-demo> git add .
C:\Users\sanje\Documents\Jenkins-demo> git commit -m "changed to lambda project"
[main adcbc82] changed to lambda project
 22 files changed, 690 insertions(+), 229 deletions(-)
 delete mode 100644 app.py
 create mode 100644 iam-policy.json
 create mode 100644 lambda-app/.gitignore
 create mode 100644 lambda-app/README.md
 rename flask.service -> lambda-app/__init__.py (100%)
 create mode 100644 lambda-app/events/event.json
 create mode 100644 lambda-app/hello_world/__init__.py
 create mode 100644 lambda-app/hello_world/app.py
 create mode 100644 lambda-app/hello_world/requirements.txt
 create mode 100644 lambda-app/samconfig.toml
 create mode 100644 lambda-app/template.yaml
 create mode 100644 lambda-app/tests/__init__.py
 create mode 100644 lambda-app/tests/requirements.txt
 create mode 100644 lambda-app/tests/unit/__init__.py
 create mode 100644 lambda-app/tests/unit/test_handler.py
 delete mode 100644 requirements.txt
 create mode 100644 tasks.txt
 delete mode 100644 templates/index.html
 delete mode 100644 test_app.py

Then, push the changes to the main branch:

C:\Users\sanje\Documents\Jenkins-demo> git push origin main

Build and Deployment Output

Once the changes are pushed, Jenkins will trigger the build automatically. The console output should confirm:

  • The successful checkout of code.
  • Installation of all required packages.
  • Execution of tests without errors.
  • Successful SAM build and deployment commands.

A sample snippet from the SAM CLI output might look like:

pip3 install -r lambda-app/tests/requirements.txt
Defaulting to user installation because normal site-packages is not writable
Requirement already satisfied: pytest in /var/lib/jenkins/.local/lib/python3.9/site-packages (from -r lambda-app/tests/requirements.txt (line 1)) (7.4.4)
Requirement already satisfied: boto3 in /var/lib/jenkins/.local/lib/python3.9/site-packages (from -r lambda-app/tests/requirements.txt (line 2)) (1.34.158)
Requirement already satisfied: requests in /var/lib/jenkins/.local/lib/python3.9/site-packages (from -r lambda-app/tests/requirements.txt (line 3)) (2.31.0)
...

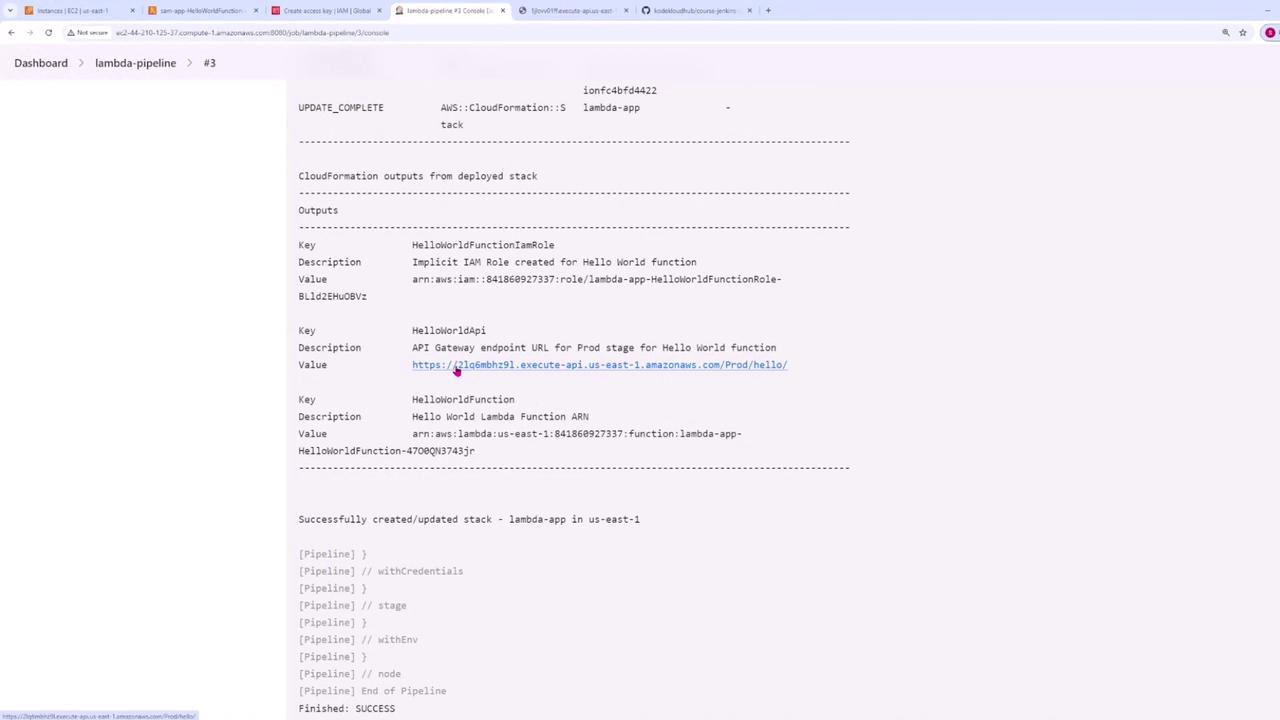
After deployment, the SAM CLI output will provide details including the IAM role, API Gateway endpoint, and the Lambda function ARN.

The image shows a screenshot of an AWS CloudFormation console output, detailing the deployment of a stack named "lambda-app" with information about IAM roles, API Gateway endpoint, and Lambda function ARN.

Click the API Gateway link provided in the output to test your deployed Lambda function. You should see a message similar to "Hello World version one" on your initial run.

Updating the Lambda Function

To deploy updates to your Lambda function (for instance, upgrading to a new version), modify the function code and push the changes to your repository. An updated version of app.py looks like this:

import json
def lambda_handler(event, context):
    return {
        "statusCode": 200,
        "body": json.dumps({
            "message": "hello world v2",
            # "location": ip.text.replace("\n", "")
        }),
    }

After modifying the file, commit and push your changes:

C:\Users\sanje\Documents\Jenkins-demo> git add .
C:\Users\sanje\Documents\Jenkins-demo> git commit -m "v2"
[main 0389F11] 1 file changed, 1 insertion(+), 1 deletion(-)
C:\Users\sanje\Documents\Jenkins-demo> git push origin main

Jenkins will trigger a new build, and you should observe that the Lambda function is updated to version two.

A sample JSON response from the updated Lambda function may look similar to:

{"message": "hello w0rld v2"}

This confirms that your CI/CD pipeline is properly set up to test, build, and deploy updates for your Lambda function.

For more detailed guidance, refer to the official AWS SAM Documentation and Jenkins Documentation.

Watch Video

Watch video content

Previous
Configuring Pipeline For Lambda