> ## Documentation Index
> Fetch the complete documentation index at: https://notes.kodekloud.com/llms.txt
> Use this file to discover all available pages before exploring further.
# Demo Pipeline Parameters
> Guide showing how to add runtime pipeline parameters in Kubeflow Pipelines to pass hyperparameters like epochs and learning rate to components for flexible experiments.
This tutorial shows how to add and use pipeline parameters with Kubeflow Pipelines. The example pipeline has two components:
* `train_model` — simulates training and accepts hyperparameters.
* `evaluate_model` — simulates model evaluation.
We start with a hardcoded pipeline, then convert it to accept runtime parameters so each pipeline run can use different hyperparameters.
## Hardcoded pipeline (problem)
In this version the `epochs` and `lr` values are fixed inside the component, so every run uses the same hyperparameters.
```python theme={null}
from kfp.dsl import component, pipeline
from kfp import compiler
@component
def train_model() -> None:
# Pretend training logic
epochs = 10
lr = 0.01
print(f"Training Model with epochs: {epochs}, and lr: {lr}")
@component
def evaluate_model() -> None:
print("Model passed with accuracy 97")
@pipeline(name="parameter-passing-example")
def ml_pipeline():
train_task = train_model()
ev = evaluate_model().after(train_task)
if __name__ == "__main__":
# Compile the pipeline into a YAML file
compiler.Compiler().compile(ml_pipeline, "parameters.yaml")
```
Problem: the hyperparameters are hardcoded. To run experiments with different values you must change the source code each time. Pipeline parameters solve this by allowing values to be supplied at run-time.
## How pipeline parameters work (overview)
* Declare parameters as arguments to the `@pipeline` function and give them default values if desired.
* Make the component accept the corresponding arguments.
* Forward the pipeline parameters to the component when constructing the pipeline tasks.
Pipeline parameters are ideal for hyperparameters, dataset locations, or any run-specific configuration. Declaring defaults keeps runs reproducible while allowing overrides in the UI or via the API.
## Parameterized pipeline (recommended)
Below is the same pipeline updated to accept `epochs` and `lr` as pipeline parameters. When you upload the compiled pipeline, the UI will expose these fields so users can override them for each run.
```python theme={null}
from kfp.dsl import component, pipeline
from kfp import compiler
@component
def train_model(epochs: int, lr: float) -> None:
# Pretend training logic
print(f"Training Model with epochs: {epochs}, and lr: {lr}")
@component
def evaluate_model() -> None:
print("Model passed with accuracy 97")
@pipeline(name="parameter-passing-example")
def ml_pipeline(epochs: int = 10, lr: float = 0.01):
train_task = train_model(epochs=epochs, lr=lr)
ev = evaluate_model().after(train_task)
if __name__ == "__main__":
# Compile the pipeline into a YAML file
compiler.Compiler().compile(ml_pipeline, "parameters.yaml")
```
Key points:
1. `ml_pipeline` declares `epochs` and `lr` (defaults: `10` and `0.01`).
2. When creating a run in the Kubeflow Pipelines UI or via API, you can override these defaults.
3. The pipeline forwards those values into `train_model` at runtime.
## Compile the pipeline
Generate the pipeline package (YAML) with:
* `python pipeline.py`
The compiler may emit a FutureWarning about a default base image used by the `@component` decorator. This is informational; see the warning callout below.
You may see a FutureWarning about the default base image changing in a future SDK release. To avoid surprises, specify an explicit `base_image` when using `@component`, or ensure your component is compatible with the newer Python version.
Example console output (trimmed):
```text theme={null}
$ python pipeline.py
/Users/sanjeev/.../pipeline.py:4: FutureWarning: The default base image used by the @dsl.component decorator will switch from 'python:3.11' to 'python:3.12' on Oct 1, 2027. To ensure your existing components work with versions of the KFP SDK released after that date, provide an explicit base_image argument and ensure compatibility with Python 3.12.
@component
```
## Upload the compiled pipeline to Kubeflow
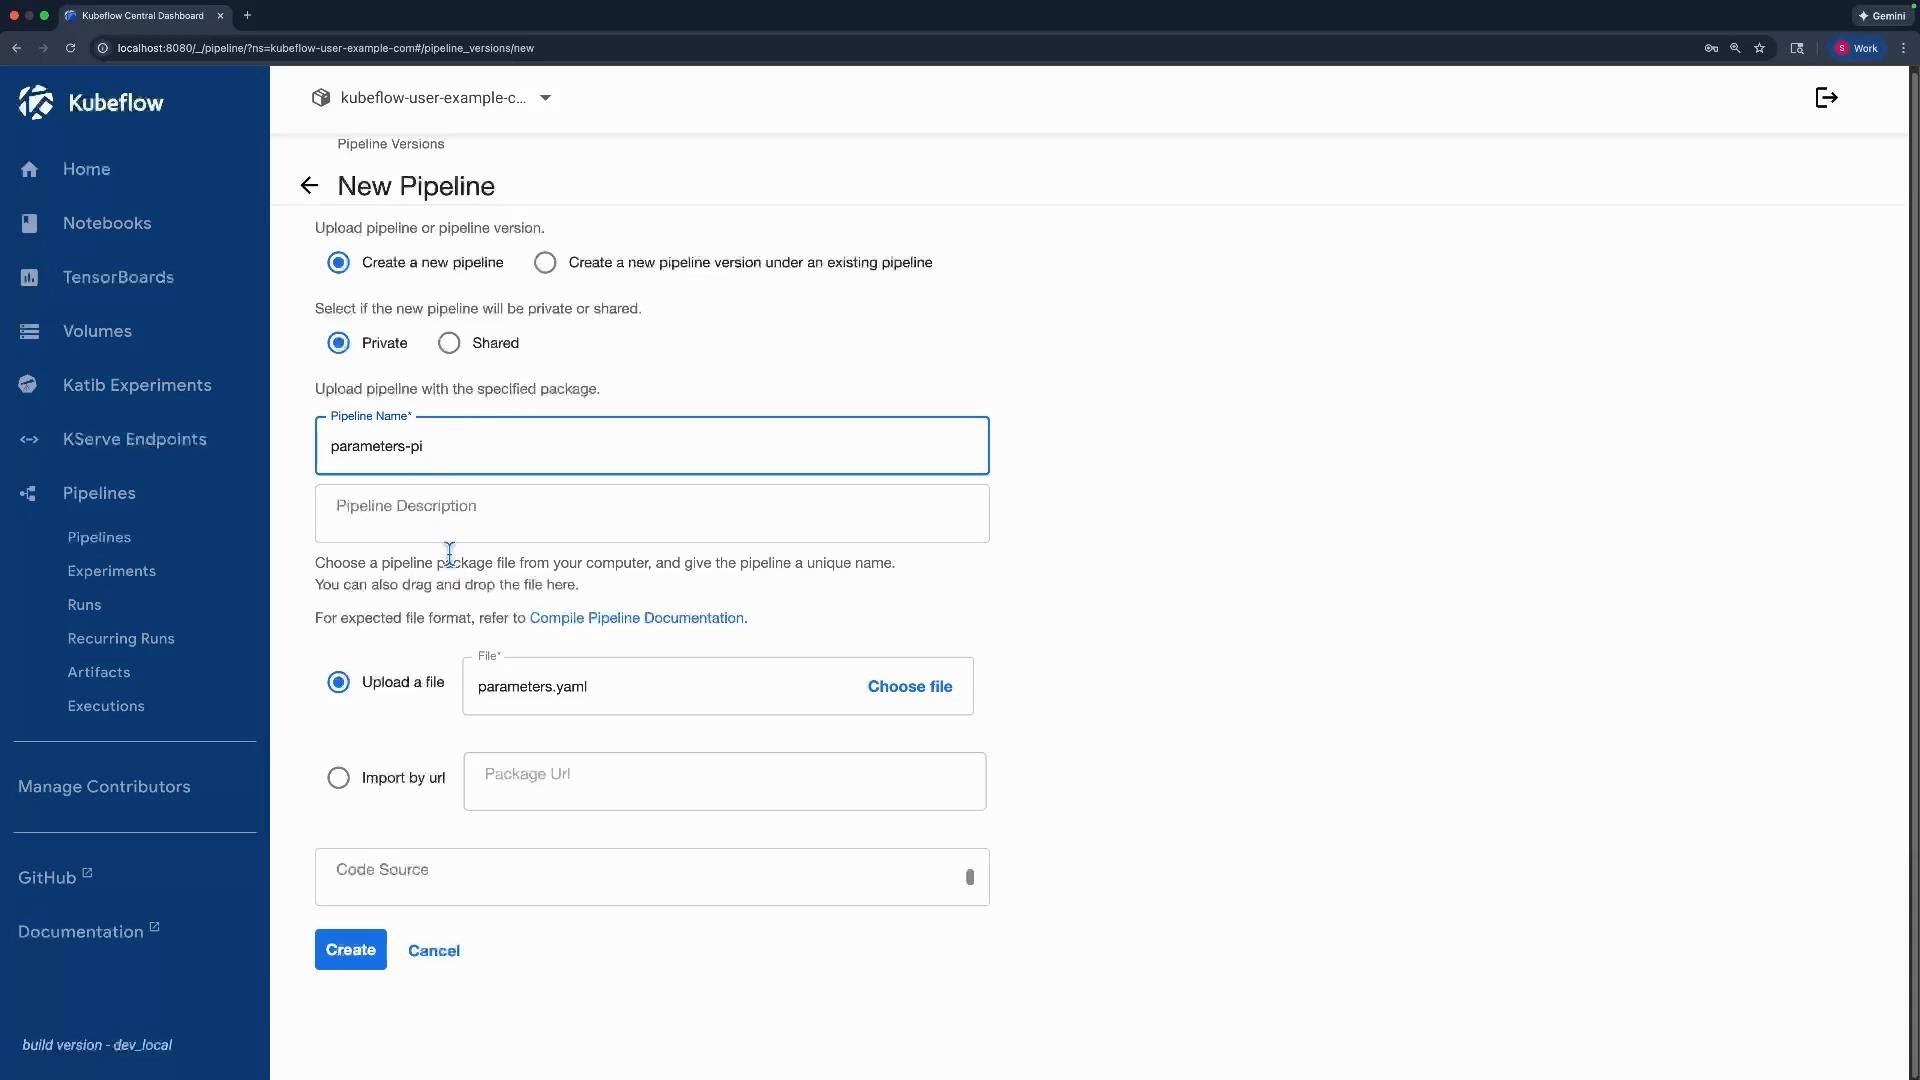
* In the Kubeflow Pipelines UI, upload the generated `parameters.yaml` and create a new pipeline.
 ## Start a run and supply parameter values
* Click "Create run" (select an experiment if needed).
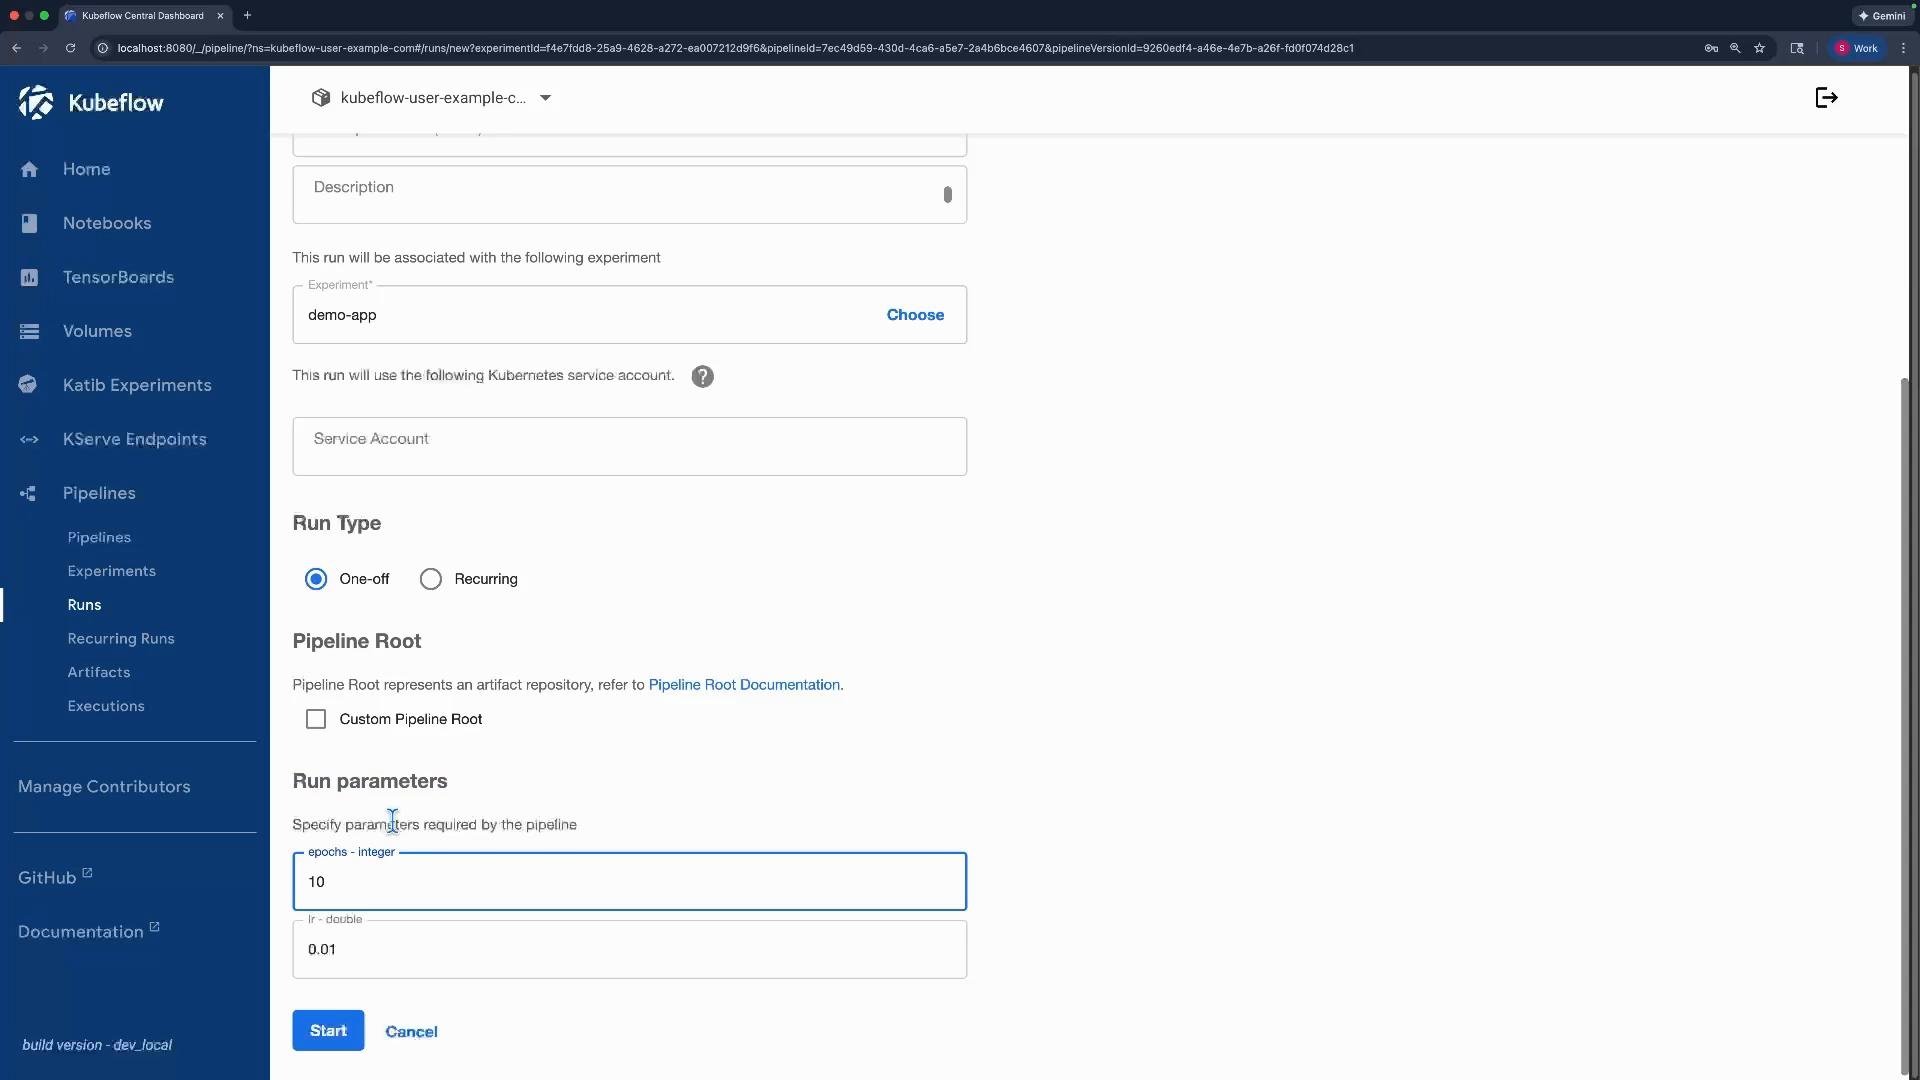
* The run form exposes the pipeline parameters (`epochs`, `lr`). Enter values to override the defaults (for example: `epochs = 20`, `lr = 0.02`) and start the run.
## Start a run and supply parameter values
* Click "Create run" (select an experiment if needed).
* The run form exposes the pipeline parameters (`epochs`, `lr`). Enter values to override the defaults (for example: `epochs = 20`, `lr = 0.02`) and start the run.
 ## Verify the run and inspect inputs
* After the run completes, open the `Train Model` step to inspect input parameters and logs.
* The run inputs will show the parameter values you supplied:
```json theme={null}
{
"inputs": {
"parameters": {
"epochs": 20,
"lr": 0.02
}
}
}
```
* The executor logs should include the component printout confirming the passed-in values:
```text theme={null}
Training Model with epochs: 20, and lr: 0.02
[KFP Executor 2026-01-19 21:48:26,678 INFO]: Wrote executor output file to /minio/mlpipeline/...
I0119 21:48:26.682420 23 launcher_v2.go:998] ExecutorOutput: {
"artifacts": {
"executor-logs": {
"artifacts": [
{
"name": "executor-logs",
"uri": "minio://mlpipeline/private-artifacts/kubeflow-user-example-com/v2/artifacts/..."
}
]
}
}
}
```
## Quick reference
| Topic | Action / Example |
| - | - |
| Declare pipeline parameters | `@pipeline` function signature: `def ml_pipeline(epochs: int = 10, lr: float = 0.01)` |
| Component argument types | `@component` function signature: `def train_model(epochs: int, lr: float)` |
| Compile | `python pipeline.py` → produces `parameters.yaml` |
| Upload | Use Kubeflow Pipelines UI to upload `parameters.yaml` and create runs |
| Override parameters | Use the UI or API to set `epochs` and `lr` per run |
## Summary
* Define pipeline parameters as inputs to the `@pipeline` function (with optional defaults).
* Accept corresponding arguments in the component that needs them.
* Pass the pipeline parameters into the component call inside the pipeline.
* Users can override defaults in the Kubeflow UI or via the API for flexible experimentation without changing code.
Further reading and references:
* [Kubeflow Pipelines Documentation](https://www.kubeflow.org/docs/components/pipelines/)
* KFP SDK component docs and examples for advanced parameter types and component packaging.
This documentation is built and hosted on [Mintlify](https://mintlify.com), a developer documentation platform.
## Verify the run and inspect inputs
* After the run completes, open the `Train Model` step to inspect input parameters and logs.
* The run inputs will show the parameter values you supplied:
```json theme={null}
{
"inputs": {
"parameters": {
"epochs": 20,
"lr": 0.02
}
}
}
```
* The executor logs should include the component printout confirming the passed-in values:
```text theme={null}
Training Model with epochs: 20, and lr: 0.02
[KFP Executor 2026-01-19 21:48:26,678 INFO]: Wrote executor output file to /minio/mlpipeline/...
I0119 21:48:26.682420 23 launcher_v2.go:998] ExecutorOutput: {
"artifacts": {
"executor-logs": {
"artifacts": [
{
"name": "executor-logs",
"uri": "minio://mlpipeline/private-artifacts/kubeflow-user-example-com/v2/artifacts/..."
}
]
}
}
}
```
## Quick reference
| Topic | Action / Example |
| - | - |
| Declare pipeline parameters | `@pipeline` function signature: `def ml_pipeline(epochs: int = 10, lr: float = 0.01)` |
| Component argument types | `@component` function signature: `def train_model(epochs: int, lr: float)` |
| Compile | `python pipeline.py` → produces `parameters.yaml` |
| Upload | Use Kubeflow Pipelines UI to upload `parameters.yaml` and create runs |
| Override parameters | Use the UI or API to set `epochs` and `lr` per run |
## Summary
* Define pipeline parameters as inputs to the `@pipeline` function (with optional defaults).
* Accept corresponding arguments in the component that needs them.
* Pass the pipeline parameters into the component call inside the pipeline.
* Users can override defaults in the Kubeflow UI or via the API for flexible experimentation without changing code.
Further reading and references:
* [Kubeflow Pipelines Documentation](https://www.kubeflow.org/docs/components/pipelines/)
* KFP SDK component docs and examples for advanced parameter types and component packaging.
This documentation is built and hosted on [Mintlify](https://mintlify.com), a developer documentation platform.