> ## Documentation Index
> Fetch the complete documentation index at: https://notes.kodekloud.com/llms.txt
> Use this file to discover all available pages before exploring further.
# Jinja2 Templates for Dynamic Configs Demo
> This article explores using Jinja2 templates in Ansible for dynamic configurations and infrastructure management.
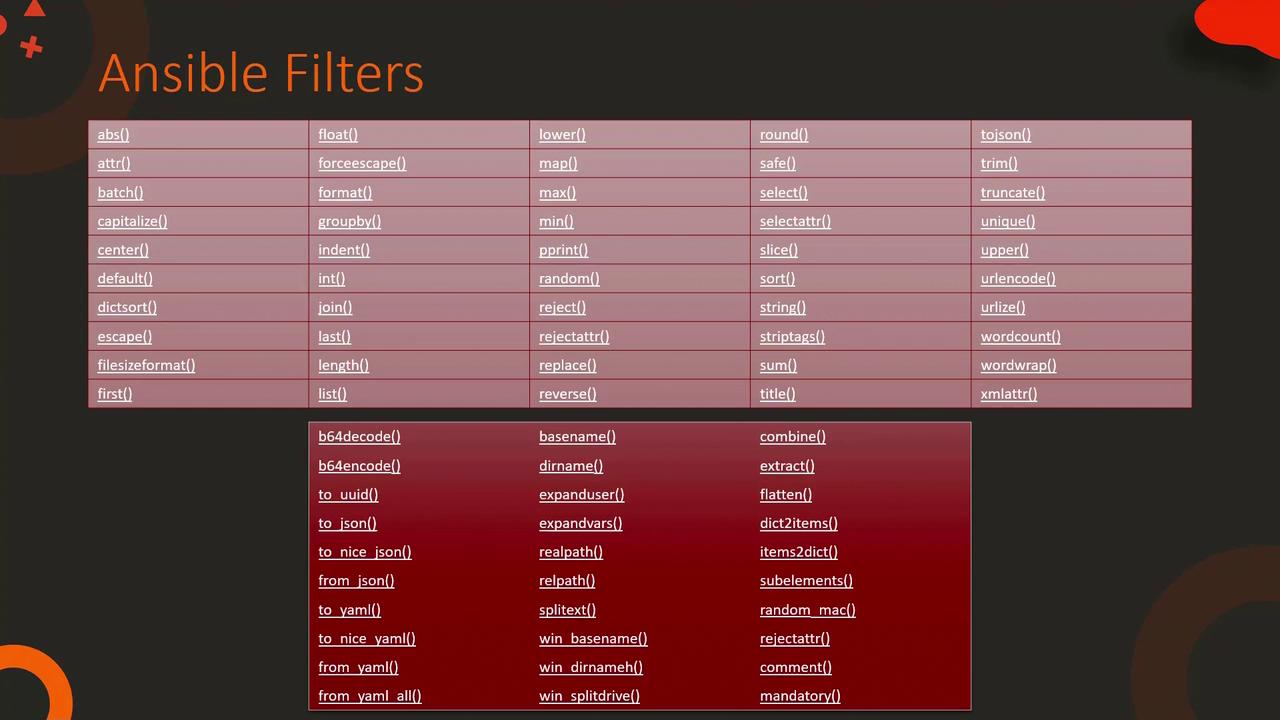
In this lesson, we explore how Ansible extends Jinja2 by incorporating filters tailored specifically for infrastructure management. While the base Jinja2 templating engine offers many built-in filters (see the [Jinja2 website](https://jinja.palletsprojects.com/) for more details), Ansible enhances this functionality with additional filters for tasks such as converting between YAML and JSON, manipulating file paths across Linux and Windows systems, managing passwords, and processing regular expressions.
## File-Related Filters
Let's begin by reviewing some file-related filters. For example, to extract the file name from a Linux file path such as `/etc/hosts`, you can use the `basename` filter. This returns `hosts`. However, note that this filter will not correctly handle Windows file paths due to the use of backslashes. In that case, the `win_basename` filter is required.
Similarly, if you need to split a Windows path into its drive letter and remaining path, apply the `win_splitdrive` filter. This filter returns an array—where the first element is the drive letter and the second element is the rest of the path. You can chain it with the `first` filter to obtain only the drive letter if needed.
```jinja2 theme={null}
{{ "/etc/hosts" | basename }}
{{ "c:\\windows\\hosts" | win_basename }}
{{ "c:\\windows\\hosts" | win_splitdrive }}
{{ "c:\\windows\\hosts" | win_splitdrive | first }}
```
## Variable Interpolation in Playbooks
In a standard Ansible playbook, Jinja2 templates undergo variable interpolation before task execution. Consider the following examples for an inventory file and a playbook snippet that uses the `nsupdate` module.
### Inventory File (/etc/ansible/hosts)
```ini theme={null}
web1 ansible_host=172.20.1.100 dns_server=10.5.5.4
web2 ansible_host=172.20.1.101 dns_server=10.5.5.4
web3 ansible_host=172.20.1.102 dns_server=10.5.5.4
```
### Playbook Using the nsupdate Module
```yaml theme={null}
---
- name: Update DNS server
hosts: all
tasks:
- nsupdate:
server: '{{ dns_server }}'
```
## Deploying a Web Server
Consider a scenario where you need to deploy a web server by copying a local `index.html` file to each web server's default directory using Ansible's `copy` module. You can start with a static inventory, playbook, and HTML file, then enhance the solution with a templated approach.
### Initial Setup with Static Files
#### Inventory File (/etc/ansible/hosts)
```ini theme={null}
[web_servers]
web1 ansible_host=172.20.1.100
web2 ansible_host=172.20.1.101
web3 ansible_host=172.20.1.102
```
#### Playbook (playbook.yml) Using the Copy Module
```yaml theme={null}
- hosts: web_servers
tasks:
- name: Copy index.html to remote servers
copy:
src: index.html
dest: /var/www/nginx-default/index.html
```
#### Local HTML File (index.html)
```html theme={null}
This is a Web Server
```
When you run this playbook, the `index.html` file is copied to each web server. However, if you want each server's homepage to display its own hostname and IP address, you can leverage variable interpolation within a Jinja2 template.
## Dynamic Content with Jinja2 Templates
A better approach is to convert your static HTML file into a dynamic Jinja2 template. Rename the file to `index.html.j2` and introduce variables. Below is an example showing the updated inventory, playbook, and Jinja2 template that customizes each server's index page based on its name.
### Inventory File (remains unchanged)
```ini theme={null}
[web_servers]
web1 ansible_host=172.20.1.100
web2 ansible_host=172.20.1.101
web3 ansible_host=172.20.1.102
```
### Updated Playbook (playbook.yml) Using the Template Module
```yaml theme={null}
- hosts: web_servers
tasks:
- name: Copy index.html to remote servers
template:
src: index.html.j2
dest: /var/www/nginx-default/index.html
```
### Jinja2 Template File (index.html.j2)
```html theme={null}
This is {{ inventory_hostname }} Server
```
When this playbook is executed, Ansible processes the Jinja2 template for each host, replacing `{{ inventory_hostname }}` with the host's actual name. For instance, if `inventory_hostname` is `web1`, the generated file will be:
```html theme={null}
This is web1 Server
```
Similarly, `web2` and `web3` will receive personalized HTML files.
> **Note:** This templating approach is not limited to static web pages. You can also generate configuration files for services such as Nginx or Redis dynamically.
## Dynamic Configuration Files
### Nginx Configuration Template
Below is an example of an Nginx configuration template (`nginx.conf.j2`) that uses variables to define the upstream server and image directory.
```nginx theme={null}
server {
location / {
fastcgi_pass {{ host }}:{{ port }};
fastcgi_param QUERY_STRING $query_string;
}
location ~ \.(gif|jpg|png)$ {
root {{ image_path }};
}
}
```
This template could render a configuration file like:
```nginx theme={null}
server {
location / {
fastcgi_pass localhost:9000;
fastcgi_param QUERY_STRING $query_string;
}
location ~ \.(gif|jpg|png)$ {
root /data/images;
}
}
```
### Redis Configuration Template with Default Filters
You can also incorporate Jinja2 filters to provide fallback values within configuration files. For instance, the following Redis configuration template uses the `default` filter:
```jinja2 theme={null}
bind {{ ip_address }}
protected-mode yes
port {{ redis_port | default('6379') }}
tcp-backlog 511
# Unix socket.
timeout 0
# TCP keepalive.
tcp-keepalive {{ tcp_keepalive | default('300') }}
daemonize no
supervised no
```
When rendered, this might produce:
```yaml theme={null}
bind 192.168.1.100
protected-mode yes
port 6379
tcp-backlog 511
# Unix socket.
timeout 0
# TCP keepalive.
tcp-keepalive 300
daemonize no
supervised no
```
### Generating Configurations with Jinja2 Loops
Jinja2 loops allow you to generate configuration file entries dynamically. For example, you can generate a list of nameserver entries for the `/etc/resolv.conf` file using a for loop.
#### Template for resolv.conf (resolv.conf.j2)
```jinja2 theme={null}
nameserver {{ name_server }}
```
Given the following variable definition:
```yaml theme={null}
name_servers:
- 10.1.1.2
- 10.1.1.3
- 8.8.8.8
```
The generated `/etc/resolv.conf` file will be:
```ini theme={null}
nameserver 10.1.1.2
nameserver 10.1.1.3
nameserver 8.8.8.8
```
> **Note:** When using templates within roles, ensure they are stored in the role's dedicated `templates` directory.
## Templates in Roles Directory Structure
An effective directory structure for organizing your Ansible roles might look like the image below:

By leveraging Jinja2 templates and Ansible's extended filters, you can efficiently deploy dynamic configurations across your infrastructure while reducing redundancy and manual intervention. This approach not only simplifies management but also enhances the consistency and scalability of your deployments.