> ## Documentation Index
> Fetch the complete documentation index at: https://notes.kodekloud.com/llms.txt
> Use this file to discover all available pages before exploring further.
# File Permissions and Ownership
> This article explores Linux file types, permissions, and ownership, detailing methods to change them for effective system administration and security management.
In this lesson, we explore how Linux represents file types and sets permissions, along with methods to change permissions and ownership. Understanding these concepts is essential for effective system administration and security management.
When listing files using the `ls -l` command, the first character in the output indicates the file type. For example:
```bash theme={null}
$ ls -l bash-script.sh
-rwxrwxr-x 1 bob bob 89 Mar 17 01:35 bash-script.sh
```
In the output above, the initial dash (`-`) signifies that "bash-script.sh" is a regular file. Other file type identifiers include:
* d: directory
* c: character device
* b: block device
* l: symbolic link
* s: socket
* p: named pipe
The characters following the file type (e.g., `rwx`) represent permissions grouped into three categories:
1. Owner (u) permissions – the first three characters after the file type.
2. Group (g) permissions – the next three characters.
3. Others (o) permissions – the final three characters.
For each permission set:
* `r` (read) permits reading the file (octal value: 4).
* `w` (write) allows modifying the file (octal value: 2).
* `x` (execute) grants the ability to run the file as a program (octal value: 1).
> **Note: Directory Permissions**
>
> For directories, the permissions work similarly:
>
> * The `r` bit allows viewing the directory's contents.
> * The `w` bit permits altering the directory's contents.
> * The `x` bit is necessary to access (cd into) the directory. Without read permission, a user can still traverse the directory provided they know a file name, though listing its contents may yield a permission error.
Consider a directory owned by Bob that has only the execute permission for the owner:
```bash theme={null}
[~]$ ls -ld /home/bob/random_dir
d--xrwx 1 bob bob 89 Mar 17 01:35 .
```
Although Bob owns the directory, he receives a permission denied error when attempting to list its contents:
```bash theme={null}
[~]$ whoami
bob
[~]$ ls /home/
```
Because Bob lacks read permissions on his own directory, he cannot list its contents. However, having the execute bit set means he can still change into the directory:
```bash theme={null}
[~]$ cd /home/bob/random_dir
[bob@ubuntu-server random_dir]$
```
Even if Bob is part of a group that has full access, Linux applies the owner's permissions first. If the owner's permissions restrict a particular action (like reading), group or other permissions are not considered.
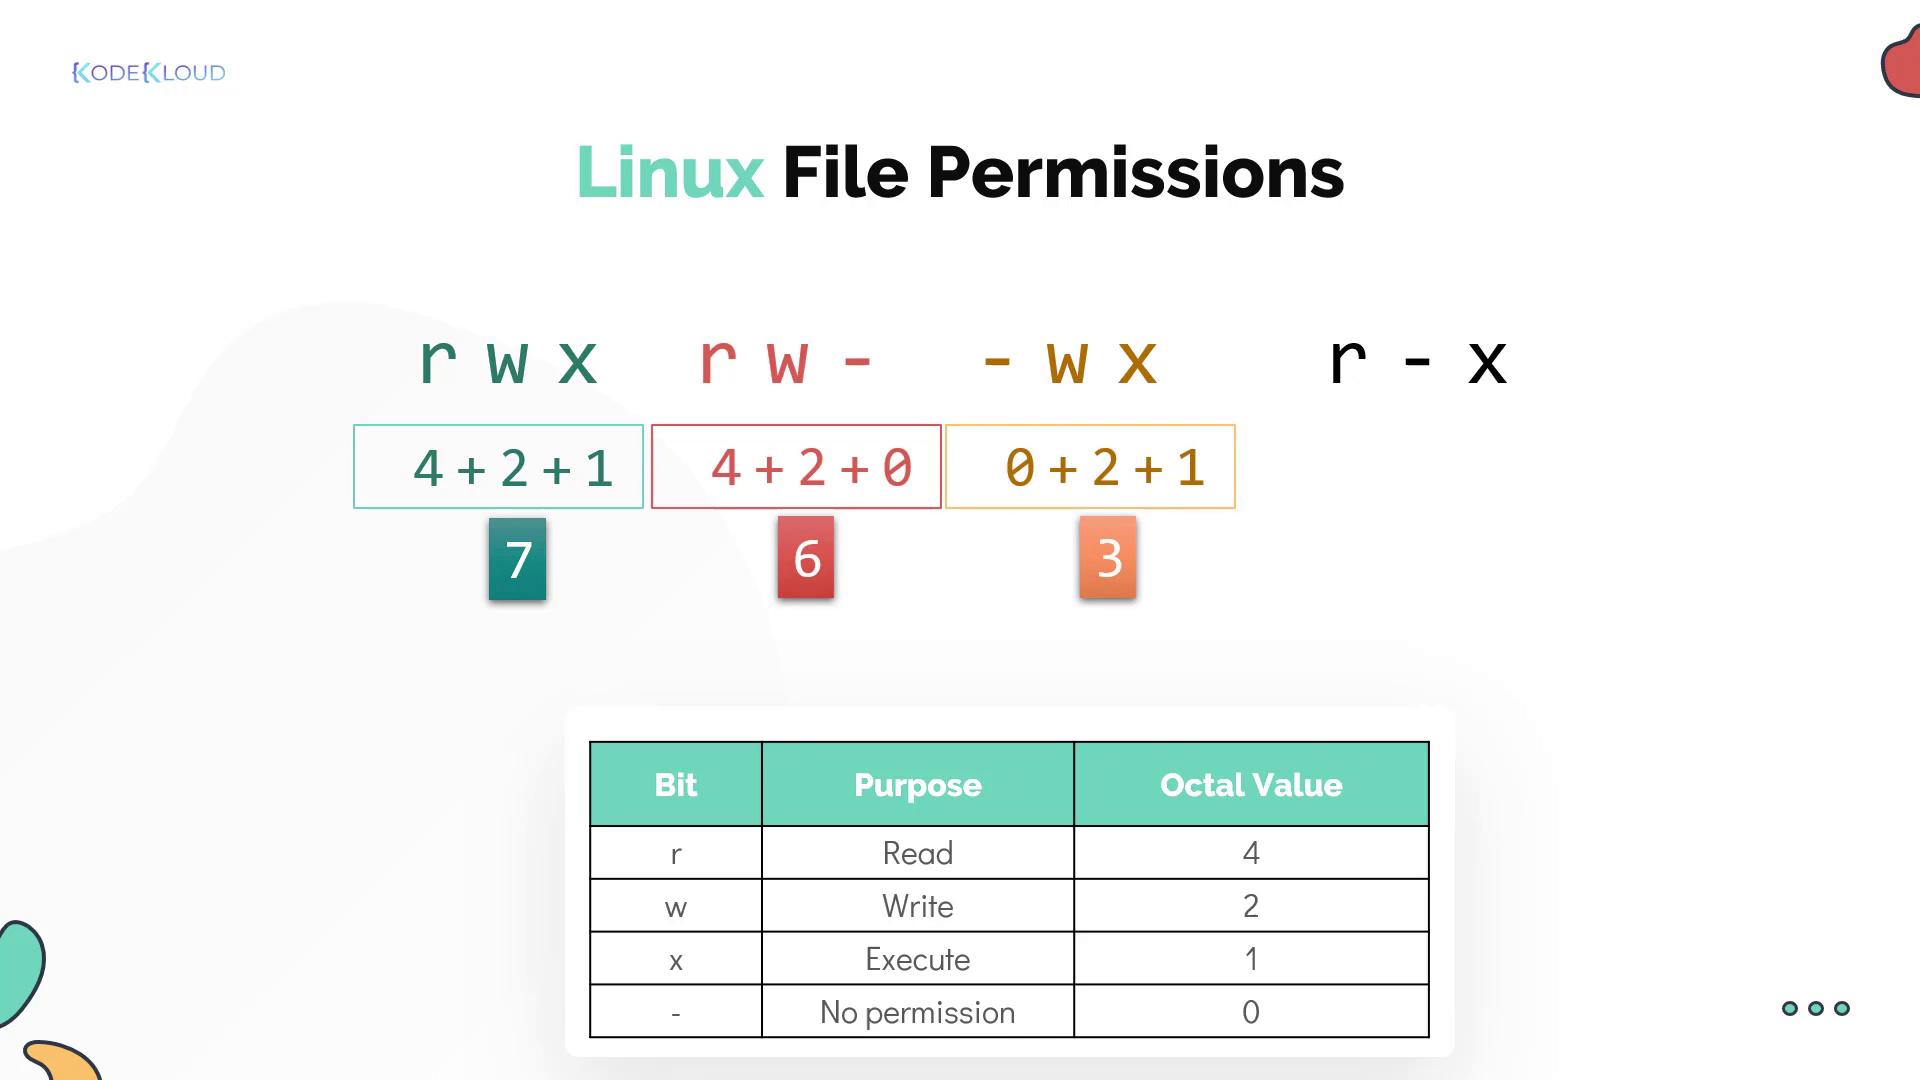
Permissions can also be represented numerically with three-digit octal values where:
* r (read) = 4
* w (write) = 2
* x (execute) = 1
* No permission = 0
For instance:
* `rwx` equals 7 (4+2+1)
* `r-x` equals 5 (4+0+1)
* `-wx` equals 3 (0+2+1)
## Changing File Permissions with chmod
Linux provides two modes to modify file permissions using the `chmod` command: symbolic mode and numeric mode.
### Symbolic Mode
In symbolic mode, you specify the target (user, group, or others) using `u` (user), `g` (group), or `o` (others). You then adjust permissions by using the `+` operator to add or the `-` operator to remove permissions. Here are some examples:
```bash theme={null}
chmod u+rwX test-file
chmod ugo+r test-file
chmod o-rwx test-file
```
These options can be combined. For example, to grant full permissions to the owner, add read and execute permissions to the group, and remove all permissions for others:
```bash theme={null}
chmod u+rwx,g+r-x,o-rwx test-file
```
### Numeric Mode
In numeric mode, you provide a three-digit octal number:
* The first digit sets permissions for the owner.
* The second digit sets permissions for the group.
* The third digit sets permissions for others.
Examples include:
* `chmod 777 test-file` grants read, write, and execute for everyone.
* `chmod 555 test-file` grants read and execute permissions for everyone.
* `chmod 660 test-file` grants read and write permissions to the owner and group, but no permissions for others.
* `chmod 750 test-file` grants complete access to the owner, read and execute access to the group, and no permissions for others.
```bash theme={null}
[~]$ chmod 777 test-file
```
These methods allow you to precisely control access to files and directories.
## Changing Ownership with chown and chgrp
Ownership changes for files or directories are handled by the `chown` and `chgrp` commands.
To change both the owner and group of a file, use:
```bash theme={null}
chown owner:group file
```
For example, to update both the owner and group of `test-file`:
```bash theme={null}
[~]$ chown bob:developer test-file
```
If you only need to change the owner:
```bash theme={null}
[~]$ chown bob andoid.apk
```
To change just the group, you can use:
```bash theme={null}
[~]$ chgrp android test-file
```
Now that you understand the concepts of file permissions and ownership in Linux, you can confidently apply these practices in your hands-on labs.
For additional information, check out these resources:
* [Linux File Permissions](https://www.tldp.org/LDP/intro-linux/html/sect_03_04.html)
* [Understanding chmod, chown, and chgrp](https://www.cyberciti.biz/faq/chmod-command-examples/)
* [Linux Security Basics](https://www.linux.com/training-tutorials/)