Linux Foundation Certified System Administrator (LFCS)
Networking
Implement Reverse Proxies and Load Balancers
In this lesson, we explore how to set up reverse proxies and load balancers for your web servers. When you visit popular websites such as KodeKloud.com or YouTube.com, the displayed content is served by a robust infrastructure rather than a single web server. By using a reverse proxy, you can seamlessly route user requests to the appropriate backend server, while load balancing evenly distributes the traffic to prevent any one server from becoming overloaded.
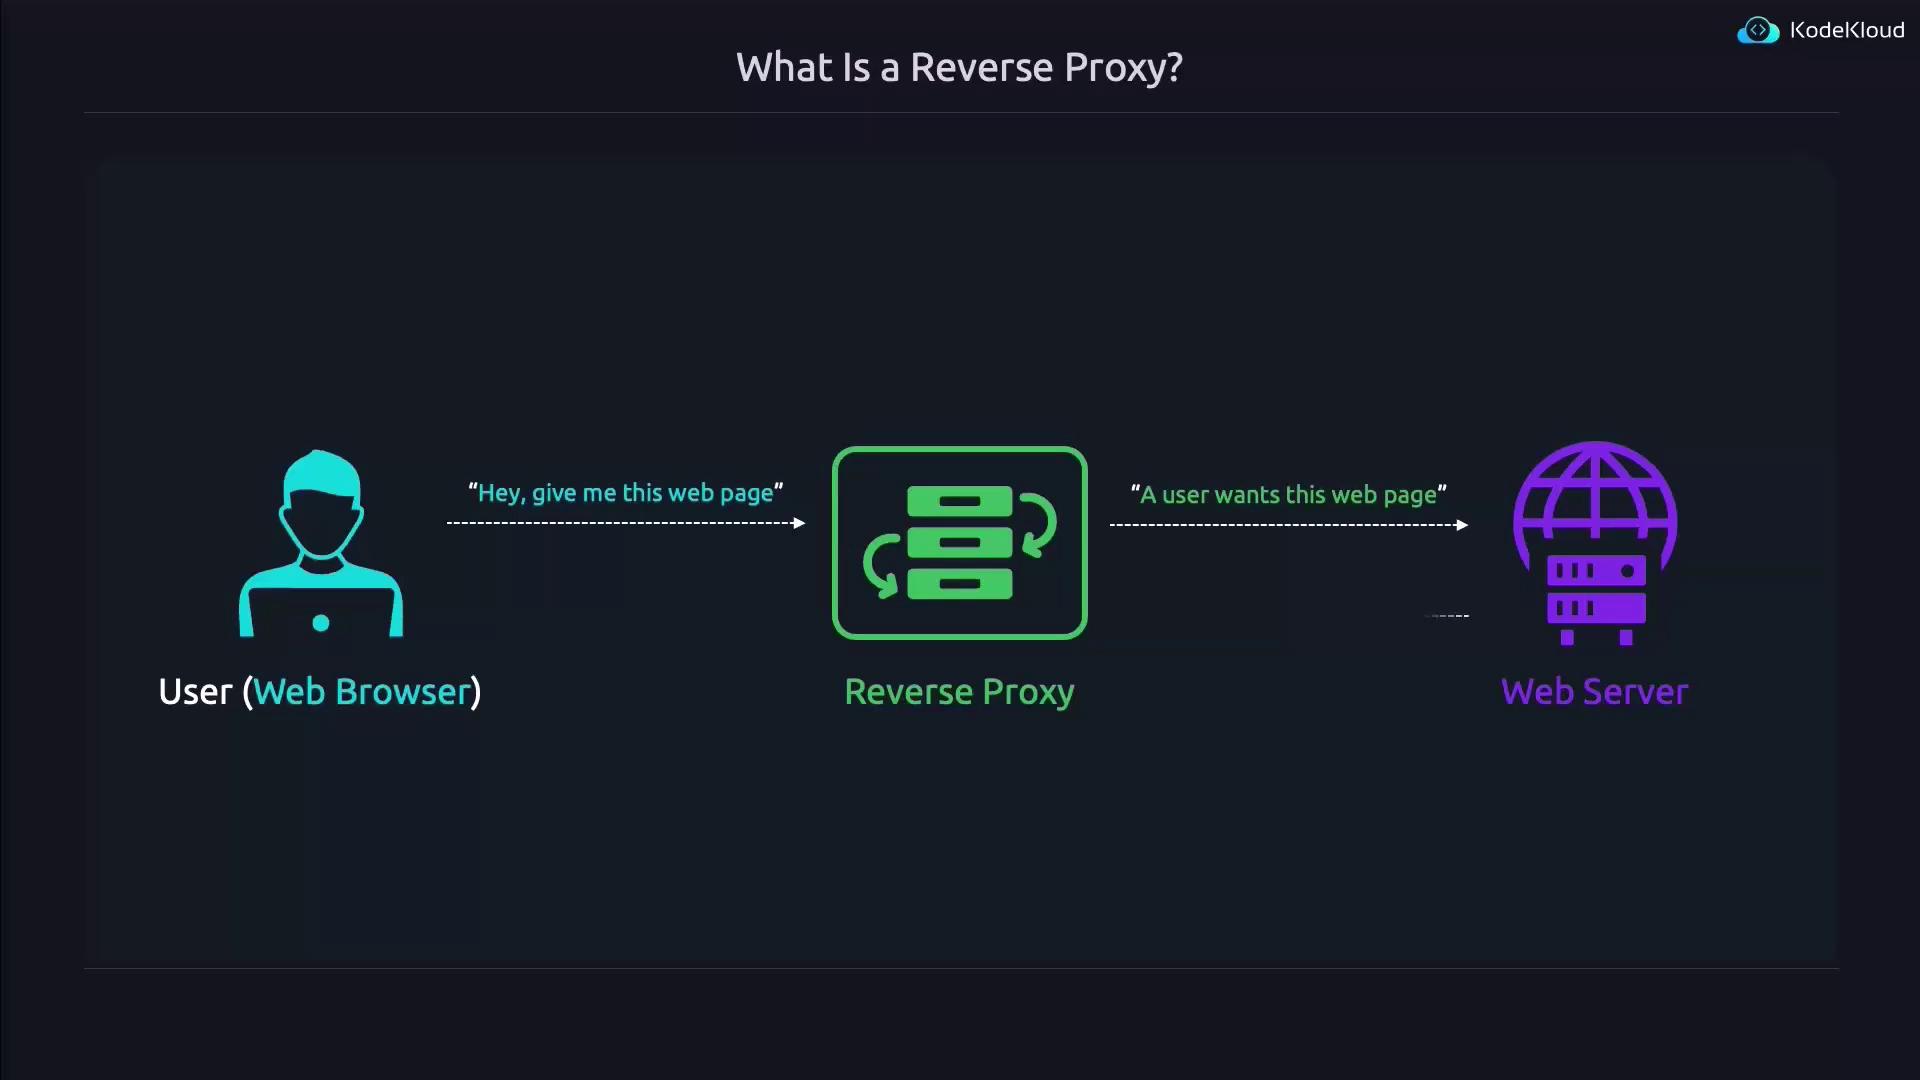
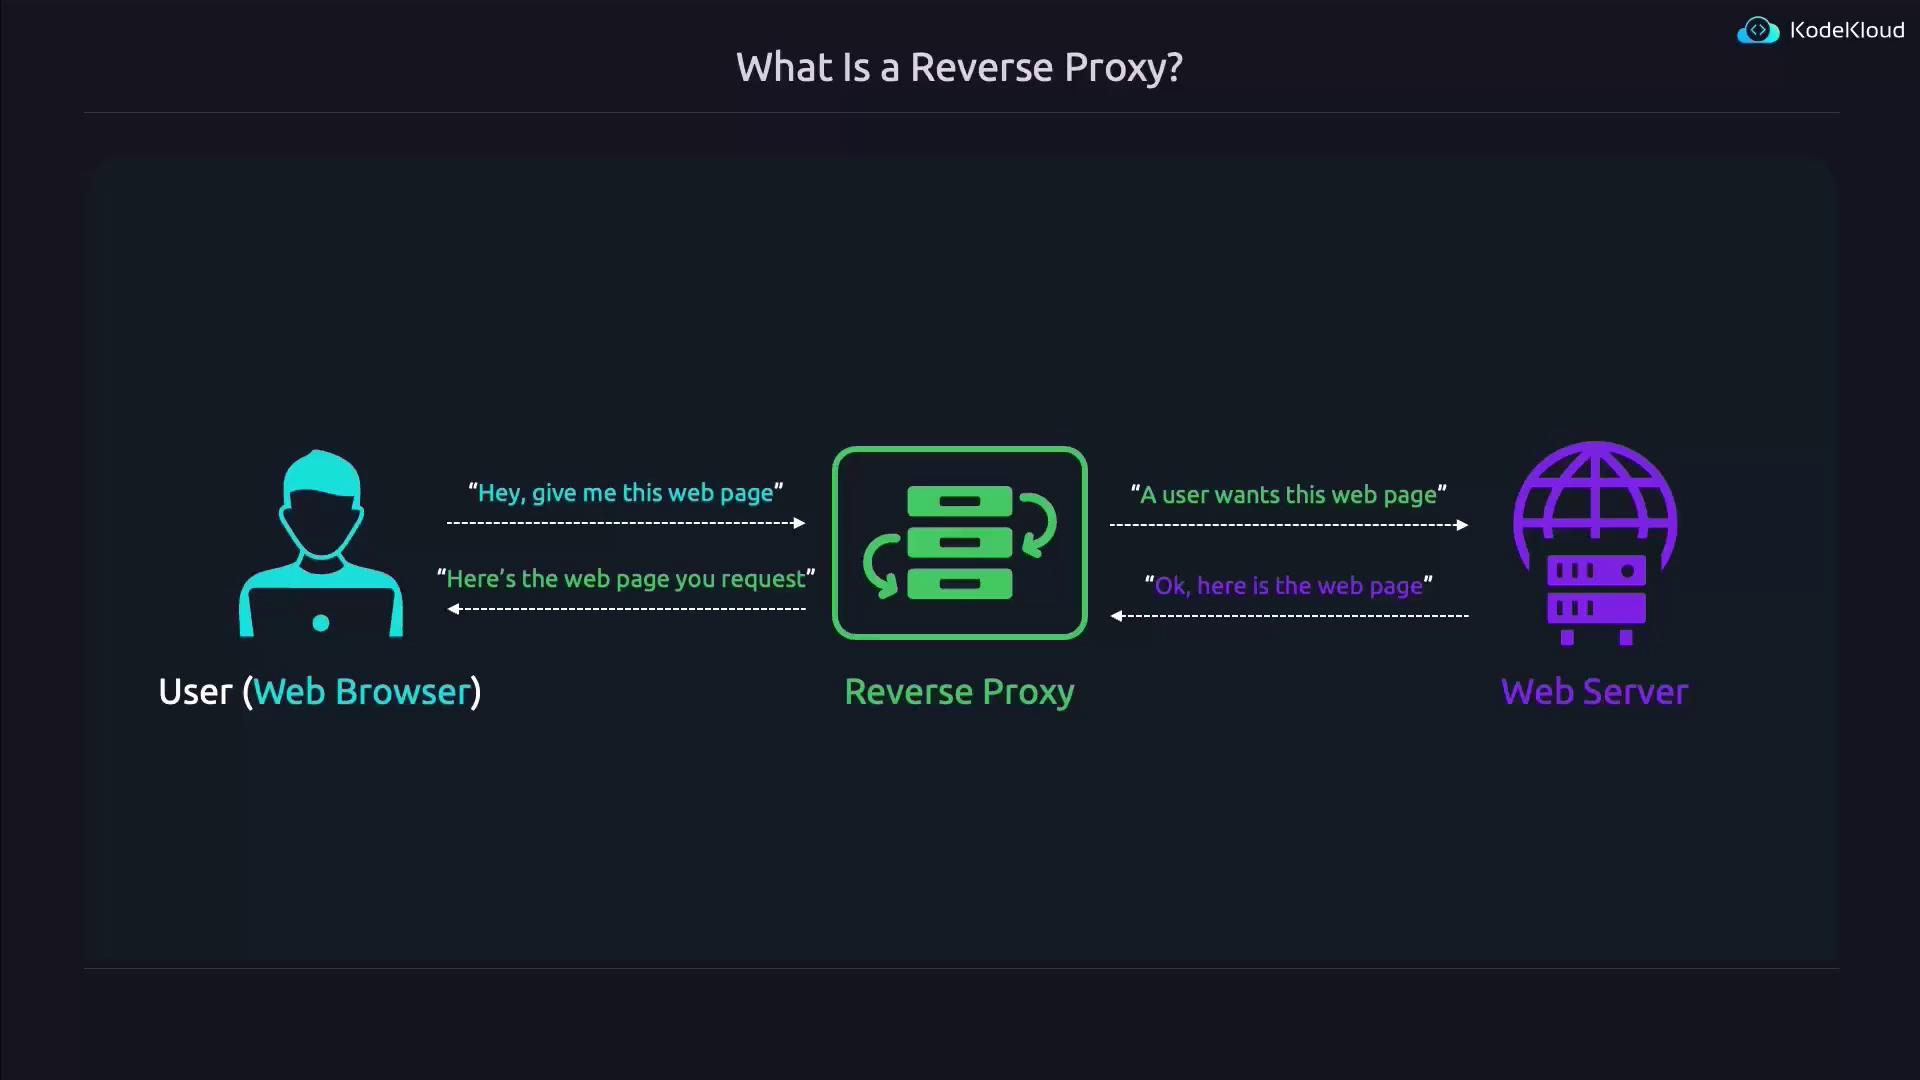
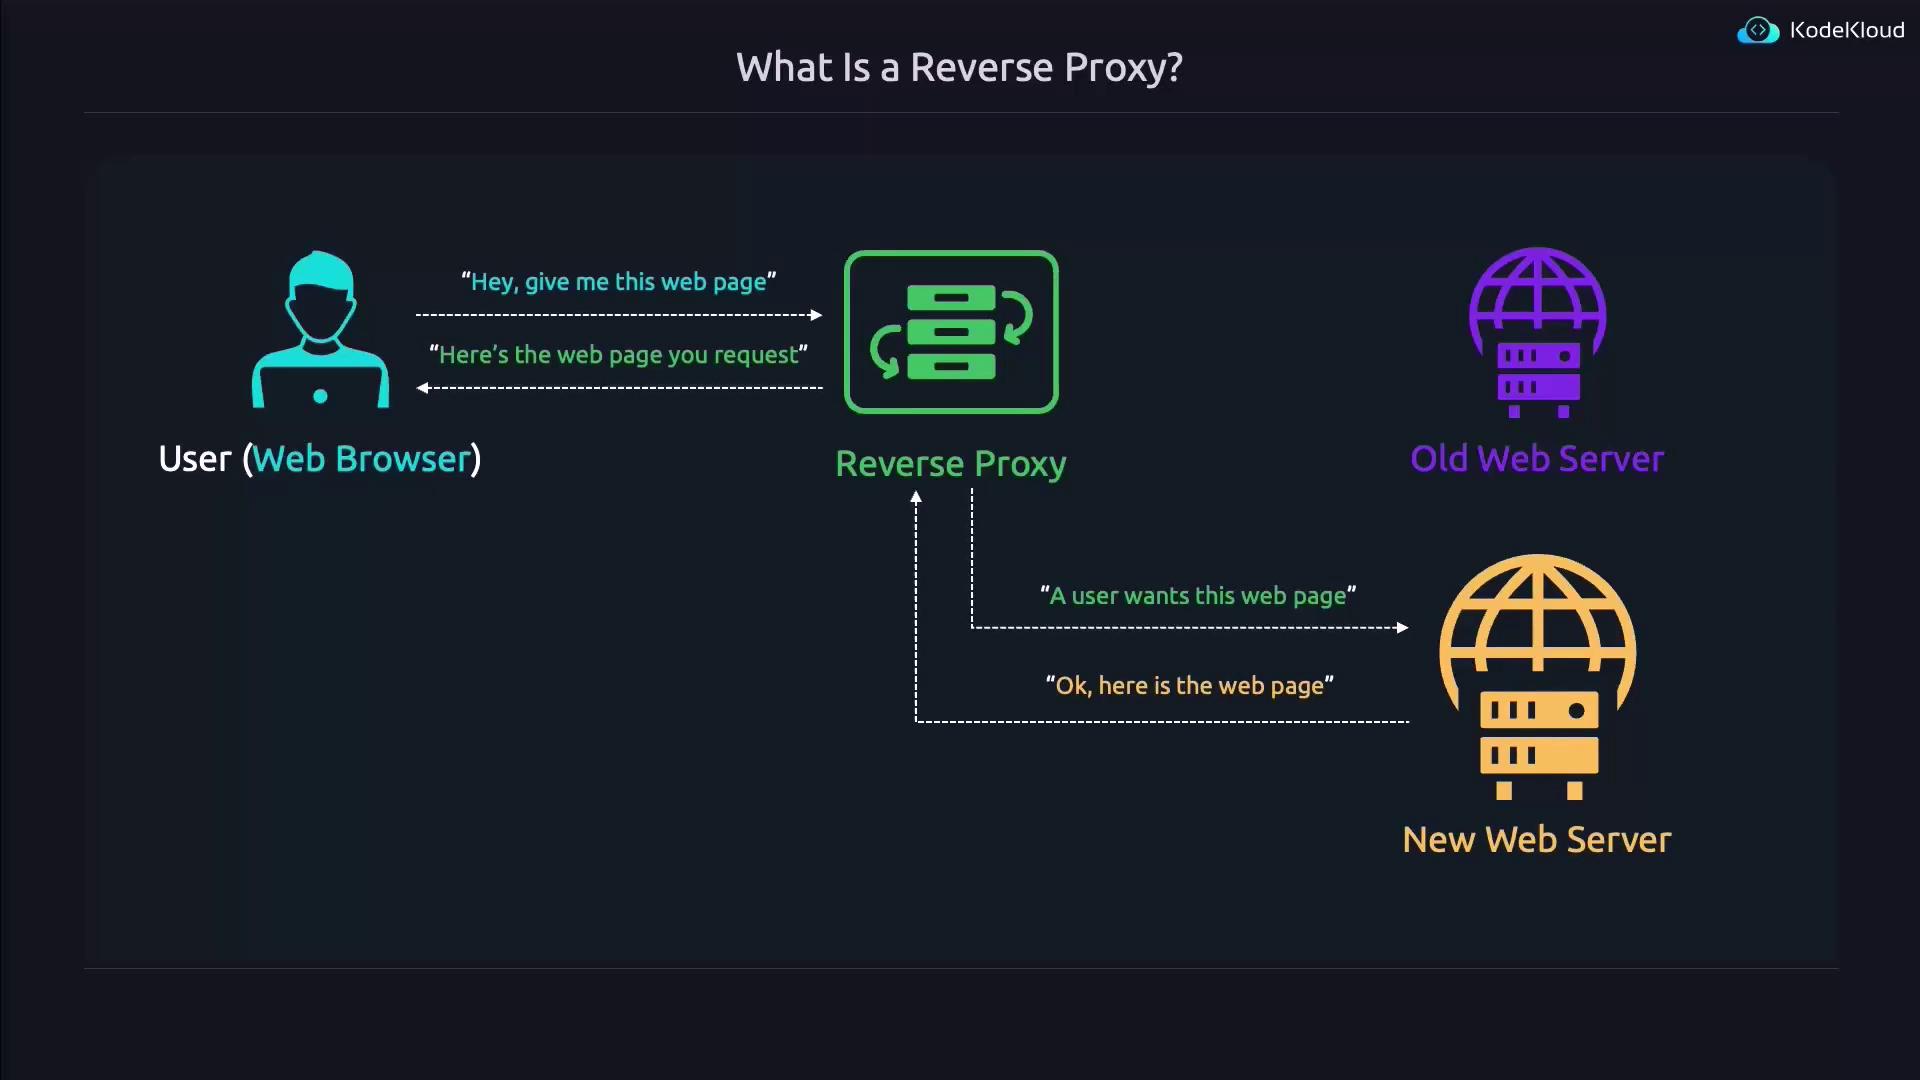
What Is a Reverse Proxy?
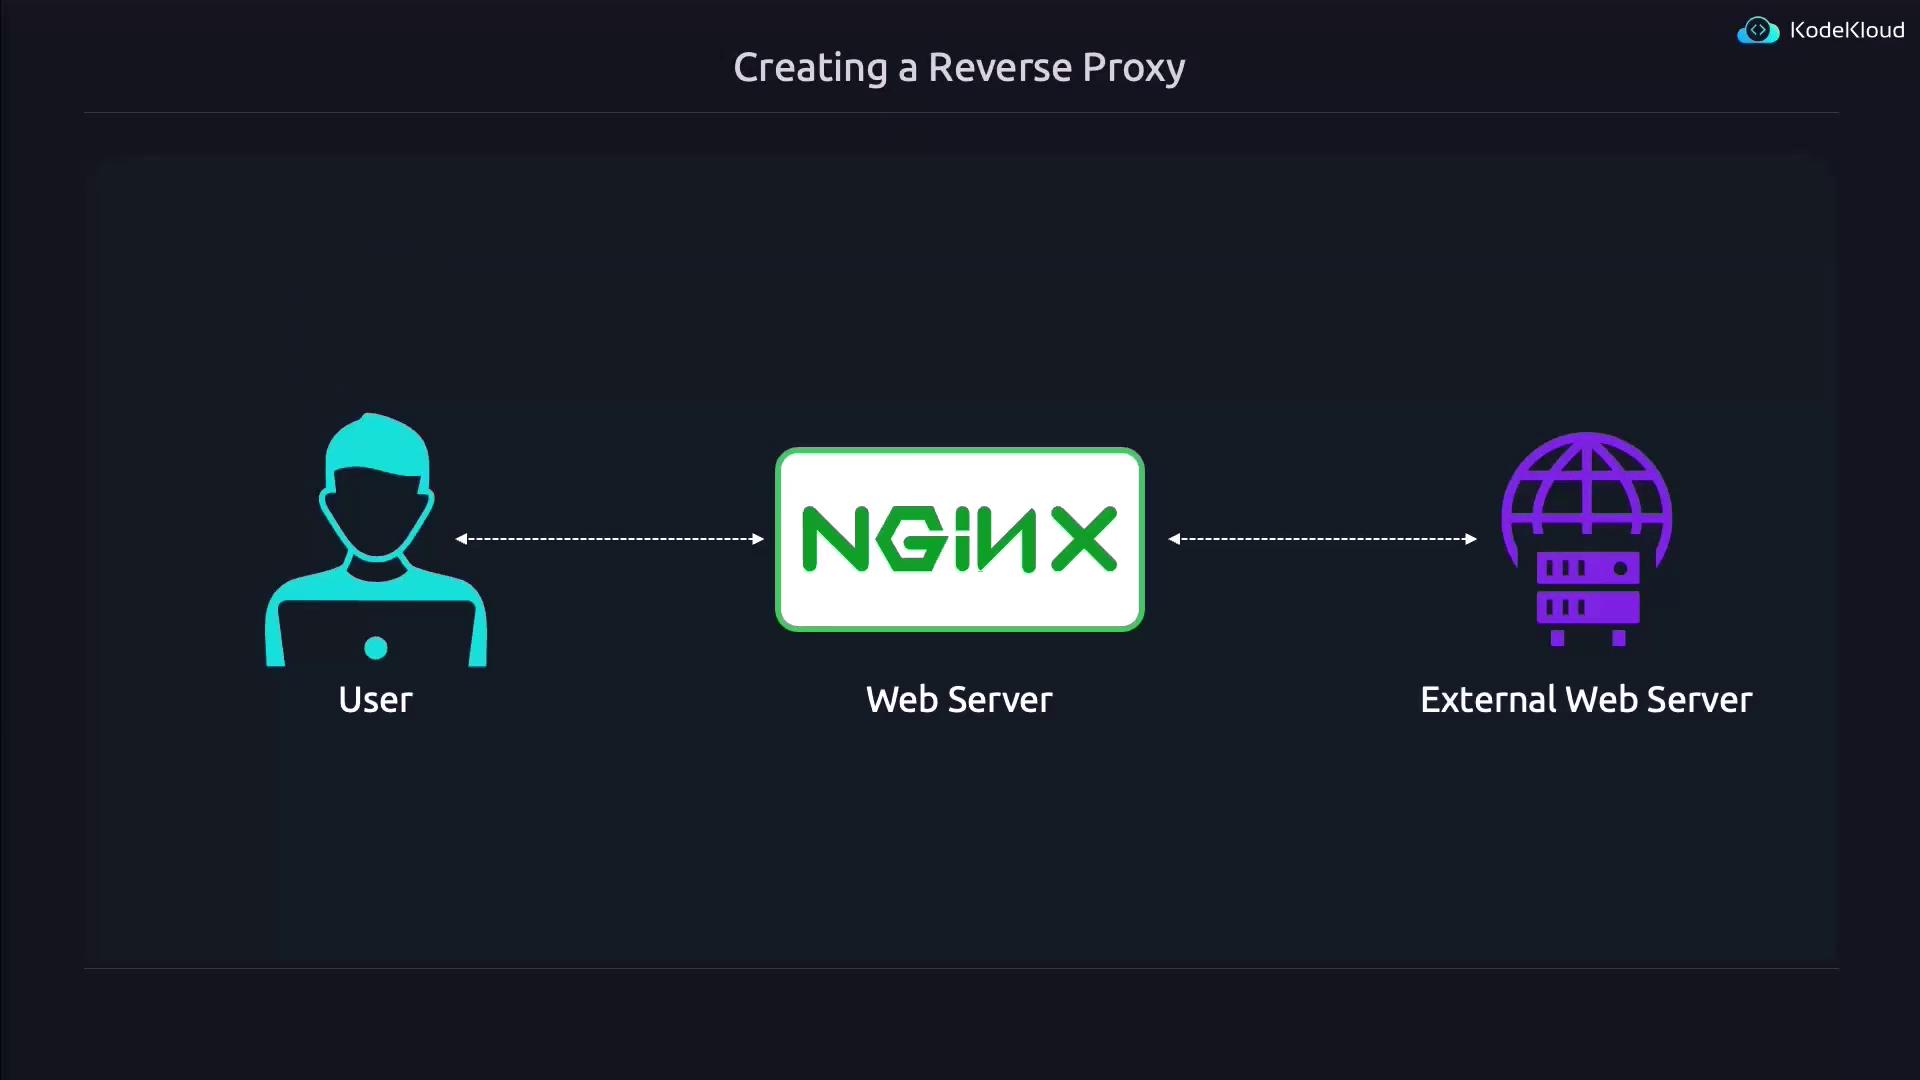
A reverse proxy acts as an intermediary between client requests and the backend web server. Rather than the client directly communicating with the web server, the reverse proxy intercepts the request and forwards it. The typical flow is as follows:
- The user sends a request to the reverse proxy.
- The reverse proxy forwards the request to the designated web server.
- The web server processes the request and sends the response back to the reverse proxy.
- Finally, the reverse proxy relays the response to the user.
This setup provides several advantages. For instance, if you deploy a new web server with enhanced resources like increased RAM and CPU power, you can quickly transition traffic by simply updating your reverse proxy configuration. This method avoids the delays associated with DNS propagation in a direct update scenario.
Another visual example:
Reverse proxies not only offer rapid traffic redirection; they can also filter web traffic, cache pages for faster delivery, and perform additional optimizations. These capabilities lay the groundwork for efficient load balancing.
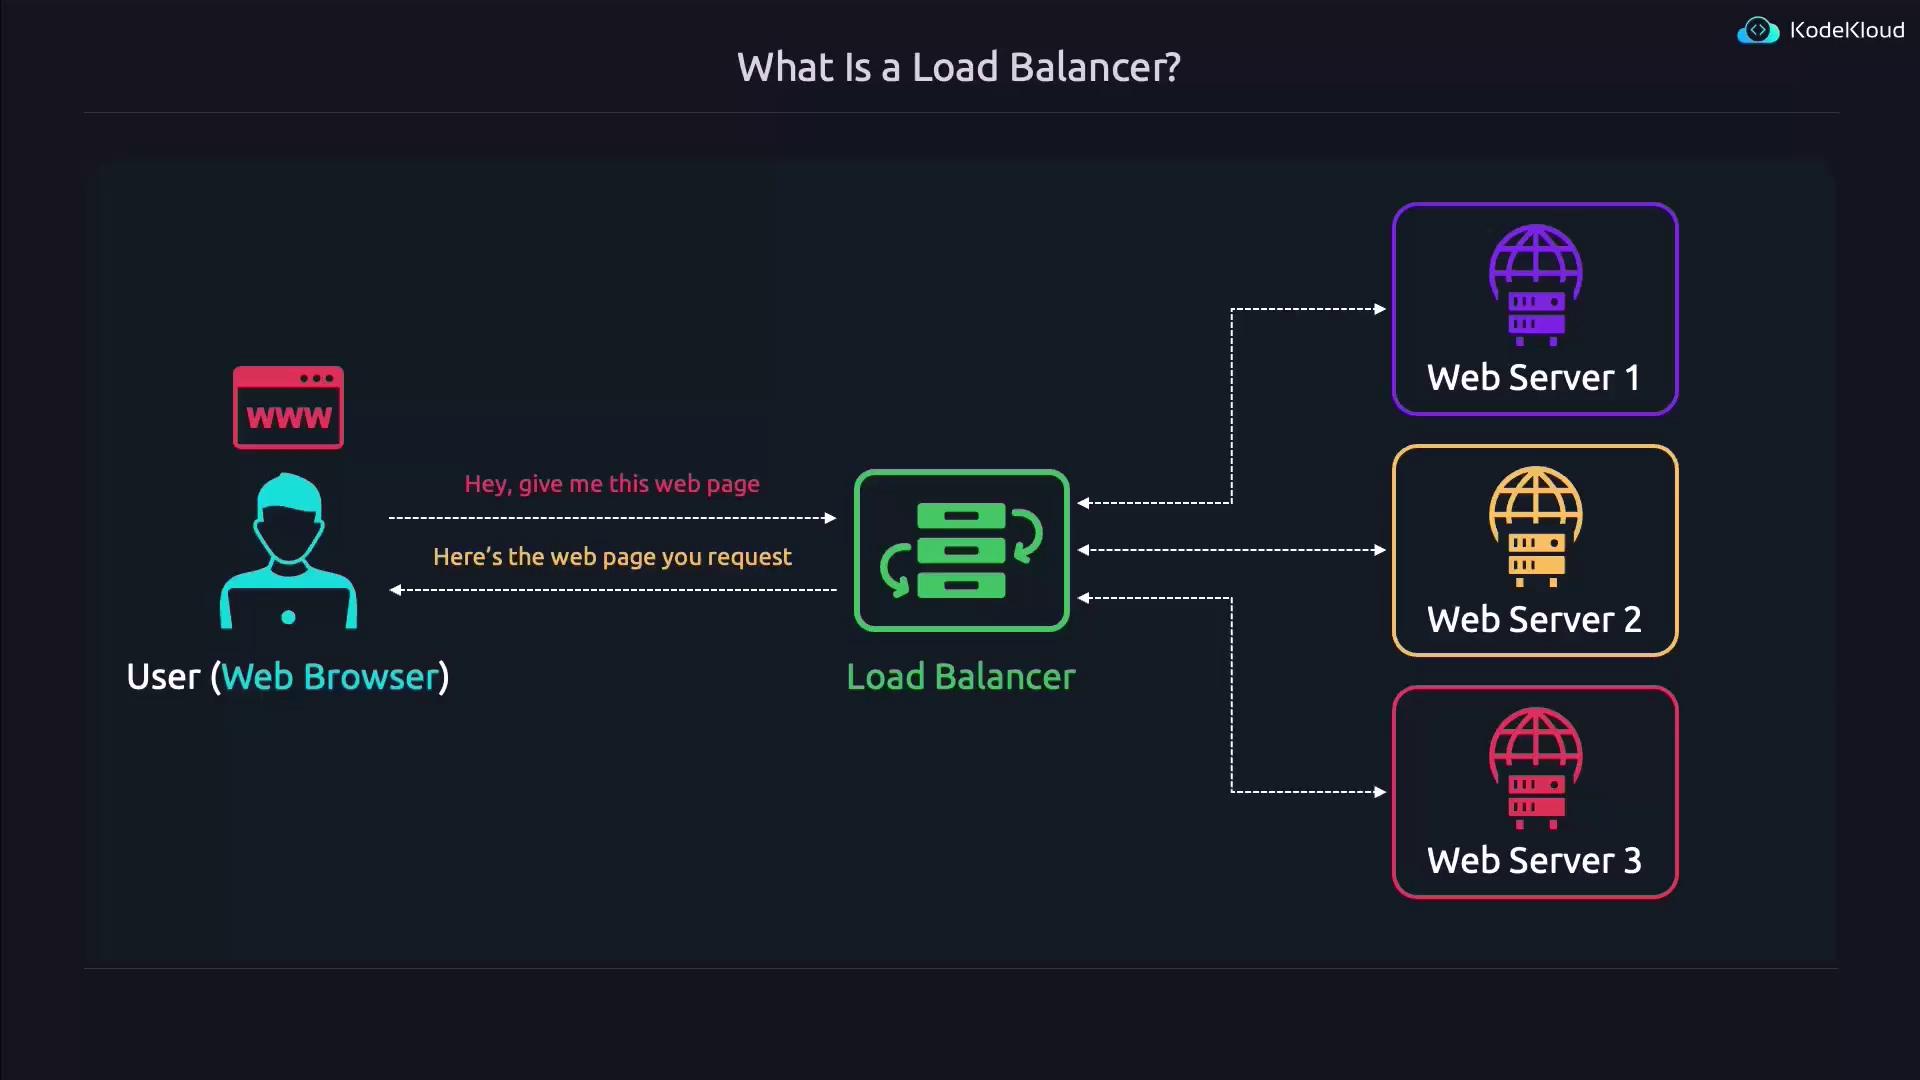
Load Balancing Basics
Load balancing distributes incoming web requests across multiple servers, ensuring that no single server becomes overwhelmed. For example, by directing requests to the least busy server, load balancing maintains an even distribution of processing tasks. This method is crucial for high-traffic sites like YouTube.com where a single server cannot handle millions of requests simultaneously.
Multiple images in this lesson further emphasize these key concepts:
When the load balancer smartly assigns inbound requests, it may choose the server with the fewest active connections, thereby maintaining an even workload across all servers.
Setting Up a Reverse Proxy with Nginx
Nginx is a popular solution for configuring reverse proxies due to its high performance and versatility. Although alternatives like HAProxy and Apache exist, Nginx remains a top choice for many users.
Step 1: Install Nginx and Create the Reverse Proxy Configuration
Begin by installing Nginx and then creating a configuration file (in this example, "proxy.conf") within the /etc/nginx/sites-available
directory.
sudo apt install nginx
sudo vim /etc/nginx/sites-available/proxy.conf
Inside this configuration file, add the following settings. The server block instructs Nginx to listen on port 80, and the location /
block specifies that requests matching the root URL should be proxied to the target web server (here, represented by IP address 1.1.1.1):
server {
listen 80;
location / {
proxy_pass http://1.1.1.1;
}
}
If you wish to proxy only specific parts of your website, such as URLs beginning with /images
, modify the configuration accordingly:
server {
listen 80;
location /images {
proxy_pass http://1.1.1.1;
}
}
For cases where the target web server listens on a non-default port, include the port number in the proxy_pass
directive:
server {
listen 80;
location /images {
proxy_pass http://1.1.1.1:8081;
}
}
To pass along the original request details—like the user’s IP address and protocol—the proxy_params
file can be included:
server {
listen 80;
location /images {
proxy_pass http://1.1.1.1;
include proxy_params;
}
}
The /etc/nginx/proxy_params
file typically contains header definitions similar to the following:
cat /etc/nginx/proxy_params
proxy_set_header Host $http_host;
proxy_set_header X-Real-IP $remote_addr;
proxy_set_header X-Forwarded-For $proxy_add_x_forwarded_for;
proxy_set_header X-Forwarded-Proto $scheme;
Note
Including these header settings ensures the target server receives crucial connection details such as the client’s original IP address.
Step 2: Enable the Configuration
After saving your configuration file within /etc/nginx/sites-available
, enable it by creating a symbolic link in the /etc/nginx/sites-enabled
directory. It is also advisable to disable the default website if it isn’t needed.
# To enable the reverse proxy configuration:
sudo ln -s /etc/nginx/sites-available/proxy.conf /etc/nginx/sites-enabled/proxy.conf
# To disable the default configuration:
sudo rm /etc/nginx/sites-enabled/default
Before applying the changes, test the configuration for syntax errors:
sudo nginx -t
You should see output confirming that the configuration syntax is OK and the test was successful:
nginx: the configuration file /etc/nginx/nginx.conf syntax is ok
nginx: configuration file /etc/nginx/nginx.conf test is successful
Finally, reload Nginx to activate your new settings:
sudo systemctl reload nginx.service
At this point, Nginx is successfully configured as a reverse proxy, directing requests to the web server at 1.1.1.1.
Configuring Nginx as a Load Balancer
Transforming Nginx into a load balancer requires a few configuration adjustments.
First, remove the symbolic link for the existing reverse proxy configuration:
sudo rm /etc/nginx/sites-enabled/proxy.conf
Next, create a new configuration file (for example, "lb.conf") in the
/etc/nginx/sites-available
directory with the content below:upstream mywebservers { server 1.2.3.4; server 5.6.7.8; } server { listen 80; location / { proxy_pass http://mywebservers; } }
Explanation of the Load Balancer Configuration
- The
upstream
block defines a pool of backend servers identified as "mywebservers". Here, servers with IP addresses 1.2.3.4 and 5.6.7.8 are listed. - The server block listens on port 80 and directs incoming requests to the backend pool specified in the upstream block.
By default, Nginx will distribute requests using the round-robin method. However, for high-traffic websites, a more dynamic load balancing method may be more appropriate. For instance, adding the least_conn
directive will instruct Nginx to send requests to the server with the fewest active connections:
upstream mywebservers {
least_conn;
server 1.2.3.4;
server 5.6.7.8;
}
server {
listen 80;
location / {
proxy_pass http://mywebservers;
}
}
If your servers have varying performance capabilities, you can assign weights to influence traffic distribution. For example, a more powerful server can be given a higher weight:
upstream mywebservers {
least_conn;
server 1.2.3.4 weight=3;
server 5.6.7.8;
}
server {
listen 80;
location / {
proxy_pass http://mywebservers;
}
}
Warning
To temporarily remove a server from the load balancing pool (for maintenance, for example), include the down
parameter in its configuration.
Mark a server as unavailable with the down
keyword:
upstream mywebservers {
least_conn;
server 1.2.3.4 weight=3 down;
server 5.6.7.8;
}
server {
listen 80;
location / {
proxy_pass http://mywebservers;
}
}
You can also designate a backup server that remains idle until it's needed if one of your primary servers fails:
upstream mywebservers {
least_conn;
server 1.2.3.4;
server 5.6.7.8;
server 10.20.30.40 backup;
}
server {
listen 80;
location / {
proxy_pass http://mywebservers;
}
}
If any backend server is operating on a custom port (for example, port 8081), specify the port number in the server directive:
upstream mywebservers {
least_conn;
server 1.2.3.4:8081;
server 5.6.7.8;
server 10.20.30.40 backup;
}
server {
listen 80;
location / {
proxy_pass http://mywebservers;
}
}
Enable and Reload the Load Balancer Configuration
Once your "lb.conf" file is created, enable it by linking it from sites-available
to sites-enabled
. Then, test and reload the Nginx configuration:
sudo ln -s /etc/nginx/sites-available/lb.conf /etc/nginx/sites-enabled/lb.conf
sudo nginx -t
sudo systemctl reload nginx.service
With these changes in place, Nginx now efficiently functions as a load balancer according to your configuration.
That’s all for this lesson. Happy configuring, and see you in the next one!
Watch Video
Watch video content