Linux Foundation Certified System Administrator (LFCS)
Users and Groups
Configure the System to Use LDAP User and Group Accounts
Linux systems typically store user account and group information locally. For example, user details are maintained in the /etc/passwd file—not to be confused with actual password storage. This file holds important account details such as username, UID, home directory, and the preferred shell. Consider the following example from /etc/passwd:
man:x:6:12:man:/var/cache/man:/usr/sbin/nologin
lp:x:7:7:lp:/var/spool/lpd:/usr/sbin/nologin
mail:x:8:8:mail:/var/mail:/usr/sbin/nologin
news:x:9:9:news:/var/spool/news:/usr/sbin/nologin
uucp:x:10:10:uucp:/var/spool/uucp:/usr/sbin/nologin
proxy:x:13:13:proxy:/bin:/usr/sbin/nologin
www-data:x:33:33:www-data:/var/www:/usr/sbin/nologin
backup:x:34:34:backup:/var/backups:/usr/sbin/nologin
list:x:38:38:Mailing List Manager:/var/list:/usr/sbin/nologin
irc:x:39:39:ircd:/run/ircd:/usr/sbin/nologin
_apt:x:42:65534:65534:nonexistent:/usr/sbin/nologin
nobody:x:65534:65534:nobody:/usr/sbin/nologin
systemd-network:x:998:998:systemd Network Management:/usr/sbin/nologin
systemd-timesync:x:997:997:systemd Time Synchronization:/usr/sbin/nologin
dhcpd:x:100:65534:DHCP Client Daemon,,,:/usr/lib/dhcpcd:/bin/false
messagebus:x:101:102:nonexistent:/usr/sbin/nologin
systemd-resolve:x:992:992:systemd Resolver:/usr/sbin/nologin
pollinate:x:102:1:/var/cache/pollinate:/bin/false
polkitd:x:991:991:User for polkitd:/usr/sbin/nologin
syslog:x:103:104:nonexistent:/usr/sbin/nologin
uuidd:x:104:104:nonexistent:/var/uuid:/usr/sbin/nologin
tcpdump:x:105:107:nonexistent:/usr/sbin/nologin
tss:x:106:108:TPM software stack,,/var/lib/tpm:/bin/false
landscape:x:107:109:/var/lib/landscape:/usr/sbin/nologin
fwupd-refresh:x:989:989:Firmware update daemon:/var/lib/fwupd:/usr/sbin/nologin
usbmux:x:108:46:usbmux daemon,,/var/lib/usbmux:/usr/sbin/nologin
sshd:x:109:65534:/run/sshd:/usr/sbin/nologin
jeremy:x:1000:1000:Jeremy Morgan:/home/jeremy:/bin/bash
jeremy@kodekloud:~$
Managing user accounts and groups individually across hundreds of servers can be challenging—even when using automation tools like Chef, Ansible, or Puppet. To simplify this, you can use a centralized LDAP (Lightweight Directory Access Protocol) server as the primary source for account data. This approach enables you to add, remove, or modify user and group information centrally; those updates then propagate automatically to all Linux clients configured to use LDAP.
For better understanding, the remainder of this guide walks you through a practical exercise to implement this setup.
Initial Verification of Local Users
Before integrating LDAP, confirm that certain user accounts (such as john and jane) are not present locally:
jeremy@kodekloud:~$ id john
id: ‘john’: no such user
jeremy@kodekloud:~$ id jane
id: ‘jane’: no such user
jeremy@kodekloud:~$
Later in this guide, you will see how the LDAP server supplies these accounts.
Setting Up an LDAP Server Using LXC Containers
In production environments, the LDAP server might be hosted on dedicated hardware or cloud platforms (such as Microsoft Azure or Windows Server). For this exercise, we will use a pre-configured LDAP server housed within an LXC container. LXC containers offer a lightweight virtualization approach, similar to Docker, but run full operating systems.
Step 1: Initialize LXD
First, initialize LXD, the hypervisor managing your LXC containers:
jeremy@kodekloud:~$ lxd init
Installing LXD snap, please be patient.
Would you like to use LXD clustering? (yes/no) [default=no]:
If prompted for the loop device size, ensure it is at least 5GB (the default value) and press Enter.
Step 2: Confirm the LDAP Server Archive
A pre-configured LDAP server has been archived as ldap-server.tar.xz. Confirm its existence:
jeremy@kodekloud:~$ ls -la
total 444860
drwxr-x--- 5 jeremy jeremy  4096 May 22 22:02 .
drwxr-xr-x 3 root   root    4096 May 22 21:51 ..
-rw-r--r-- 1 jeremy jeremy   220 Mar 31 08:41 .bash_logout
-rw-r--r-- 1 jeremy jeremy  3771 Mar 31 08:41 .bashrc
drwx------ 2 jeremy jeremy  4096 May 22 21:52 .cache
-rwxr-xr-x 1 jeremy jeremy 455502300 May 22 21:51 ldap-server.tar.xz
-rw-r--r-- 1 jeremy jeremy   807 Mar 31 08:41 .profile
drwx------ 3 jeremy jeremy  4096 May 22 22:02 snap
drwx------ 2 jeremy jeremy  4096 May 22 21:51 .ssh
jeremy@kodekloud:~$
Step 3: Import and Start the Container
Import the container image:
jeremy@kodekloud:~$ lxc import ldap-server.tar.xz
Wait until the import completes and then list your containers:
jeremy@kodekloud:~$ lxc list
+---------------+---------+-----------+---------+-------------+
|     NAME      |  STATE  |   IPV4    |   IPV6  |   TYPE      |
+---------------+---------+-----------+---------+-------------+
|  ldap-server  |  STOPPED|           |         |  CONTAINER  |
+---------------+---------+-----------+---------+-------------+
jeremy@kodekloud:~$
Start the container:
jeremy@kodekloud:~$ lxc start ldap-server
Next, verify that the container is running and note its IPv4 address:
jeremy@kodekloud:~$ lxc list
+---------------+---------+-------------------------------+-------------------------------------------------------------+-------------+
|     NAME      |  STATE  |            IPV4               |                           IPV6                              |   TYPE      |
+---------------+---------+-------------------------------+-------------------------------------------------------------+-------------+
|  ldap-server  | RUNNING | 10.0.142.218 (eth0)           | fd42:f1ca:1ed:230d:216:3eff:fe88:50e8 (eth0)                  | CONTAINER  |
+---------------+---------+-------------------------------+-------------------------------------------------------------+-------------+
jeremy@kodekloud:~$
At this point, your LDAP server is operational. Note that for simplicity, every password on this server is set to "password." Both the LDAP admin and the Linux accounts (John and Jane) have the password "password."
Configuring the Linux System to Use LDAP for Account Management
To enable your Linux system to query LDAP for user and group information, you must install the package libnss-ldapd. This package enhances the Name Service Switch (NSS), allowing the system to retrieve data from sources such as LDAP.
Installing libnss-ldapd
Run the following commands to update your package lists and install libnss-ldapd:
jeremy@kodekloud:~$ sudo apt update && sudo apt install libnss-ldapd
[sudo] password for jeremy:
A configuration wizard will appear to assist you in setting up libnss-ldapd.
Tip
When prompted for the NSLCD URL, replace the default "ldap://127.0.0.1/" with the actual IP address of your LDAP server (e.g., "ldap://10.0.142.218/") and ensure you include the trailing slash.
Next, provide the distinguished name (DN) for the LDAP search base. Although an example like "dc=hsd1,dc=or,dc=comcast,dc=net" might be shown, our pre-configured server uses the domain "kodekloud.com." Therefore, enter:
dc=kodekloud,dc=com
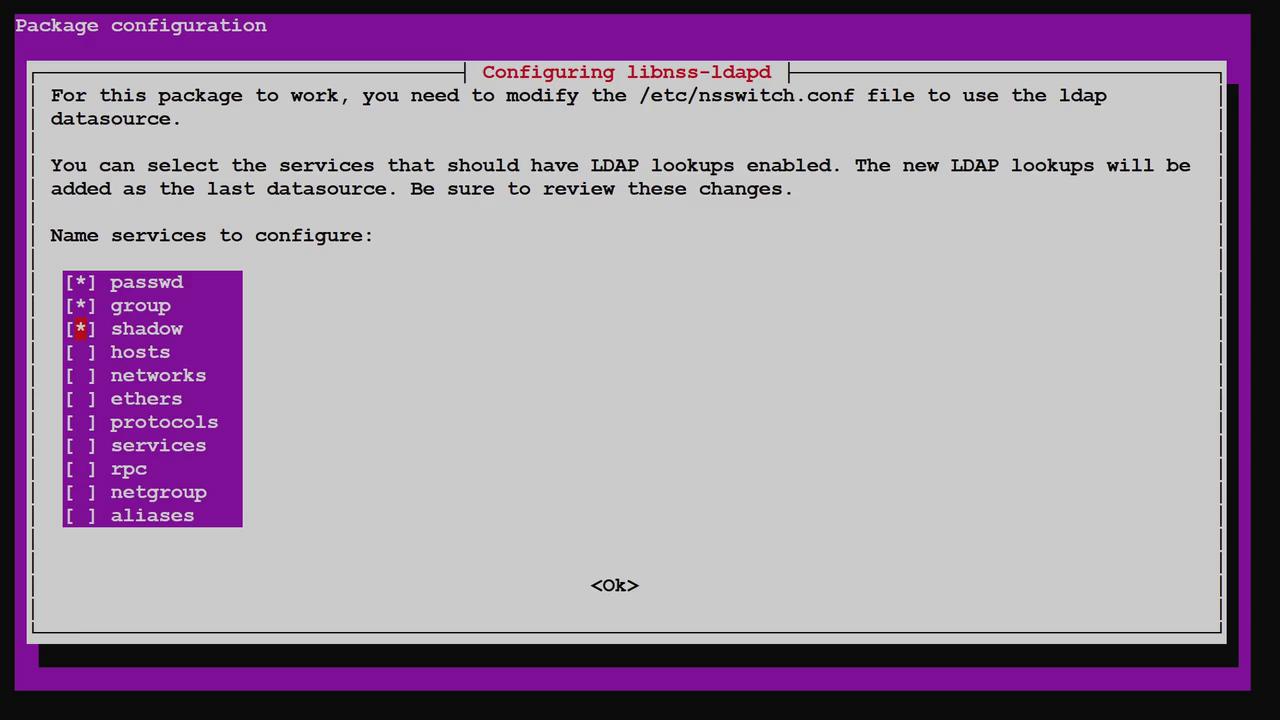
When choosing the services to use LDAP lookups, ensure that you select passwd (users), group, and shadow (passwords). Confirm these selections and complete the wizard.
Below is the relevant image of the LDAP configuration interface (do not modify the image link or description):
Press Enter to complete the configuration. The wizard updates files such as /etc/nsswitch.conf and sets up the NSLCD service.
Verifying /etc/nsswitch.conf
The updated /etc/nsswitch.conf file should now include LDAP as a source for passwd, group, and shadow data:
passwd:         files systemd ldap
group:          files systemd ldap
shadow:         files systemd ldap
gshadow:        files systemd
...
This informs the system to fetch user information from local files, systemd, and the LDAP server. The Name Service Switch uses the NSLCD daemon to perform LDAP queries; its configuration is stored in /etc/nslcd.conf. To view the NSLCD configuration, run:
sudo cat /etc/nslcd.conf
A typical configuration may appear as follows:
# The user and group nslcd should run as.
uid nslcd
gid nslcd

# The location at which the LDAP server(s) should be reachable.
uri ldap://10.0.142.218/

# The search base that will be used for all queries.
base dc=kodekloud,dc=com

# The LDAP protocol version to use.
#ldap_version 3

# The DN to bind with for normal lookups.
#binddn cn=anonymous,dc=example,dc=net
#bindpw secret

# The DN used for password modifications by root.
#rootpwmoddn cn=admin,dc=example,dc=com

# SSL options
#ssl off
#tls_reqcert never
tls_cacertfile /etc/ssl/certs/ca-certificates.crt

# The search scope.
#scope sub
You may update the LDAP server IP or base here if necessary.
Testing LDAP Integration
Initially, local test commands confirmed that the accounts for John and Jane were absent:
jeremy@kodekloud:~$ id john
id: ‘john’: no such user
jeremy@kodekloud:~$ id jane
id: ‘jane’: no such user
jeremy@kodekloud:~$
After configuring LDAP, re-run the commands to verify that these users are now recognized:
jeremy@kodekloud:~$ id john
uid=10000(john) gid=10000(ldapusers) groups=10000(ldapusers)
jeremy@kodekloud:~$ id jane
uid=10001(jane) gid=10000(ldapusers) groups=10000(ldapusers)
jeremy@kodekloud:~$
The output indicates that John and Jane are LDAP users who belong to the "ldapusers" group. To view all user entries (both local and LDAP), use the following command:
jeremy@kodekloud:~$ getent passwd
To filter specifically for LDAP-based entries:
jeremy@kodekloud:~$ getent passwd --service ldap
john:x:10000:10000:John Smith:/home/john:/bin/bash
jane:x:10001:10000:Jane Smith:/home/jane:/bin/bash
Similarly, to display LDAP-based group information:
jeremy@kodekloud:~$ getent group --service ldap
ldapusers:*:10000:
Notice that although the LDAP entries for John and Jane specify home directories (/home/john and /home/jane), these directories have not yet been created:
jeremy@kodekloud:~$ ls /home
jeremy
jeremy@kodekloud:~$
Automating Home Directory Creation with PAM
Manually creating home directories for every LDAP user is not scalable, especially across many servers. Instead, Pluggable Authentication Modules (PAM) can automatically create a user's home directory upon login if it does not exist.
To enable this automation, update your PAM configuration by executing:
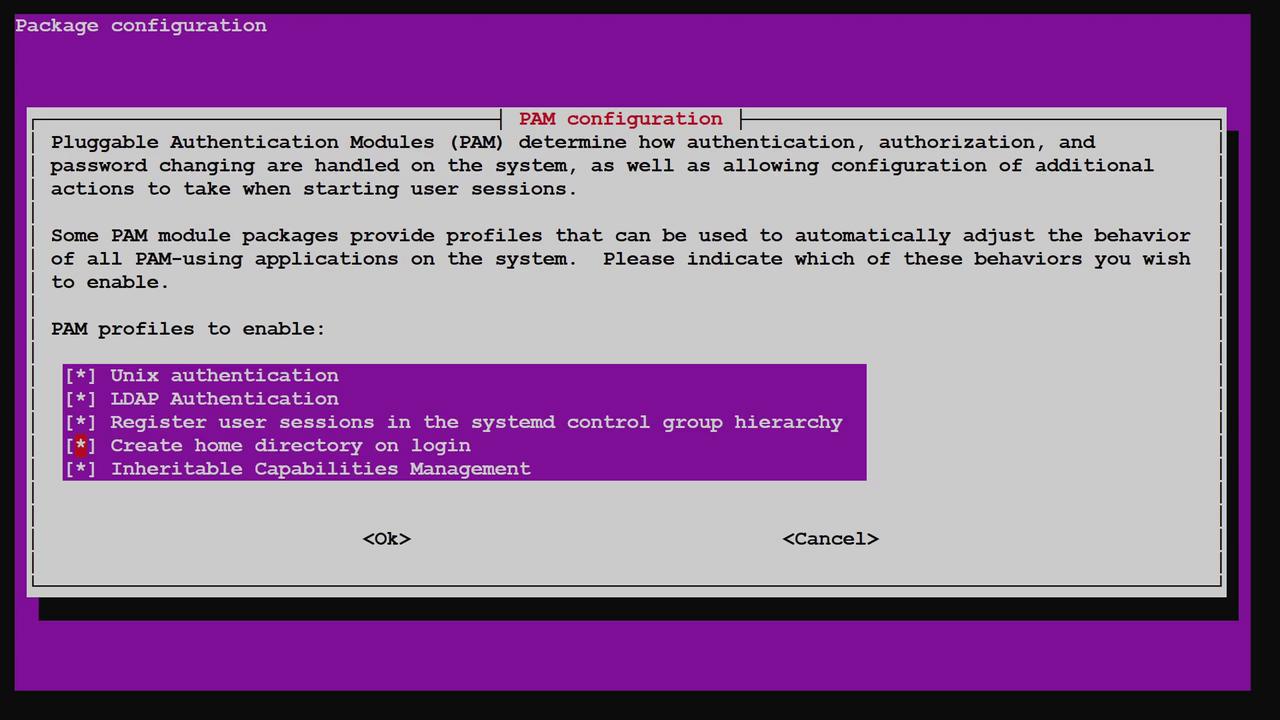
sudo pam-auth-update
When the configuration screen appears, select the option labeled "Create home directory on login" and press Enter to save your changes.
Below is an image of the PAM configuration interface (do not modify the image link or its description):
Now, test the home directory creation by logging in as John using his LDAP credentials (password is "password"). Upon a successful login, PAM automatically creates the /home/john directory, if it is missing.
After logging in as John, verify the home directory exists:
john@kodekloud:~$ ls /home
jeremy  john
john@kodekloud:~$
Summary
By configuring your Linux system to leverage an LDAP server for user and group accounts, you centralize account management. This setup automatically retrieves and updates user data—including creating home directories on first login via PAM—thereby eliminating the need to manage accounts across every individual server.
This guide demonstrated how to:
- Set up and start an LDAP server in an LXC container
- Install and configure libnss-ldapd to integrate LDAP lookups
- Verify that user and group information is correctly fetched from LDAP
- Use PAM to automatically create home directories on user login
For more information, refer to the following resources:
Happy learning, and see you in the next lesson!
Watch Video
Watch video content