> ## Documentation Index
> Fetch the complete documentation index at: https://notes.kodekloud.com/llms.txt
> Use this file to discover all available pages before exploring further.
# Connection Handling
> Guide to NGINX connection handling, tuning worker processes and connections, keepalive and upstream pooling, sendfile and TCP options, and protocol impacts on scalability and latency.
In this guide we explain how NGINX manages connections, the key tunables that affect scalability and latency, and practical settings to optimize performance for both client and upstream (backend) connections.
NGINX uses a single master process that spawns multiple worker processes. Each worker runs an independent event loop that accepts and processes client requests and I/O events.
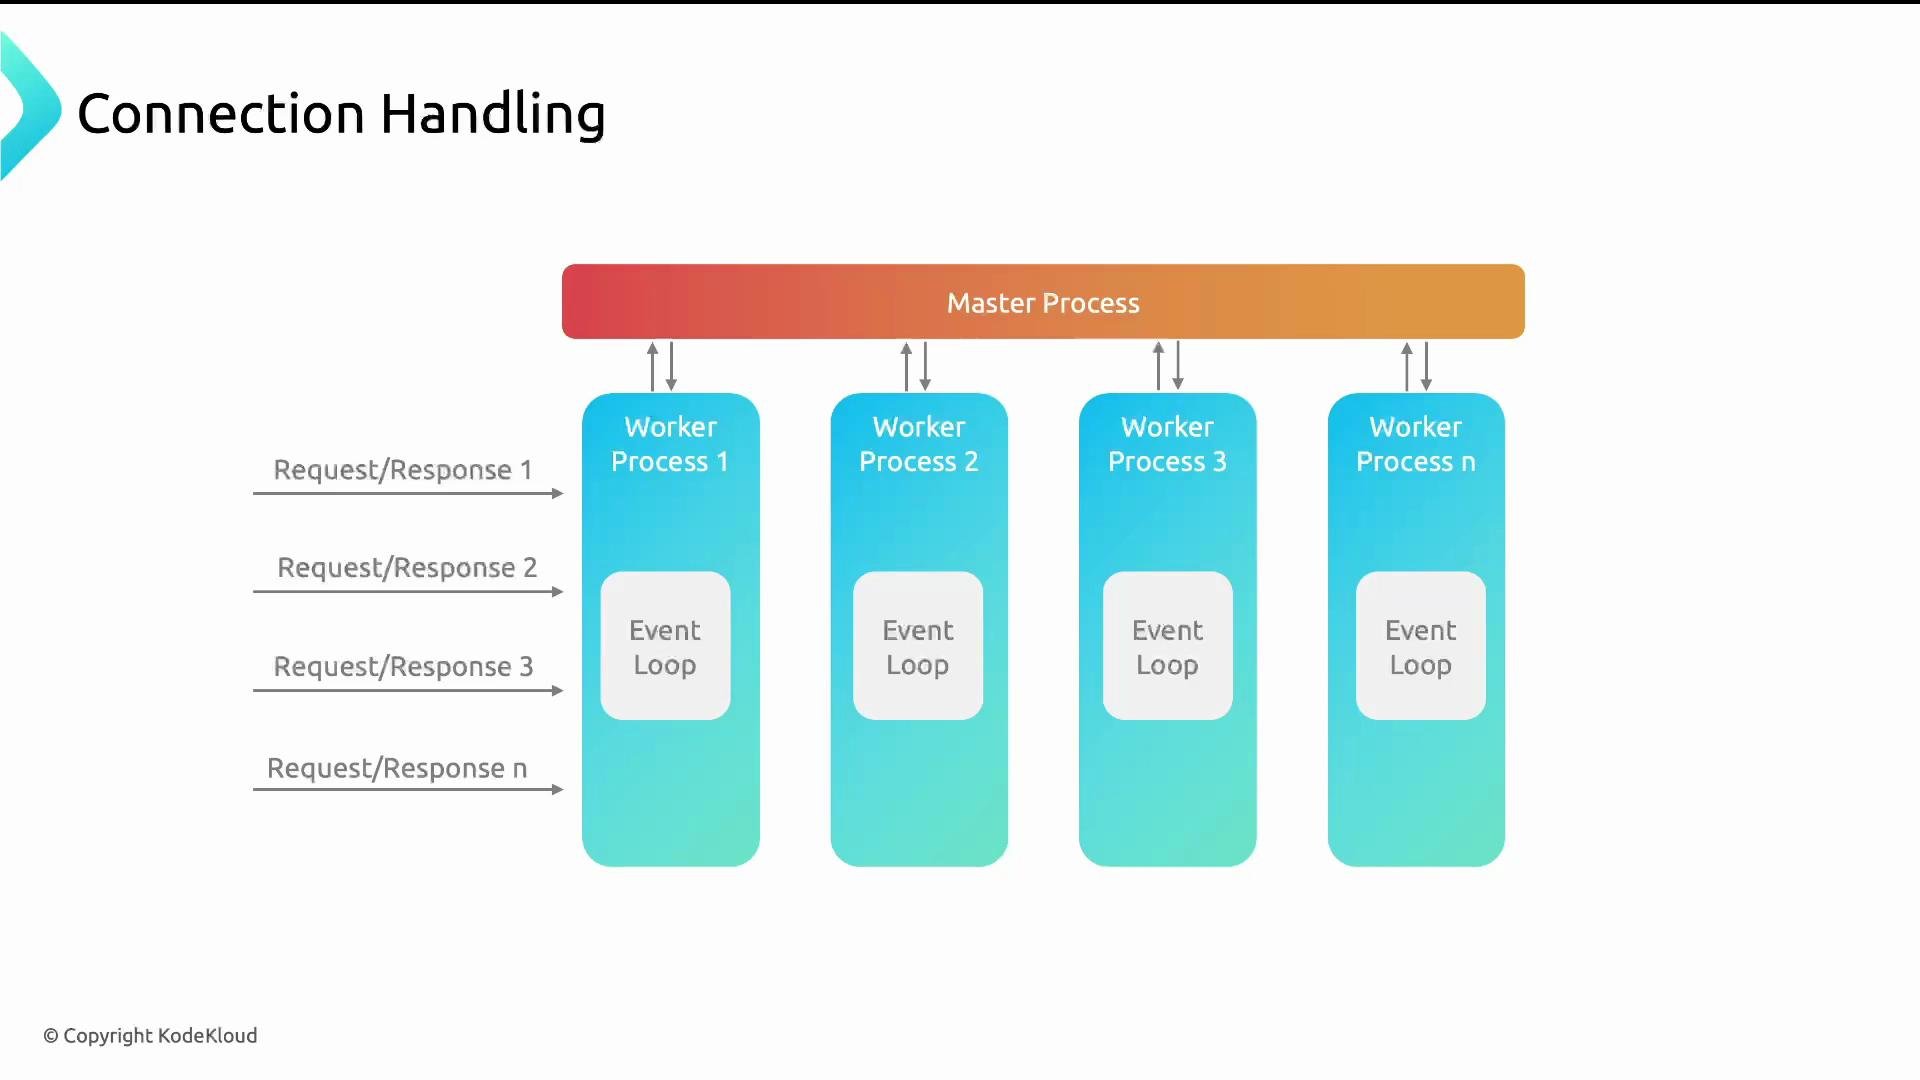 Each worker handles its own client connections independently, which allows NGINX to scale across CPU cores by distributing work across worker processes.
How many workers should you run?
* Recommended: use one worker process per CPU core.
Example configuration:
```nginx theme={null}
worker_processes auto;
```
When `worker_processes` is `auto`, NGINX will attempt to create one worker per available CPU core. The approximate theoretical maximum number of simultaneous connections is:
max\_connections ≈ worker\_processes \* worker\_connections
This is an approximation — the real limit depends on reserved file descriptors (for the master, listening sockets), open upstream connections, OS limits, and additional modules. Always leave headroom when sizing.
Configure `worker_connections` in the `events` block. A common starting value is 1024, and you can increase it as needed. Also adjust OS limits with `worker_rlimit_nofile` and `ulimit -n`.
Example:
```nginx theme={null}
worker_processes auto;
worker_rlimit_nofile 100000;
events {
worker_connections 1024;
}
```
The practical maximum concurrent connections also depends on OS file descriptor limits and other module usage. If you increase `worker_connections`, raise the process file descriptor limit (`ulimit -n`) and consider setting `worker_rlimit_nofile`. Reserve some descriptors for the master process and listening sockets.
Key directives (quick reference)
| Directive | Context | Purpose | Typical value / notes |
| ---------------------------- | -------- | ----------------------------------------------------- | ---------------------- |
| `worker_processes` | global | Number of worker processes (one per core recommended) | `auto` |
| `worker_connections` | `events` | Max connections per worker | `1024` (tune to needs) |
| `worker_rlimit_nofile` | global | Increases process file descriptor limit | `100000` |
| `keepalive_requests` | `http` | Max requests per keepalive connection | `100` |
| `keepalive_timeout` | `http` | Idle time to keep an HTTP keepalive connection open | `65s` |
| `sendfile` | `http` | Enable zero-copy file transfers | `on` |
| `tcp_nopush` / `tcp_nodelay` | `http` | Control TCP packetization behavior | Platform dependent |
## Persistent connections (keepalive)
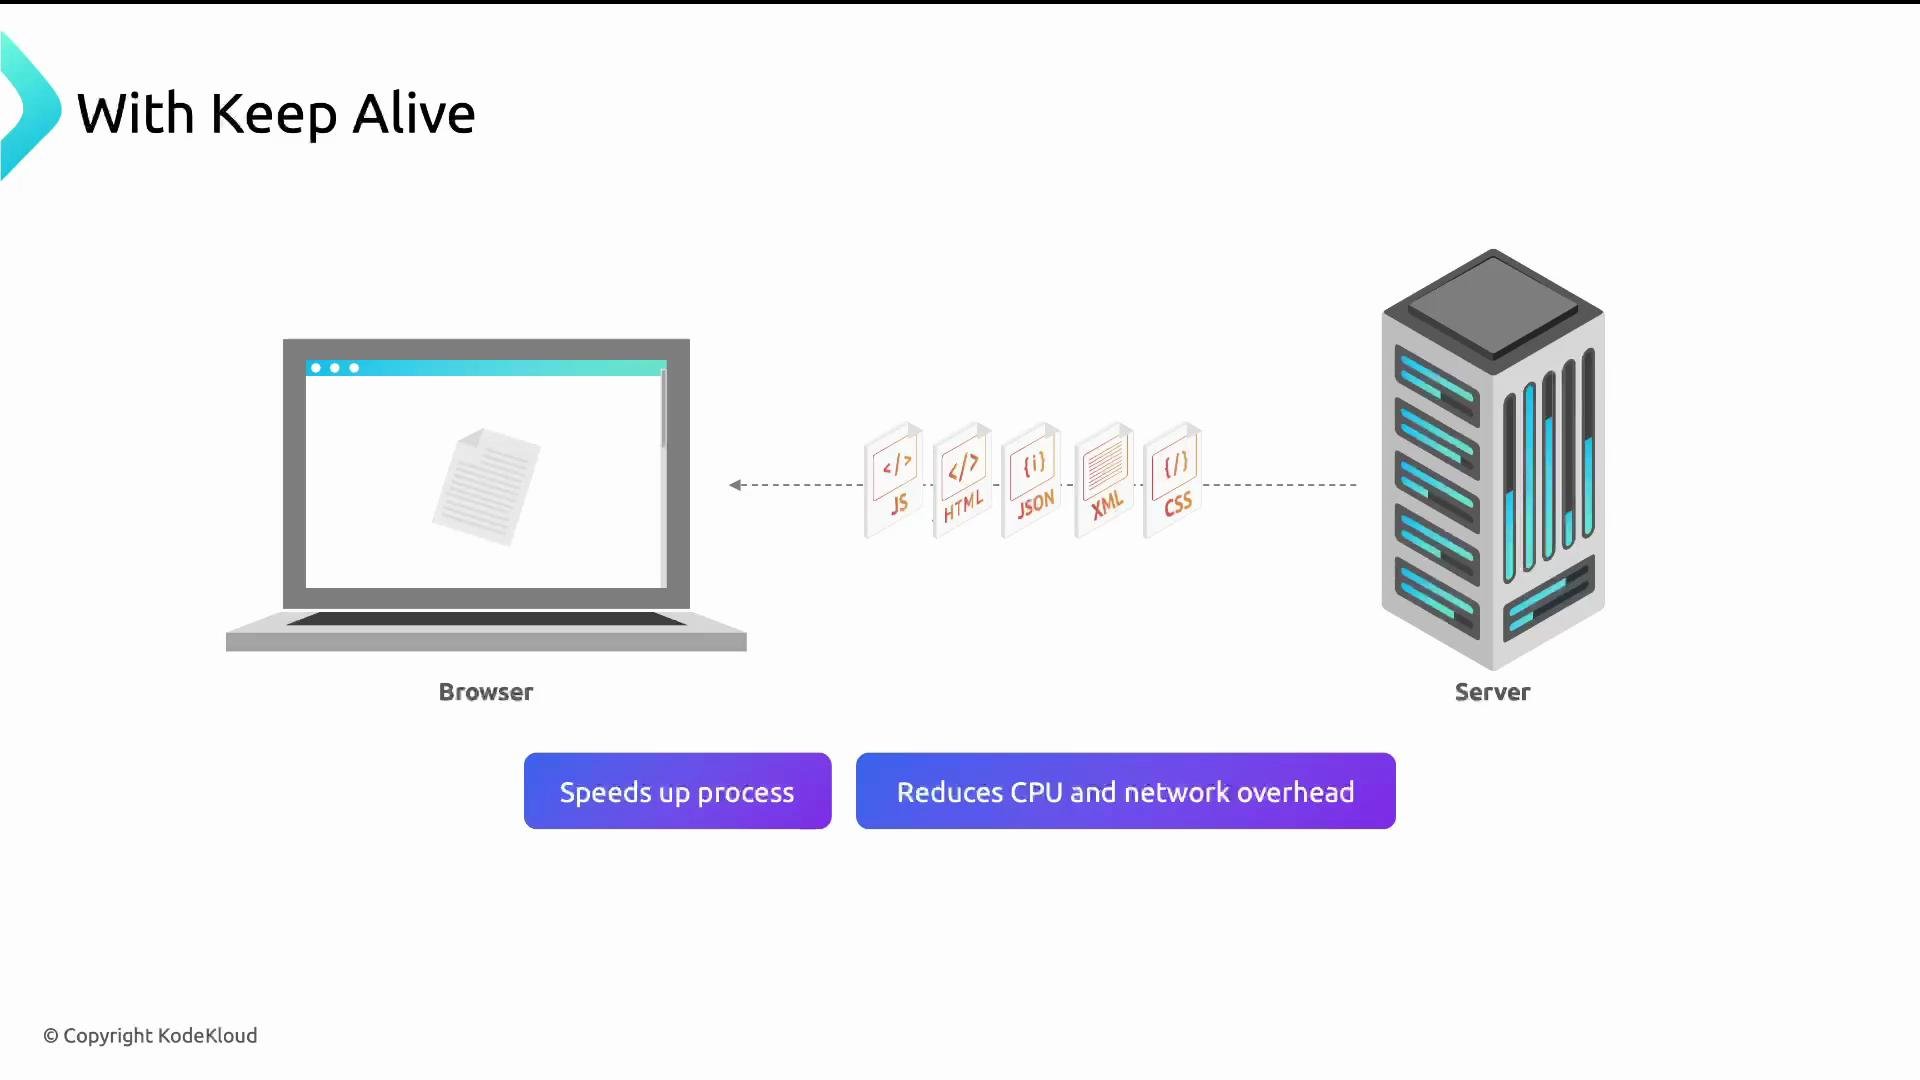
Persistent (keepalive) connections let clients reuse the same TCP connection for multiple requests (HTML, CSS, JS, images, fonts). This reduces TCP handshake/teardown overhead, lowers latency, and lowers CPU/network cost.
Each worker handles its own client connections independently, which allows NGINX to scale across CPU cores by distributing work across worker processes.
How many workers should you run?
* Recommended: use one worker process per CPU core.
Example configuration:
```nginx theme={null}
worker_processes auto;
```
When `worker_processes` is `auto`, NGINX will attempt to create one worker per available CPU core. The approximate theoretical maximum number of simultaneous connections is:
max\_connections ≈ worker\_processes \* worker\_connections
This is an approximation — the real limit depends on reserved file descriptors (for the master, listening sockets), open upstream connections, OS limits, and additional modules. Always leave headroom when sizing.
Configure `worker_connections` in the `events` block. A common starting value is 1024, and you can increase it as needed. Also adjust OS limits with `worker_rlimit_nofile` and `ulimit -n`.
Example:
```nginx theme={null}
worker_processes auto;
worker_rlimit_nofile 100000;
events {
worker_connections 1024;
}
```
The practical maximum concurrent connections also depends on OS file descriptor limits and other module usage. If you increase `worker_connections`, raise the process file descriptor limit (`ulimit -n`) and consider setting `worker_rlimit_nofile`. Reserve some descriptors for the master process and listening sockets.
Key directives (quick reference)
| Directive | Context | Purpose | Typical value / notes |
| ---------------------------- | -------- | ----------------------------------------------------- | ---------------------- |
| `worker_processes` | global | Number of worker processes (one per core recommended) | `auto` |
| `worker_connections` | `events` | Max connections per worker | `1024` (tune to needs) |
| `worker_rlimit_nofile` | global | Increases process file descriptor limit | `100000` |
| `keepalive_requests` | `http` | Max requests per keepalive connection | `100` |
| `keepalive_timeout` | `http` | Idle time to keep an HTTP keepalive connection open | `65s` |
| `sendfile` | `http` | Enable zero-copy file transfers | `on` |
| `tcp_nopush` / `tcp_nodelay` | `http` | Control TCP packetization behavior | Platform dependent |
## Persistent connections (keepalive)
Persistent (keepalive) connections let clients reuse the same TCP connection for multiple requests (HTML, CSS, JS, images, fonts). This reduces TCP handshake/teardown overhead, lowers latency, and lowers CPU/network cost.
 Important keepalive directives (set in `http` context):
* `keepalive_requests` — maximum number of requests a client can make over one keepalive connection (default \~100).
* `keepalive_timeout` — time to keep an idle keepalive connection open after the last request.
Example:
```nginx theme={null}
http {
keepalive_requests 100;
keepalive_timeout 65s;
}
```
Upstream (reverse-proxy) keepalive
When NGINX proxies to backend servers, it can keep idle connections open to upstream servers to reuse them across proxied requests. Use `keepalive` in an `upstream` block to control how many idle connections NGINX maintains per worker.
```nginx theme={null}
http {
upstream backend {
server 10.10.0.101:80;
server 10.10.0.102:80;
server 10.10.0.103:80;
keepalive 32;
}
}
```
When proxying with upstream keepalive, set the following in your `location` block to ensure proper HTTP version and connection handling:
```nginx theme={null}
server {
listen 80;
location / {
proxy_http_version 1.1;
proxy_set_header Connection "";
proxy_pass http://backend;
}
}
```
* `proxy_http_version 1.1` enables persistent connections to upstreams.
* `proxy_set_header Connection ""` prevents forwarding hop-by-hop connection headers so NGINX can manage pooling.
You can confirm the protocol used by a site with curl:
```bash theme={null}
curl --head https://www.google.com
```
Look for the HTTP version in the response headers (e.g., `HTTP/2 200`).
## HTTP protocol evolution (why connection handling changed)
A short history and why each evolution matters for connection handling:
Important keepalive directives (set in `http` context):
* `keepalive_requests` — maximum number of requests a client can make over one keepalive connection (default \~100).
* `keepalive_timeout` — time to keep an idle keepalive connection open after the last request.
Example:
```nginx theme={null}
http {
keepalive_requests 100;
keepalive_timeout 65s;
}
```
Upstream (reverse-proxy) keepalive
When NGINX proxies to backend servers, it can keep idle connections open to upstream servers to reuse them across proxied requests. Use `keepalive` in an `upstream` block to control how many idle connections NGINX maintains per worker.
```nginx theme={null}
http {
upstream backend {
server 10.10.0.101:80;
server 10.10.0.102:80;
server 10.10.0.103:80;
keepalive 32;
}
}
```
When proxying with upstream keepalive, set the following in your `location` block to ensure proper HTTP version and connection handling:
```nginx theme={null}
server {
listen 80;
location / {
proxy_http_version 1.1;
proxy_set_header Connection "";
proxy_pass http://backend;
}
}
```
* `proxy_http_version 1.1` enables persistent connections to upstreams.
* `proxy_set_header Connection ""` prevents forwarding hop-by-hop connection headers so NGINX can manage pooling.
You can confirm the protocol used by a site with curl:
```bash theme={null}
curl --head https://www.google.com
```
Look for the HTTP version in the response headers (e.g., `HTTP/2 200`).
## HTTP protocol evolution (why connection handling changed)
A short history and why each evolution matters for connection handling:
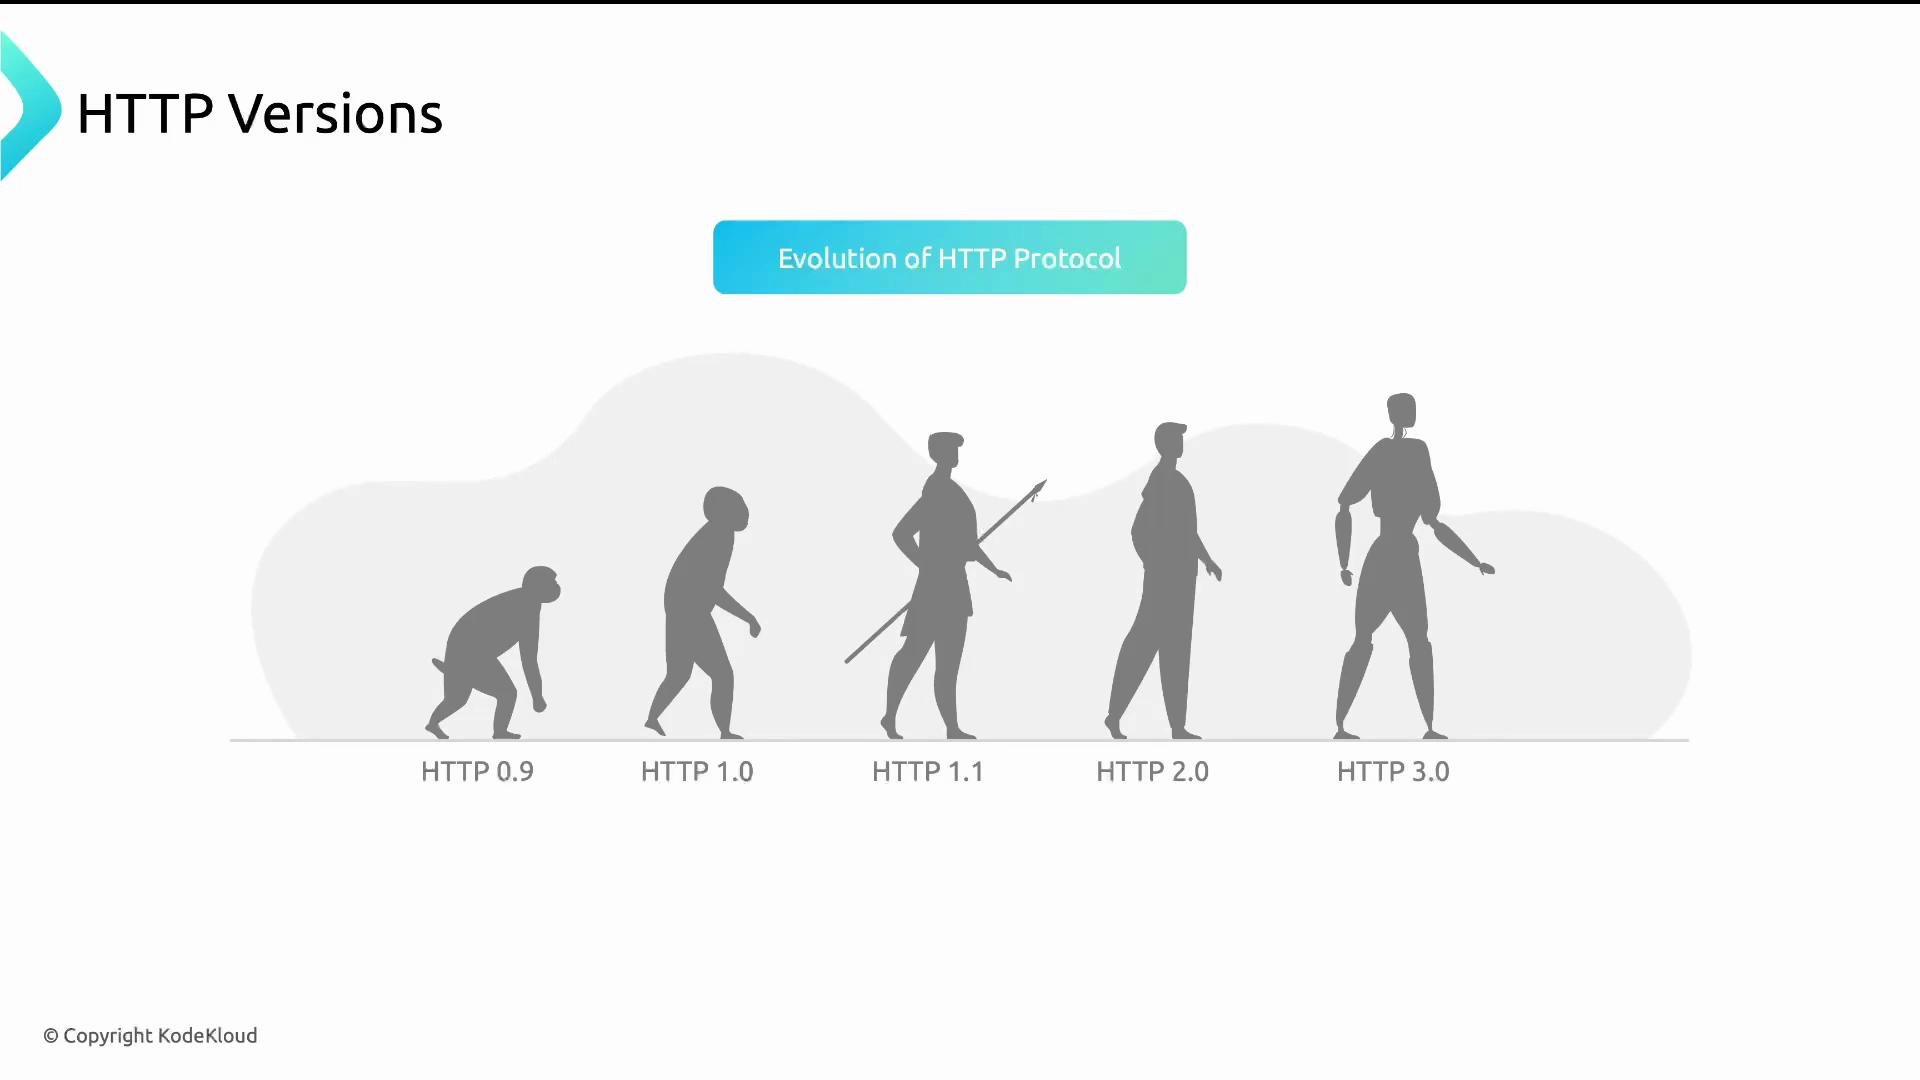 * HTTP/0.9 — minimal; no headers or status codes.
* HTTP/1.0 — introduced headers and status codes.
* HTTP/1.1 — introduced persistent connections (keepalive), chunked transfers, cache controls.
* HTTP/2 — multiplexing multiple requests/responses over one connection, header compression (HPACK), reduced connection concurrency needs.
* HTTP/3 — built on QUIC (UDP-based), reduces connection setup latency and improves behavior on lossy networks; requires TLS 1.3.
TCP vs UDP (brief)
* TCP: connection-oriented, reliable, retransmits lost packets (used by HTTP/1.x, HTTP/2 over TLS).
* UDP: connectionless, lower overhead, no built-in retransmission (used by QUIC/HTTP/3).
Usage trends snapshot
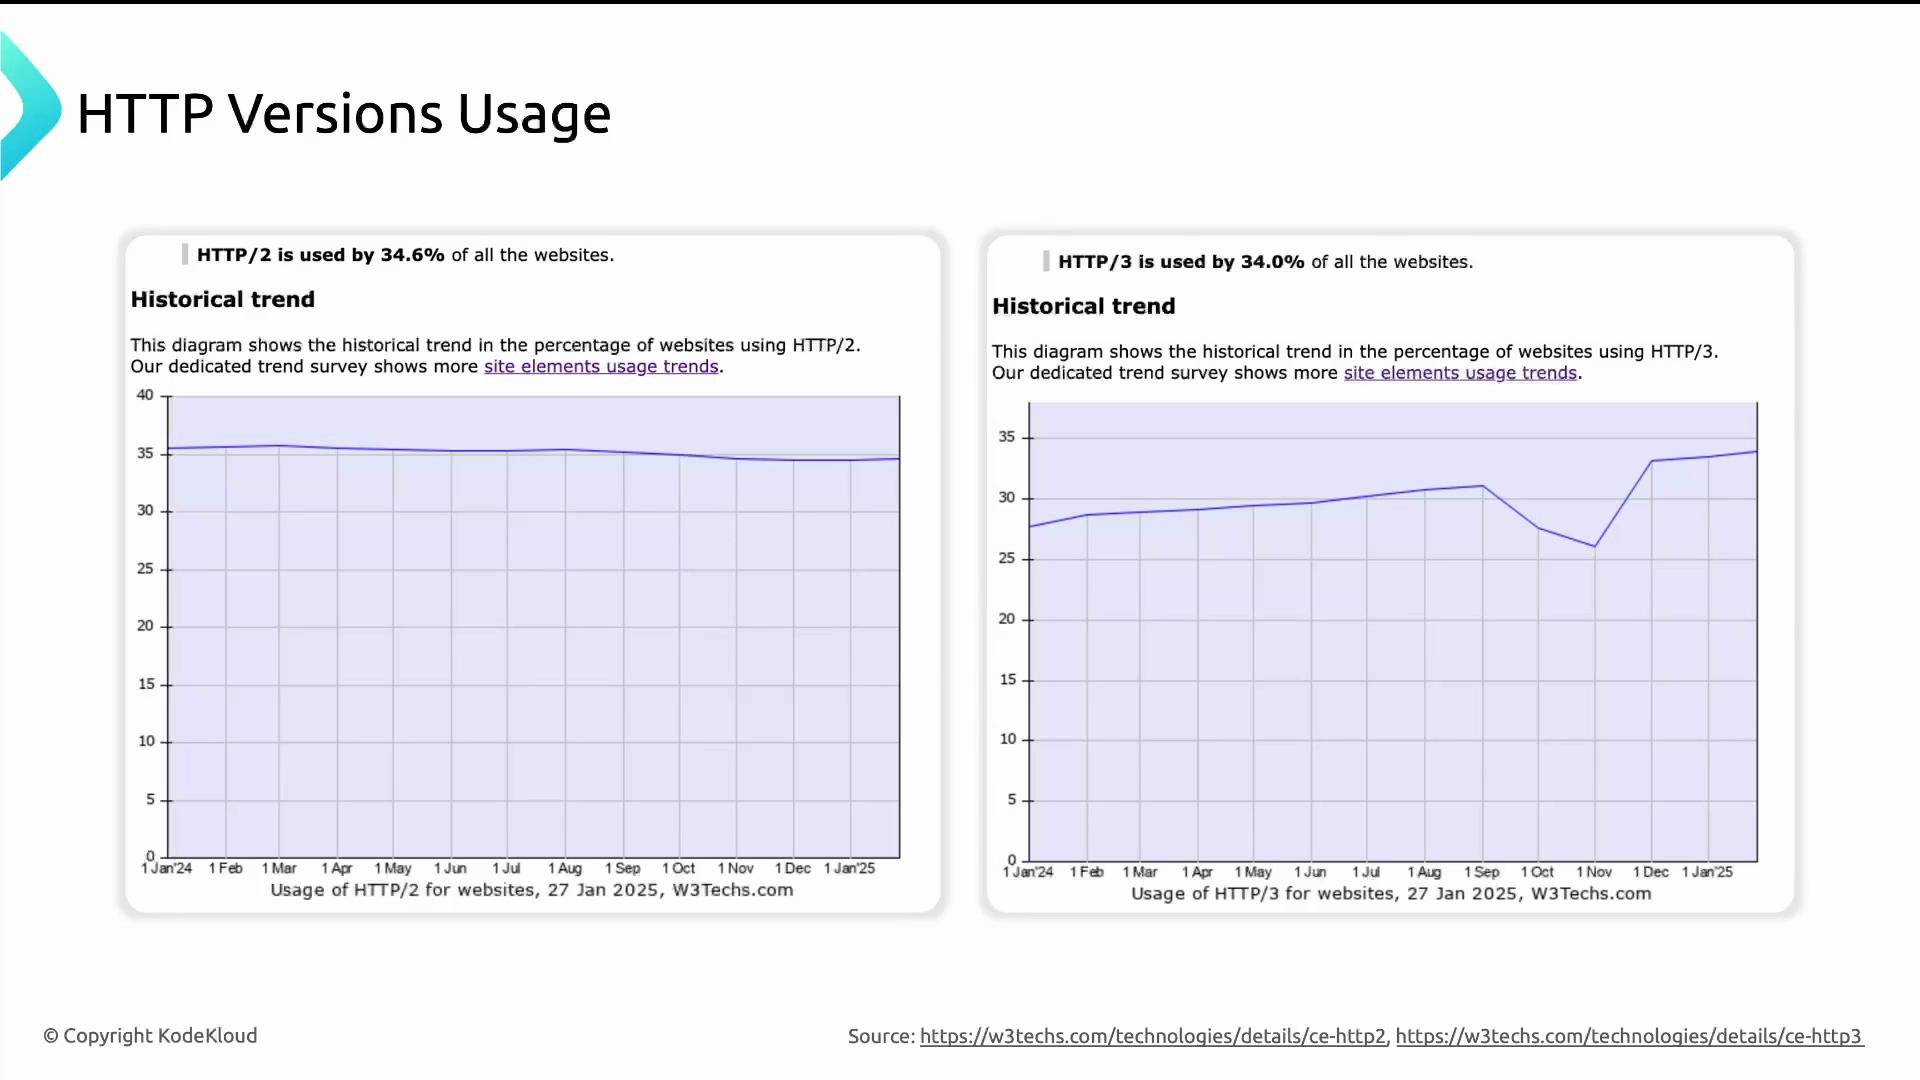
Below is an example snapshot showing how usage of HTTP/2 and HTTP/3 changed over time (illustrative).
* HTTP/0.9 — minimal; no headers or status codes.
* HTTP/1.0 — introduced headers and status codes.
* HTTP/1.1 — introduced persistent connections (keepalive), chunked transfers, cache controls.
* HTTP/2 — multiplexing multiple requests/responses over one connection, header compression (HPACK), reduced connection concurrency needs.
* HTTP/3 — built on QUIC (UDP-based), reduces connection setup latency and improves behavior on lossy networks; requires TLS 1.3.
TCP vs UDP (brief)
* TCP: connection-oriented, reliable, retransmits lost packets (used by HTTP/1.x, HTTP/2 over TLS).
* UDP: connectionless, lower overhead, no built-in retransmission (used by QUIC/HTTP/3).
Usage trends snapshot
Below is an example snapshot showing how usage of HTTP/2 and HTTP/3 changed over time (illustrative).
 ## sendfile and zero-copy
Traditionally, serving a file involves copying data from disk (kernel) to user space and then back to kernel space for network transmission — consuming CPU and memory bandwidth. NGINX supports `sendfile`, which allows the kernel to send file data directly from disk to socket (zero-copy), lowering CPU overhead and improving throughput for static files.
Enable zero-copy in the `http` context:
```nginx theme={null}
http {
sendfile on;
tcp_nopush on; # on Linux uses TCP_CORK to group packets for large transfers
tcp_nodelay on; # disables Nagle's algorithm so small packets are sent promptly
}
```
Note: behavior for `tcp_nopush` / `tcp_nodelay` is platform-specific and their interaction can affect latency vs throughput. Validate on your workload.
## TCP packetization: TCP\_CORK (tcp\_nopush) vs TCP\_NODELAY (tcp\_nodelay)
NGINX exposes settings to control how data is packetized and when it’s pushed to the network:
* `tcp_nopush on;` (Linux uses TCP\_CORK) — delays packet transmission until a larger chunk is available, producing fewer, fuller packets (better throughput for large static responses).
* `tcp_nodelay on;` — disables Nagle’s algorithm (TCP\_NODELAY) sending small packets immediately to reduce latency.
Choosing between them is a trade-off:
* Prefer `tcp_nopush` for serving large static files efficiently.
* Prefer `tcp_nodelay` for low-latency, interactive responses.
* You may combine both in NGINX; test combinations as results vary by OS and workload.
Changing connection and file-descriptor limits can destabilize a server if not tested. Always validate changes in staging, monitor `ulimit -n`, `netstat` / `ss` for socket states, and keep some descriptor/connection headroom for master/listening sockets and upstream connections.
## Conclusion and next steps
Tuning connection handling in NGINX involves:
* Setting an appropriate `worker_processes` (one per core recommended).
* Sizing `worker_connections` and raising OS file descriptor limits (`worker_rlimit_nofile`, `ulimit -n`) accordingly.
* Enabling and tuning keepalive for clients and upstream servers.
* Using `sendfile` and appropriate TCP options (`tcp_nopush`, `tcp_nodelay`) for efficient static delivery.
* Understanding protocol differences (HTTP/1.1 vs HTTP/2 vs HTTP/3) to choose the right approach for your traffic profile.
Recommended follow-ups:
* Test configuration changes in a staging environment.
* Monitor file descriptor usage, CPU, latency, and network throughput.
* Review NGINX official docs for platform-specific behavior:
* [https://nginx.org/en/docs/](https://nginx.org/en/docs/)
* [https://nginx.org/en/docs/http/ngx\_http\_core\_module.html](https://nginx.org/en/docs/http/ngx_http_core_module.html)
Links and references
* NGINX documentation: [https://nginx.org/en/docs/](https://nginx.org/en/docs/)
* HTTP/3 and QUIC background: [https://datatracker.ietf.org/wg/quic/about/](https://datatracker.ietf.org/wg/quic/about/)
* Linux TCP tuning basics: [https://www.kernel.org/doc/html/latest/networking/index.html](https://www.kernel.org/doc/html/latest/networking/index.html)
## sendfile and zero-copy
Traditionally, serving a file involves copying data from disk (kernel) to user space and then back to kernel space for network transmission — consuming CPU and memory bandwidth. NGINX supports `sendfile`, which allows the kernel to send file data directly from disk to socket (zero-copy), lowering CPU overhead and improving throughput for static files.
Enable zero-copy in the `http` context:
```nginx theme={null}
http {
sendfile on;
tcp_nopush on; # on Linux uses TCP_CORK to group packets for large transfers
tcp_nodelay on; # disables Nagle's algorithm so small packets are sent promptly
}
```
Note: behavior for `tcp_nopush` / `tcp_nodelay` is platform-specific and their interaction can affect latency vs throughput. Validate on your workload.
## TCP packetization: TCP\_CORK (tcp\_nopush) vs TCP\_NODELAY (tcp\_nodelay)
NGINX exposes settings to control how data is packetized and when it’s pushed to the network:
* `tcp_nopush on;` (Linux uses TCP\_CORK) — delays packet transmission until a larger chunk is available, producing fewer, fuller packets (better throughput for large static responses).
* `tcp_nodelay on;` — disables Nagle’s algorithm (TCP\_NODELAY) sending small packets immediately to reduce latency.
Choosing between them is a trade-off:
* Prefer `tcp_nopush` for serving large static files efficiently.
* Prefer `tcp_nodelay` for low-latency, interactive responses.
* You may combine both in NGINX; test combinations as results vary by OS and workload.
Changing connection and file-descriptor limits can destabilize a server if not tested. Always validate changes in staging, monitor `ulimit -n`, `netstat` / `ss` for socket states, and keep some descriptor/connection headroom for master/listening sockets and upstream connections.
## Conclusion and next steps
Tuning connection handling in NGINX involves:
* Setting an appropriate `worker_processes` (one per core recommended).
* Sizing `worker_connections` and raising OS file descriptor limits (`worker_rlimit_nofile`, `ulimit -n`) accordingly.
* Enabling and tuning keepalive for clients and upstream servers.
* Using `sendfile` and appropriate TCP options (`tcp_nopush`, `tcp_nodelay`) for efficient static delivery.
* Understanding protocol differences (HTTP/1.1 vs HTTP/2 vs HTTP/3) to choose the right approach for your traffic profile.
Recommended follow-ups:
* Test configuration changes in a staging environment.
* Monitor file descriptor usage, CPU, latency, and network throughput.
* Review NGINX official docs for platform-specific behavior:
* [https://nginx.org/en/docs/](https://nginx.org/en/docs/)
* [https://nginx.org/en/docs/http/ngx\_http\_core\_module.html](https://nginx.org/en/docs/http/ngx_http_core_module.html)
Links and references
* NGINX documentation: [https://nginx.org/en/docs/](https://nginx.org/en/docs/)
* HTTP/3 and QUIC background: [https://datatracker.ietf.org/wg/quic/about/](https://datatracker.ietf.org/wg/quic/about/)
* Linux TCP tuning basics: [https://www.kernel.org/doc/html/latest/networking/index.html](https://www.kernel.org/doc/html/latest/networking/index.html)