> ## Documentation Index
> Fetch the complete documentation index at: https://notes.kodekloud.com/llms.txt
> Use this file to discover all available pages before exploring further.
# Demo Deploy an Application
> Guide demonstrating how to deploy a simple Python Flask application to an OpenShift cluster using S2I, monitor builds, and expose the app via a route.
Welcome — in this lesson you'll deploy a simple Python/Flask application to an OpenShift Origin cluster. The demo environment consists of two parts:
* Left: an OpenShift cluster (the web console).
* Right: a local GitLab repository with the application source.
The Git repository contains:
* A Flask application file (`.py`) that serves a simple web page.
* A `requirements.txt` file listing dependencies (e.g., `Flask`).
This guide walks through deploying the app using OpenShift's web console (source-to-image / S2I workflow), monitoring the build, and exposing the application via a route.
## Step-by-step: Deploy the Flask app
1. Log in to the OpenShift web console as a developer.
2. Create a new project: click Create Project and provide a descriptive name.
3. Open the new project from the project list to view its Project Console.
4. Click Browse Catalog to see builders and templates available in the cluster.
5. Choose the Python builder image because the app uses Python/Flask.
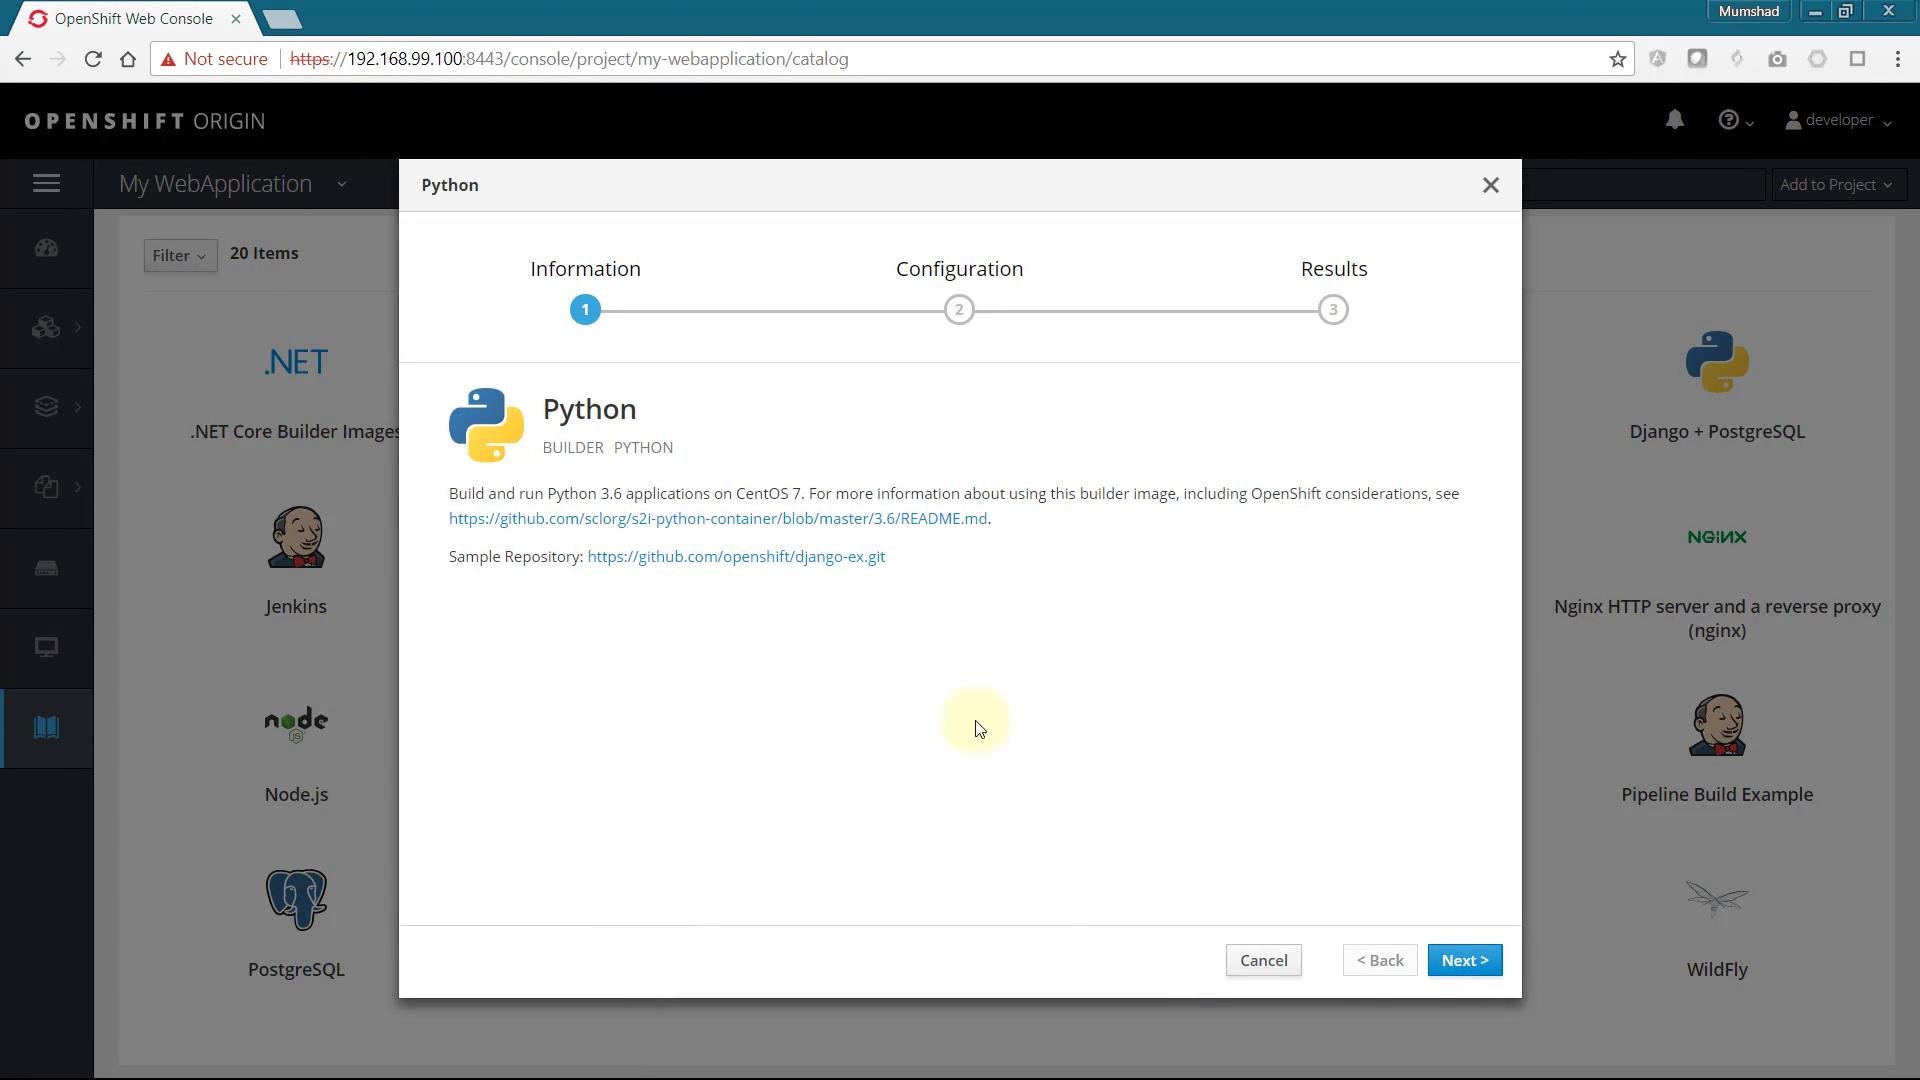 6. In the creation wizard, provide:
* An application name (for example `simple-webapp`)
* The Git repository URL (copy the URL from your GitLab repository)
* Any environment variables or build options you need
7. Click Next (or Create) to start the build. OpenShift will create a BuildConfig and kick off a source-to-image build from your Git repository.
OpenShift creates a `BuildConfig` automatically when you deploy from a Git repository. The S2I (source-to-image) process clones your repo, installs dependencies from `requirements.txt`, builds the image, and pushes it into the cluster registry.
## Monitor the build and image push
After the build starts, the Overview and Builds pages show build progress. To inspect build output, go to the Builds section and open the build log (View Log). The log typically shows:
* Git clone of your repository
* Installation of Python dependencies from `requirements.txt`
* S2I layers assembling the application image
* The image push to the internal registry
Example build log (condensed):
```bash theme={null}
Cloning "http://192.168.56.150/root/simple-webapp.git" ...
Commit: 1c42c7e9d39f7c797e7102a2964008af491ca5ef (Add new file)
Author: Administrator
Date: Mon Apr 30 09:27:46 2018 +0000
---> Installing application source ...
---> Installing dependencies ...
Collecting Flask (from -r requirements.txt (line 1))
Downloading https://files.pythonhosted.org/packages/90/72/.../Flask-1.0.1-py2.py3-none-any.whl (91kB)
Collecting Jinja2>=2.10 (from Flask->-r requirements.txt (line 1))
Downloading https://files.pythonhosted.org/packages/7f/ff/.../Jinja2-2.10-py2.py3-none-any.whl (126kB)
Collecting Werkzeug>=0.14 (from Flask->-r requirements.txt (line 1))
Downloading https://files.pythonhosted.org/packages/20/c4/.../Werkzeug-0.14.1-py2.py3-none-any.whl (322kB)
Collecting itsdangerous>=0.24 (from Flask->-r requirements.txt (line 1))
Downloading https://files.pythonhosted.org/packages/dc/b4/.../itsdangerous-0.24.tar.gz (46kB)
Collecting click>=5.1 (from Flask->-r requirements.txt (line 1))
Downloading https://files.pythonhosted.org/packages/34/c1/.../click-6.7-py2.py3-none-any.whl (71kB)
Collecting MarkupSafe>=0.23 (from Jinja2->Flask->-r requirements.txt (line 1))
Downloading https://files.pythonhosted.org/packages/4d/de/.../MarkupSafe-1.0.tar.gz
Installing collected packages: MarkupSafe, Jinja2, Werkzeug, itsdangerous, click, Flask
Running setup.py install for MarkupSafe: started
Running setup.py install for MarkupSafe: finished with status 'done'
Running setup.py install for itsdangerous: started
Running setup.py install for itsdangerous: finished with status 'done'
Successfully installed Flask-1.0.1 Jinja2-2.10 MarkupSafe-1.0 Werkzeug-0.14.1 click-6.7 itsdangerous-0.24
You are using pip version 9.0.1, however version 10.0.1 is available.
You should consider upgrading via the `pip install --upgrade pip` command.
Pushing image 172.30.1.1:5000/my-webapplication/simple-webapp:latest ...
Pushed 0/10 layers, 0% complete
Pushed 1/10 layers, 11% complete
Pushed 2/10 layers, 22% complete
Pushed 3/10 layers, 31% complete
Pushed 4/10 layers, 41% complete
Pushed 5/10 layers, 51% complete
Pushed 6/10 layers, 66% complete
Pushed 7/10 layers, 75% complete
Pushed 8/10 layers, 83% complete
Pushed 9/10 layers, 91% complete
```
## What OpenShift creates for you
When the image push finishes, OpenShift typically creates these runtime artifacts:
| Resource Type | Purpose | Notes / Example |
| - | - | - |
| BuildConfig | Defines how to build an image from source | Created for S2I builds from Git |
| ImageStream | Tracks images inside the cluster registry | E.g. `simple-webapp:latest` |
| DeploymentConfig (or Deployment) | Describes how to run pods from the image | Scales pods, manages rollouts |
| Pod(s) | Running instances of your application | The application process runs here |
| Service | Internal network access to pods | Exposes port (e.g., `8080`) to the cluster |
| Route | Provides an external URL to the Service | The URL you share with users |
## Verify the deployment and open the app
On the Overview page you can view:
* The Build and BuildConfig
* The DeploymentConfig and Replica status
* Networking information (exposed port such as `8080`, and the Route)
6. In the creation wizard, provide:
* An application name (for example `simple-webapp`)
* The Git repository URL (copy the URL from your GitLab repository)
* Any environment variables or build options you need
7. Click Next (or Create) to start the build. OpenShift will create a BuildConfig and kick off a source-to-image build from your Git repository.
OpenShift creates a `BuildConfig` automatically when you deploy from a Git repository. The S2I (source-to-image) process clones your repo, installs dependencies from `requirements.txt`, builds the image, and pushes it into the cluster registry.
## Monitor the build and image push
After the build starts, the Overview and Builds pages show build progress. To inspect build output, go to the Builds section and open the build log (View Log). The log typically shows:
* Git clone of your repository
* Installation of Python dependencies from `requirements.txt`
* S2I layers assembling the application image
* The image push to the internal registry
Example build log (condensed):
```bash theme={null}
Cloning "http://192.168.56.150/root/simple-webapp.git" ...
Commit: 1c42c7e9d39f7c797e7102a2964008af491ca5ef (Add new file)
Author: Administrator
Date: Mon Apr 30 09:27:46 2018 +0000
---> Installing application source ...
---> Installing dependencies ...
Collecting Flask (from -r requirements.txt (line 1))
Downloading https://files.pythonhosted.org/packages/90/72/.../Flask-1.0.1-py2.py3-none-any.whl (91kB)
Collecting Jinja2>=2.10 (from Flask->-r requirements.txt (line 1))
Downloading https://files.pythonhosted.org/packages/7f/ff/.../Jinja2-2.10-py2.py3-none-any.whl (126kB)
Collecting Werkzeug>=0.14 (from Flask->-r requirements.txt (line 1))
Downloading https://files.pythonhosted.org/packages/20/c4/.../Werkzeug-0.14.1-py2.py3-none-any.whl (322kB)
Collecting itsdangerous>=0.24 (from Flask->-r requirements.txt (line 1))
Downloading https://files.pythonhosted.org/packages/dc/b4/.../itsdangerous-0.24.tar.gz (46kB)
Collecting click>=5.1 (from Flask->-r requirements.txt (line 1))
Downloading https://files.pythonhosted.org/packages/34/c1/.../click-6.7-py2.py3-none-any.whl (71kB)
Collecting MarkupSafe>=0.23 (from Jinja2->Flask->-r requirements.txt (line 1))
Downloading https://files.pythonhosted.org/packages/4d/de/.../MarkupSafe-1.0.tar.gz
Installing collected packages: MarkupSafe, Jinja2, Werkzeug, itsdangerous, click, Flask
Running setup.py install for MarkupSafe: started
Running setup.py install for MarkupSafe: finished with status 'done'
Running setup.py install for itsdangerous: started
Running setup.py install for itsdangerous: finished with status 'done'
Successfully installed Flask-1.0.1 Jinja2-2.10 MarkupSafe-1.0 Werkzeug-0.14.1 click-6.7 itsdangerous-0.24
You are using pip version 9.0.1, however version 10.0.1 is available.
You should consider upgrading via the `pip install --upgrade pip` command.
Pushing image 172.30.1.1:5000/my-webapplication/simple-webapp:latest ...
Pushed 0/10 layers, 0% complete
Pushed 1/10 layers, 11% complete
Pushed 2/10 layers, 22% complete
Pushed 3/10 layers, 31% complete
Pushed 4/10 layers, 41% complete
Pushed 5/10 layers, 51% complete
Pushed 6/10 layers, 66% complete
Pushed 7/10 layers, 75% complete
Pushed 8/10 layers, 83% complete
Pushed 9/10 layers, 91% complete
```
## What OpenShift creates for you
When the image push finishes, OpenShift typically creates these runtime artifacts:
| Resource Type | Purpose | Notes / Example |
| - | - | - |
| BuildConfig | Defines how to build an image from source | Created for S2I builds from Git |
| ImageStream | Tracks images inside the cluster registry | E.g. `simple-webapp:latest` |
| DeploymentConfig (or Deployment) | Describes how to run pods from the image | Scales pods, manages rollouts |
| Pod(s) | Running instances of your application | The application process runs here |
| Service | Internal network access to pods | Exposes port (e.g., `8080`) to the cluster |
| Route | Provides an external URL to the Service | The URL you share with users |
## Verify the deployment and open the app
On the Overview page you can view:
* The Build and BuildConfig
* The DeploymentConfig and Replica status
* Networking information (exposed port such as `8080`, and the Route)
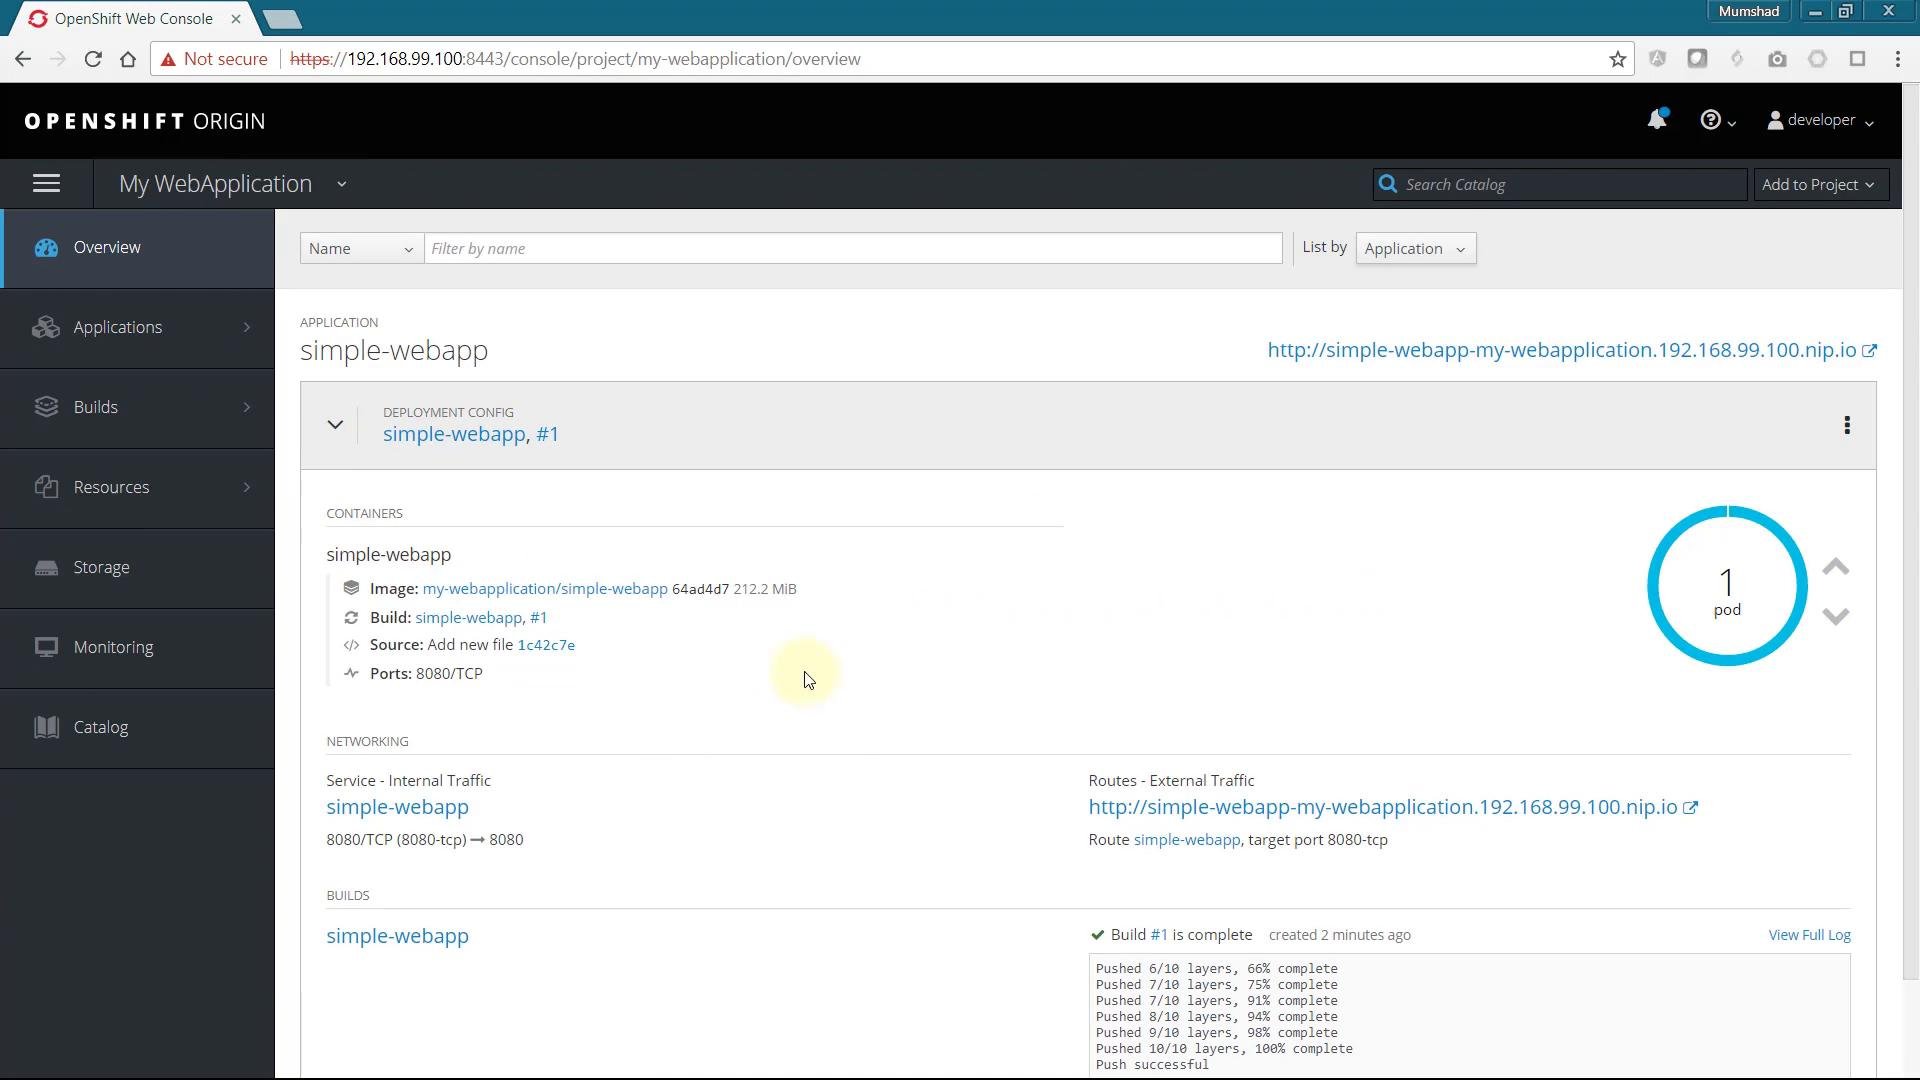 Click the Route URL to open the application in a browser. That public route is the endpoint to share with your users.
## Next steps and further reading
This demo demonstrates a basic single-container deployment using OpenShift S2I. Typical follow-ups include:
* Deploying multi-tier applications (front-end, API, database)
* Composing microservices and adding health checks, probes, and readiness checks
* Automating builds and deployments with CI/CD (e.g., GitLab CI)
* Securing routes and configuring TLS termination
Links and references:
* [OpenShift Documentation](https://docs.openshift.com/)
* [Kubernetes Concepts](https://kubernetes.io/docs/concepts/overview/what-is-kubernetes/)
* [Source-to-Image (S2I) Overview](https://github.com/openshift/source-to-image)
This documentation is built and hosted on [Mintlify](https://mintlify.com), a developer documentation platform.
Click the Route URL to open the application in a browser. That public route is the endpoint to share with your users.
## Next steps and further reading
This demo demonstrates a basic single-container deployment using OpenShift S2I. Typical follow-ups include:
* Deploying multi-tier applications (front-end, API, database)
* Composing microservices and adding health checks, probes, and readiness checks
* Automating builds and deployments with CI/CD (e.g., GitLab CI)
* Securing routes and configuring TLS termination
Links and references:
* [OpenShift Documentation](https://docs.openshift.com/)
* [Kubernetes Concepts](https://kubernetes.io/docs/concepts/overview/what-is-kubernetes/)
* [Source-to-Image (S2I) Overview](https://github.com/openshift/source-to-image)
This documentation is built and hosted on [Mintlify](https://mintlify.com), a developer documentation platform.